Enrich services using GitOps
This guide will walk you through the process of enriching a service in Port using Gitops.
In practice, this can be used by developers to independently add additional valuable data to their services in Port.
This guide includes steps that require integration with GitHub:
- GitHub (Ocean) - uses the Ocean framework. We strongly recommend this integration for new and migrated setups.
- GitHub (Sunset) - uses a GitHub app that is in sunset and will be fully deprecated on September 15, 2026.
Common use cases
- Developers can enrich their services without needing to nag devops engineers.
- Platform engineers can create RBAC-controlled actions for developers, empowering their independence.
- R&D managers can track additional, valuable data about services in the organization.
Prerequisites
- A Port account with permissions to create self-service actions.
- GitHub (Ocean)
- GitHub (Sunset)
- GitHub Ocean needs to be installed in your organization.
- Port's GitHub app needs to be installed in your GitHub organization.
- Automatic discovery of services using git as source of truth is set up.
- A repository in your Git provider in which you can create a workflow/pipeline. If you don't have one, we recommend creating a new repository named
Port-actions.
Configure automatic discovery mapping
If you need to set up automatic discovery, add the following mapping to your GitHub integration. This creates service entities from repositories and enables port.yml ingestion for GitOps-based enrichment.
- GitHub (Ocean)
- GitHub (Sunset)
For GitHub (Ocean), use the For includedFiles selector for repository kind and .__includedFiles["filename"] for file content. Alternatively, use the file kind with organization and repos for scoping:Ocean repository and port.yml mapping (click to expand)
port.yml content in repository kind, use .__includedFiles["port.yml"]. To scope by organization and repositories, use the file kind with organization and repos (with name and branch). File content is accessed via .content (not .file.content):
For GitHub (Sunset), add this block to your integration mapping. The For file:// prefix fetches file content from repositories:Legacy repository and port.yml mapping (click to expand)
port.yml ingestion, add a file kind resource. See the port.yml ingestion pattern for details.
Set up data model
To support GitOps-based repository enrichment in your portal,
we will add two new properties to the existing service blueprint,
and create a new Domain blueprint that groups related services together.
Let's add the following properties to track important metadata about our services:
- A Type property to classify services (e.g., microservice, library, CLI)
- A Lifecycle property to track development stages (development, staging, production)
Add new properties to the service blueprint
-
Go to your Builder, expand the
serviceblueprint, and click onNew property. -
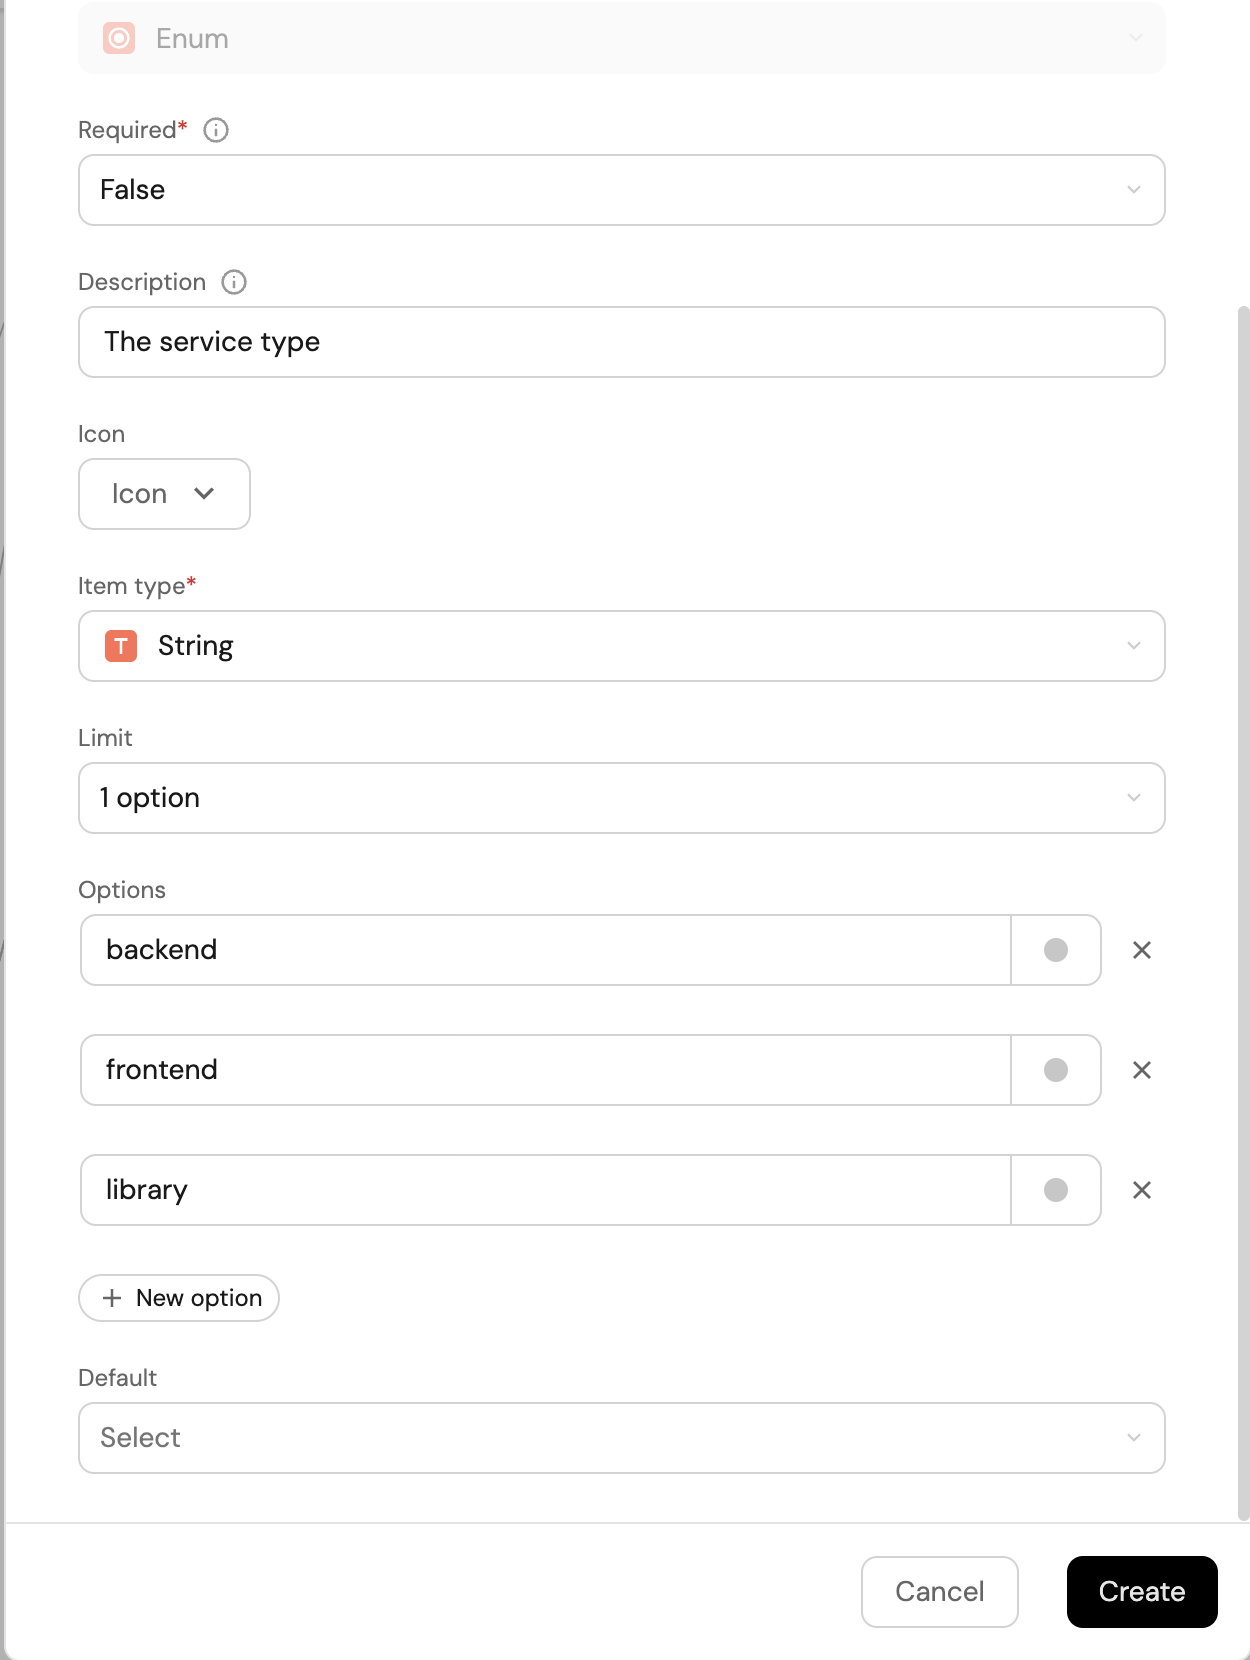
The first property will be the service Type, chosen from a predefined list of options. Fill out the form like the example below, and click
Create:
-
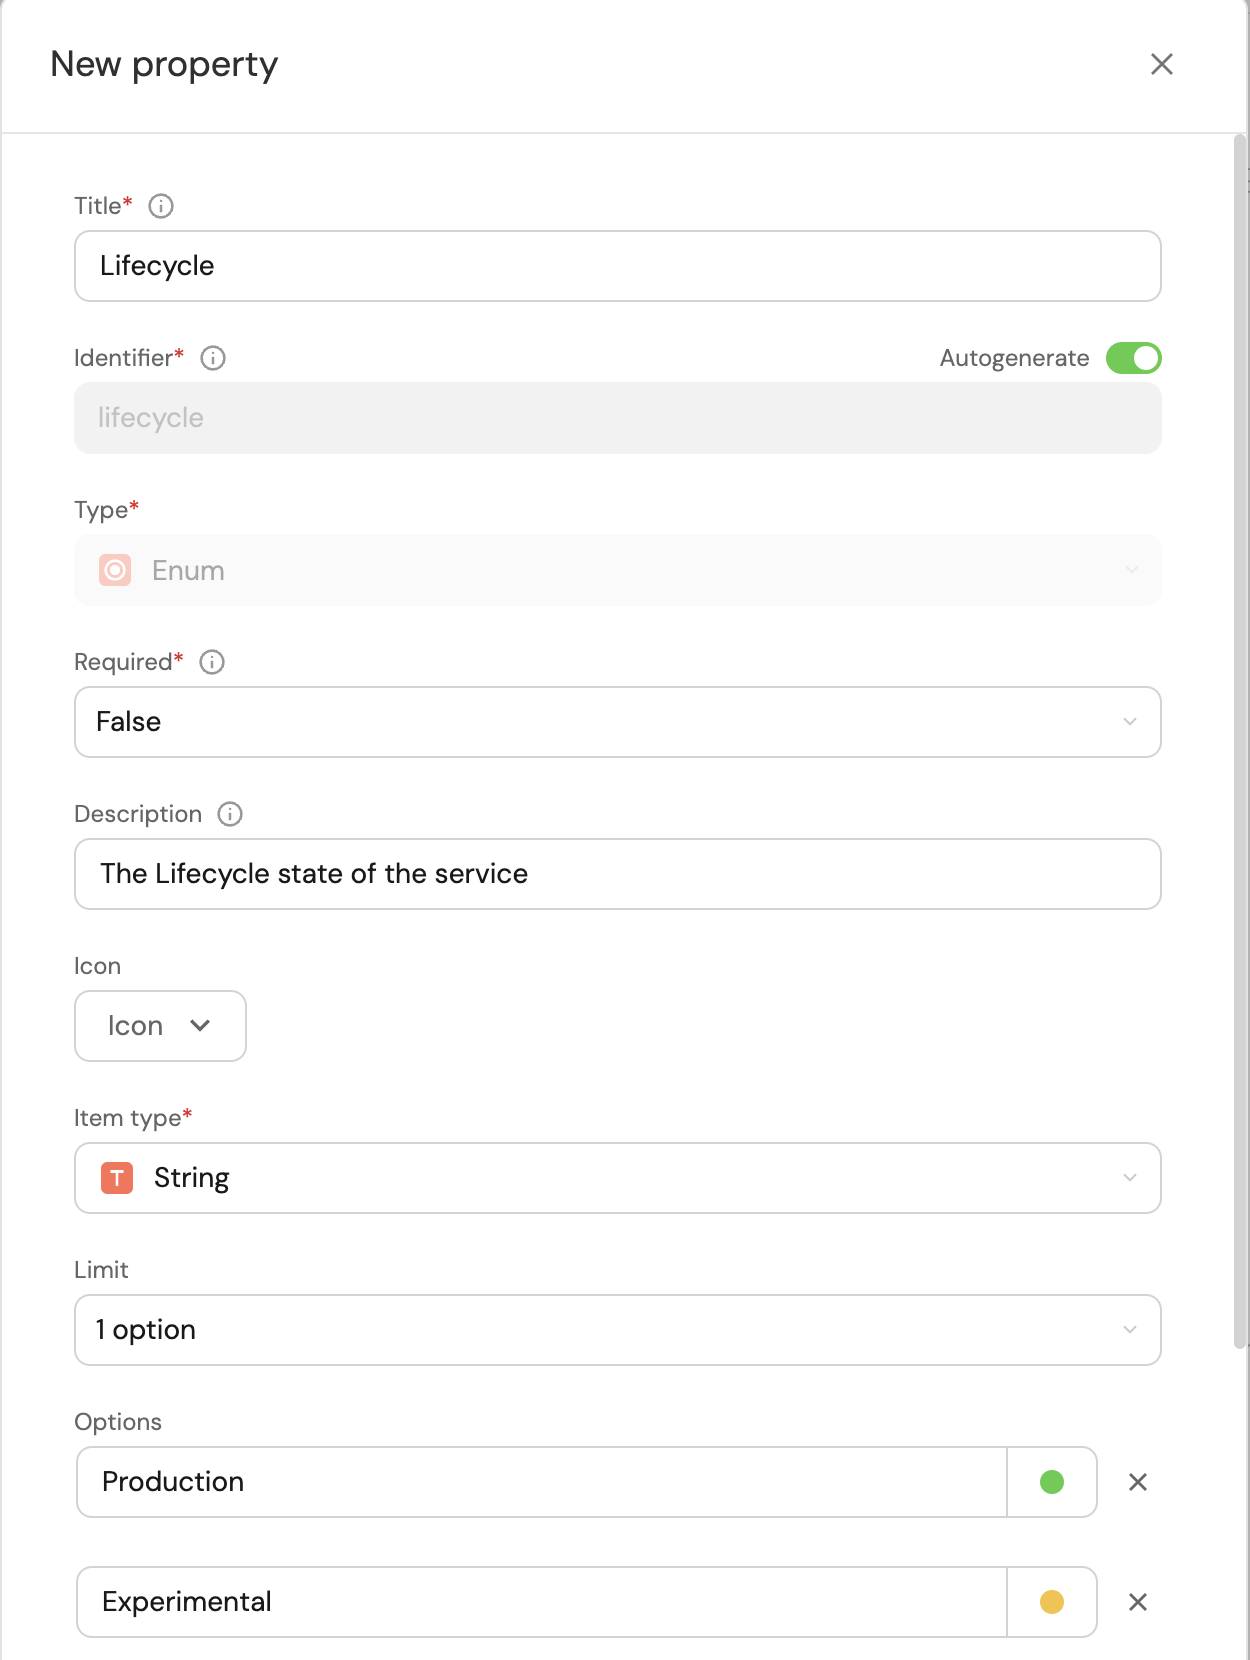
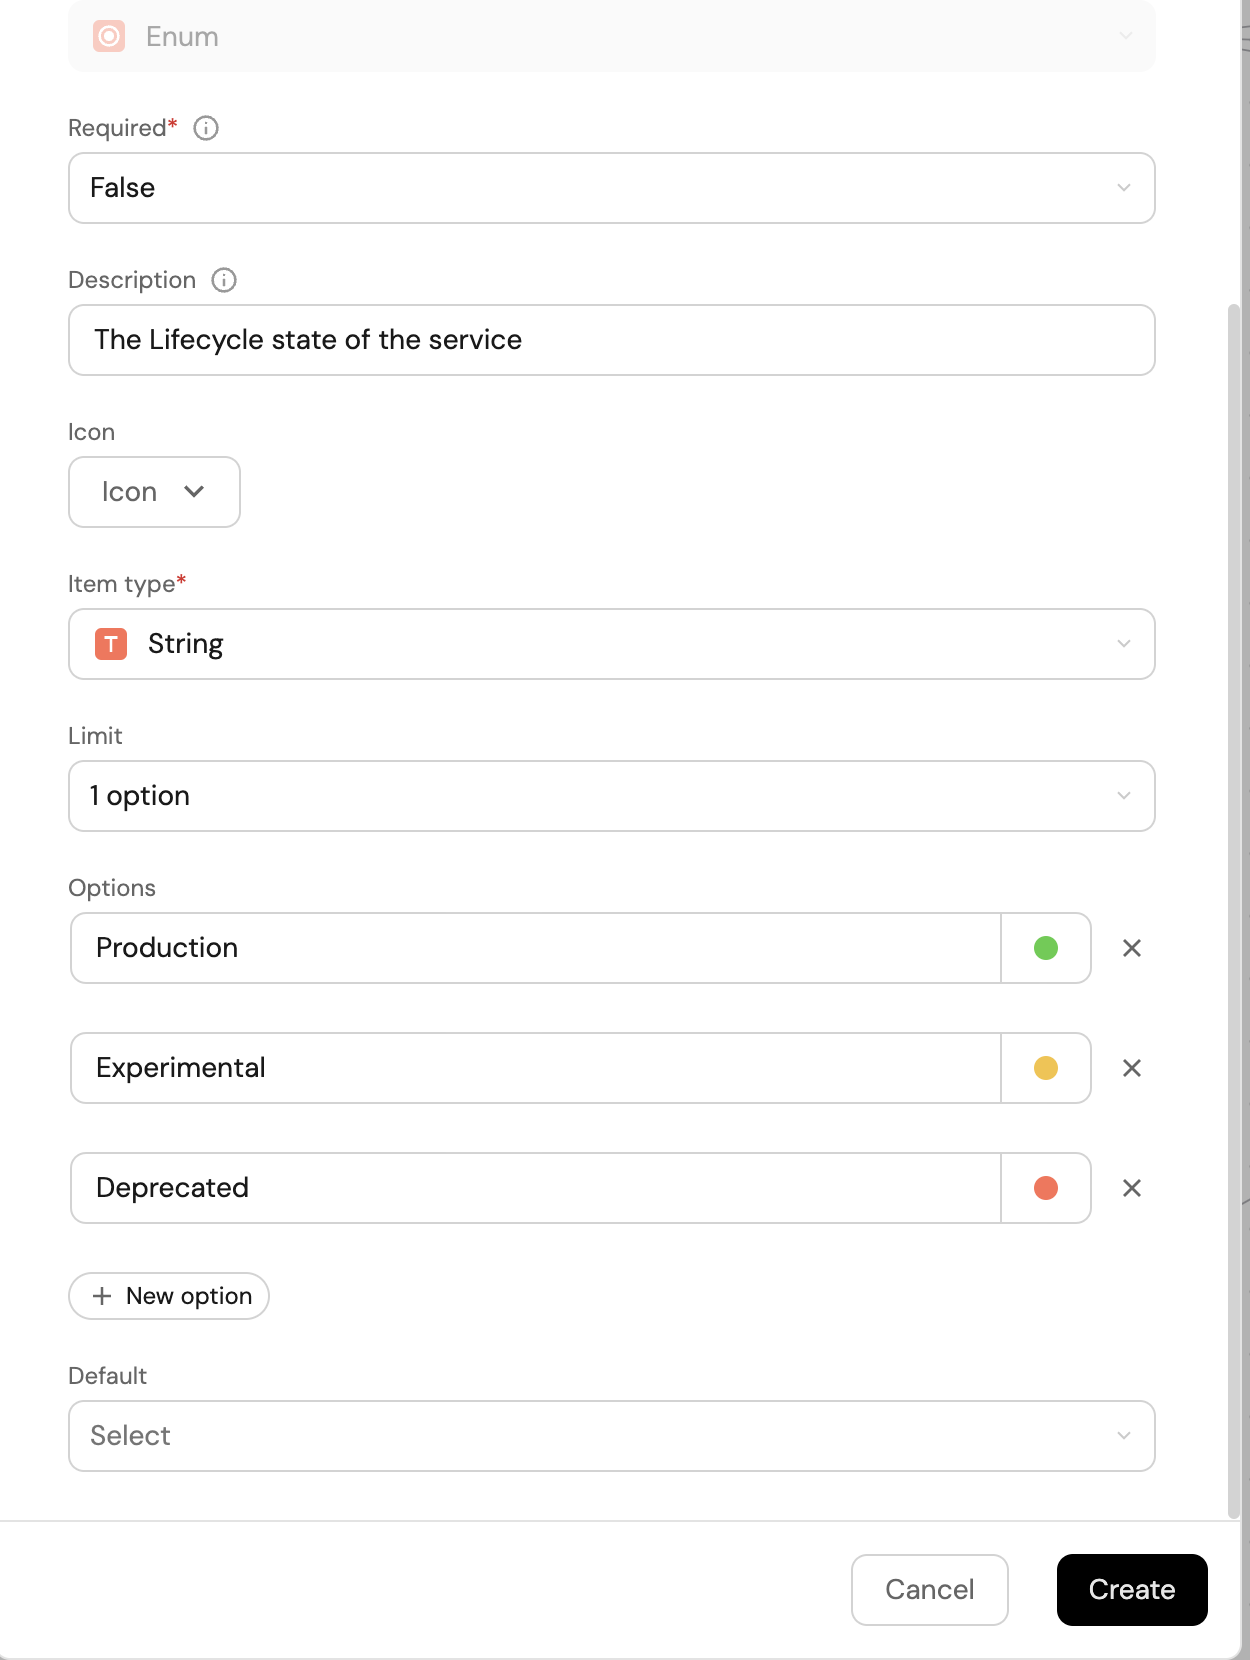
The second property will be the lifecycle state of the service, also chosen from a predefined list of options. Fill out the form like the example below, and click
Create:Note the colors of the inputs, this will make it easier to see a repository's lifecycle in your catalog 😎
Create a Domain blueprint
To group services by business or functional areas, let's define a Domain blueprint:
-
In your Builder, click on the
+ Blueprintbutton:
-
Click on the
Edit JSONbutton in the top right corner, replace the content with the following definition, then clickCreate:Blueprint JSON (click to expand)
{"identifier": "domain","title": "Domain","icon": "TwoUsers","schema": {"properties": {"architecture": {"title": "Architecture","type": "string","format": "url","spec": "embedded-url"}},"required": []},"mirrorProperties": {},"calculationProperties": {},"relations": {}}
Connect services to domains
Now that we have a blueprint to represent a domain, let's connect it to our services.
We will do this by adding a relation to the service blueprint:
-
Go to your Builder, expand the
serviceblueprint, and click onNew relation: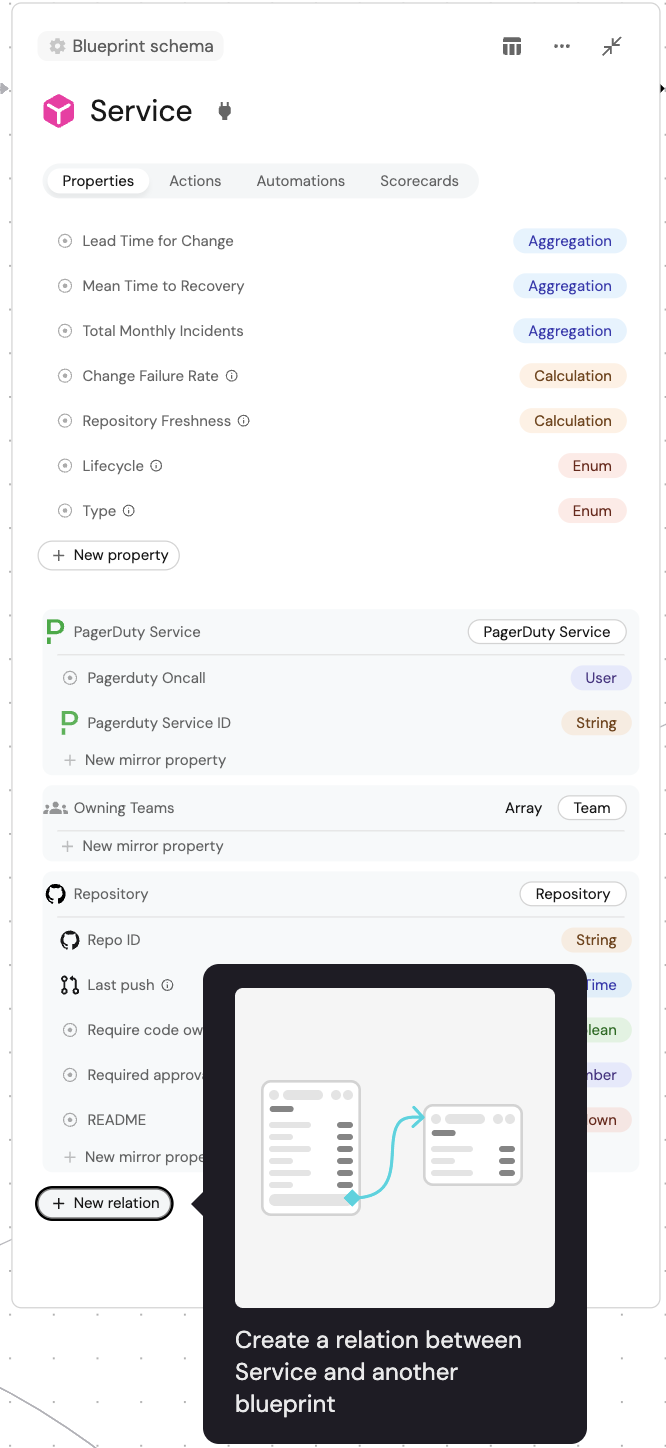
-
Fill out the form like this, then click
Create: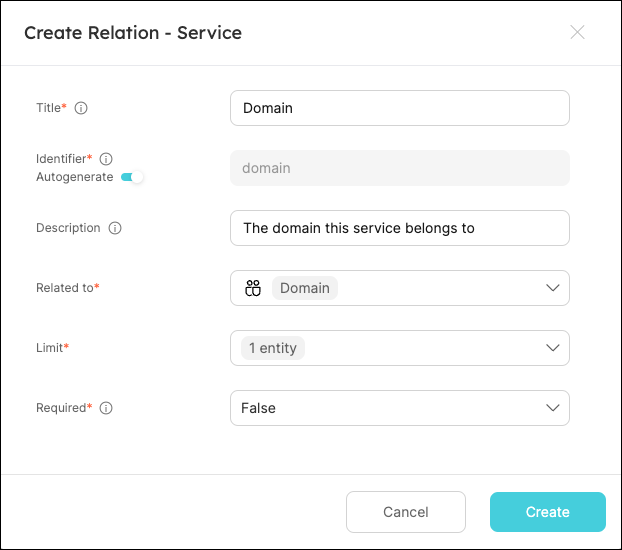
Create domains via Gitops
Now that we have a Domain blueprint, we can create some domains in Port. This can be done manually from the UI, or via Gitops which is the method we will use in this guide.
-
In your
Port-actions(or equivalent) Github repository, create a new file namedport.ymlin the root directory, and use the following snippet as its content:port.yml (click to expand)
- identifier: paymenttitle: Paymentblueprint: domainproperties:architecture: https://lucid.app/documents/embedded/c3d64493-a5fe-4b18-98d5-66d355080de3- identifier: shippingtitle: Shippingblueprint: domainproperties:architecture: https://lucid.app/documents/embedded/c3d64493-a5fe-4b18-98d5-66d355080de3 -
Head back to your software catalog, you will see that Port has created two new
domainentities: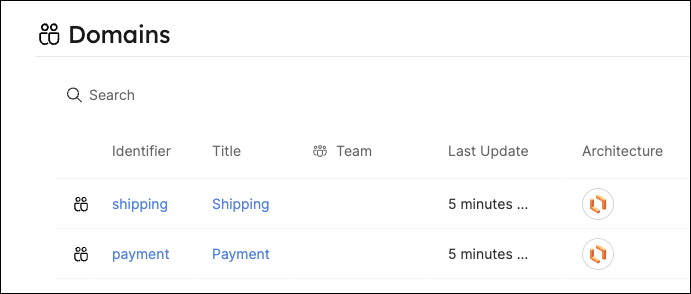
The architecture property is a URL to a Lucidchart diagram. This is a handy way to track a domain's architecture in your software catalog.
Create an action to enrich services
As platform engineers, we want to enable our developers to perform certain actions on their own. Let's create an action that developers can use to add data to a service, and allocate it to a domain.
-
Head to the Self-service page of your portal.
-
Click on the
+ Actionbutton in the top-right corner :
-
Fill the basic form with the following:
-
Title: Enter
Enrich Service -
Identifier Toggle the switch icon off and type a
service_enrich_service -
Description: Enter the description (e.g., Enrich service with data.)
-
Icon: Type
Microserviceand choose the Icon (optional) -
Operation: Choose
Day-2from the dropdown -
Blueprint: Choose
Servicefrom the dropdown
-
-
Click on
Next, and add theDomaininput:-
Click on
+ Input. -
Enter the Title
Domain. -
Select the Type
Entity selection. -
Add the Description (optional).
-
Set Required to
True. -
Select
Domainas the Blueprint -
Click on the
Createbutton.
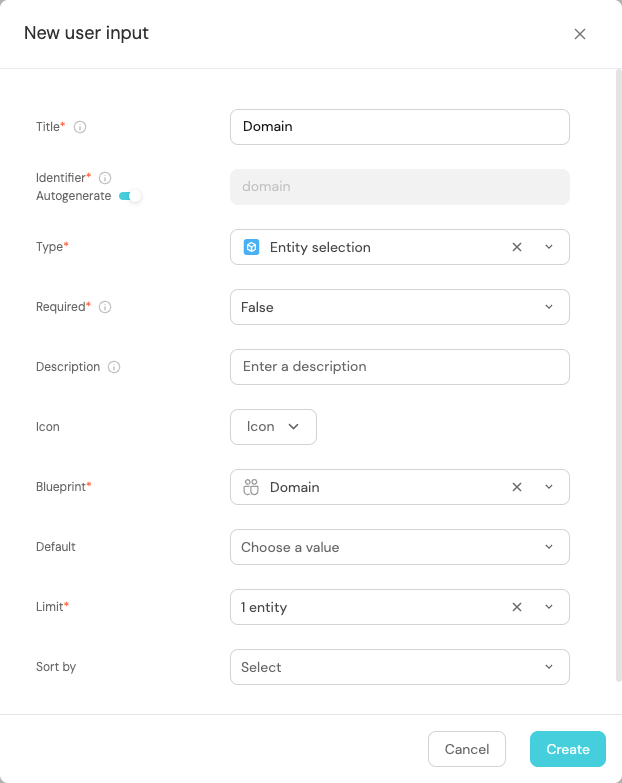
Entity selection input typeThe
Entity selectiontype allows the executing user to choose an entity directly from the catalog.
-
-
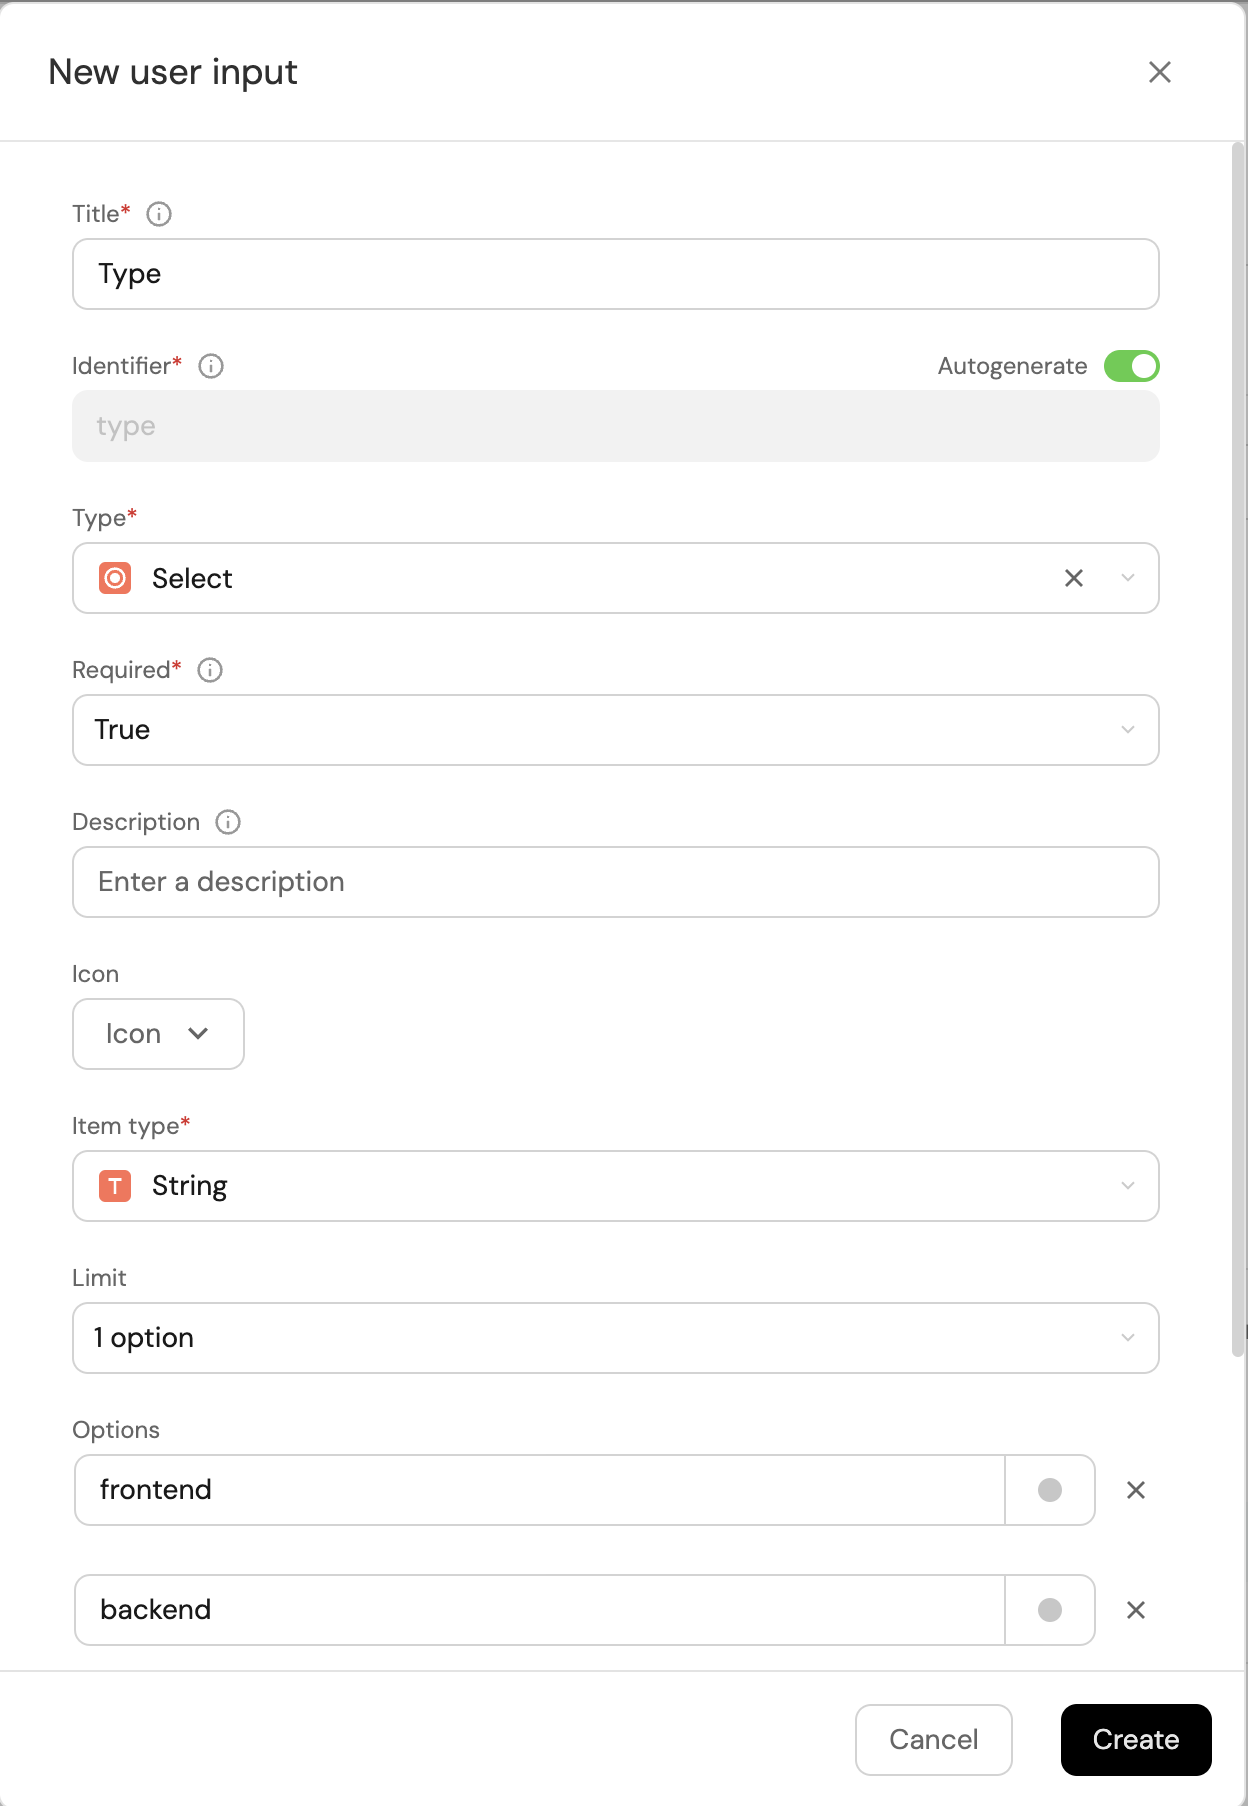
Click on
+ Inputagain to add theTypeinput:-
Enter the Title
Type. -
Select the Type
Select. -
Add the Options
frontend,backend,library. -
Add the Description (optional).
-
Set Required to
True. -
Click on the
Createbutton.
-
-
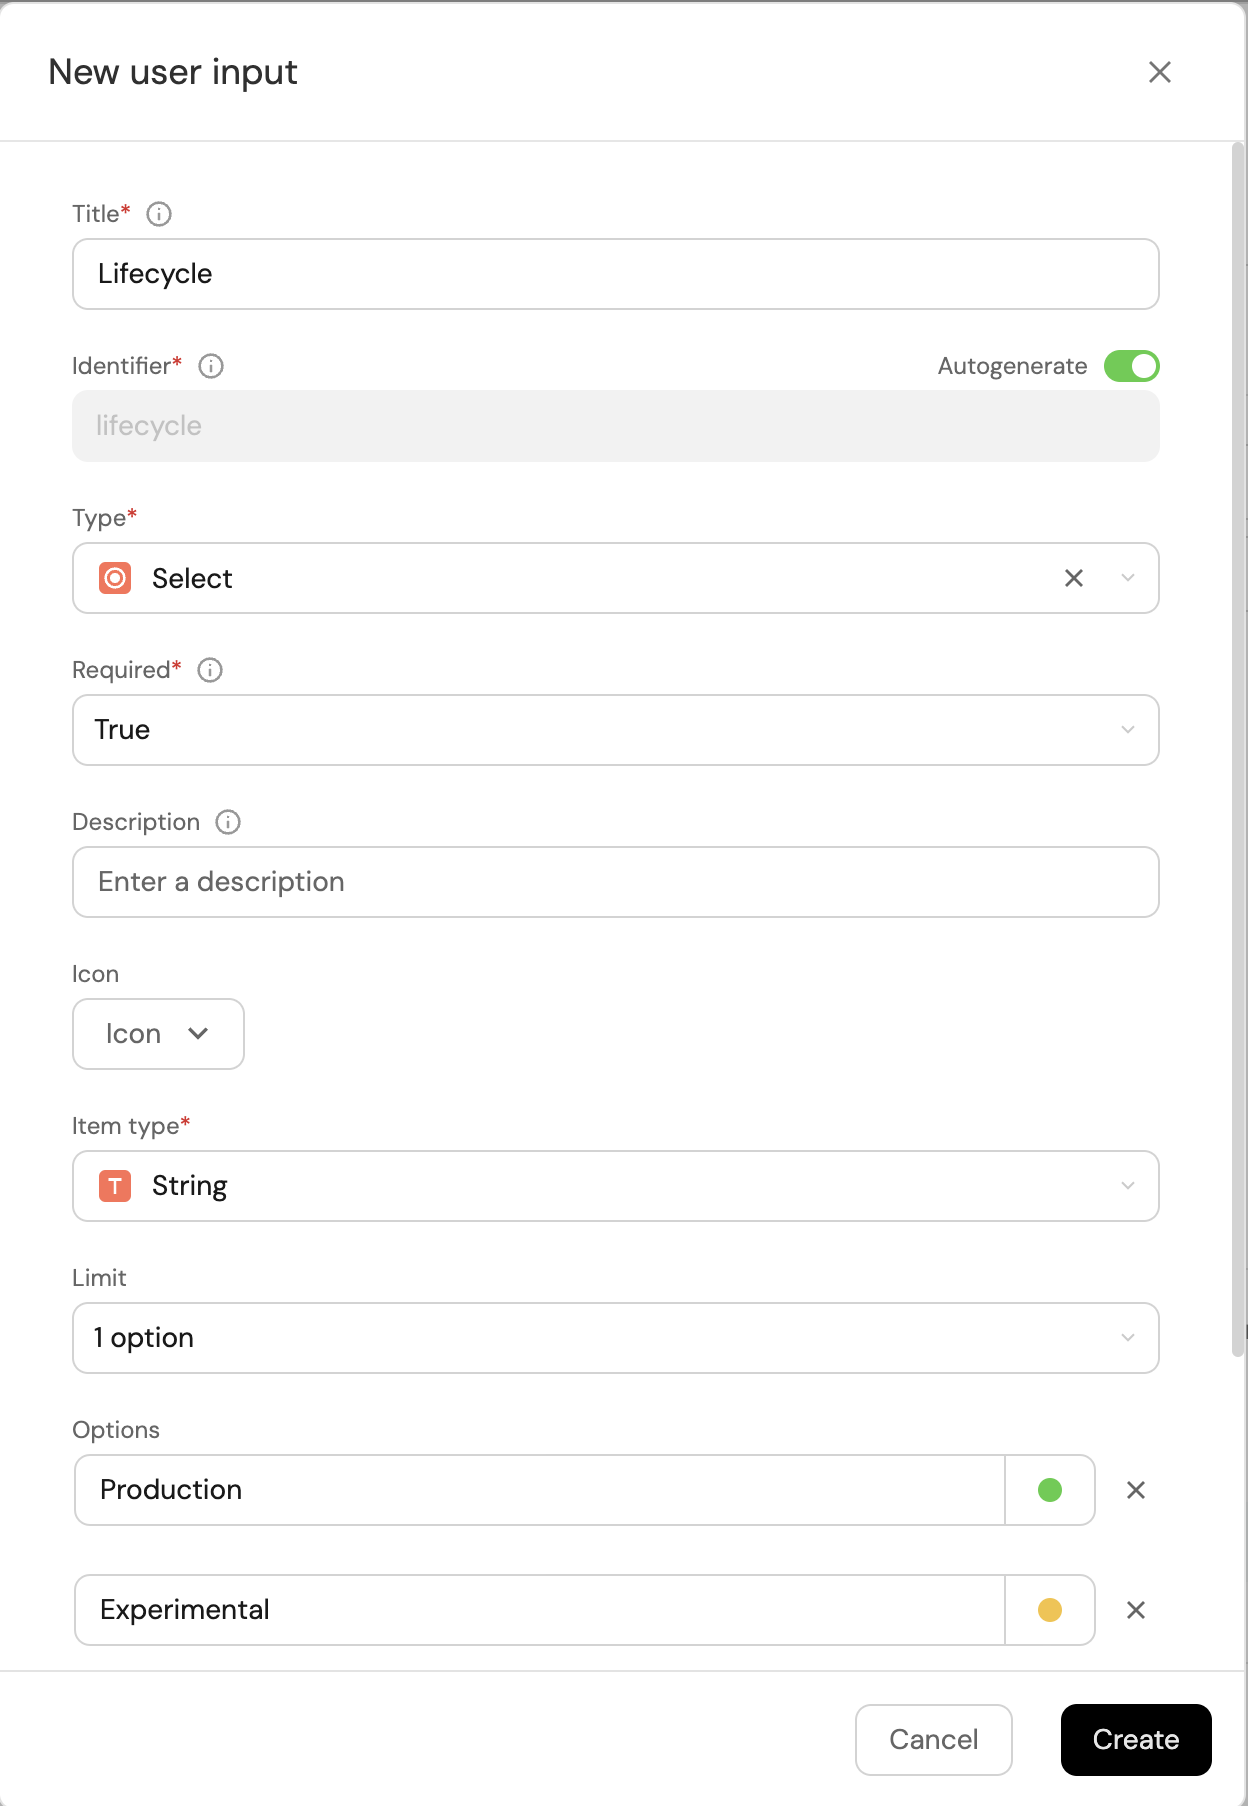
Click on
+ Inputone more time to add theLifecycleinput:-
Enter the Title
Lifecycle. -
Select the Type
Select. -
Add the Options
Production,Experimental,Deprecated. -
Add the Description (optional).
-
Set Required to
True. -
Click on the
Createbutton.
-
-
Click on
Nextto configure the Backend.
Define backend type
Now we'll define the backend of the action. Port supports multiple invocation types, for this tutorial we will use a Github workflow, a GitLab pipeline, or a Jenkins pipeline (choose this option if you are using Bitbucket).
- Github
- GitLab
- Bitbucket (Jenkins)
- GitHub (Ocean)
- GitHub (Sunset)
Note that you will need to have GitHub ocean installed in your Github organization (the one that contains the repository you will work with).
Note that you will need to have Port's Github app installed in your Github organization (the one that contains the repository you will work with).
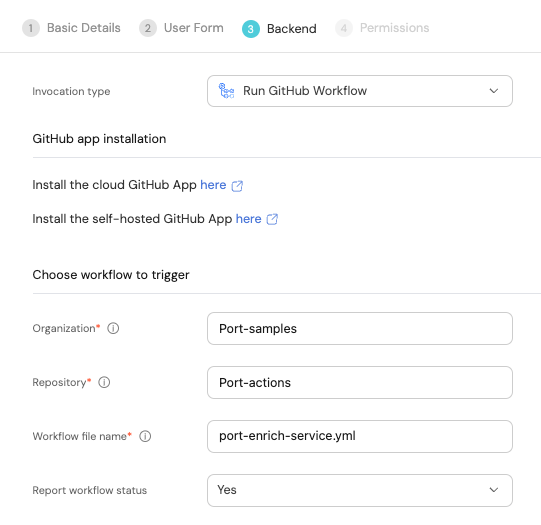
Follow these steps to setup the backend:
-
Select
Run Github Workflowas the invocation type. -
Fill out the form with your values:
-
Replace the
OrganizationandRepositoryvalues with your values (this is where the workflow will reside and run). -
Name the workflow
port-enrich-service.yml. -
Fill out your workflow details:
-
Scroll down to the
Configure the invocation payloadsection.
This is where you can define which data will be sent to your backend each time the action is executed.For this example, we will send some details that our backend needs to know - the user inputs, the entity, and the id of the action run.
Copy the following JSON snippet and paste it in the payload code box:{"port_context": {"entity": "{{ .entity.identifier }}","runId": "{{ .run.id }}"},"domain": "{{ .inputs.domain.identifier }}","type": "{{ .inputs.type }}","lifecycle": "{{ .inputs.lifecycle }}"}
-
First, choose Trigger Webhook URL as the invocation type.
-
The endpoint URL should look like this:
https://gitlab.com/api/v4/projects/<PROJECT_ID>/ref/main/trigger/pipeline?token=<TRIGGER_TOKEN>.
We will create thePROJECT_IDandTRIGGER_TOKENin the next section and come back to update the URL. -
Fill out the rest of the form like this, then click
Next: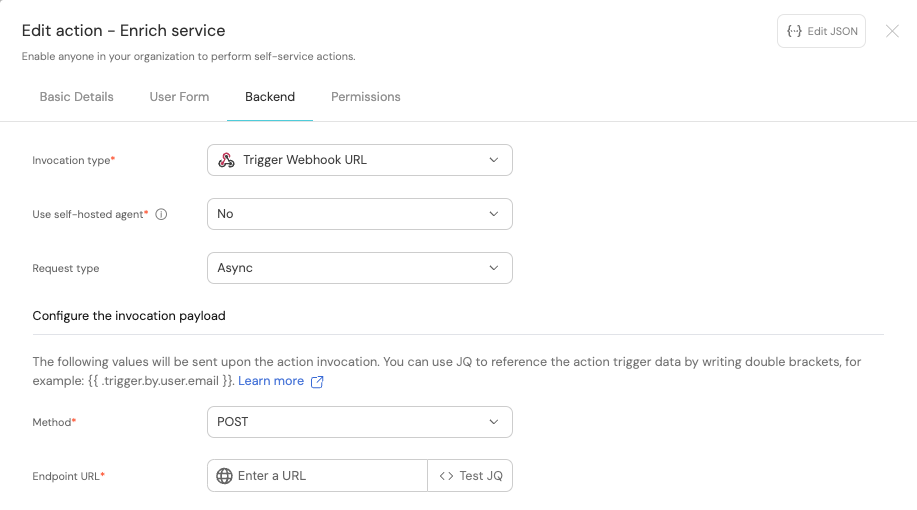
Webhook protectionThe webhook URL can be triggered by anyone with access to it.
In order to protect the webhook, see the Validating webhook signatures page. -
Scroll down to the
Configure the invocation payloadsection.
This is where you can define which data will be sent to your backend each time the action is executed.For this example, we will send some details that our backend needs to know, including the service name, and the id of the action run.
Copy the following JSON snippet and paste it in the payload code box:{"port_context": {"entity": "{{ .entity.identifier }}","runId": "{{ .run.id }}"},"domain": "{{ .inputs.domain.identifier }}","type": "{{ .inputs.type }}","lifecycle": "{{ .inputs.lifecycle }}"}
Note that you will need to have Port's Bitbucket app installed in your Bitbucket workspace (the one that contains the repository you'll work with).
First, choose Jenkins as the invocation type.
-
Follow the instructions under
Define a webhook to trigger a Jenkins jobto obtain your webhook URL. -
Use
enrichServiceas the name of your new job token.
Then, fill out your workflow details:
-
Replace the
Webhook URLwith your value (this is where the pipeline will reside and run). -
Leave the
Use self-hosted agentoption set toNo.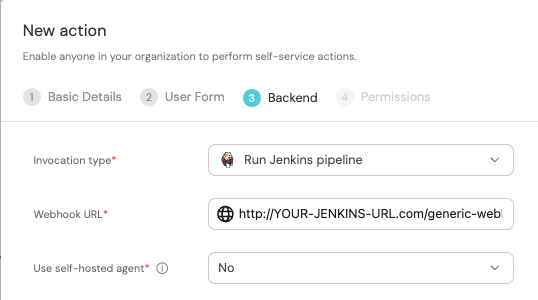
-
Scroll down to the
Configure the invocation payloadsection.
This is where you can define which data will be sent to your backend each time the action is executed.For this example, we will send some details that our backend needs to know - the three user inputs, and the id of the action run.
Copy the following JSON snippet and paste it in the payload code box:{"port_context": {"entity": "{{ .entity.identifier }}","repo_url": "{{ .entity.properties.url }}","runId": "{{ .run.id }}"},"domain": "{{ .inputs.domain.identifier }}","type": "{{ .inputs.type }}","lifecycle": "{{ .inputs.lifecycle }}"}
The last step is customizing the action's permissions. For simplicity's sake, we will use the default settings. For more information, see the permissions page. Click Create.
Set up the action's backend
Our action will create a pull-request in the repository, containing a port.yml file that will add data to the repository in Port. Choose a backend type below to setup the workflow:
- Github
- GitLab
- Bitbucket (Jenkins)
-
First, let's create the necessary token and secrets. If you've already completed the
scaffold a new service guide, you should already have these configured and you can skip this step.-
Go to your Github tokens page, create a personal access token with
repoandadmin:orgscope, and copy it (this token is needed to create a pull-request from our workflow).
-
Go to your Port application, click on your profile picture
 , then click
 Credentials. Copy yourClient IDandClient secret.
-
-
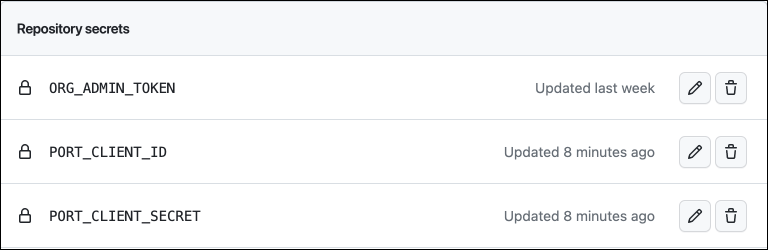
In your
Port-actions(or equivalent) Github repository, create 3 new secrets underSettings->Secrets and variables->Actions:ORG_ADMIN_TOKEN- the personal access token you created in the previous step.PORT_CLIENT_ID- the client ID you copied from your Port app.PORT_CLIENT_SECRET- the client secret you copied from your Port app.
-
Go to your Port application, click on your profile picture
, then click Credentials. Copy yourClient IDandClient secret. -
Under your root group, access
Settings->Access Tokens, and create aMaintainerrole token with theapi,read_repository, andwrite_repositoryscopes. Copy the token's value. -
Create a new project named
Port-pipelines. Copy its GitLab project ID and replace the(PROJECT_ID)in the webhook URL. Then, under Settings->CI/CD, create a new Pipeline trigger token and use it to replace(TRIGGER_TOKEN)in the webhook URL. -
In the same menu (CI/CD), add the following variables to the pipeline:
-
PORT_CLIENT_ID- Your Port client ID. -
PORT_CLIENT_SECRET- Your Port client secret. -
GITLAB_ACCESS_TOKEN- The GitLab group access token you created in the previous step.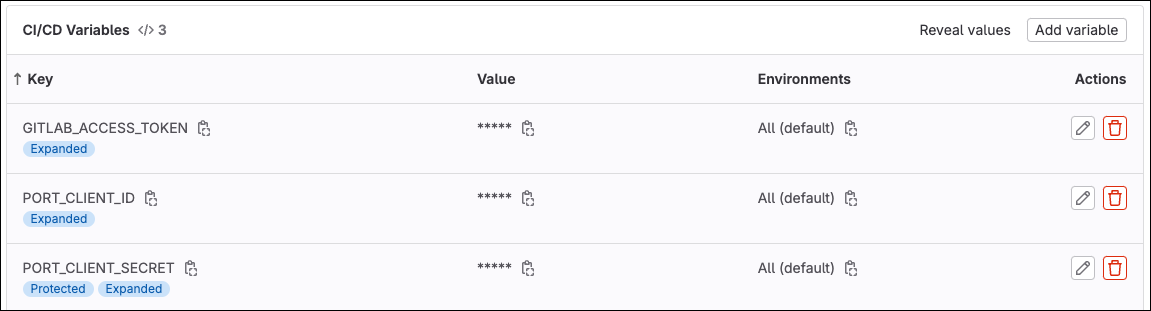
-
-
Create a Bitbucket app password with
Pull requests:writepermissions, and copy its value. -
Create the following Jenkins credentials in your Jenkins instance:
- A
username with passwordcredential namedBITBUCKET_CREDENTIALSwith your Bitbucket username as the username, and theapp passwordyou created in the previous step as the password.Get your Port credentials
To get your Port credentials, go to your Port application, click on your profile picture
, and select Credentials. Here you can view and copy yourCLIENT_IDandCLIENT_SECRET: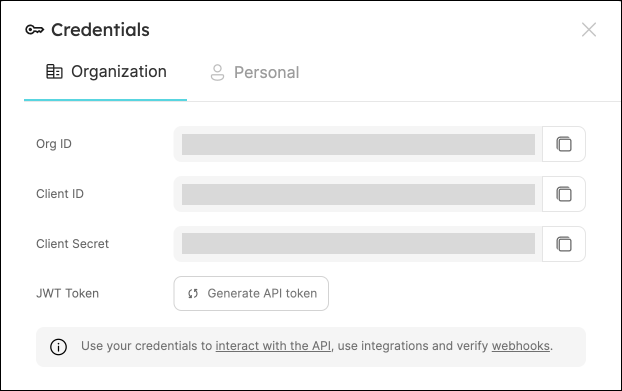
- A
secret textcredential namedPORT_CLIENT_IDwith your Port client ID as the secret. - A
secret textcredential namedPORT_CLIENT_SECRETwith your Port client secret as the secret.
- A
-
Create a Jenkins Pipeline with the following configuration:
-
Enable webhook trigger for the pipeline.
-
Define post-content variables for the pipeline with the following names and values:
Name Value LIFECYCLE $.lifecycle TYPE $.type DOMAIN $.domain ENTITY_IDENTIFIER $.port_context.entity REPO_URL $.port_context.repo_url RUN_ID $.port_context.runId -
Set
enrichServiceas the pipeline's token.
-
We will now create a YML file that will serve as a template for our repository's port.yml configuration file.
- In your repository, create a file named
enrichService.ymlunder/templates/(its path should be/templates/enrichService.yml). - Copy the following snippet and paste it in the file's contents:
enrichService.yml (click to expand)
# enrichService.yml

- identifier: "{{ service_identifier }}"
  blueprint: service
  properties:
    type: "{{ service_type }}"
    lifecycle: "{{ service_lifecycle }}"
  relations:
    domain: "{{ domain_identifier }}"
Now let's create the file that contains our logic:
- Github
- GitLab
- Bitbucket (Jenkins)
In the same repository, under .github/workflows, create a new file named port-enrich-service.yml and use the following snippet as its content:Github workflow (click to expand)
In the same repository, create a new file called .gitlab-ci.yml and inside it paste the following: GitLab pipeline (click to expand)
Create a Jenkins pipeline script with the following content (replace <PORT-ACTIONS-REPO-URL> with the URL of the repository you used in the previous step):Jenkins pipeline script (click to expand)
The port_region, port.baseUrl, portBaseUrl, port_base_url and OCEAN__PORT__BASE_URL parameters select which Port API instance to use:
- EU (app.port.io) →
https://api.port.io - US (app.us.port.io) →
https://api.us.port.io
The action is ready to be executed 🚀
Execute the action
-
After creating an action, it will appear under the Self-service page. Find your new
Enrich serviceaction, and click onExecute. -
Choose a service from the dropdown, a domain to assign it to, and any values for its type and lifecycle, then click
Execute: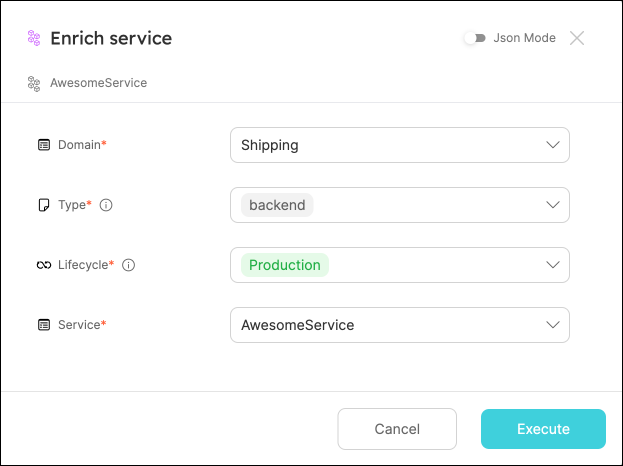
-
Click on the running actions icon on the top right conner to view running actions.:
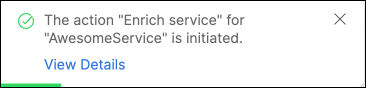
-
Head over to your repository, you will see that a new pull-request was created:

This page provides details about the action run. We can see that the backend returned
Successand the pull-request was created successfully. -
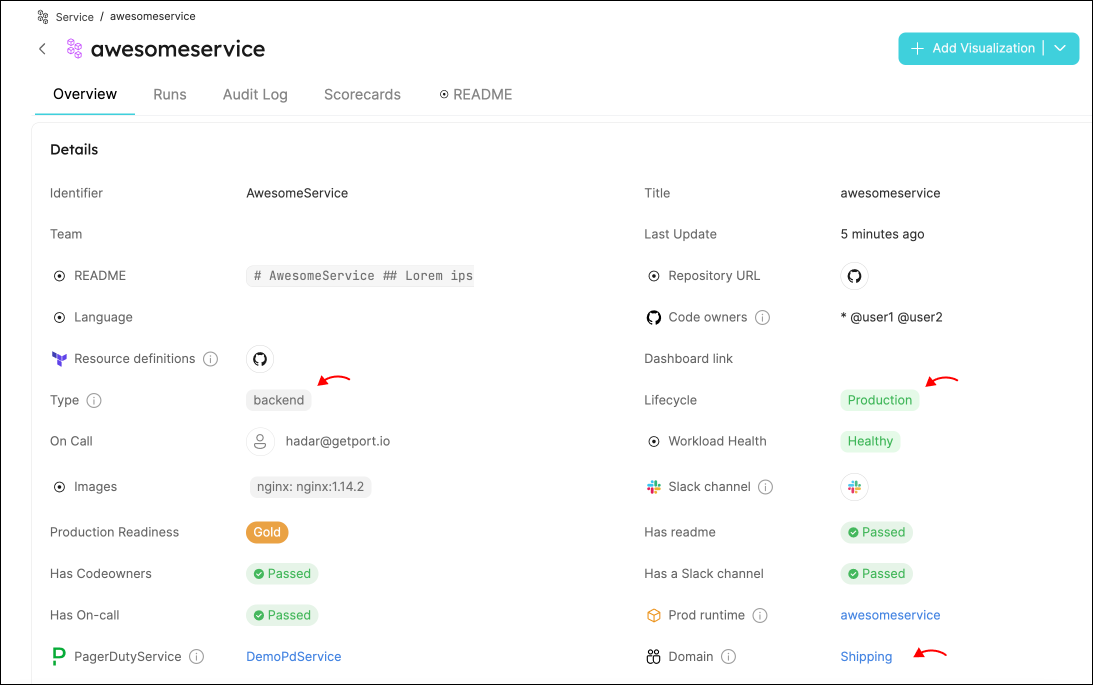
Merge the pull-request, then head back to your software catalog.
-
Find your service, and click on its identifier. This will take you to the service's entity page, where you can see your new properties populated with data:
Possible enhancements
- More Custom Properties: Add extra fields (e.g., repository owner, security posture) to your Repository blueprint.
- Sentry or Other Integrations: Fetch data from tools like Sentry or Jira and reflect it in your software catalog automatically.
- Customized GitOps Templates: Adjust the enrichRepository.yml file for more complex updates—e.g., adding environment variables, custom tags, or even provisioning logic.
- Advanced RBAC: Limit who can run the "Enrich repository" action or which properties certain teams can modify.
- Multi-step Workflows: Chain additional steps to notify Slack, create a Jira ticket, or update other systems before merging.
Conclusion
Gitops is a common practice in modern software development, as it ensures that the state of your infrastructure is always in sync with your codebase.
Port allows you to easily integrate your Gitops practices with your software catalog, reflecting the state of your infrastructure, and allowing you to empower your developers with controlled actions.
More guides & tutorials will be available soon, in the meantime feel free to reach out with any questions via our community slack or Github project.