Dashboard page
Dashboards are collections of widgets that allow you to display entity data using graphic elements.
⬆ The
Plan my daydashboard as displayed in Port's demo portal.
It tracks the logged-in user's open tasks, PRs, and issues, as well as quick actions to perform routine tasks.
Similar to catalog pages, dashboards reside in the panel on the left-hand side of the software catalog.
Dashboards are a great way to display aggregated data and track information that is relevant and/or interesting to you and your developers.
Create a dashboard page
- From the UI
- From Pulumi
-
Go to the Software catalog in your portal.
-
In the left sidebar, click on
+, then selectNew dashboard. -
Name your dashboard and click
Create.
See all the supported variables in the Port Pulumi documentation
Introduction
This guide walks you through creating custom pages using our Pulumi provider. We'll cover:
- Widget Building Blocks: Creating the helper functions for generating different widget types.
- Dashboard Design: Composing widgets into layouts for your dashboard.
- Customization: Adapting the examples to your specific needs.
Prerequisites
- Basic Port Concepts: Familiarity with blueprints, entities, and datasets in your Port system is helpful.
- You will also need your Port credentials.
- This guide also assumes that you have installed Pulumi, and the Port provider's SDK in your chosen language.
- Python
- Typescript
- Let us create some helper functions. These will help to create the different kinds of widgets.
Widget Helper Functions (click to expand)
import json
from port_pulumi import Page

# Widget Helper Functions
def generate_widget_id(title, widget_type):
    """
    Generates a unique widget ID based on the title and widget type.

    Args:
        title (str): The title of the widget.
        widget_type (str): The type of the widget (e.g., "markdown", "table-entities-explorer").

    Returns:
        str: The generated widget ID, e.g., "microservicesGuideMarkdown".
    """
    # Convert title to camelCase
    title_words = title.split()
    camel_case_title = title_words[0].lower() + "".join(
        word.capitalize() for word in title_words[1:]
    )

    # Combine camelCase title and widget type
    base_id = f"{camel_case_title}{widget_type.capitalize()}"

    # Ensure the length does not exceed the limit
    max_length = len("QlUwO3VRBMQ3HjdH")
    return base_id[:max_length]

# Load markdown from a file helper function
def read_markdown_file(file_path):
    with open(file_path, "r", encoding="utf-8") as file:
        markdown_content = file.read()
        return markdown_content


def create_markdown_widget(title, description, markdown_content):
    """
    Creates a markdown widget configuration.

    Args:
        title (str): The title of the widget.
        subtitle (str): The subtitle of the markdown content.
        description (str): A description for the widget.

    Returns:
        tuple: A tuple containing:
            * widget_config (dict): The widget configuration dictionary.
            * widget_id (str): The generated widget ID.
    """
    widget_id = generate_widget_id(title, "markdown")
    widget_config = {
        "title": title,
        "icon": "BlankPage",
        "markdown": markdown_content,
        "type": "markdown",
        "description": description,
        "id": widget_id,
    }
    return widget_config, widget_id


def create_iframe_widget(title, url, url_type="public", description=""):
    widget_id = generate_widget_id(title, "iframe-widget")
    widget_config = {
        "title": title,
        "description": description,
        "icon": "Code",
        "urlType": url_type,
        "url": url,
        "type": "iframe-widget",
        "id": widget_id,
    }
    return widget_config, widget_id
- Now we can define the widgets in our dashboard and the layout of the page.
Dashboard Configuration (click to expand)
# ... (Rest of the Code: Helper Functions)

file_path = "microservices.md"  # Replace with the path to your Markdown file
markdown_content = read_markdown_file(file_path)

# Widget Creation (with IDs); we use the IDs to define the layout of the dashboard
markdown_config, markdown_id = create_markdown_widget(
    title="Service Guide",
    description="Services are typically organized around business capabilities. Each service is often owned by a single, small team.",
    markdown_content=markdown_content,
)

quote_config, quote_id = create_iframe_widget(
    title="Quote of the Day",
    url="https://kwize.com/quote-of-the-day/embed/&txt=0"
)

# Dashboard Layout Definition
dashboard_layout = {
    "id": "myDashboardWidget",  # This is optional, as Port can auto-generate IDs
    "type": "dashboard-widget",
    "layout": [
        {
            "columns": [
                {"id": markdown_id, "size": 6},
                {"id": quote_id, "size": 6},
            ],
            "height": 400,
        }
    ],
}

widgets_config = {
    **dashboard_layout,  # Embed the layout structure
    "widgets": [
        markdown_config,
        quote_config
    ],
}

print(widgets_config)
- Now we can define the page and run
pulumi upto create the page in Port.
Page Definition (click to expand)
import json
from port_pulumi import Page

// ... (Rest of the Code)

# Page Creation
microservice_dashboard_page = Page(
    "microservice-overview-page-resource",
    identifier="microservice_overview_page",
    title="Microservices Dashboard",
    icon="Microservice",
    type="dashboard",
    widgets=[json.dumps(widgets_config)],
)
- Let us now add helper functions to create dataset dependent widgets.
If you have not already, we recommend installing the GitHub app in order to get some data into your Port account. Subsequently, you can use the blueprints from this guide and follow along for tangible results.
More Widget Functions (click to expand)
# ... (Other helper functions)

def use_dataset(blueprint_id):
    """
    Creates a dataset configuration that filters entities based on the provided blueprint ID.

    Args:
        blueprint_id (str): The ID of the blueprint to filter for.

    Returns:
        dict: The dataset configuration dictionary.
    """
    return {  # Directly return the dataset
        "combinator": "and",
        "rules": [{"operator": "=", "value": blueprint_id, "property": "$blueprint"}],
    }


def create_table_explorer_widget(title, dataset, excludedFields=["properties.readme"]):
    widget_id = generate_widget_id(title, "table-entities-explorer")
    widget_config = {
        "displayMode": "widget",
        "title": title,
        "type": "table-entities-explorer",
        "dataset": dataset,
        "id": widget_id,
        "excludedFields": excludedFields,
    }
    return widget_config, widget_id


def create_entities_pie_chart_widget(title, dataset, property):
    widget_id = generate_widget_id(title, "entities-pie-chart")
    widget_config = {
        "title": title,
        "icon": "PieChart",
        "type": "entities-pie-chart",
        "dataset": dataset,
        "property": property,
        "id": widget_id,
    }
    return widget_config, widget_id


def create_entities_number_chart_widget(
    title,
    blueprint_id,
    dataset=[],
    func="average",
    measure_time_by="$createdAt",
    averageOf="day",
    description="",
):
    """
    Creates an entities number chart widget configuration.

    Args:
      title (str):  The title of the widget.
      dataset:  The dataset for the widget.
      func (str, optional): The aggregation function to use. Options: "average", "count", "sum". Defaults to "average".
      measure_time_by (str, optional): The property to use for time-based aggregations. Defaults to "$createdAt".
      averageOf (str, optional): The time period for averaging. Options: "day", "week", "month". Defaults to "day".
      description (str, optional): A description for the widget.

    Returns:
      tuple: A tuple containing the widget configuration dictionary and its ID.
    """

    widget_id = generate_widget_id(title, "entities-number-chart")
    widget_config = {
        "blueprint": blueprint_id,
        "calculationBy": "entities",
        "title": title,
        "description": description,
        "type": "entities-number-chart",
        "icon": "Calculator",
        "dataset": dataset,
        "func": func,
        "measureTimeBy": measure_time_by,
        "averageOf": averageOf,
        "unit": "custom",
        "unitCustom": "per day",
        "id": widget_id,
    }
    return widget_config, widget_id
- Let us now create dataset dependent widgets.
Dataset Widgets (click to expand)
# ... Sample Data & Widget Creation ...

# ... (Creation of markdownConfig e.t.c)

# Dataset configuration: `service` is the name of the blueprint in Port
services_dataset = use_dataset("service")

table_config, table_id = create_table_explorer_widget(
    title="Services",
    dataset=services_dataset,
    excludedFields=["properties.readme"],
)

pie_chart_config, pie_chart_id = create_entities_pie_chart_widget(
    title="Languages", dataset=services_dataset, property="property#language"
)

pr_chart_config, pr_chart_id = create_entities_number_chart_widget(
    title="Avg Pull Requests",
    blueprint_id="githubPullRequest",
    description="Hpw many PRs do we open daily",
)

# Dashboard Layout Definition
dashboard_layout = {
    "id": "myDashboardWidget",  # This is optional, as Port can auto-generate IDs
    "type": "dashboard-widget",
    "layout": [
        # previous configuration: markdown and quote widgets,
        {
            "height": 400,
            "columns": [
                {"id": pie_chart_id, "size": 6},
                {"id": pr_chart_id, "size": 6},
            ],
        },
        {"height": 400, "columns": [{"id": table_id, "size": 12}]},
    ],
}

widgets_config = {
    **dashboard_layout,  # Embed the layout structure
    "widgets": [
        markdown_config,
        quote_config,
        pie_chart_config,
        pr_chart_config,
        table_config
    ],
}

print(widgets_config)
- Now you can run the
pulumi upcommand again to update the page.
import * as pulumi from "@pulumi/pulumi";
import * as port from "@port-labs/port";
import * as fs from "fs"; // Assuming we use Node's 'fs' module for file reading

// ------------------ Widget Helper Functions ------------------

interface WidgetConfig {
  // Sample interface, adjust as needed
  id: string;
  title: string;
  type: string;
  icon?: string; // Optional properties
  description?: string;
  markdown?: string;
  blueprint?: string;
  displayMode?: string;
  dataset?: any;
  excludedFields?: string[];
  property?: string;
  calculationBy?: string;
  urlType?: string;
  // ... other widget properties
}

function generateWidgetId(title: string, widgetType: string): string {
  const titleWords = title.split(" ");
  const camelCaseTitle =
    titleWords[0].toLowerCase() +
    titleWords
      .slice(1)
      .map((word) => word)
      .join("");
  const baseId = `${camelCaseTitle}${widgetType}`;

  // Ensure the length does not exceed the limit
  const maxLength = 20; // Replace with the correct limit if needed
  return baseId.substring(0, maxLength);
}

function createMarkdownWidget(
  title: string,
  description: string,
  markdownContent: string
): [WidgetConfig, string] {
  const widgetId = generateWidgetId(title, "markdown");
  const widgetConfig: WidgetConfig = {
    title,
    icon: "BlankPage",
    markdown: markdownContent,
    type: "markdown",
    description,
    id: widgetId,
  };
  return [widgetConfig, widgetId];
}

function createTableExplorerWidget(
  title: string,
  dataset: any,
  excludedFields: string[] = ["properties.readme"]
): [WidgetConfig, string] {
  const widgetId = generateWidgetId(title, "table-entities-explorer");
  const widgetConfig: WidgetConfig = {
    displayMode: "widget", // Assuming  this property exists
    title,
    type: "table-entities-explorer",
    dataset,
    id: widgetId,
    excludedFields,
  };
  return [widgetConfig, widgetId];
}

function createEntitiesPieChartWidget(
  title: string,
  dataset: any,
  property: string
): [WidgetConfig, string] {
  const widgetId = generateWidgetId(title, "entities-pie-chart");
  const widgetConfig = {
    title,
    icon: "PieChart",
    type: "entities-pie-chart",
    dataset,
    property,
    id: widgetId,
  };
  return [widgetConfig, widgetId];
}

function createIframeWidget(
  title: string,
  url: string,
  urlType: string = "public",
  description: string = ""
): [WidgetConfig, string] {
  const widgetId = generateWidgetId(title, "iframe-widget");
  const widgetConfig = {
    title,
    description,
    icon: "Code",
    urlType,
    url,
    type: "iframe-widget",
    id: widgetId,
  };
  return [widgetConfig, widgetId];
}

function createEntitiesNumberChartWidget(
  title: string,
  blueprintId: string,
  dataset: any = [],
  func: "average" | "count" | "sum" = "average",
  measureTimeBy: string = "$createdAt",
  averageOf: "day" | "week" | "month" = "day",
  description: string = ""
): [WidgetConfig, string] {
  const widgetId = generateWidgetId(title, "entities-number-chart");
  const widgetConfig = {
    blueprint: blueprintId,
    calculationBy: "entities",
    title,
    description,
    type: "entities-number-chart",
    icon: "Calculator",
    dataset,
    func,
    measureTimeBy,
    averageOf,
    unit: "custom",
    unitCustom: "per day",
    id: widgetId,
  };
  return [widgetConfig, widgetId];
}

// ------------------ Other Helper Functions ------------------

function readMarkdownFile(filePath: string): string {
  return fs.readFileSync(filePath, "utf-8");
}

function useDataset(blueprintId: string): any {
  // Type may vary depending on your provider
  return {
    combinator: "and",
    rules: [{ operator: "=", value: blueprintId, property: "$blueprint" }],
  };
}

// ------------------ Sample Data & Widget Creation ------------------

const servicesDataset = useDataset("service");
const githubPrDataset = useDataset("githubPullRequest");

const filePath = "microservices.md";
const markdownContent = readMarkdownFile(filePath);

const [markdownConfig, markdownId] = createMarkdownWidget(
  "Service Guide",
  "Services are typically organized around business capabilities...",
  markdownContent
);

// Table Explorer Widget
const [tableConfig, tableId] = createTableExplorerWidget(
  "Services",
  servicesDataset,
  ["properties.readme", "properties.slack"]
);

// Entities Pie Chart Widget
const [pieChartConfig, pieChartId] = createEntitiesPieChartWidget(
  "Languages",
  servicesDataset,
  "property#language"
);

// Iframe Widget
const [quoteConfig, quoteId] = createIframeWidget(
  "Quote of the Day",
  "https://kwize.com/quote-of-the-day/embed/&txt=0"
);

// Entities Number Chart Widget
const [prChartConfig, prChartId] = createEntitiesNumberChartWidget(
  "Avg Pull Requests",
  "githubPullRequest",
  githubPrDataset,
  "average",
  "$createdAt",
  "day",
  "How many PRs do we open daily?"
);

// ------------------ Dashboard Layout ------------------

const dashboardLayout = {
  id: "myDashboardWidget", // Optional
  type: "dashboard-widget",
  layout: [
    {
      // Row 1
      columns: [
        { id: markdownId, size: 6 }, // Markdown Widget (half width)
        { id: pieChartId, size: 6 }, // Pie Chart Widget (half width)
      ],
      height: 400, // Minimum row height is 400px
    },
    {
      // Row 2
      columns: [
        { id: quoteId, size: 12 }, // Quote Widget (half width)
        { id: prChartId, size: 6 }, // PR Chart Widget (half width)
      ],
      height: 400,
    },
    {
      // Row 3
      columns: [
        { id: tableId, size: 12 }, // Table Widget (full width)
      ],
      height: 400,
    },
  ],
};

const widgetsConfig = {
  ...dashboardLayout,
  widgets: [
    markdownConfig,
    pieChartConfig,
    quoteConfig,
    prChartConfig,
    tableConfig,
  ],
};

// ------------------ Page Creation ------------------

export const microserviceDashboardPage = new port.Page(
  "microservice-overview-page-resource",
  {
    identifier: "microservice_overview_page",
    title: "Microservices Dashboard",
    icon: "Microservice",
    type: "dashboard",
    widgets: [JSON.stringify(widgetsConfig)],
  }
);
Properties
When creating a dashboard page, you can set the following properties:
| Field | Description | Required |
|---|---|---|
Title | Dashboard page title | true |
Identifier | The dashboard identifier. This is used to reference the page in various places within your portal and is automatically generated when you create the page. | true |
Description | A description of the dashboard. Supports markdown links ( [link text](https://www.link.com)) | false |
Icon | The page icon | false |
Add new widgets
A dashboard can include any of the supported widgets.
To add a new widget, click on the + Widget button in the top right corner of the dashboard page and choose your desired type.
Reorder and resize widgets
Widgets can be expanded and/or moved within a dashboard page:
-
To move a widget, drag it from the top to your desired position.
-
To resize a widget, hover over one of its sides, then click and drag it to expand/shrink it.
Each dashboard row has a minimum height of 400px and cannot be resized below this threshold.
Expand a widget to full page (borderless)
When a dashboard page has exactly one widget, you can expand that widget so it fills the page without a card header or border. This is useful when you want a single table, chart, or other widget to use the full content area.
To expand a widget:
- Open the widget's
...menu. - Select Expand to Page.
In full-page mode:
- The widget fills the page content area without a card header or border.
- The widget
...menu moves to the page filter row. - Dragging the widget is disabled.
To return to the normal card layout, open the ... menu and select Collapse from Page.
Expand to Page is available only when the page has exactly one widget. If you add a second widget, the normal grid layout returns. The full-page setting is kept, so removing the extra widgets brings full-page mode back automatically.
You need edit permissions on the page to expand or collapse a widget. The option is not available when the page is locked.
You can also set full-page mode when managing pages via the API or IaC by adding "fullPage": true on the root dashboard-widget:
Dashboard widget with full-page mode (click to expand)
{
  "id": "myDashboardWidget",
  "type": "dashboard-widget",
  "fullPage": true,
  "layout": [
    {
      "height": 400,
      "columns": [
        { "id": "myTableWidget", "size": 12 }
      ]
    }
  ],
  "widgets": [
    {
      "id": "myTableWidget",
      "type": "table-entities-explorer",
      "title": "Services",
      "dataset": {
        "combinator": "and",
        "rules": [
          {
            "property": "$blueprint",
            "operator": "=",
            "value": "service"
          }
        ]
      }
    }
  ]
}
Duplicate a dashboard
You can duplicate an existing dashboard page to quickly create a copy with the same configuration.
To duplicate a dashboard:
- Click the
...menu either in the top right corner of the dashboard page, or next to the dashboard item in the catalog sidebar. - Select Duplicate dashboard.
The duplicated dashboard inherits the original name followed by the suffix (copy). It appears immediately below the source dashboard in the sidebar and retains all original widgets, layout configurations, and permission settings.
To duplicate a dashboard, you need both edit permissions on the source page and create page permissions in the portal.
Dashboard filters
Dashboard filters allow you to apply selected filters across all supported widgets within a dashboard at once.
This makes it easier to explore data consistently, without having to filter each widget individually.
You can also save named filter presets and switch between them from the dashboard.
Supported widgets
Dashboard filters currently apply to the following widgets:
Supported filter types
When creating a dashboard filter, you can choose between:
- Basic properties - Meta properties that apply across all blueprints in the dashboard.
- Blueprint-specific properties - Properties from a specific blueprint that is selected in one or more widgets in the dashboard.
The blueprint dropdown will only show blueprints that are used in widgets within the dashboard. For example, if a widget uses the microservice blueprint, microservice will appear as an option in the filter dropdown.

Filters applied to a specific blueprint will only affect widgets that are relevant to that blueprint in the dashboard.
Filters applied to basic properties will affect all supported widgets across all blueprints.
Basic properties
When selecting Basic properties, you can filter on the following meta properties:
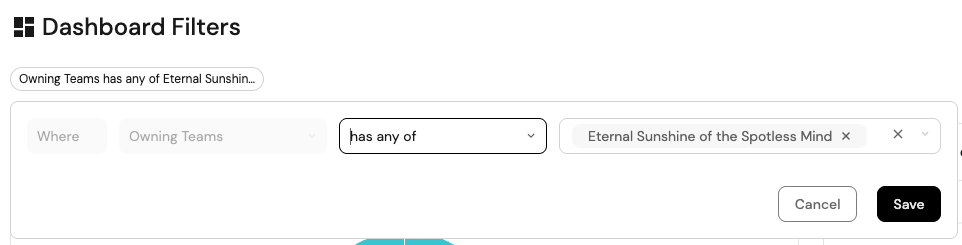
- Owning teams:
- Filter entities based on selected team(s).
- Use the
My Teamsoption to dynamically filter entities relevant to the current user. - Applies only to blueprints that include an
Owning Teamproperty.
- Title: Filter entities by their entity title using different string operators.
- Identifier: Filter entities by their identifier using different string operators.
- Entity creation date: Filter entities by the date they were created, using date-time operators.
- Last update: Filter entities by the date they were last updated, using date-time operators.
Blueprint properties
When selecting a specific blueprint (e.g., service), you can filter on any property defined for that blueprint, including:
- Owning teams: Filter entities of that specific blueprint based on selected team(s). This differs from filtering on owning team using basic properties, which applies across all blueprints.
- Any other blueprint property: Filter on any property defined in the selected blueprint using the appropriate comparison operators for that property type.
For example, you can filter on owning team across all dashboard blueprints by selecting Basic properties → Owning teams, or you can filter on owning team only for the service blueprint by selecting Service → Owning teams.
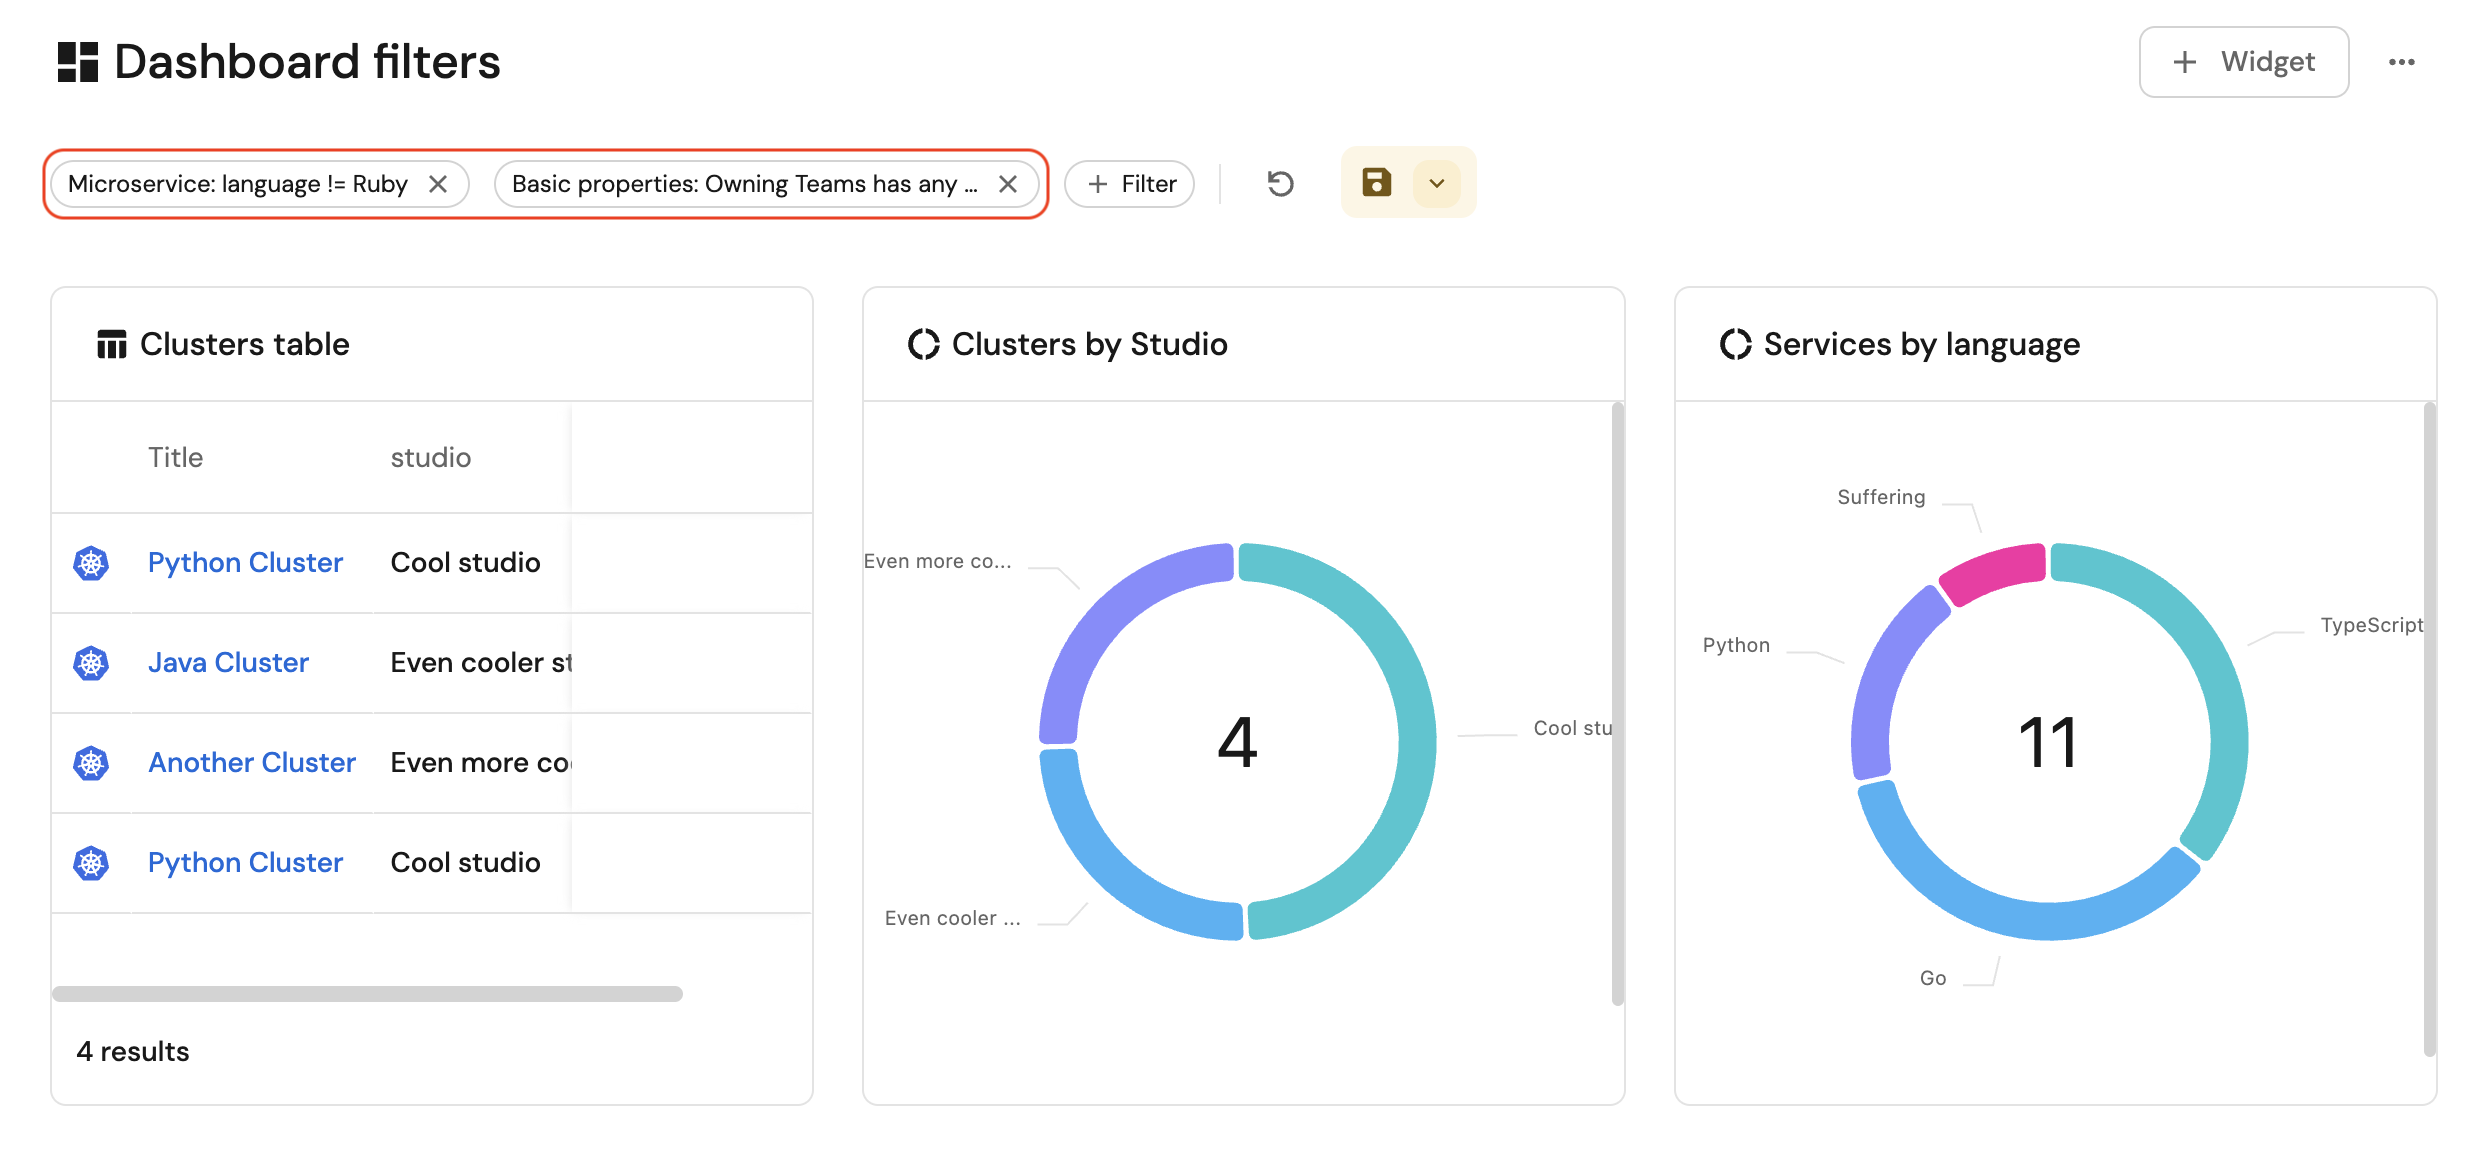
Below is an example dashboard with two types of filters applied:
- A Blueprint properties filter on the
microserviceblueprint that excludes entities wherelanguage = Ruby. This filter only affects widgets that displaymicroservicedata. - A Basic properties filter on Owning teams, which applies to all supported widgets in the dashboard, regardless of blueprint.
In the example, the Services by language widget reflects the blueprint filter by omitting microservices with language = Ruby, while every widget is narrowed by the Owning teams filter to show only entities associated with the selected team(s).
Filter presets
This feature is currently in closed beta with limited availability.
To request access, please contact Port's support team.
Filter presets let you save named sets of dashboard filters and switch between them without rebuilding the query each time.
Each dashboard with presets includes an All tab. All shows the dashboard with no preset filters applied. Named presets appear next to it.
Create a preset
- Add one or more dashboard filters using the Filter button.
- Click Save as Preset.
- Enter a Preset name, then click Save.
The new preset appears as a tab and becomes the active selection.
After the first preset exists, use the + button next to the preset tabs to save another preset from the current filters.
Save as Preset is available only when at least one filter is applied, you have edit permissions on the page, and the page is not locked.
Apply a preset
Click a named preset tab to apply its saved filters across all supported widgets. Click All to clear those filters.
Port remembers the last preset you selected on each dashboard. If you have not selected a preset yet and the dashboard already has presets, the first named preset is applied.
Reorder and delete presets
If you have edit permissions and the page is not locked:
- Drag a named preset tab to change its order. All stays first and cannot be moved.
- Click the close icon on a named preset tab to delete it.
If you delete the active preset, Port selects the first remaining named preset. If none remain, it selects All.
Save presets for other users
Creating, reordering, and deleting presets updates your current view. Click Save this view to persist those changes for everyone who can open the dashboard.
If you change filters while a named preset is selected, Save this view updates that preset.
If All is selected and the dashboard already has presets, you cannot save filters on All. Create a named preset instead.
You can still save the view from All when the change is to the preset list itself, for example after deleting a preset.
Reset view restores the saved filters for the currently selected preset. If All is selected, it clears the filters.
Manage presets from the API
You can define presets when you create or update a dashboard page by setting pageFilterPresets. Each preset has:
identifier: A unique identifier for the preset.title: The label shown on the preset tab.filters: An array of dashboard filters. Each filter uses the same shape aspageFilters(identifier,title, andquery).
Preset identifiers must be unique on the page. Filter identifiers must also be unique within each preset.
Permissions
Admin role: As an admin (or a member with edit permissions for the dashboard), you can add, edit, or remove filters from the dashboard page. Then, save the view to apply it for other users. You can also create, reorder, and delete filter presets, then save the view so others can use them.
Member role: As a member, you can view, add, edit, or remove filters on the page (unless the page is locked). The changes apply only to your own view. You can switch between existing filter presets. Creating, reordering, or deleting presets requires edit permissions on the page.
If the page is locked, you cannot change filters or switch presets.