Manage and visualize your AWS S3 buckets and RDS instances
This guide includes steps that require integration with GitHub:
- GitHub (Ocean) - uses the Ocean framework. We strongly recommend this integration for new and migrated setups.
- GitHub (Sunset) - uses a GitHub app that is in sunset and will be fully deprecated on September 15, 2026.
This guide demonstrates how to set up a monitoring solution to gain visibility into security configurations from your AWS S3 and RDS instances using Port's AWS integration. You will learn how to:
- Ingest AWS S3 and RDS data into Port's software catalog using Port's AWS integration.
- Set up self-service actions to manage RDS instances (reboot and delete).
- Build dashboards in Port to monitor and take action on your AWS storage resources.
Common use cases
- Identify publicly accessible S3 buckets to prevent accidental data exposure.
- Track RDS instances with weak or missing encryption settings.
- Empower platform teams to automate day-2 operations via GitHub workflows.
Prerequisites
This guide assumes the following:
- You have a Port account and have completed the onboarding process.
- Port's AWS integration is installed in your account.
- Port's GitHub integration or Port's GitHub Ocean integration is installed (required for self-service actions).
We recommend creating a dedicated repository for the workflows that are used by Port actions.
Set up data model
When installing the AWS integration in Port, the AWS Account blueprint is created by default.
However, the S3 and RDS Instance blueprints are not created automatically so we will need to create them manually.
Create the S3 blueprint
-
Go to the Builder page of your portal.
-
Click on
+ Blueprint. -
Click on the
{...}button in the top right corner, and chooseEdit JSON. -
Add this JSON schema:
AWS S3 blueprint (Click to expand)
{"identifier": "awsS3Bucket","description": "This blueprint represents an AWS S3 bucket in our software catalog","title": "S3","icon": "Bucket","schema": {"properties": {"link": {"type": "string","format": "url","title": "Link"},"regionalDomainName": {"type": "string","title": "Regional Domain Name"},"versioningStatus": {"type": "string","title": "Versioning Status","enum": ["Enabled","Suspended"]},"encryption": {"type": "array","title": "Encryption"},"lifecycleRules": {"type": "array","title": "Lifecycle Rules"},"publicAccessConfig": {"type": "object","title": "Public Access"},"tags": {"type": "array","title": "Tags"},"arn": {"type": "string","title": "ARN"},"region": {"type": "string","title": "Region"},"blockPublicAccess": {"type": "boolean","title": "Block Public Access"}},"required": []},"mirrorProperties": {},"calculationProperties": {},"aggregationProperties": {},"relations": {"account": {"title": "account","target": "awsAccount","required": false,"many": false}}} -
Click
Saveto create the blueprint.
Create the RDS instance blueprint
-
Go to the Builder page of your portal.
-
Click on
+ Blueprint. -
Click on the
{...}button in the top right corner, and chooseEdit JSON. -
Add this JSON schema:
AWS RDS instance blueprint (Click to expand)
{"identifier": "rdsInstance","description": "This blueprint represents an AWS RDS DBInstance in our software catalog","title": "RDS Instance","icon": "AWS","schema": {"properties": {"link": {"type": "string","format": "url","title": "Link"},"dbInstanceClass": {"type": "string","title": "DB Instance Class"},"dbInstanceStatus": {"type": "string","title": "DB Instance Status"},"engine": {"type": "string","title": "Engine"},"storageType": {"type": "string","title": "Storage Type"},"engineVersion": {"type": "string","title": "Engine Version"},"port": {"type": "number","title": "Port"},"allocatedStorage": {"type": "number","title": "Allocated Storage"},"endpoint": {"type": "string","title": "Endpoint"},"multiAZ": {"type": "boolean","title": "Multi-AZ"},"deletionProtection": {"type": "boolean","title": "Deletion Protection"},"availabilityZone": {"type": "string","title": "Availability Zone"},"masterUsername": {"type": "string","title": "Master Username"},"publicAccess": {"type": "boolean","title": "Public Access"},"vpcSecurityGroups": {"type": "array","items": {"type": "string"},"title": "VPC Security Groups"},"arn": {"type": "string","title": "ARN"},"storageEncrypted": {"type": "boolean","title": "Storage Encrypted"}},"required": []},"mirrorProperties": {},"calculationProperties": {},"aggregationProperties": {},"relations": {"account": {"title": "Account","target": "awsAccount","required": true,"many": false}}} -
Click
Saveto create the blueprint.
Update integration mapping
-
Go to the Data Sources page of your portal.
-
Select the AWS integration.
-
Add the following YAML block into the editor to ingest storage data from AWS:
AWS integration configuration (Click to expand)
deleteDependentEntities: truecreateMissingRelatedEntities: trueenableMergeEntity: trueresources:- kind: AWS::Organizations::Accountselector:query: 'true'port:entity:mappings:identifier: .Idtitle: .Nameblueprint: '"awsAccount"'properties:arn: .Arnemail: .Emailstatus: .Statusjoined_method: .JoinedMethodjoined_timestamp: .JoinedTimestamp | sub(" "; "T")- kind: AWS::S3::Bucketselector:query: 'true'useGetResourceAPI: trueport:entity:mappings:identifier: .Identifiertitle: .Identifierblueprint: '"awsS3Bucket"'properties:regionalDomainName: .Properties.RegionalDomainNameencryption: .Properties.BucketEncryption.ServerSideEncryptionConfigurationlifecycleRules: .Properties.LifecycleConfiguration.RulespublicAccessConfig: .Properties.PublicAccessBlockConfigurationblockPublicAccess: >-.Properties.PublicAccessBlockConfiguration | (.BlockPublicAcls and.IgnorePublicAcls and .BlockPublicPolicy and.RestrictPublicBuckets)tags: .Properties.Tagsarn: .Properties.Arnregion: .Properties.RegionalDomainName | capture(".*\\.(?<region>[^\\.]+)\\.amazonaws\\.com") | .regionlink: .Properties | select(.Arn != null) | "https://console.aws.amazon.com/go/view?arn=" + .Arnrelations:account: .__AccountId- kind: AWS::RDS::DBInstanceselector:query: 'true'useGetResourceAPI: 'true'port:entity:mappings:identifier: .Identifiertitle: .Properties.DBInstanceIdentifierblueprint: '"rdsInstance"'properties:link: 'https://console.aws.amazon.com/go/view?arn=' + .Properties.DBInstanceArndbInstanceClass: .Properties.DBInstanceClassdbInstanceStatus: .Properties.DBInstanceStatusengine: .Properties.EnginestorageType: .Properties.StorageTypeengineVersion: .Properties.EngineVersionport: .Properties.Endpoint.PortallocatedStorage: .Properties.AllocatedStorageendpoint: .Properties.Endpoint.AddressmultiAZ: .Properties.MultiAZdeletionProtection: .Properties.DeletionProtectionavailabilityZone: .Properties.AvailabilityZonemasterUsername: .Properties.MasterUsernamepublicAccess: .Properties.PubliclyAccessiblevpcSecurityGroups: .Properties.VpcSecurityGroupsarn: .Properties.DBInstanceArnstorageEncrypted: .Porperties.StorageEncryptedrelations:account: .__AccountId -
Click
Save & Resyncto apply the mapping.
Set up self-service actions
Now let us create self-service actions to manage your RDS instances directly from Port using GitHub Actions. You will implement workflows to:
- Reboot an RDS instance.
- Delete an RDS instance.
To implement these use-cases, follow the steps below:
Add GitHub secrets
In your GitHub repository, go to Settings > Secrets and add the following secrets:
PORT_CLIENT_ID- Port Client ID learn more.PORT_CLIENT_SECRET- Port Client Secret learn more.AWS_ACCESS_KEY_ID- AWS IAM user's access key.AWS_SECRET_ACCESS_KEY- AWS IAM user's secret access key.AWS_REGION- AWS region (e.g.,us-east-1).
Reboot an RDS instance
Add GitHub workflow
Create the file .github/workflows/reboot-rds-instance.yaml in the .github/workflows folder of your repository.
Reboot RDS GitHub workflow (Click to expand)
name: Reboot RDS Instance

on:
  workflow_dispatch:
    inputs:
      port_context:
        required: true
        description: 'Action and general context (blueprint, entity, run id, etc...)'
        type: string

jobs:
  reboot-rds-instance:
    runs-on: ubuntu-latest
    steps:
      - name: Inform Port of workflow start
        uses: port-labs/port-github-action@v1
        with:
          clientId: ${{ secrets.PORT_CLIENT_ID }}
          clientSecret: ${{ secrets.PORT_CLIENT_SECRET }}
          baseUrl: https://api.port.io
          operation: PATCH_RUN
          runId: ${{fromJson(inputs.port_context).runId}}
          logMessage: Configuring AWS credentials to reboot RDS instance with ID ${{ fromJson(inputs.port_context).entity.identifier }}

      - name: Configure AWS credentials
        uses: aws-actions/configure-aws-credentials@v4
        with:
          aws-access-key-id: ${{ secrets.AWS_ACCESS_KEY_ID }}
          aws-secret-access-key: ${{ secrets.AWS_SECRET_ACCESS_KEY }}
          aws-region: ${{ secrets.AWS_REGION }}

      - name: Reboot RDS instance
        run: aws rds reboot-db-instance --db-instance-identifier ${{ fromJson(inputs.port_context).entity.identifier }}

      - name: Inform Port about RDS reboot success
        if: success()
        uses: port-labs/port-github-action@v1
        with:
          clientId: ${{ secrets.PORT_CLIENT_ID }}
          clientSecret: ${{ secrets.PORT_CLIENT_SECRET }}
          baseUrl: https://api.port.io
          operation: PATCH_RUN
          runId: ${{ fromJson(inputs.port_context).runId }}
          status: 'SUCCESS'
          logMessage: ✅ RDS instance with ID ${{ fromJson(inputs.port_context).entity.identifier }} rebooted successfully
          summary: RDS instance reboot completed successfully

      - name: Inform Port about RDS reboot failure
        if: failure()
        uses: port-labs/port-github-action@v1
        with:
          clientId: ${{ secrets.PORT_CLIENT_ID }}
          clientSecret: ${{ secrets.PORT_CLIENT_SECRET }}
          baseUrl: https://api.port.io
          operation: PATCH_RUN
          runId: ${{ fromJson(inputs.port_context).runId }}
          status: 'FAILURE'
          logMessage: ❌ Failed to reboot RDS instance with ID ${{ fromJson(inputs.port_context).entity.identifier }}
          summary: RDS instance reboot failed
Create Port action
- Go to the Self-service page of your portal.
- Click on the
+ New Actionbutton. - Click on the
{...} Edit JSONbutton. - Copy and paste the following JSON configuration into the editor.
- GitHub (Ocean)
- GitHub (Sunset)
Reboot RDS instance action (Click to expand)
<YOUR_GITHUB_OCEAN_INTEGRATION_ID>- your GitHub Ocean integration installation ID.<GITHUB-ORG>- your GitHub organization or user name.<GITHUB-REPO>- your GitHub repository name.
{
  "identifier": "reboot_rds_instance",
  "title": "Reboot RDS Instance",
  "icon": "AmazonRDS",
  "description": "Reboot an RDS Instance",
  "trigger": {
    "type": "self-service",
    "operation": "DAY-2",
    "userInputs": {
      "properties": {},
      "required": []
    },
    "blueprintIdentifier": "rdsInstance"
  },
  "invocationMethod": {
    "type": "INTEGRATION_ACTION",
    "installationId": "<YOUR_GITHUB_OCEAN_INTEGRATION_ID>",
    "integrationActionType": "dispatch_workflow",
    "integrationActionExecutionProperties": {
      "org": "<GITHUB-ORG>",
      "repo": "<GITHUB-REPO>",
      "workflow": "reboot-rds-instance.yaml",
      "workflowInputs": {
        "port_context": {
          "entity": "{{ .entity }}",
          "blueprint": "{{ .action.blueprint }}",
          "runId": "{{ .run.id }}"
        }
      },
      "reportWorkflowStatus": true
    }
  },
  "requiredApproval": false
}
Reboot RDS instance action (Click to expand)
Make sure to replace <GITHUB_ORG> and <GITHUB_REPO> with your GitHub organization and repository names respectively.
{
  "identifier": "reboot_rds_instance",
  "title": "Reboot RDS Instance",
  "icon": "AmazonRDS",
  "description": "Reboot an RDS Instance",
  "trigger": {
    "type": "self-service",
    "operation": "DAY-2",
    "userInputs": {
      "properties": {},
      "required": []
    },
    "blueprintIdentifier": "rdsInstance"
  },
  "invocationMethod": {
    "type": "GITHUB",
    "org": "<GITHUB-ORG>",
    "repo": "<GITHUB-REPO>",
    "workflow": "reboot-rds-instance.yaml",
    "workflowInputs": {
      "port_context": {
        "entity": "{{ .entity }}",
        "blueprint": "{{ .action.blueprint }}",
        "runId": "{{ .run.id }}"
      }
    },
    "reportWorkflowStatus": true
  },
  "requiredApproval": false
}
- Click
Save.
Now you should see the Reboot RDS Instance action in the self-service page. 🎉
Delete an RDS instance
Add GitHub workflow
Create the file .github/workflows/delete-rds-instance.yaml in the .github/workflows folder of your repository.
Delete RDS GitHub workflow (Click to expand)
name: Delete RDS Instance

on:
  workflow_dispatch:
    inputs:
      port_context:
        required: true
        description: 'Action and general context (blueprint, entity, run id, etc...)'
        type: string
      should_create_db_snapshot:
        required: true
        description: 'Specifies whether to skip the creation of a final DB snapshot before deleting the instance'
        type: string

jobs:
  delete-rds-instance:
    runs-on: ubuntu-latest
    steps:
      - name: Inform Port of workflow start
        uses: port-labs/port-github-action@v1
        with:
          clientId: ${{ secrets.PORT_CLIENT_ID }}
          clientSecret: ${{ secrets.PORT_CLIENT_SECRET }}
          baseUrl: https://api.port.io
          operation: PATCH_RUN
          runId: ${{fromJson(inputs.port_context).runId}}
          logMessage: Configuring AWS credentials to delete RDS instance with ID ${{ fromJson(inputs.port_context).entity.identifier }}

      - name: Configure AWS credentials
        uses: aws-actions/configure-aws-credentials@v4
        with:
          aws-access-key-id: ${{ secrets.AWS_ACCESS_KEY_ID }}
          aws-secret-access-key: ${{ secrets.AWS_SECRET_ACCESS_KEY }}
          aws-region: ${{ secrets.AWS_REGION }}

      - name: Delete RDS instance
        run: aws rds delete-db-instance --db-instance-identifier ${{ fromJson(inputs.port_context).entity.identifier }} ${{ inputs.should_create_db_snapshot }}

      - name: Inform Port about RDS delete success
        if: success()
        uses: port-labs/port-github-action@v1
        with:
          clientId: ${{ secrets.PORT_CLIENT_ID }}
          clientSecret: ${{ secrets.PORT_CLIENT_SECRET }}
          baseUrl: https://api.port.io
          operation: PATCH_RUN
          runId: ${{ fromJson(inputs.port_context).runId }}
          status: 'SUCCESS'
          logMessage: ✅ RDS instance with ID ${{ fromJson(inputs.port_context).entity.identifier }} deleted successfully
          summary: RDS instance delete completed successfully

      - name: Inform Port about RDS delete failure
        if: failure()
        uses: port-labs/port-github-action@v1
        with:
          clientId: ${{ secrets.PORT_CLIENT_ID }}
          clientSecret: ${{ secrets.PORT_CLIENT_SECRET }}
          baseUrl: https://api.port.io
          operation: PATCH_RUN
          runId: ${{ fromJson(inputs.port_context).runId }}
          status: 'FAILURE'
          logMessage: ❌ Failed to delete RDS instance with ID ${{ fromJson(inputs.port_context).entity.identifier }}
          summary: RDS instance delete failed
Create Port action
- Go to the Self-service page of your portal.
- Click on the
+ New Actionbutton. - Click on the
{...} Edit JSONbutton. - Copy and paste the following JSON configuration into the editor.
- GitHub (Ocean)
- GitHub (Sunset)
Delete RDS instance action (Click to expand)
<YOUR_GITHUB_OCEAN_INTEGRATION_ID>- your GitHub Ocean integration installation ID.<GITHUB-ORG>- your GitHub organization or user name.<GITHUB-REPO>- your GitHub repository name.
{
  "identifier": "delete_rds_instance",
  "title": "Delete RDS Instance",
  "icon": "AmazonRDS",
  "description": "Delete an RDS instance",
  "trigger": {
    "type": "self-service",
    "operation": "DELETE",
    "userInputs": {
      "properties": {
        "skip_db_snapshot": {
          "type": "boolean",
          "title": "Skip DB snapshot",
          "description": "Specifies whether to skip the creation of a final DB snapshot before deleting the instance",
          "default": false
        }
      },
      "required": [
        "skip_db_snapshot"
      ],
      "order": [
        "skip_db_snapshot"
      ]
    },
    "blueprintIdentifier": "rdsInstance"
  },
  "invocationMethod": {
    "type": "INTEGRATION_ACTION",
    "installationId": "<YOUR_GITHUB_OCEAN_INTEGRATION_ID>",
    "integrationActionType": "dispatch_workflow",
    "integrationActionExecutionProperties": {
      "org": "<GITHUB-ORG>",
      "repo": "<GITHUB-REPO>",
      "workflow": "delete-rds-instance.yaml",
      "workflowInputs": {
        "should_create_db_snapshot": "{{ if .inputs.skip_db_snapshot == true then \"--skip-final-snapshot\" else \"--no-skip-final-snapshot\" end }}",
        "port_context": {
          "runId": "{{ .run.id }}",
          "entity": "{{ .entity }}"
        }
      },
      "reportWorkflowStatus": true
    }
  },
  "requiredApproval": false
}
Delete RDS instance action (Click to expand)
Make sure to replace <GITHUB_ORG> and <GITHUB_REPO> with your GitHub organization and repository names respectively.
{
  "identifier": "delete_rds_instance",
  "title": "Delete RDS Instance",
  "icon": "AmazonRDS",
  "description": "Delete an RDS instance",
  "trigger": {
    "type": "self-service",
    "operation": "DELETE",
    "userInputs": {
      "properties": {
        "skip_db_snapshot": {
          "type": "boolean",
          "title": "Skip DB snapshot",
          "description": "Specifies whether to skip the creation of a final DB snapshot before deleting the instance",
          "default": false
        }
      },
      "required": [
        "skip_db_snapshot"
      ],
      "order": [
        "skip_db_snapshot"
      ]
    },
    "blueprintIdentifier": "rdsInstance"
  },
  "invocationMethod": {
    "type": "GITHUB",
    "org": "<GITHUB-ORG>",
    "repo": "<GITHUB-REPO>",
    "workflow": "delete-rds-instance.yaml",
    "workflowInputs": {
      "should_create_db_snapshot": "{{ if .inputs.skip_db_snapshot == true then \"--skip-final-snapshot\" else \"--no-skip-final-snapshot\" end }}",
      "port_context": {
        "runId": "{{ .run.id }}",
        "entity": "{{ .entity }}"
      }
    },
    "reportWorkflowStatus": true
  },
  "requiredApproval": false
}
- Click
Save.
Now you should see the Delete RDS Instance action in the self-service page. 🎉
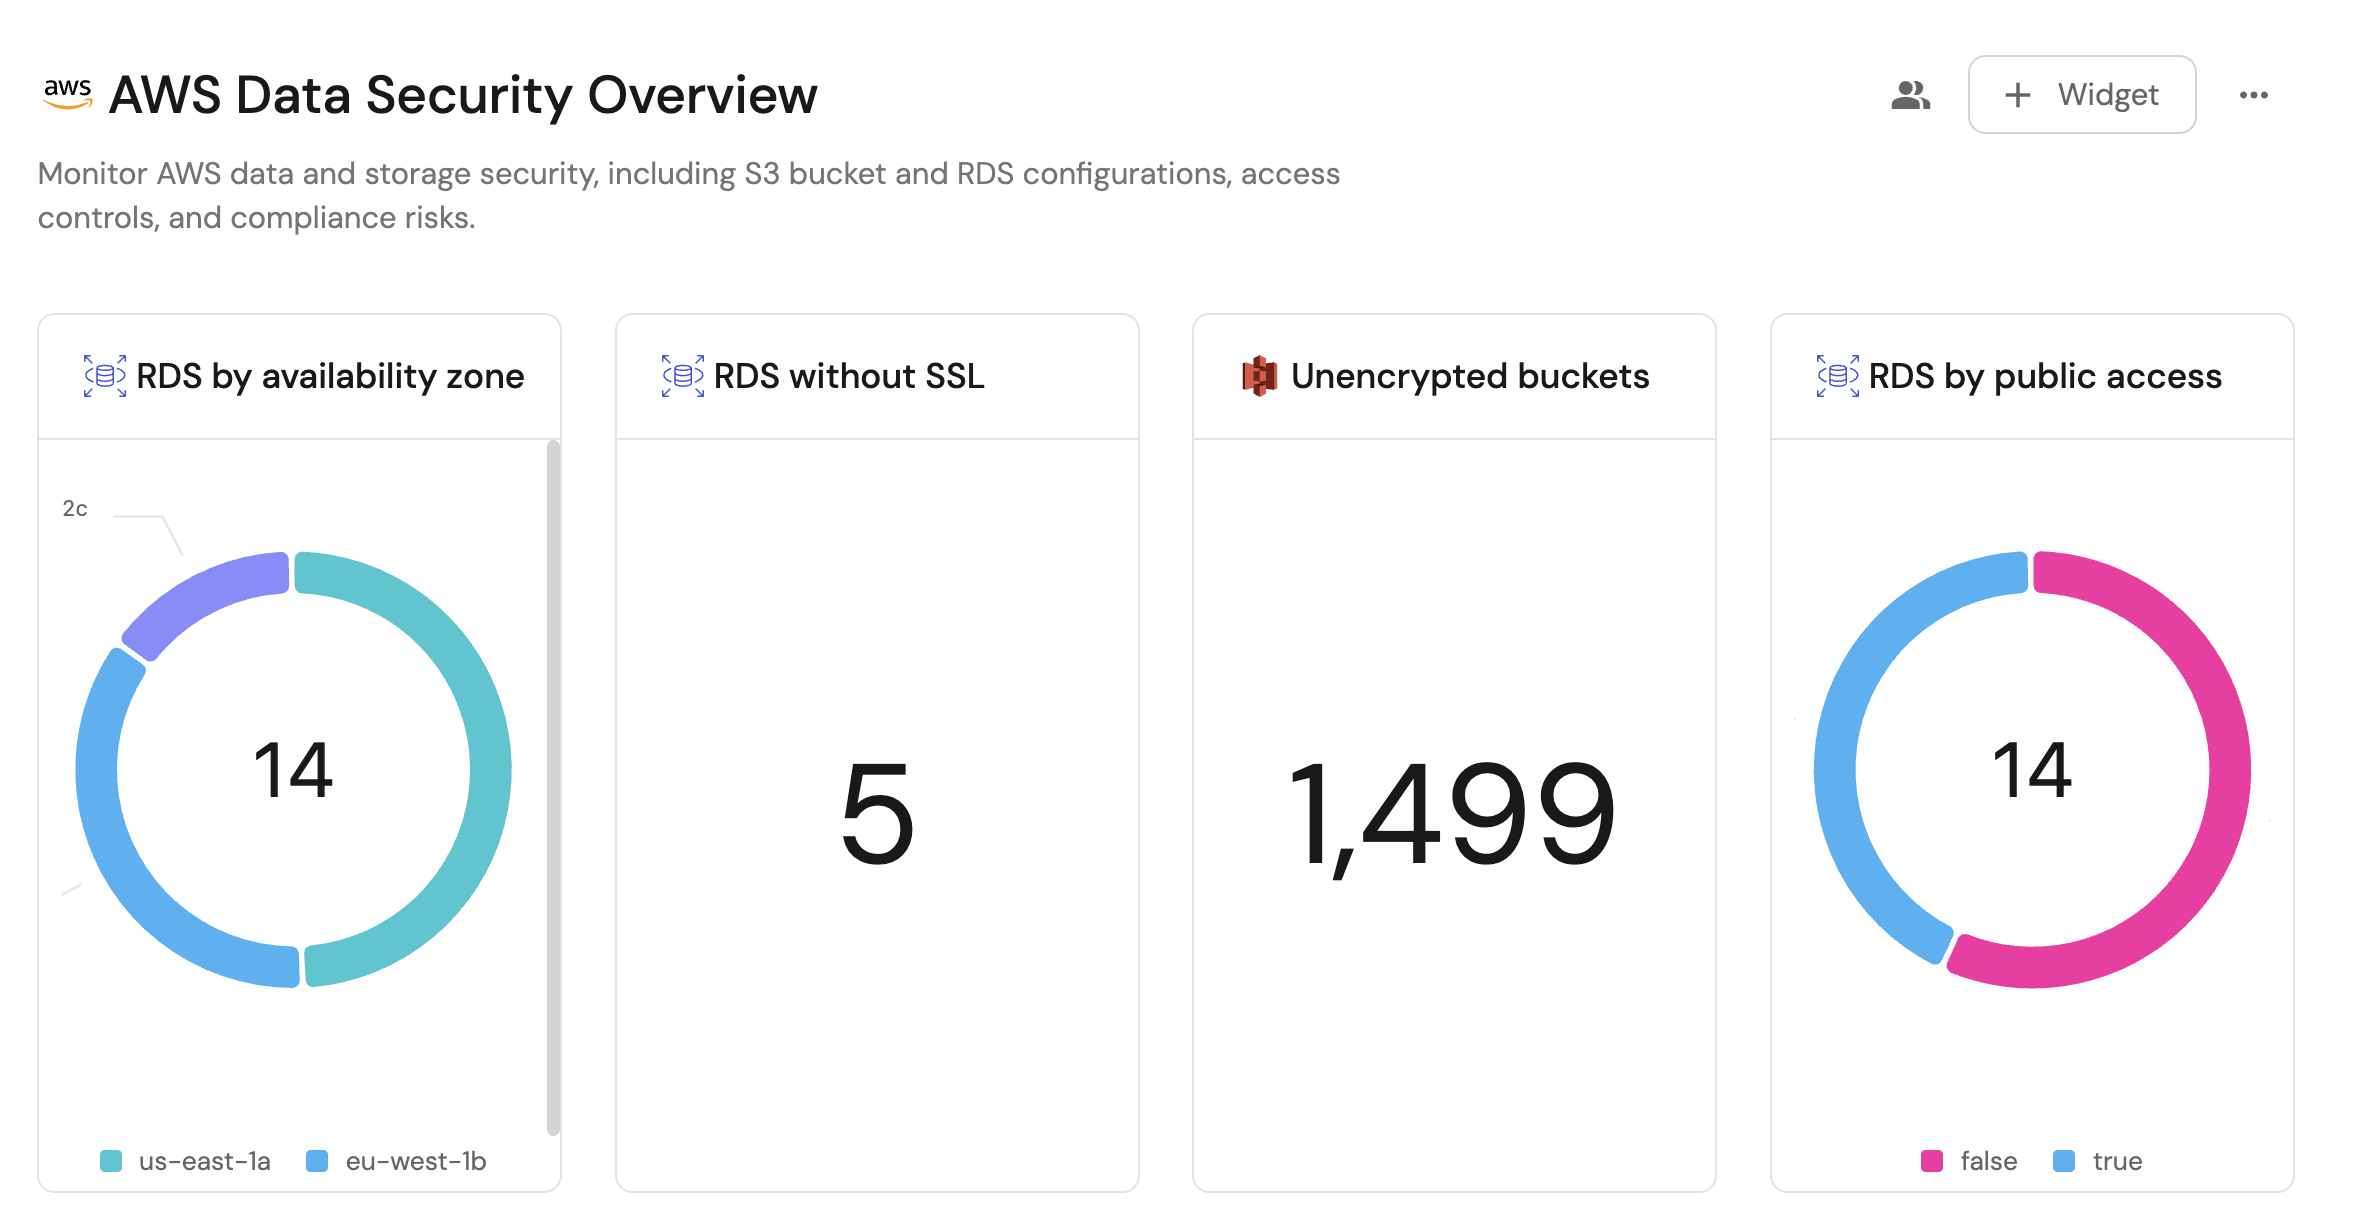
Visualize metrics
Once the AWS storage data is synced, we can create a dedicated dashboard in Port to monitor and analyze security configurations and access controls using customizable widgets.
Create a dashboard
- Navigate to your software catalog.
- Click on the
+button in the left sidebar. - Select New dashboard.
- Name the dashboard AWS Storage Security Overview.
- Input
Monitor and manage AWS S3 buckets and RDS instances security configurationsunder Description. - Select the
AWSicon. - Click
Create.
We now have a blank dashboard where we can start adding widgets to visualize security insights from our AWS storage.
Add widgets
In the new dashboard, create the following widgets:
RDS by availability zone (click to expand)
-
Click
+ Widgetand select Pie chart. -
Title:
RDS by availability zone(add theAmazonRDSicon). -
Choose the RDS Instance blueprint.
-
Under
Breakdown by property, select the Availability Zone property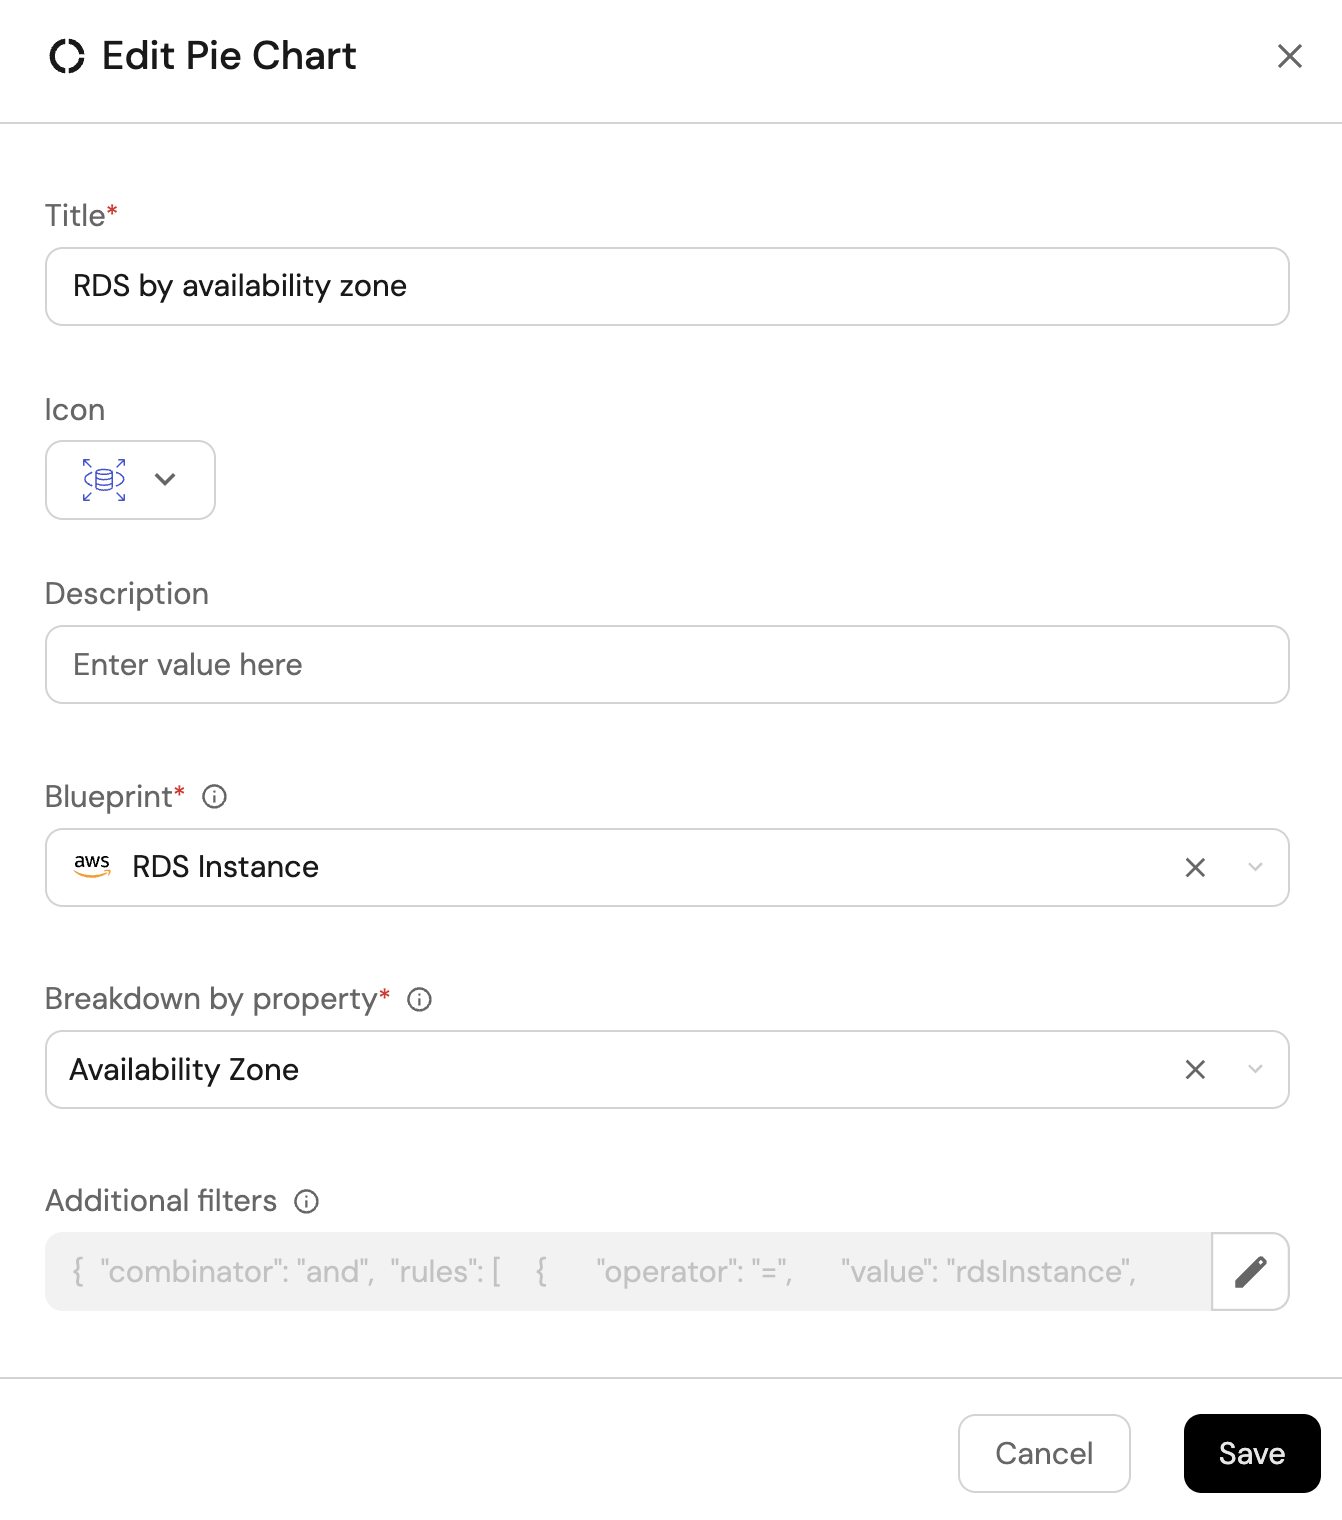
-
Click Save.
RDS by public access (click to expand)
-
Click
+ Widgetand select Pie chart. -
Title:
RDS by public access(add theAmazonRDSicon). -
Choose the RDS Instance blueprint.
-
Under
Breakdown by property, select the Public Access property
-
Click Save.
Unprotected RDS by engine (click to expand)
-
Click
+ Widgetand select Pie chart. -
Title:
Unprotected RDS by engine(add theAmazonRDSicon). -
Choose the RDS Instance blueprint.
-
Under
Breakdown by property, select the Engine property. -
Add this JSON to the Additional filters editor to filter unprotected RDS instances:
[{"combinator":"and","rules":[{"property":"deletionProtection","operator":"=","value":false}]}]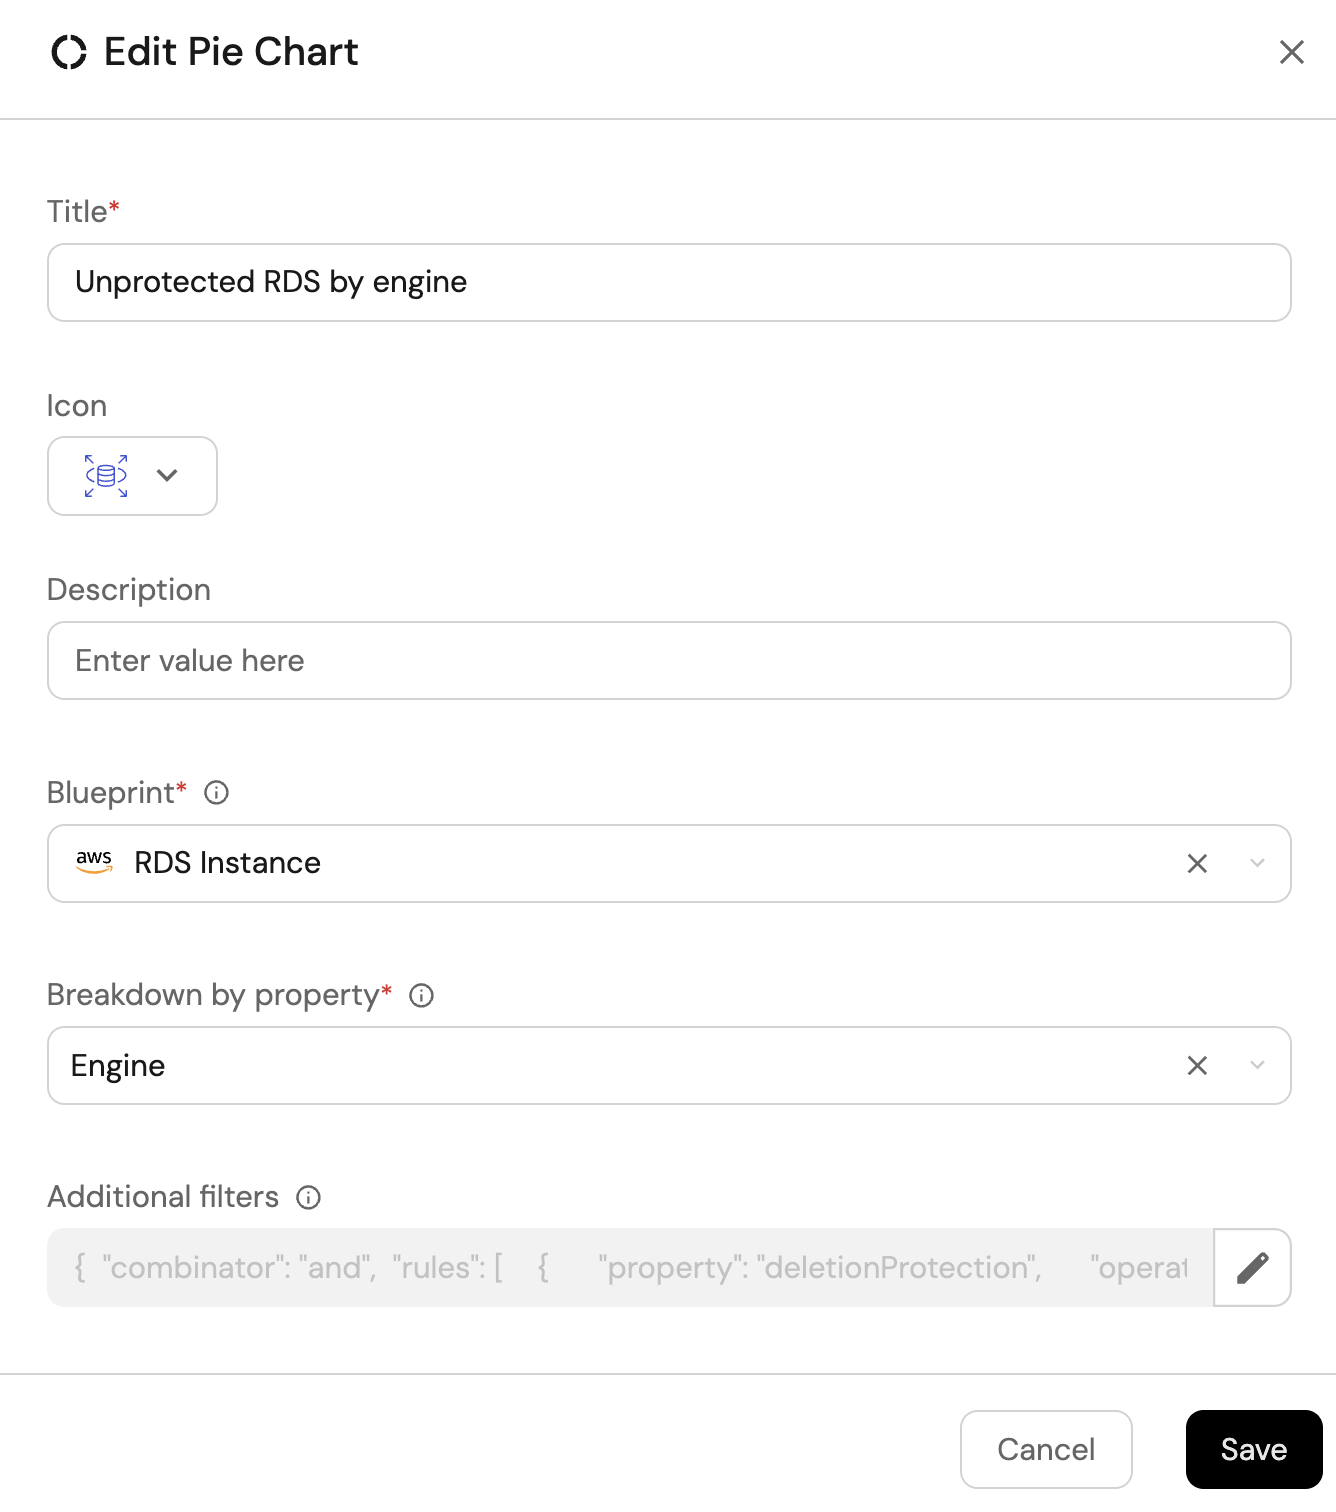
-
Click Save.
RDS without SSL (click to expand)
-
Click
+ Widgetand select Number Chart. -
Title:
RDS without SSL(add theAmazonRDSicon). -
Select
Count entitiesChart type and choose RDS Instance as the Blueprint. -
Select
countfor the Function. -
Add this JSON to the Additional filters editor to filter RDS instances without SSL configuration:
[{"combinator":"and","rules":[{"property":"storageEncrypted","operator":"=","value":false}]}]
-
Click
Save.
S3 buckets by public access (click to expand)
-
Click
+ Widgetand select Pie chart. -
Title:
S3 by public access(add theS3icon). -
Choose the S3 blueprint.
-
Under
Breakdown by property, select the Block Public Access property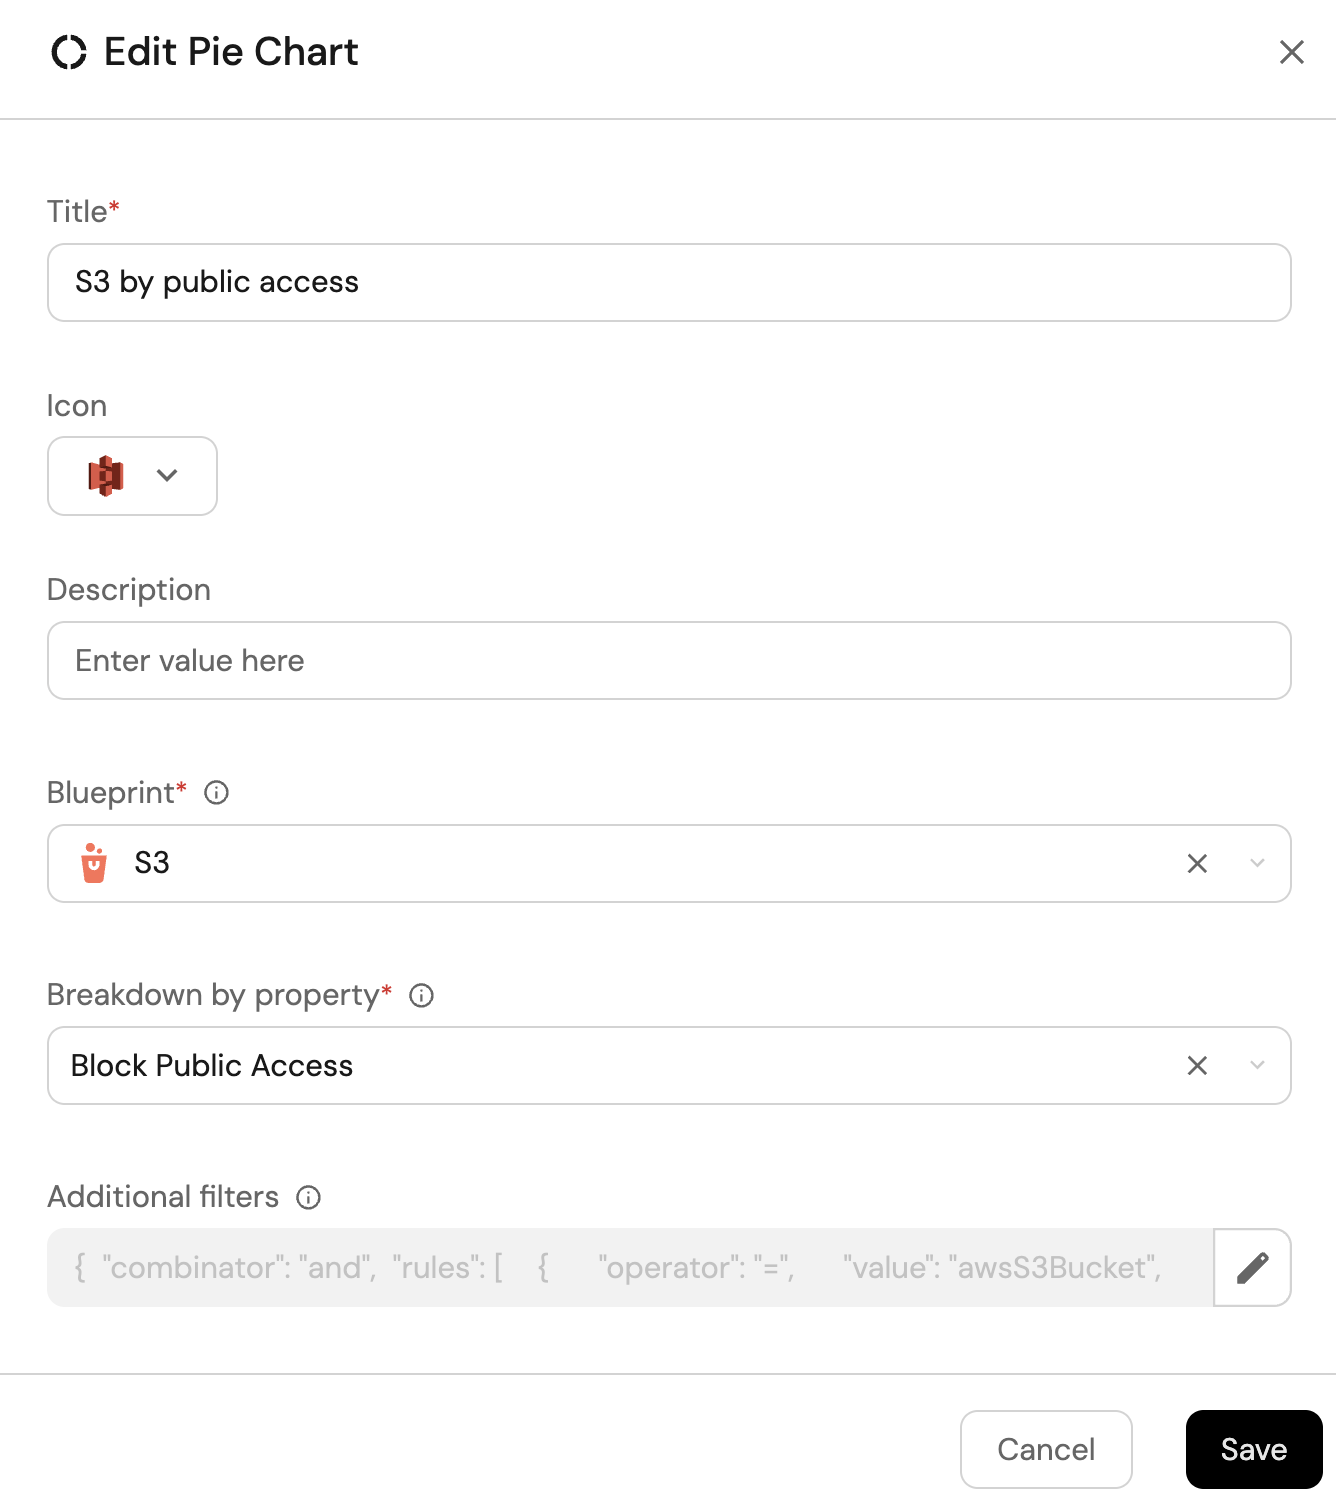
-
Click Save.
Unencrypted S3 buckets (click to expand)
-
Click
+ Widgetand select Number Chart. -
Title:
Unencrypted S3 buckets(add theS3icon). -
Select
Count entitiesChart type and choose S3 as the Blueprint. -
Select
countfor the Function. -
Add this JSON to the Additional filters editor to filter S3 buckets without encryption configurations:
[{"combinator":"and","rules":[{"property":"encryption","operator":"isNotEmpty"}]}]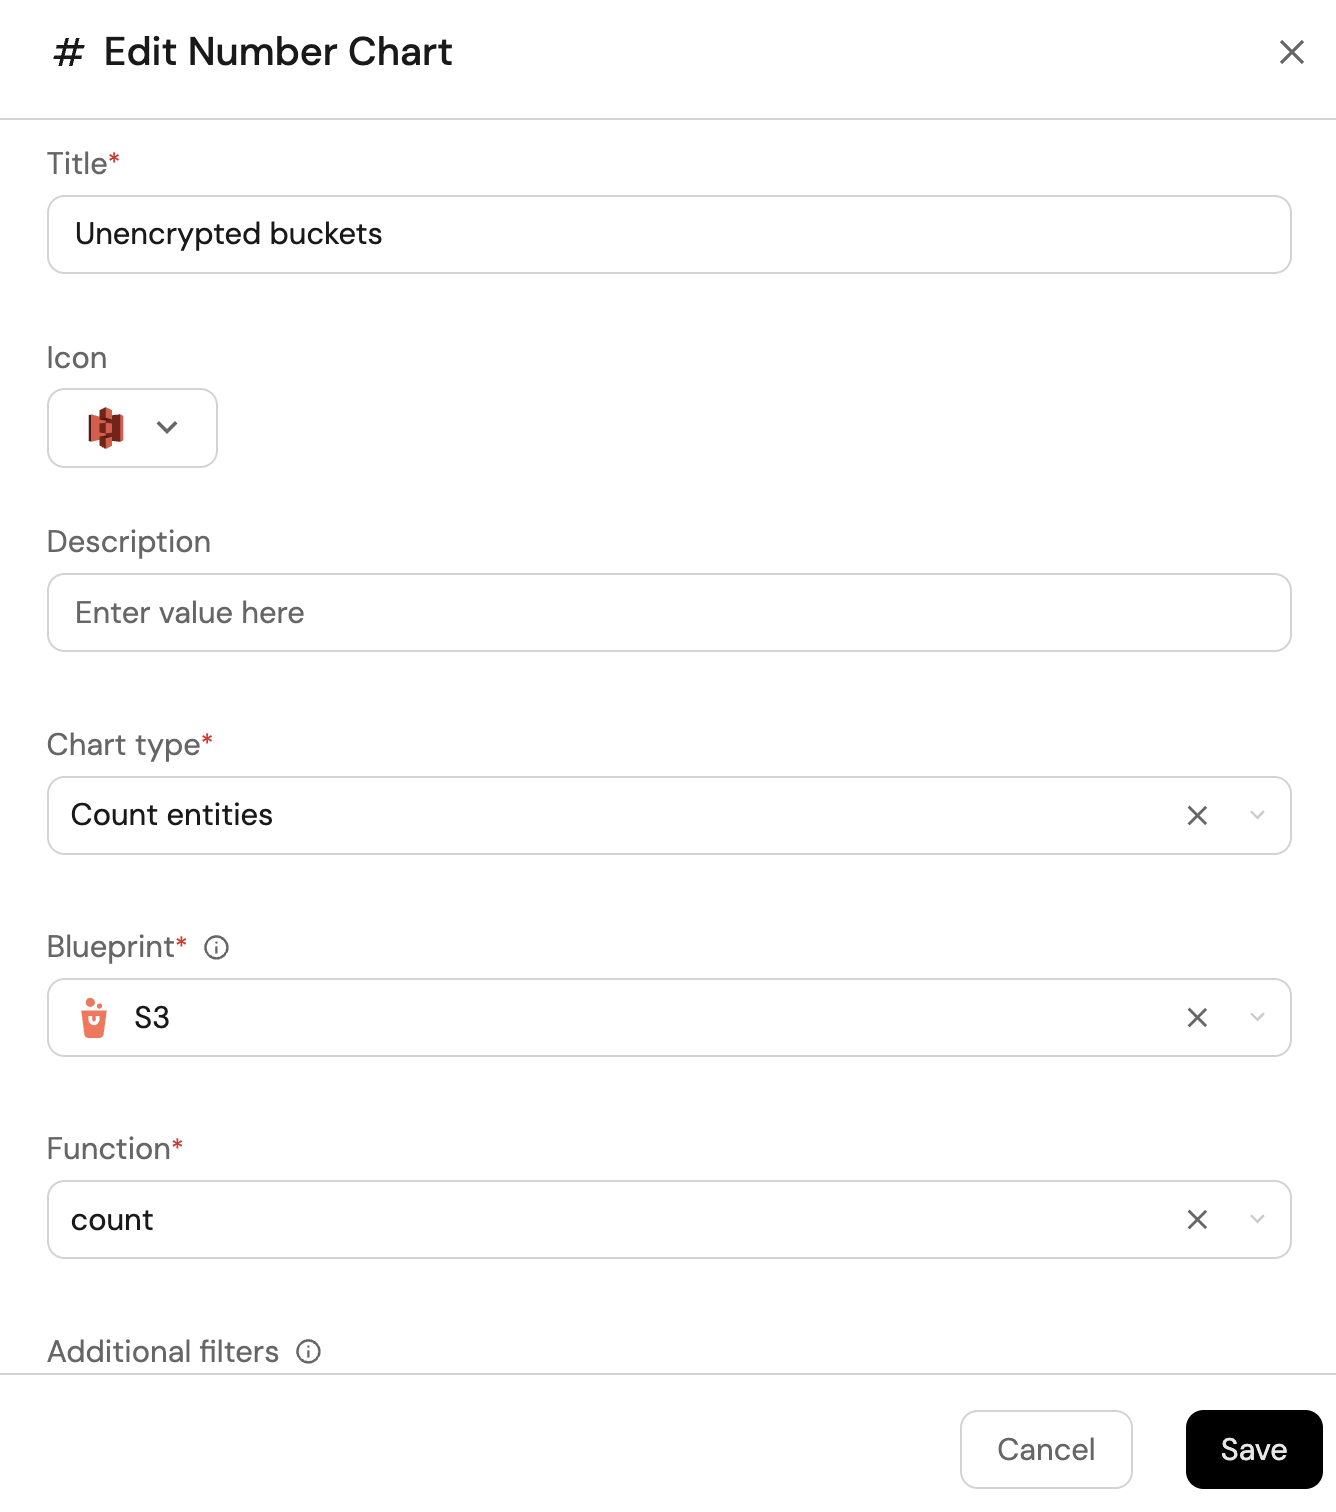
-
Click
Save.
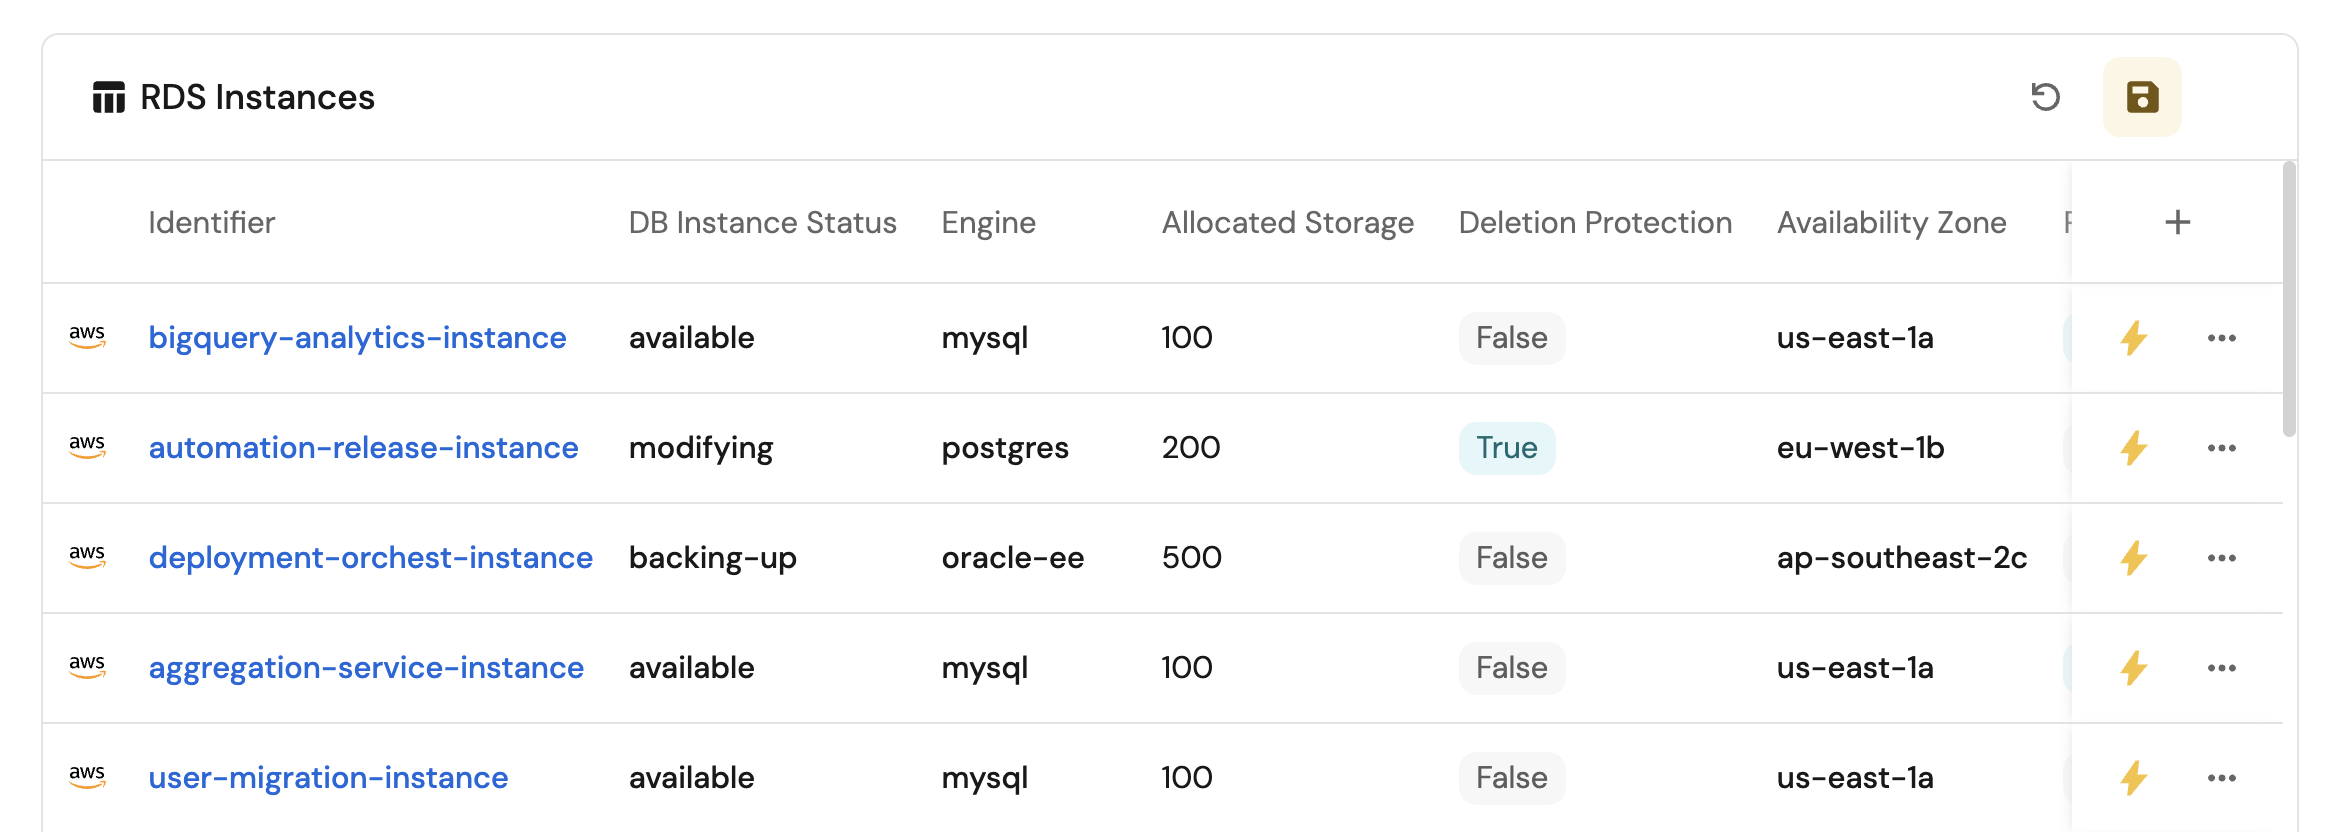
Insecure RDS instances table (click to expand)
- Click
+ Widgetand select Table. - Title the widget Insecure RDS Instances.
- Choose the RDS Instance blueprint
- Add this JSON to the Additional filters editor to filter insecure RDS instances:
[{"combinator":"or","rules":[{"property":"storageEncrypted","operator":"=","value":false},{"property":"deletionProtection","operator":"=","value":false},{"property":"publicAccess","operator":"=","value":true}]}]
- Click Save to add the widget to the dashboard.
- Click on the
...button in the top right corner of the table and select Customize table. - In the top right corner of the table, click on
Manage Propertiesand add the following properties:- DB Instance Status: The current status of the RDS instance.
- Engine: The database engine type.
- Storage Encrypted: Whether storage encryption is enabled.
- Deletion Protection: Whether deletion protection is enabled.
- Public Access: Whether the instance is publicly accessible.
- Account: The name of each related AWS account.
- Click on the save icon in the top right corner of the widget to save the customized table.