Visualize Okta security insights
Send this guide to your coding agent.
Prerequisite: Install Port MCP
Open plan mode. Implement this Port guide in my org via MCP:

https://docs.port.io/guides/all/visualize-okta-security-insights

Goal: get the guide's core flow working end-to-end in my org; adapting it to fit my existing setup takes priority over matching the guide 1:1.

Plan:
1. Confirm MCP is connected, in the right org, with sufficient permissions.
2. Diff the guide's data model (blueprints, properties, relations, actions, agents, automations, integrations, secrets) against mine.
3. Propose adaptations for gaps, reusing existing blueprints/relations over guide-named duplicates.
4. Flag what needs a UI click, credential, or secret from me, testing MCP capability empirically before ruling anything out.
5. Stop on any blocker and give me options. Approving this plan authorizes the writes it lists; pause only for writes beyond what's listed.

Build:
- Extend blueprint schema additively when upserting; don't remove or overwrite existing properties, and treat type conflicts as a blocker, not an auto-fix.
- List any mock data in the plan, minimal and labeled mock; once approved, seed it without re-asking, and tell me what you seeded.
- For anything the guide writes downstream (e.g. a webhook target), use a real entity, not a mock.
- For pages/widgets, use the real page identifier from the app URL, not a guessed slug.
- When you hit a UI step confirmed (not assumed) unsupported via MCP, pause, give exact clicks, then resume via MCP.
- Validate and give links after each meaningful step (only a tool-returned URL, no guessed paths); don't proceed if the last run wasn't a success.

Done:
- Confirm the guide's expected output exists and runs in Port.
- Summarize adaptations, seeded data, what was mocked or skipped, remaining UI steps, and how to verify.
This guide demonstrates how to build a security analytics dashboard for Okta identity and access management. You'll learn how to visualize security metrics such as admin role exposure, user security posture, group access patterns, and more using Port's Okta integration.
Common use cases
- Monitor admin role exposure and privileged access
- Track user security status and lifecycle events
- Visualize group membership patterns and access distribution
- Identify security gaps in user provisioning and deprovisioning
- Audit access patterns and organizational structure
- Monitor compliance with security policies
Prerequisites
This guide assumes the following:
- You have a Port account and have completed the onboarding process.
- Port's Okta integration is installed and configured in your account.
- You have admin access to configure blueprints, scorecards, and dashboards in Port.
Set up data model
We'll enhance the data model to capture security-related information from Okta. The Okta integration provides users and groups data, which we'll extend with security properties and relationships.
Enhance the Okta user blueprint
First, let's add security-related properties to the Okta user blueprint to track security posture:
- Go to the Builder page of your portal.
- Find and click on the okta-user blueprint.
- Click on the
{...}button in the top right corner, and chooseEdit JSON. - Update the blueprint to include security properties:
Enhanced Okta user blueprint (click to expand)
{
  "identifier": "okta-user",
  "title": "Okta User",
  "icon": "Okta",
  "schema": {
    "properties": {
      "login": {
        "title": "Login",
        "type": "string"
      },
      "email": {
        "title": "Email",
        "type": "string"
      },
      "firstName": {
        "title": "First Name",
        "type": "string"
      },
      "lastName": {
        "title": "Last Name",
        "type": "string"
      },
      "displayName": {
        "title": "Display Name",
        "type": "string"
      },
      "title": {
        "title": "Job Title",
        "type": "string"
      },
      "department": {
        "title": "Department",
        "type": "string"
      },
      "employeeNumber": {
        "title": "Employee Number",
        "type": "string"
      },
      "mobilePhone": {
        "title": "Mobile Phone",
        "type": "string"
      },
      "primaryPhone": {
        "title": "Primary Phone",
        "type": "string"
      },
      "streetAddress": {
        "title": "Street Address",
        "type": "string"
      },
      "city": {
        "title": "City",
        "type": "string"
      },
      "state": {
        "title": "State",
        "type": "string"
      },
      "zipCode": {
        "title": "ZIP Code",
        "type": "string"
      },
      "countryCode": {
        "title": "Country Code",
        "type": "string"
      },
      "status": {
        "title": "Status",
        "type": "string",
        "enum": ["ACTIVE", "INACTIVE", "PASSWORD_EXPIRED", "LOCKED_OUT", "SUSPENDED", "DEPROVISIONED"]
      },
      "created": {
        "title": "Created Date",
        "type": "string",
        "format": "date-time"
      },
      "activated": {
        "title": "Activated Date",
        "type": "string",
        "format": "date-time"
      },
      "lastLogin": {
        "title": "Last Login",
        "type": "string",
        "format": "date-time"
      },
      "lastUpdated": {
        "title": "Last Updated",
        "type": "string",
        "format": "date-time"
      }
    },
    "required": ["login", "email"]
  },
  "calculationProperties": {
    "hasAdminRole": {
      "title": "Has Admin Role",
      "type": "boolean",
      "calculation": "[.groups[]?.name] | any(test(\"admin|Admin|ADMIN\"))"
    },
    "isPrivileged": {
      "title": "Is Privileged",
      "type": "boolean",
      "calculation": "[.groups[]?.name] | any(test(\"admin|Admin|ADMIN|privileged|Privileged|PRIVILEGED\"))"
    },
    "daysSinceLastLogin": {
      "title": "Days Since Last Login",
      "type": "number",
      "calculation": "if .lastLogin then (((now | todateiso8601) - (.lastLogin | fromdateiso8601)) / 86400) | floor else null end"
    },
    "securityRiskLevel": {
      "title": "Security Risk Level",
      "type": "string",
      "calculation": "if .status == \"LOCKED_OUT\" or .status == \"SUSPENDED\" then \"CRITICAL\" elif .status == \"PASSWORD_EXPIRED\" then \"HIGH\" elif .daysSinceLastLogin > 90 then \"MEDIUM\" elif .isPrivileged and .daysSinceLastLogin > 30 then \"MEDIUM\" else \"LOW\" end"
    },
    "groupCount": {
      "title": "Group Count",
      "type": "number",
      "calculation": ".groups | length"
    }
  },
  "relations": {
    "groups": {
      "title": "Groups",
      "target": "okta-group",
      "required": false,
      "many": true
    }
  }
}
- Click
Saveto update the blueprint.
Enhance the Okta group blueprint
Now let's enhance the group blueprint to track security-related group information:
- Go to the Builder page of your portal.
- Find and click on the okta-group blueprint.
- Click on the
{...}button in the top right corner, and chooseEdit JSON. - Update the blueprint to include security properties:
Enhanced Okta group blueprint (click to expand)
{
  "identifier": "okta-group",
  "title": "Okta Group",
  "icon": "Okta",
  "schema": {
    "properties": {
      "name": {
        "title": "Name",
        "type": "string"
      },
      "description": {
        "title": "Description",
        "type": "string"
      },
      "type": {
        "title": "Type",
        "type": "string",
        "enum": ["BUILT_IN", "OKTA_GROUP", "APP_GROUP"]
      },
      "created": {
        "title": "Created Date",
        "type": "string",
        "format": "date-time"
      },
      "lastUpdated": {
        "title": "Last Updated",
        "type": "string",
        "format": "date-time"
      }
    },
    "required": ["name"]
  },
  "calculationProperties": {
    "isAdminGroup": {
      "title": "Is Admin Group",
      "type": "boolean",
      "calculation": ".name | test(\"admin|Admin|ADMIN|administrator|Administrator\")"
    },
    "isPrivileged": {
      "title": "Is Privileged",
      "type": "boolean",
      "calculation": ".name | test(\"admin|Admin|ADMIN|privileged|Privileged|PRIVILEGED|root|Root|ROOT\")"
    },
    "securityRiskLevel": {
      "title": "Security Risk Level",
      "type": "string",
      "calculation": "if .isPrivileged then \"MEDIUM\" else \"LOW\" end"
    }
  },
  "relations": {
    "members": {
      "title": "Members",
      "target": "okta-user",
      "required": false,
      "many": true
    }
  }
}
- Click
Saveto update the blueprint.
Update data source mapping
Ensure your Okta integration mapping includes groups and all necessary user fields:
- Go to the Data Sources page of your portal.
- Select the Okta integration.
- Verify your mapping configuration includes groups:
Okta integration configuration (click to expand)
resources:
  - kind: okta-user
    selector:
      query: 'true'
      include_groups: true
      include_applications: true
      fields: "id,status,created,activated,lastLogin,lastUpdated,profile:(login,firstName,lastName,displayName,email,title,department,employeeNumber,mobilePhone,primaryPhone,streetAddress,city,state,zipCode,countryCode)"
    port:
      entity:
        mappings:
          identifier: .id
          title: .profile.displayName // .profile.firstName + " " + .profile.lastName // .profile.login
          blueprint: '"okta-user"'
          properties:
            login: .profile.login
            email: .profile.email
            firstName: .profile.firstName
            lastName: .profile.lastName
            displayName: .profile.displayName
            title: .profile.title
            department: .profile.department
            employeeNumber: .profile.employeeNumber
            mobilePhone: .profile.mobilePhone
            primaryPhone: .profile.primaryPhone
            streetAddress: .profile.streetAddress
            city: .profile.city
            state: .profile.state
            zipCode: .profile.zipCode
            countryCode: .profile.countryCode
            status: .status
            created: .created
            activated: .activated
            lastLogin: .lastLogin
            lastUpdated: .lastUpdated
          relations:
            groups: .groups[]?.id
  - kind: okta-group
    selector:
      query: 'true'
    port:
      entity:
        mappings:
          identifier: .id
          title: .profile.name
          blueprint: '"okta-group"'
          properties:
            name: .profile.name
            description: .profile.description
            type: .type
            created: .created
            lastUpdated: .lastUpdated
- Click
Save & Resyncto apply the mapping and sync the data.
Before creating widgets, verify that data is being synced:
- Navigate to your software catalog.
- Search for
okta-userorokta-groupto see if entities are being created. - If no entities appear, check the Data Sources page to ensure the Okta integration is running and syncing successfully.
Create security scorecards
Scorecards help track security compliance and identify areas that need attention. Let's create scorecards for user security posture and admin access.
Create user security posture scorecard
- Go to the Builder page.
- Click on the okta-user blueprint.
- Go to the Scorecards tab.
- Click + Add Scorecard.
- Configure the scorecard:
User security posture scorecard configuration (click to expand)
Scorecard Name: User Security Posture
Rules:
-
Active Status
- Level: Bronze
- Title: User is active
- Rule:
status == "ACTIVE"
-
Recent Activity
- Level: Silver
- Title: User logged in within last 90 days
- Rule:
daysSinceLastLogin != null and daysSinceLastLogin <= 90
-
Password Status
- Level: Bronze
- Title: Password is not expired
- Rule:
status != "PASSWORD_EXPIRED"
-
Account Status
- Level: Gold
- Title: Account is not locked or suspended
- Rule:
status != "LOCKED_OUT" and status != "SUSPENDED"
-
Privileged Access Review
- Level: Silver
- Title: Privileged users logged in within last 30 days
- Filter:
isPrivileged == true(only applies to privileged users) - Rule:
daysSinceLastLogin != null and daysSinceLastLogin <= 30
- Click
Saveto create the scorecard.
Create admin access scorecard
- Go to the Builder page.
- Click on the okta-user blueprint.
- Go to the Scorecards tab.
- Click + Add Scorecard.
- Configure the scorecard:
Admin access scorecard configuration (click to expand)
Scorecard Name: Admin Access Compliance
Rules:
-
Admin Group Membership
- Level: Gold
- Title: User is member of admin group
- Rule:
hasAdminRole == true
-
Admin Activity
- Level: Silver
- Title: Admin user logged in within last 30 days
- Filter:
hasAdminRole == true(only applies to admin users) - Rule:
daysSinceLastLogin != null and daysSinceLastLogin <= 30
-
Admin Account Status
- Level: Gold
- Title: Admin account is active and not locked
- Filter:
hasAdminRole == true(only applies to admin users) - Rule:
status == "ACTIVE" and status != "LOCKED_OUT" and status != "SUSPENDED"
- Click
Saveto create the scorecard.
Create dashboard
Now let's create a comprehensive security insights dashboard to visualize all the security metrics.
Set up the dashboard
- Navigate to your software catalog.
- Click on the
+button in the left sidebar. - Select New dashboard.
- Name the dashboard Okta Security Insights.
- Click
Create.
Add widgets
In the new dashboard, create the following widgets to visualize security insights:
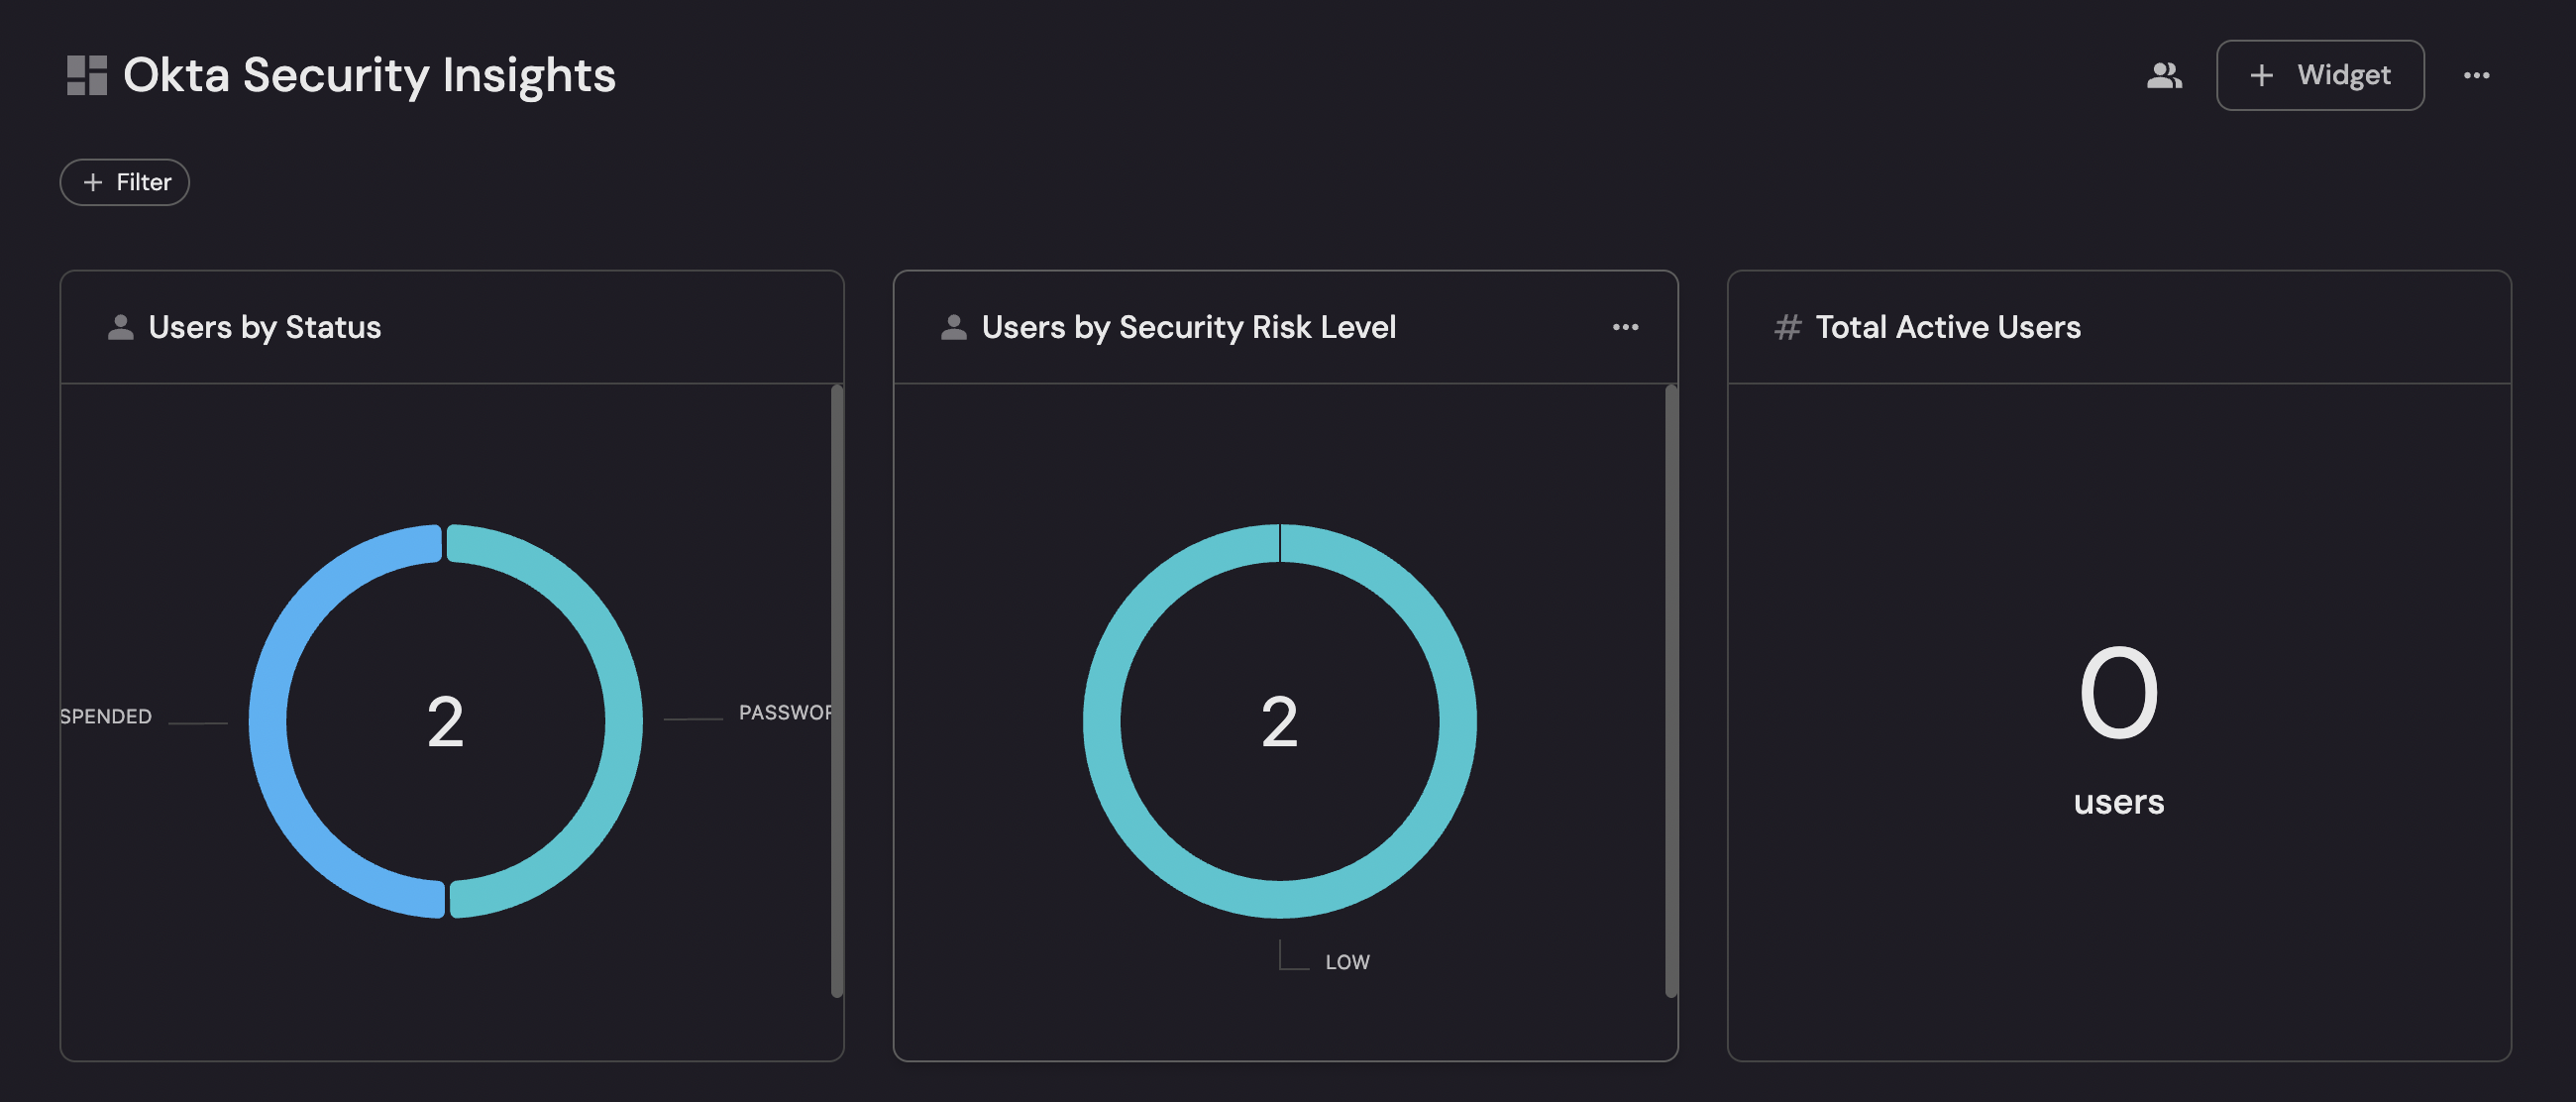
Users by status (click to expand)
- Click
+ Widgetand select Pie chart. - Title:
Users by Status(add theUsericon). - Choose the okta-user blueprint.
- Under
Breakdown by property, select Status. - Click Save.
Users by security risk level (click to expand)
- Click
+ Widgetand select Pie chart. - Title:
Users by Security Risk Level. - Choose the okta-user blueprint.
- Under
Breakdown by property, select Security Risk Level. - Click Save.
Total active users (click to expand)
- Click
+ Widgetand select Number Chart. - Title:
Total Active Users(add theUsericon). - Select
Count entitiesChart type and choose okta-user as the Blueprint. - Select
countfor the Function. - Add this JSON to the Additional filters editor:
{"combinator": "and","rules": [{"property": "status","operator": "=","value": "ACTIVE"}]}
- Select
customas the Unit and inputusersas the Custom unit. - Click Save.
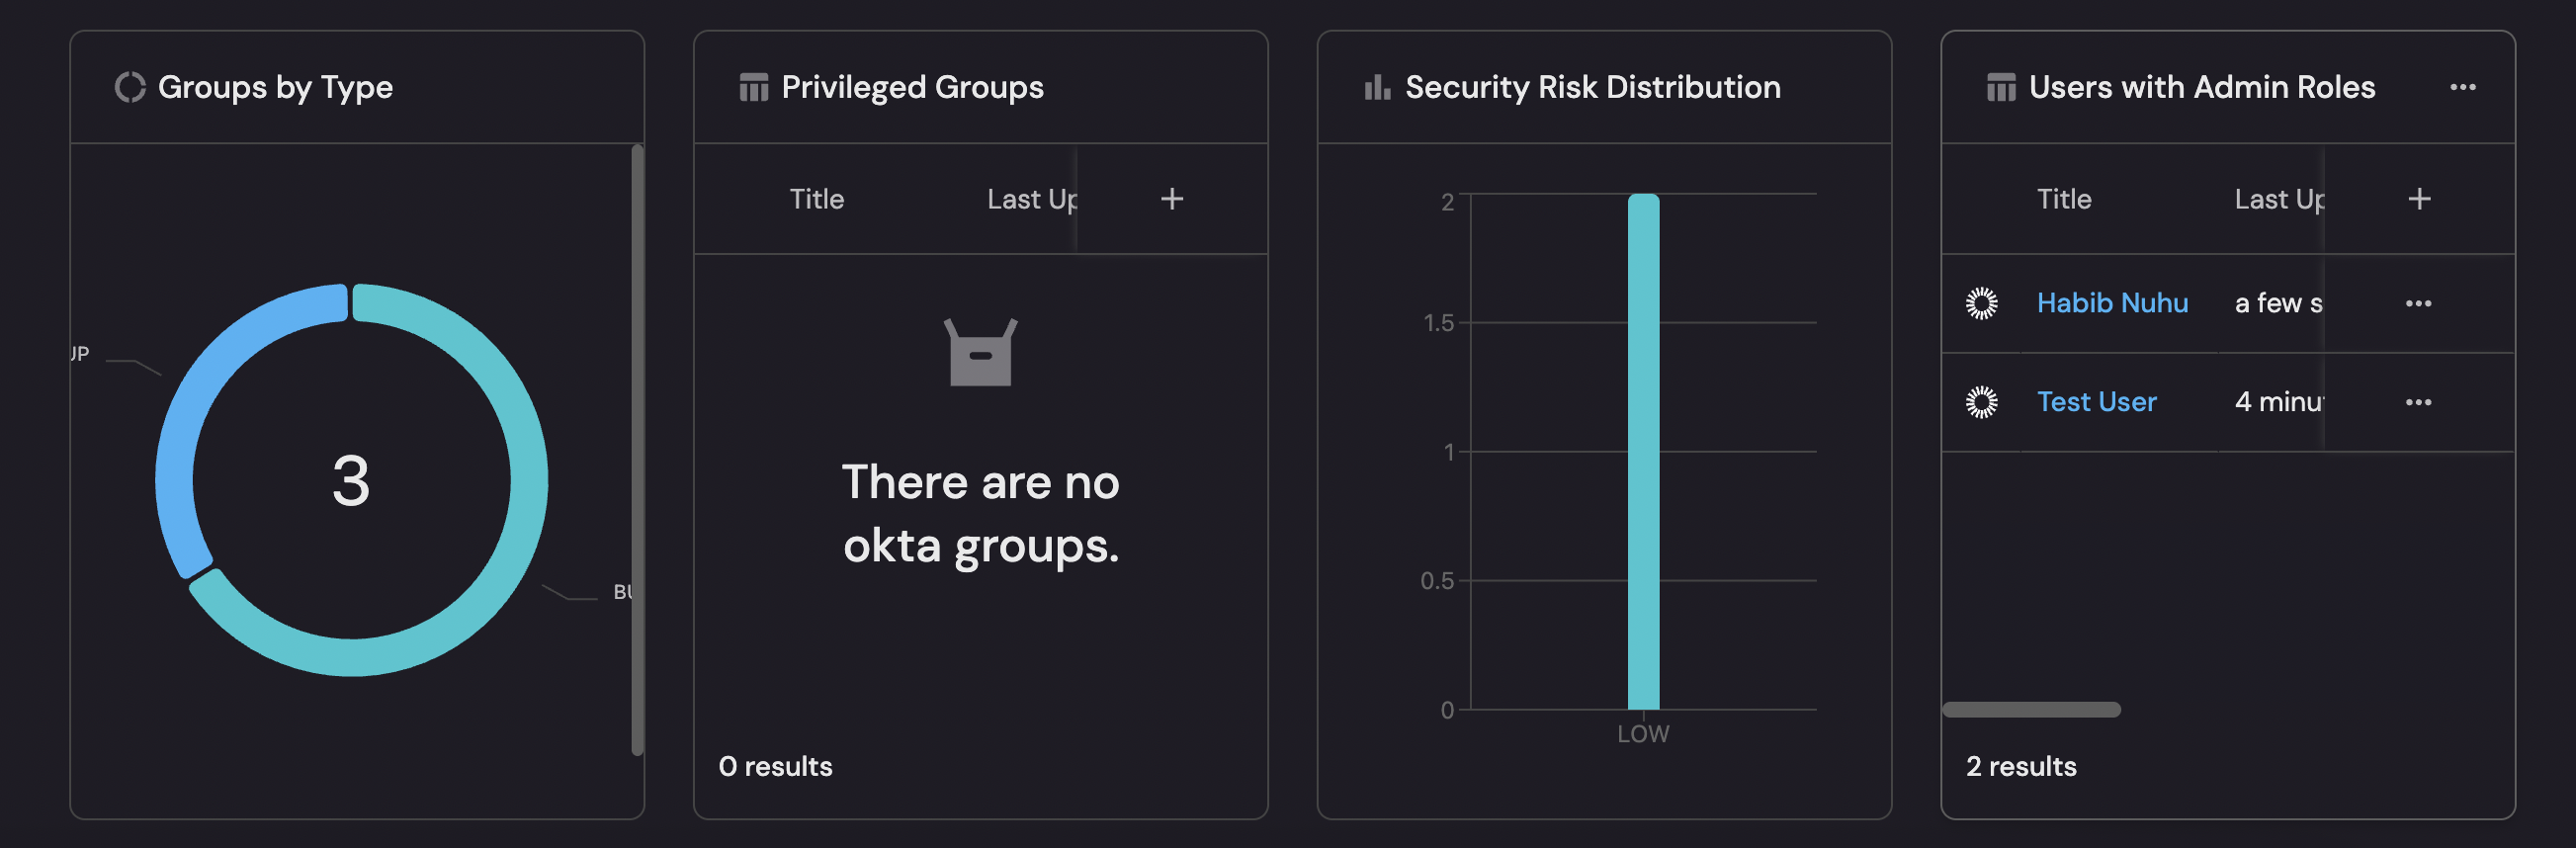
Users with admin roles (click to expand)
- Click
+ Widgetand select Table. - Title:
Users with Admin Roles. - Choose the okta-user blueprint.
- Add a filter on the Has Admin Role calculation property equals
trueto show only users with admin roles. - Configure columns to show: Display Name, Email, Has Admin Role, Groups, Status, Last Login.
- Click Save.
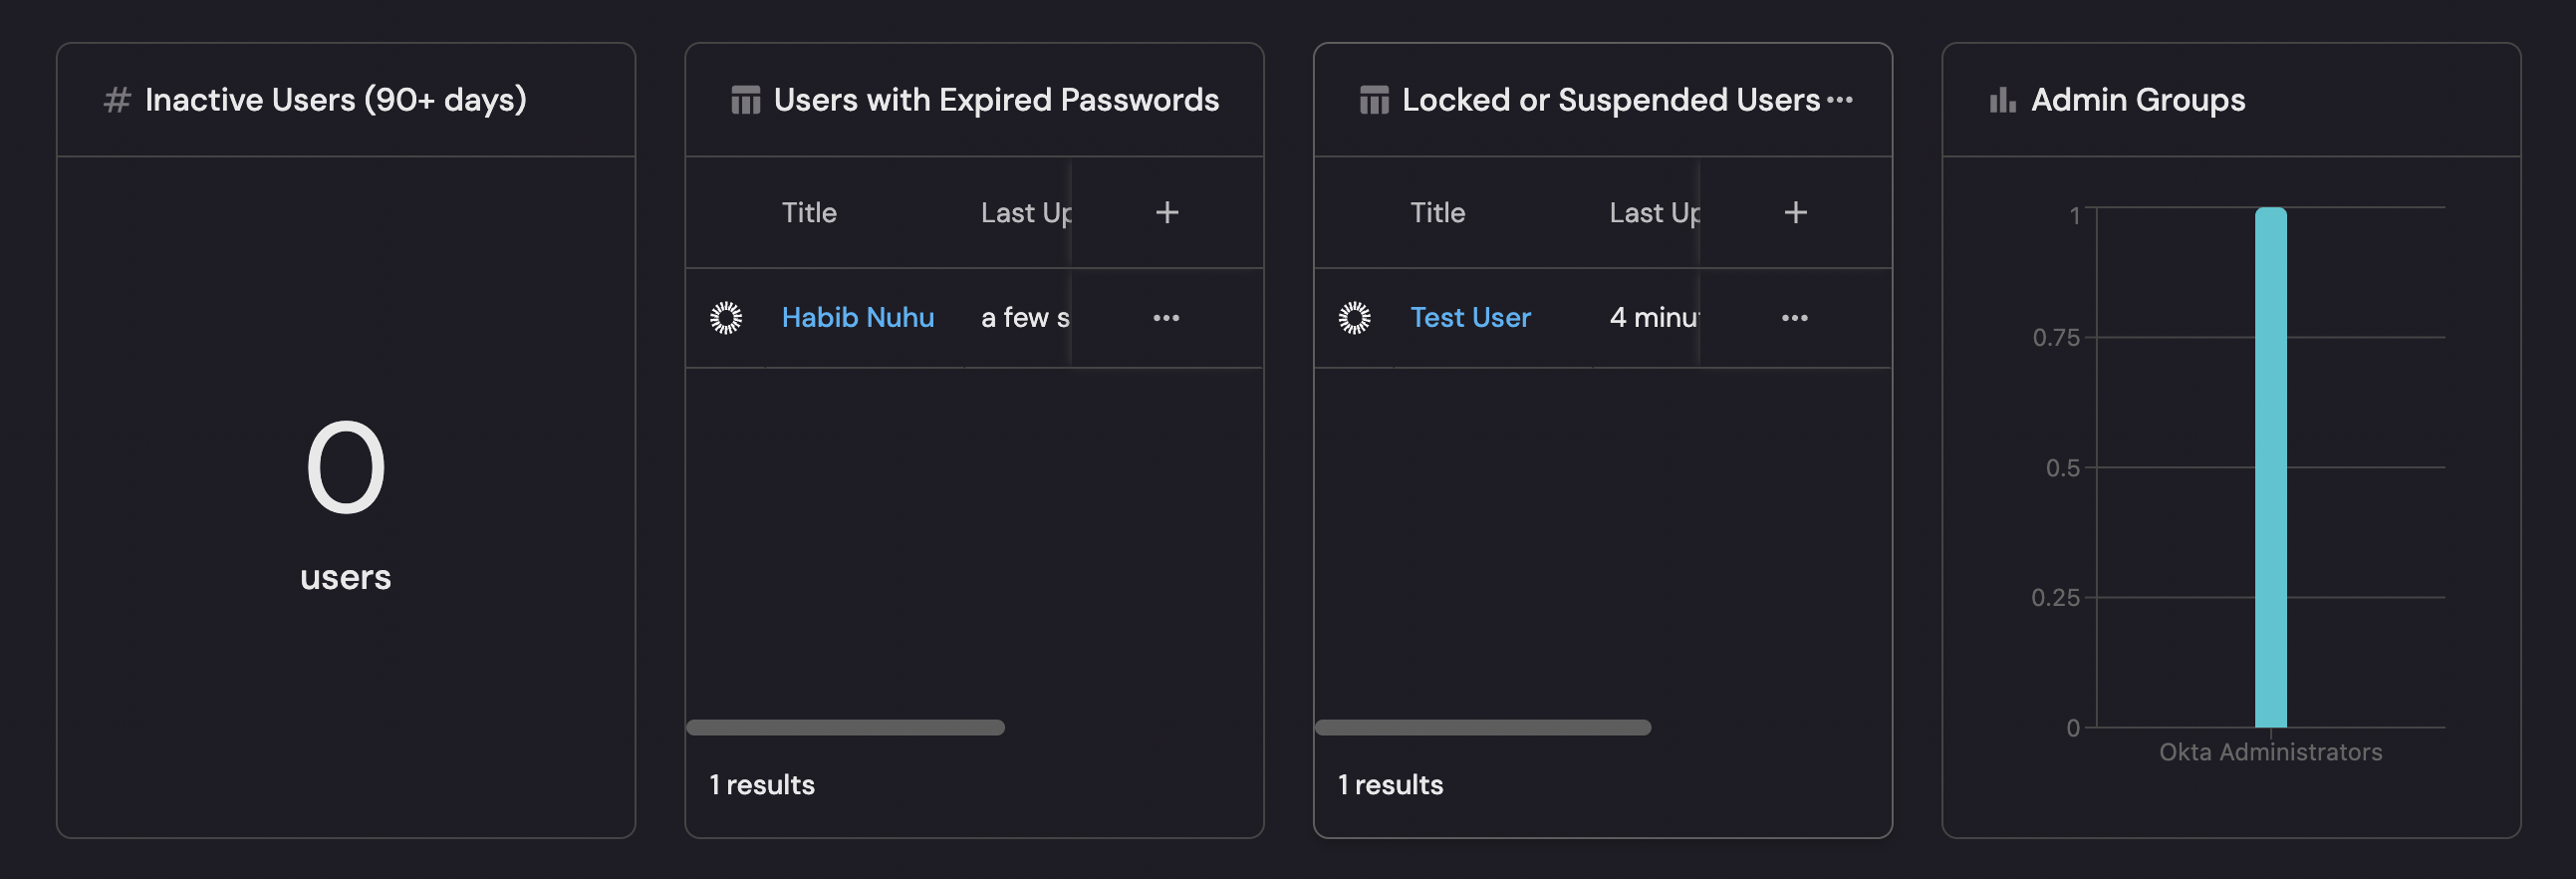
Inactive users (90+ days) (click to expand)
- Click
+ Widgetand select Number Chart. - Title:
Inactive Users (90+ days). - Select
Count entitiesChart type and choose okta-user as the Blueprint. - Select
countfor the Function. - Add this JSON to the Additional filters editor:
{"combinator": "or","rules": [{"property": "lastLogin","operator": "isEmpty"},{"property": "lastLogin","operator": "notBetween","value": {"preset": "last3Months"}}]}
- Select
customas the Unit and inputusersas the Custom unit. - Click Save.
Users with expired passwords (click to expand)
- Click
+ Widgetand select Table. - Title:
Users with Expired Passwords. - Choose the okta-user blueprint.
- Add filter where Status equals
PASSWORD_EXPIRED. - Configure columns to show: Display Name, Email, Status, Last Login.
- Click Save.
Locked or suspended users (click to expand)
- Click
+ Widgetand select Table. - Title:
Locked or Suspended Users. - Choose the okta-user blueprint.
- Add filter where Status is one of:
LOCKED_OUT,SUSPENDED. - Configure columns to show: Display Name, Email, Status, Security Risk Level, Last Login.
- Click Save.
Privileged users table (click to expand)
- Click
+ Widgetand select Table. - Title:
Privileged Users. - Choose the okta-user blueprint.
- Add filter using the JSON editor:
Or use the UI filter and search for Is Privileged in the property dropdown.{"combinator": "and","rules": [{"property": "isPrivileged","operator": "=","value": true}]}
- Configure columns to show: Display Name, Email, Has Admin Role, Group Count, Days Since Last Login, Security Risk Level.
- Click Save.
Admin groups (click to expand)
- Click
+ Widgetand select Bar chart. - Title:
Admin Groups. - Choose the okta-group blueprint.
- Under Breakdown by property, select Name.
- Add filter to find admin groups by filtering on the
nameproperty:{"combinator": "or","rules": [{"property": "name","operator": "contains","value": "admin"},{"property": "name","operator": "contains","value": "Admin"},{"property": "name","operator": "contains","value": "ADMIN"},{"property": "name","operator": "contains","value": "administrator"},{"property": "name","operator": "contains","value": "Administrator"}]} - Click Save.
Groups by type (click to expand)
- Click
+ Widgetand select Pie chart. - Title:
Groups by Type. - Choose the okta-group blueprint.
- Under
Breakdown by property, select Type. - Click Save.
Privileged groups (click to expand)
- Click
+ Widgetand select Table. - Title:
Privileged Groups. - Choose the okta-group blueprint.
- Add filter using the JSON editor:
Or use the UI filter and search for Is Privileged in the property dropdown.{"combinator": "and","rules": [{"property": "isPrivileged","operator": "=","value": true}]}
- Configure columns to show: Name, Type, Security Risk Level, Description.
- Click Save.
Security risk distribution (click to expand)
- Click
+ Widgetand select Bar chart. - Title:
Security Risk Distribution. - Choose the okta-user blueprint.
- Under Breakdown by property, select Security Risk Level.
- Click Save.
Troubleshooting
If your dashboard widgets show errors or no data, try the following:
Widget shows "Failed to load data" or "Query Error"
-
Verify data is synced:
- Navigate to your software catalog.
- Search for
okta-userorokta-groupentities. - If no entities exist, the Okta integration may not be syncing. Check the Data Sources page.
-
Check calculation properties:
- Ensure calculation properties like
daysSinceLastLogin,isPrivileged, andisAdminGroupare correctly defined in your blueprints. - Verify that persistent calculation properties are enabled for your organization, as this is required for filtering by calculation properties in widget filters.
- Ensure calculation properties like
-
Verify filter syntax:
- For JSON filters, ensure the property identifier matches exactly (e.g.,
isPrivilegednotIs Privileged). - Boolean values should be
trueorfalse(not strings). - Check that the property exists in the blueprint schema.
- For JSON filters, ensure the property identifier matches exactly (e.g.,
-
Test without filters:
- Remove all filters from the widget to see if data appears.
- If data appears without filters, the issue is with the filter configuration.
- Gradually add filters back to identify which one is causing the problem.
Widget shows "There are no okta users" or "0 results"
-
Check if data exists:
- The filter may be working correctly, but there might genuinely be no users matching the criteria.
- Try removing the filter to see all users.
- Verify the filter values match actual data (e.g., status values are uppercase like
ACTIVE,LOCKED_OUT).
-
Verify property values:
- Status values are case-sensitive:
ACTIVE,LOCKED_OUT,SUSPENDED,PASSWORD_EXPIRED. - Boolean calculation properties return
trueorfalse, not strings.
- Status values are case-sensitive:
-
Check the Okta integration:
- Ensure the integration has synced recently.
- Check if users exist in your Okta organization that match the filter criteria.
Summary
You've successfully created a comprehensive Okta Security Insights dashboard that visualizes:
- User security posture - Status distribution, risk levels, and compliance metrics
- Admin role exposure - Privileged users and administrative group memberships
- Access patterns - Group memberships and access distribution
- Security gaps - Inactive users, expired passwords, locked accounts
- Risk assessment - Security risk levels and prioritized remediation targets
Next steps
Extend with additional data sources
While the current Okta integration focuses on users and groups, you can extend this dashboard by:
- Integrating Okta System Log API - Add sign-in events, failed authentication attempts, and security events
- Adding application data - Track application assignments and security configurations
- Including MFA data - Monitor multi-factor authentication enrollment and usage
- Risk events - Integrate Okta Risk Insights for risky sign-in detection
Set up automation
Create automations to:
- Alert security teams when high-risk users are identified
- Automatically update security risk levels based on user activity
- Generate reports for compliance audits
- Trigger remediation workflows for security gaps
Create additional scorecards
Build scorecards for:
- Group security compliance
- Application access security
- MFA enrollment rates
- Password policy compliance