Visualize and manage your Azure DevOps deployments
Send this guide to your coding agent.
Prerequisite: Install Port MCP
Open plan mode. Implement this Port guide in my org via MCP:

https://docs.port.io/guides/all/visualize-and-manage-azure-devops-deployments

Goal: get the guide's core flow working end-to-end in my org; adapting it to fit my existing setup takes priority over matching the guide 1:1.

Plan:
1. Confirm MCP is connected, in the right org, with sufficient permissions.
2. Diff the guide's data model (blueprints, properties, relations, actions, agents, automations, integrations, secrets) against mine.
3. Propose adaptations for gaps, reusing existing blueprints/relations over guide-named duplicates.
4. Flag what needs a UI click, credential, or secret from me, testing MCP capability empirically before ruling anything out.
5. Stop on any blocker and give me options. Approving this plan authorizes the writes it lists; pause only for writes beyond what's listed.

Build:
- Extend blueprint schema additively when upserting; don't remove or overwrite existing properties, and treat type conflicts as a blocker, not an auto-fix.
- List any mock data in the plan, minimal and labeled mock; once approved, seed it without re-asking, and tell me what you seeded.
- For anything the guide writes downstream (e.g. a webhook target), use a real entity, not a mock.
- For pages/widgets, use the real page identifier from the app URL, not a guessed slug.
- When you hit a UI step confirmed (not assumed) unsupported via MCP, pause, give exact clicks, then resume via MCP.
- Validate and give links after each meaningful step (only a tool-returned URL, no guessed paths); don't proceed if the last run wasn't a success.

Done:
- Confirm the guide's expected output exists and runs in Port.
- Summarize adaptations, seeded data, what was mocked or skipped, remaining UI steps, and how to verify.
This guide demonstrates how to bring your Azure DevOps deployment experience into Port. You will learn how to:
- Ingest Azure DevOps pipeline data into Port's context lake using Port's Azure DevOps integration.
- Set up self-service actions to manage deployments (trigger, retry, and cancel).
- Build dashboards in Port to monitor and take action on your Azure DevOps deployments.
Common use cases
- Monitor the status and health of all Azure DevOps deployments across projects from a single dashboard.
- Empower platform teams to automate day-2 operations via webhooks.
Prerequisites
This guide assumes the following:
- You have a Port account and have completed the onboarding process.
- Port's Azure DevOps integration is installed in your account.
Set up data model
The Azure DevOps integration comes with a Pipeline blueprint, but Pipeline run is not supported in the integration. We will create a custom blueprint for Pipeline runs and update the integration configuration.
Create the pipeline blueprint
-
Go to the builder page in Port.
-
Click on
+ Blueprint. -
Click on the
{...}button in the top right corner, and chooseEdit JSON. -
Add this JSON schema:
Azure DevOps pipeline blueprint (Click to expand)
{"identifier": "azureDevopsPipeline","title": "Pipeline","icon": "AzureDevops","schema": {"properties": {"url": {"type": "string","format": "url","title": "URL"},"revision": {"type": "number","title": "Revision"},"folder": {"title": "Folder","type": "string"}},"required": []},"mirrorProperties": {},"calculationProperties": {},"aggregationProperties": {},"relations": {"project": {"title": "Project","target": "project","required": true,"many": false}}} -
Click
Saveto create the blueprint.
Create the pipeline run blueprint
Since the Azure DevOps integration does not support pipeline runs, we will create a custom blueprint for pipeline runs that will be populated via webhooks.
-
Go to the builder page in Port.
-
Click on
+ Blueprint. -
Click on the
{...}button in the top right corner, and chooseEdit JSON. -
Add this JSON schema:
Pipeline run blueprint (Click to expand)
{"identifier": "pipeline_run","description": "Pipeline runs, delivered via service webhook","title": "Pipeline run","icon": "AzurePipline","schema": {"properties": {"status": {"icon": "DefaultProperty","title": "Status","type": "string","enum": ["inProgress","completed","canceling"],"enumColors": {"inProgress": "lightGray","completed": "green","canceling": "orange"}},"result": {"icon": "DefaultProperty","title": "Result","type": "string","enum": ["succeeded","failed","canceled"],"enumColors": {"succeeded": "green","failed": "red","canceled": "lightGray"}},"created_date": {"type": "string","title": "Created Date","format": "date-time"},"finished_date": {"type": "string","title": "Finished Date","format": "date-time"},"pipeline_run_link": {"type": "string","title": "Pipeline Run Link","format": "url"},"pipeline_definition_url": {"type": "string","title": "Pipeline Definition Url","format": "url"},"stages": {"type": "object","title": "Stages"},"commit": {"type": "string","title": "Commit"},"target_branch": {"type": "string","title": "Target Branch"},"source_branch": {"type": "string","title": "Source Branch"}},"required": []},"mirrorProperties": {},"calculationProperties": {},"aggregationProperties": {},"relations": {"pipeline": {"title": "Pipeline","target": "azureDevopsPipeline","required": false,"many": false}}} -
Click
Saveto create the blueprint.
Update the integration mapping
-
Go to the data sources page in Port.
-
Select the Azure DevOps integration.
-
Add the following YAML block into the editor to ingest pipelines from your Azure DevOps account:
Azure DevOps integration configuration (Click to expand)
resources:- kind: projectselector:query: 'true'defaultTeam: 'true'port:entity:mappings:identifier: '.id | gsub(" "; "")'blueprint: '"project"'title: .nameproperties:state: .staterevision: .revisionvisibility: .visibilitydefaultTeam: .defaultTeam.namelink: .url | gsub("_apis/projects/"; "")- kind: pipelineselector:query: 'true'port:entity:mappings:identifier: .id | tostringtitle: .nameblueprint: '"azureDevopsPipeline"'properties:url: .urlrevision: .revisionfolder: .folderrelations:project: '.__projectId | gsub(" "; "")' -
Click
Save & Resyncto apply the mapping.
Configure a webhook in Port
Since the Azure DevOps integration does not support pipeline runs, we will use Azure DevOps service hooks and Port's webhook feature to ingest pipeline run state change events to Port.
-
Go to the data sources page in Port.
-
Click on the
+ Data sourcebutton in the top right corner. -
Select the
Webhooktab. -
Click on
Custom integration. -
Give your webhook a title and description, and select an icon to represent it. You may title it
ADO Pipeline Run Mapper. -
Click
Next. -
In the
Mappingtab, you can see your new webhook URL. -
Scroll down to box number 3 and add this JSON configuration to map the data received from Azure DevOps to the blueprint:
Pipeline run webhook configuration (Click to expand)
[{"blueprint": "pipeline_run","operation": "create","filter": ".body.eventType == \"ms.vss-pipelines.run-state-changed-event\"","entity": {"identifier": "(.body.resource.pipeline.id | tostring)+ \"-\" + (.body.resource.run.id | tostring)","title": ".body.resource.pipeline.name + \" - \" + (.body.resource.pipeline.id | tostring)","properties": {"status": ".body.resource.run.state","result": ".body.resource.run.result","source_branch": ".body.resource.run.variables[\"system.pullRequest.sourceBranch\"].value","target_branch": ".body.resource.run.resources.repositories.self.refName","commit": ".body.resource.run.resources.repositories.self.version","created_date": ".body.resource.run.createdDate","finished_date": ".body.resource.run.finishedDate","pipeline_run_link": ".body.resource.run._links.web.href","pipeline_definition_url": ".body.resource.run._links[\"pipeline.web\"].href","stages": "{ \"stages\": .body.resource.stages }"},"relations": {"pipeline": ".body.resource.run.pipeline.id | tostring"}}}] -
When finished, click
Save.
Set up service hook in Azure DevOps portal
To complete the integration, you need to configure a service hook in Azure DevOps to send pipeline run events to Port.
-
Navigate to your Azure DevOps portal and select your project.
-
Go to Project Settings and click on Service hooks in the left navigation bar.
-
Click on the
+button to create a new hook subscription. -
Select Web Hook as the service and click Next.
-
Under Trigger, select Run state changed event and click Next.
-
Enter the webhook URL from your Port webhook configuration into the URL text field.
-
Click Finish to complete the service hook setup.
The service hook will automatically send pipeline run state change events to Port whenever a pipeline run is triggered, updated, or completed in your Azure DevOps project.
Whenever a pipeline run is initiated, the configured webhook will send an event to Port, allowing Port to ingest the data into the context lake using the webhook configuration.
Set up self-service actions
We will create self-service actions in Port to directly interact with the Azure DevOps API. These actions let users:
- Trigger a new pipeline run.
- Rerun a failed pipeline.
- Cancel a running pipeline.
Each action will be configured via JSON and triggered using synced webhooks secured with secrets. To implement these use-cases, follow the steps below:
Add Port secrets
To add a secret to Port:
-
In your Port application, click on your profile picture
 .
. -
Click on Credentials.
-
Click on the
Secretstab. -
Click on
+ Secretand add the following secrets:_AZURE_DEVOPS_ORGANIZATION_NAME: Your Azure DevOps organization name (e.g.,myorg)._AZURE_DEVOPS_AUTH_TOKEN: A Personal Access Token (PAT) with appropriate permissions for pipeline operations.
Trigger a new pipeline run
-
Go to the self-service page in Port.
-
Click on the
+ New Actionbutton. -
Click on the
{...} Edit JSONbutton. -
Copy and paste the following JSON configuration into the editor.
Trigger a new pipeline run action (Click to expand)
{"identifier": "trigger_azure_devops_pipeline","title": "Trigger ADO Pipeline","icon": "Azure","description": "Initiates a new pipeline run in Azure DevOps with specified environment and branch parameters","trigger": {"type": "self-service","operation": "DAY-2","userInputs": {"properties": {"environment": {"title": "Environment","type": "string","enum": ["staging","production"],"enumColors": {"staging": "orange","production": "red"}},"target_branch": {"title": "Branch","type": "string","enum": ["main","develop","feature/latest"],"default": "main"}},"required": ["environment","target_branch"],"order": ["environment","target_branch"]},"blueprintIdentifier": "azureDevopsPipeline"},"invocationMethod": {"type": "WEBHOOK","url": "https://dev.azure.com/{{.secrets._AZURE_DEVOPS_ORGANIZATION_URL}}/{{.entity.relations.project}}/_apis/pipelines/{{.entity.identifier}}/runs?api-version=7.1","agent": false,"synchronized": true,"method": "POST","headers": {"Content-Type": "application/json","Authorization": "Basic {{.secrets._AZURE_DEVOPS_AUTH_TOKEN}}"},"body": {"resources": {"repositories": {"self": {"refName": "refs/heads/{{ .inputs.target_branch }}"}}},"templateParameters": {"environment": "{{ .inputs.environment }}","run_id": "{{ .run.id }}"}}},"requiredApproval": false} -
Click
Save.
Now you should see the Trigger ADO Pipeline action in the self-service page. 🎉
Rerun a failed pipeline
-
Go to the self-service page in Port.
-
Click on the
+ New Actionbutton. -
Click on the
{...} Edit JSONbutton. -
Copy and paste the following JSON configuration into the editor.
Rerun a failed pipeline action (Click to expand)
{"identifier": "rerun_azure_devops_pipeline","title": "Rerun ADO Pipeline","icon": "AzurePipline","description": "Restarts a failed Azure DevOps pipeline run to retry all previously failed jobs and stages","trigger": {"type": "self-service","operation": "DAY-2","userInputs": {"properties": {},"required": [],"order": []},"blueprintIdentifier": "pipeline_run"},"invocationMethod": {"type": "WEBHOOK","url": "https://dev.azure.com/{{.secrets._AZURE_DEVOPS_ORGANIZATION_URL}}/{{.entity.properties.pipeline_run_link | split(\"/\")[4]}}/_apis/build/builds/{{.entity.identifier | split(\"-\")[-1]}}?retry=true&api-version=7.1","agent": false,"synchronized": true,"method": "PATCH","headers": {"Content-Type": "application/json","Authorization": "Basic {{.secrets._AZURE_DEVOPS_AUTH_TOKEN}}"},"body": {}},"requiredApproval": false} -
Click
Save.
Now you should see the Rerun ADO Pipeline action in the self-service page. 🎉
Cancel a running pipeline
-
Go to the self-service page in Port.
-
Click on the
+ New Actionbutton. -
Click on the
{...} Edit JSONbutton. -
Copy and paste the following JSON configuration into the editor.
Cancel a running pipeline action (Click to expand)
{"identifier": "cancel_azure_devops_pipeline","title": "Cancel ADO Pipeline","icon": "Unavailable","description": "Terminates an active Azure DevOps pipeline run to stop all ongoing jobs and stages","trigger": {"type": "self-service","operation": "DAY-2","userInputs": {"properties": {},"required": [],"order": []},"condition": {"type": "SEARCH","rules": [{"property": "status","operator": "=","value": "inProgress"}],"combinator": "and"},"blueprintIdentifier": "pipeline_run"},"invocationMethod": {"type": "WEBHOOK","url": "https://dev.azure.com/{{.secrets._AZURE_DEVOPS_ORGANIZATION_URL}}/{{.entity.properties.pipeline_run_link | split(\"/\")[4]}}/_apis/build/builds/{{.entity.identifier | split(\"-\")[-1]}}?api-version=7.1","agent": false,"synchronized": true,"method": "PATCH","headers": {"Content-Type": "application/json","Authorization": "Basic {{.secrets._AZURE_DEVOPS_AUTH_TOKEN}}"},"body": {"status": 4}},"requiredApproval": false} -
Click
Save.
Now you should see the Cancel ADO Pipeline action in the self-service page. 🎉
Visualize metrics
With pipelines ingested and actions configured, the next step is building a dashboard to monitor Azure DevOps data directly in Port. We can visualize all pipeline details using customizable widgets. In addition, we can trigger remediation workflows right from your dashboard.
Create a dashboard
- Navigate to your context lake.
- Click on the
+button in the left sidebar. - Select New dashboard.
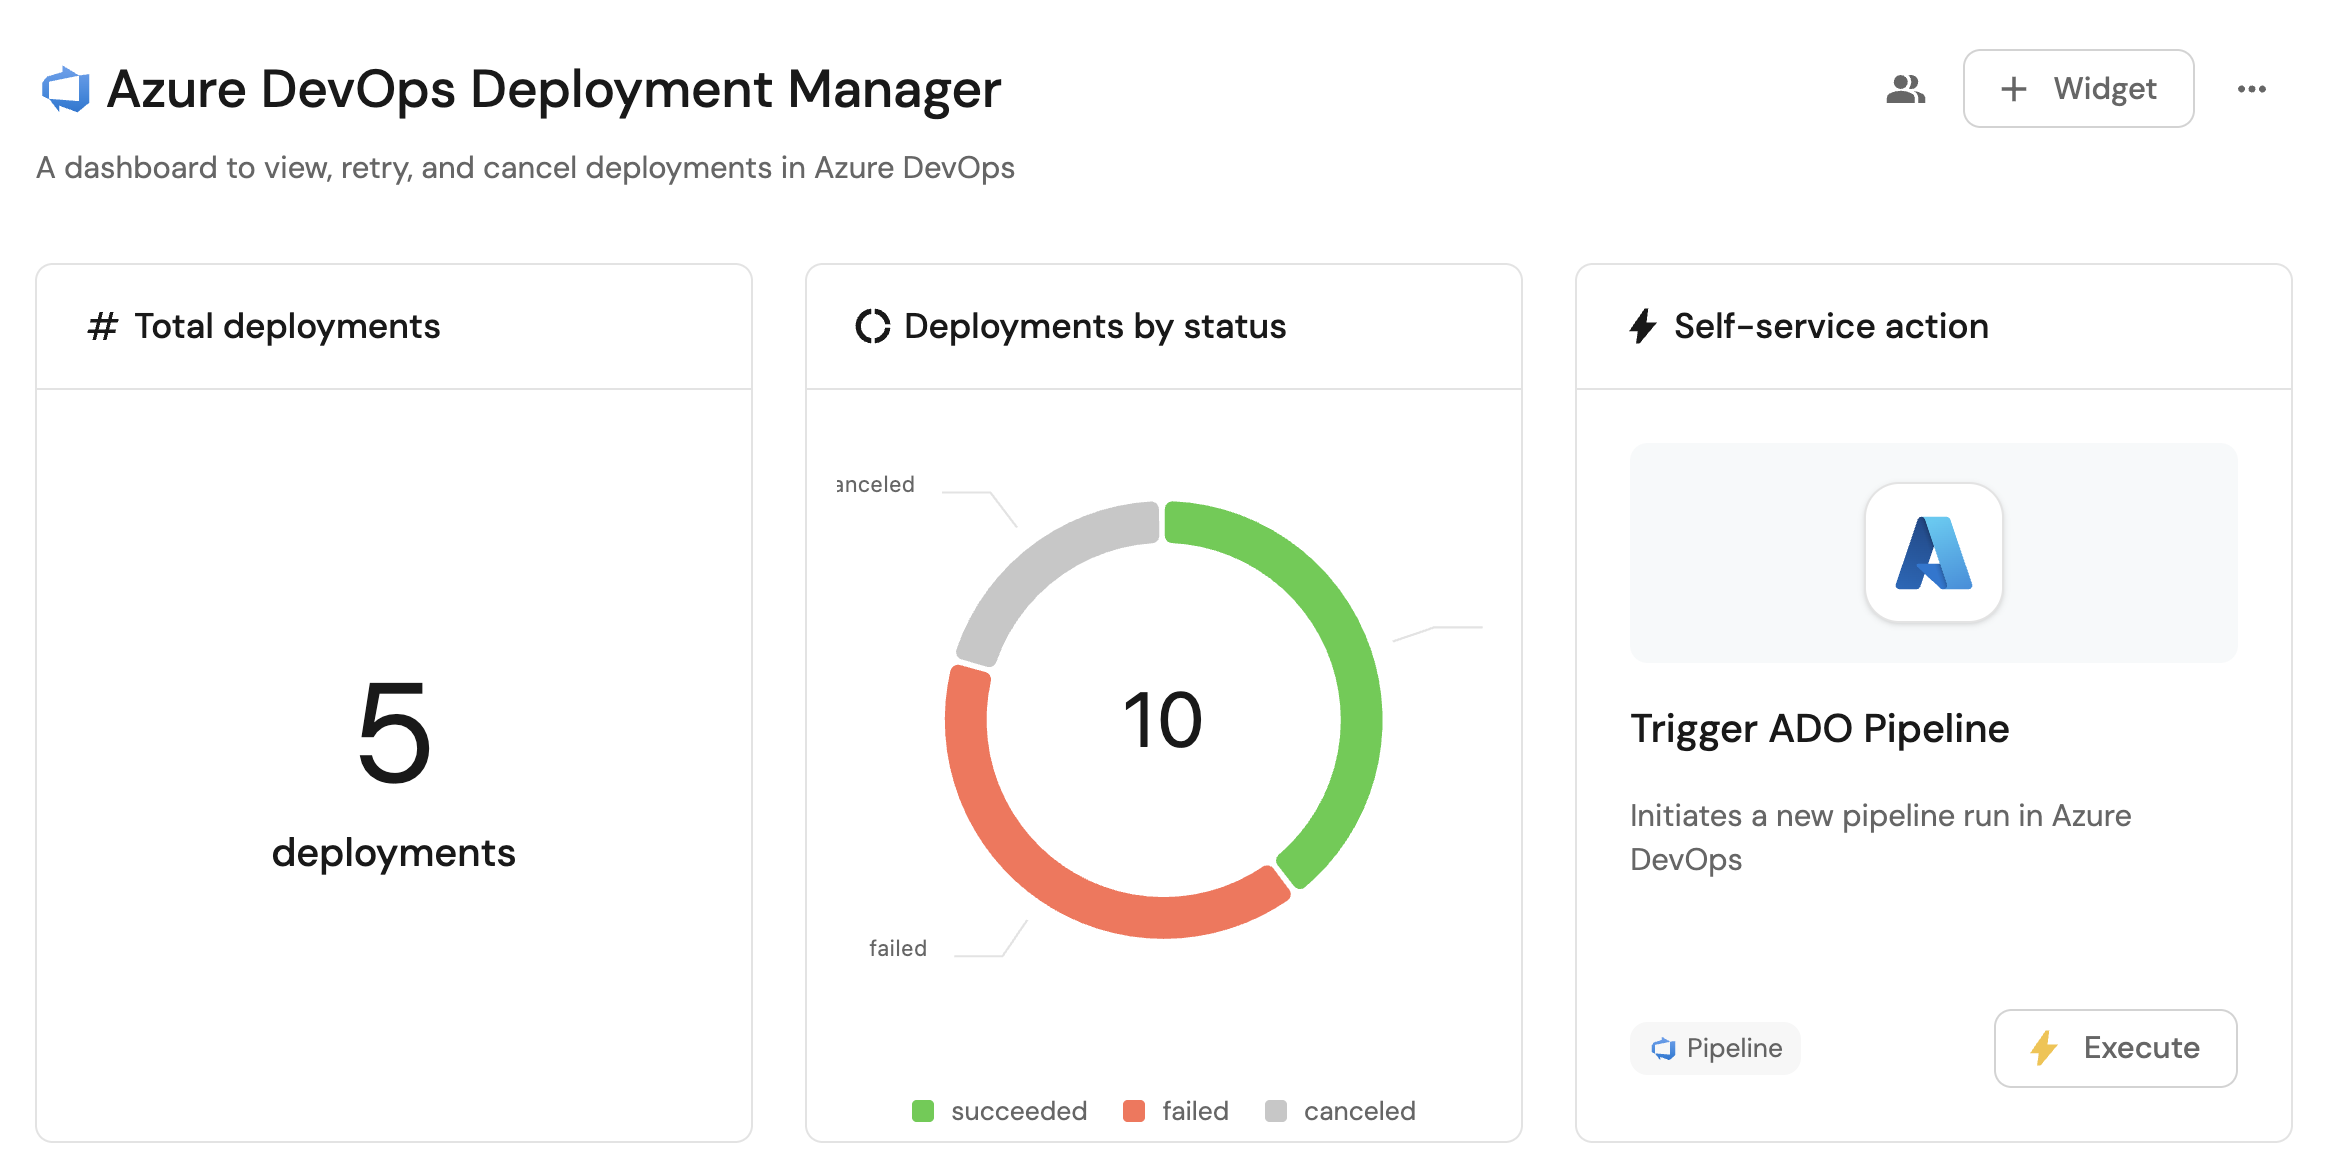
- Name the dashboard Azure DevOps Deployment Manager.
- Input
A dashboard to view, retry, and cancel deployments in Azure DevOpsunder Description. - Select the
AzureDevopsicon. - Click
Create.
We now have a blank dashboard where we can start adding widgets to visualize insights from our Azure DevOps deployments. In this guide, we define deployments as pipeline runs where the target branch is refs/heads/main.
Add widgets
In the new dashboard, create the following widgets:
Total deployments created in the last 3 months (click to expand)
-
Click
+ Widgetand select Number Chart. -
Title:
Total deployments(add theDeploymenticon). -
Select
Count entitiesChart type and choose Pipeline run as the Blueprint. -
Select
countfor the Function. -
Add this JSON to the Additional filters editor to filter deployments created in the last 3 months:
{"combinator": "and","rules": [{"property": "target_branch","operator": "=","value": "refs/heads/main"},{"property": "created_date","operator": "between","value": {"preset": "last3Months"}}]} -
Select
customas the Unit and inputdeploymentsas the Custom unit. -
Click
Save.
Deployment by status (click to expand)
-
Click
+ Widgetand select Pie chart. -
Title:
Deployments by status(add theDeploymenticon). -
Choose the Pipeline run blueprint.
-
Under
Breakdown by property, select the Status property -
Add this JSON to the Additional filters editor to filter deployments:
{"combinator": "and","rules": [{"property": "target_branch","operator": "=","value": "refs/heads/main"}]} -
Click Save.
Trigger pipeline action (click to expand)
- Click
+ Widgetand select Action card. - Choose the Trigger ADO Pipeline action we created in this guide.
- Click Save.
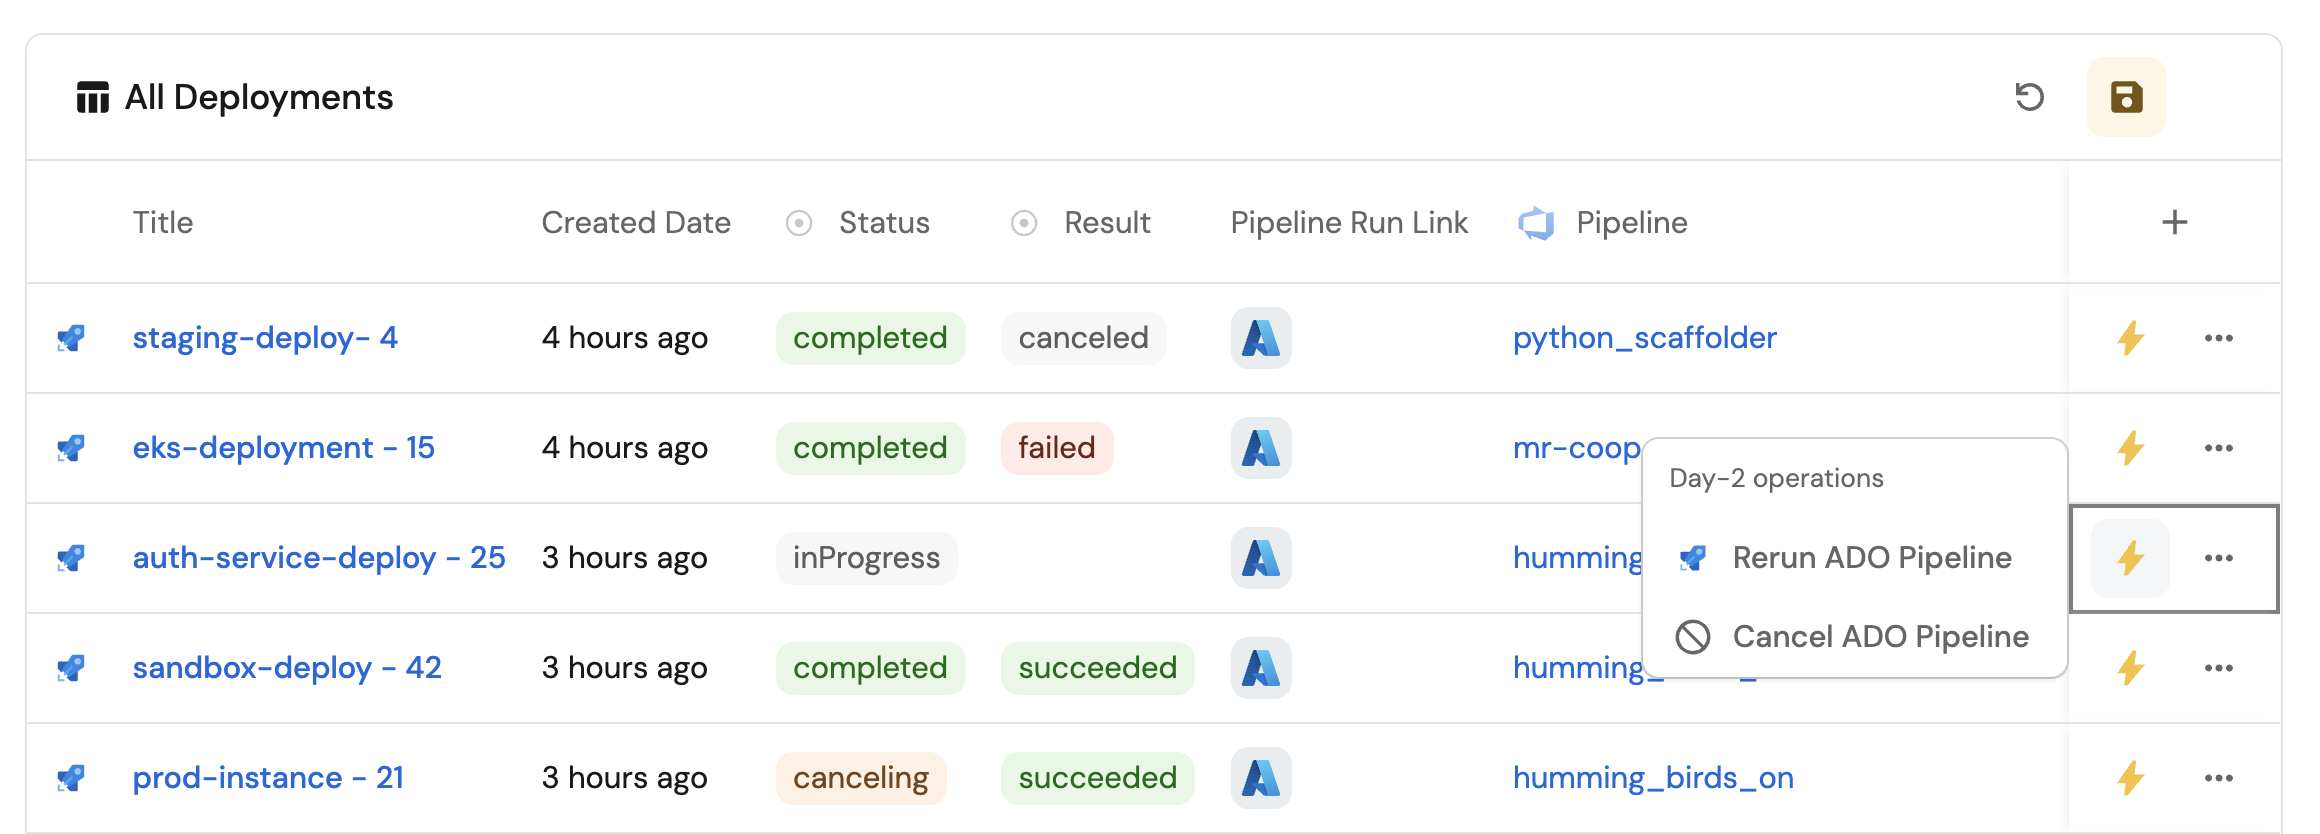
All Azure DevOps deployments view (click to expand)
-
Click
+ Widgetand select Table. -
Title the widget All Deployments.
-
Choose the Pipeline Run blueprint.
-
Add this JSON to the Additional filters editor to filter deployments:
{"combinator": "and","rules": [{"property": "target_branch","operator": "=","value": "refs/heads/main"}]} -
Click Save to add the widget to the dashboard.
-
Click on the
...button in the top right corner of the table and select Customize table. -
In the top right corner of the table, click on
Manage Propertiesand add the following properties:- Status: The status of the pipeline run.
- Result: The result of the pipeline run.
- Pipeline Run Link: The URL to the pipeline run.
- Created Date: The date the pipeline run was created.
- Pipeline: The related Azure DevOps pipeline.
-
Click on the save icon in the top right corner of the widget to save the customized table.