Scaffold a new service
This guide walks you through setting up a workflow that allows developers to scaffold a new service.
A service in Port is a flexible concept, allowing you to represent a piece of software and its related components in a way that makes sense for you.
The workflow we will create in this guide will:
- Create a new Git repository.
- Create a new service in Port, and relate it to the new repository, giving it its context.
Port workflows are currently in open beta and available to all users. Workflows may undergo changes without prior notice.
Common use cases
- Enable developers to independently spin up new microservices with boilerplate code.
- Reduce friction for developers and prevent implementation differences by defining the logic of scaffolding a service and providing developers with a workflow they can simply execute.
- Track created services using a wide array of visualizations.
Prerequisites
- A Port account with permissions to build workflows.
- The Git Integration that is relevant for you needs to be installed.
- A repository in your Git provider in which you can create a workflow/pipeline (the backend that creates the repositories).
How it works
The workflow has two parts:
- The workflow - A self-service trigger node collects the service name from the developer, then an action node triggers your Git provider's backend pipeline to create the repository.
- The backend - A CI pipeline (GitHub Actions, GitLab CI, Jenkins, or Azure Pipelines) that creates the repository and scaffolds it from a cookiecutter template.
For GitHub, the workflow uses a native integration action to dispatch the GitHub Actions workflow.
For GitLab, Bitbucket (Jenkins), and Azure DevOps, the workflow uses a webhook node to trigger the pipeline, since native integration actions for these providers are not yet available.
Set up the backend
Now we will write the logic that the workflow will trigger.
- GitHub
- GitLab
- Bitbucket (Jenkins)
- Azure DevOps
If the GitHub organization which will house your workflow is not the same as the one you'll create the new repository in, install GitHub ocean in the other organization as well.
-
First, let's create the necessary token and secrets:
-
Go to your GitHub tokens page, create a personal access token (classic) with
repo,admin:repo_hookandadmin:orgscope, and copy it (this token is needed to create a repo from our workflow). SAML SSO
If your organization uses SAML SSO, you will need to authorize your token. Follow these instructions and then continue this guide.
-
Go to your Port application, click on your profile picture
 , then click
 Credentials. Copy yourClient IDandClient secret.
-
-
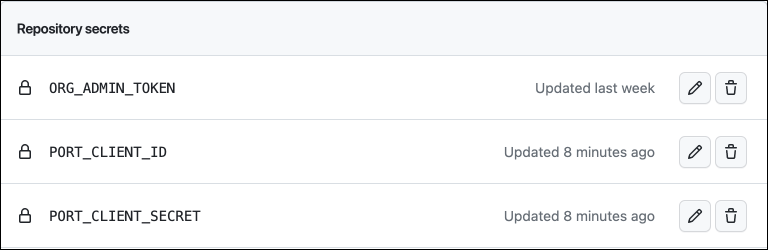
In the repository where your backend workflow will reside, create 3 new secrets under
Settings->Secrets and variables->Actions:ORG_ADMIN_TOKEN- the personal access token you created in the previous step.PORT_CLIENT_ID- the client ID you copied from your Port app.PORT_CLIENT_SECRET- the client secret you copied from your Port app.
-
Now let's create the backend workflow file that creates the repository.
First, ensure that you have a.github/workflowsdirectory, then create a new file namedport-create-service.ymland use the following snippet as its content (remember to change<YOUR-ORG-NAME>to your GitHub organization name):Github workflow (click to expand)
port-create-service.ymlname: Scaffold a new serviceon:workflow_dispatch:inputs:service_name:required: truedescription: The name of the new servicetype: stringjobs:scaffold-service:runs-on: ubuntu-latestenv:ORG_NAME: <YOUR-ORG-NAME>steps:- uses: actions/checkout@v6- name: Create GitHub Repositoryuses: port-labs/cookiecutter-gha@v1.1.1with:portClientId: ${{ secrets.PORT_CLIENT_ID }}portClientSecret: ${{ secrets.PORT_CLIENT_SECRET }}token: ${{ secrets.ORG_ADMIN_TOKEN }}repositoryName: ${{ inputs.service_name }}portUserInputs: '{"cookiecutter_app_name": "${{ inputs.service_name }}" }'cookiecutterTemplate: https://github.com/lacion/cookiecutter-golangblueprintIdentifier: "githubRepository"organizationName: ${{ env.ORG_NAME }}createPortEntity: trueThis backend workflow only creates the repository and its
githubRepositoryentity in Port. The Port workflow itself creates theserviceentity and relates it to the repository, so there is no need to report status from the backend workflow - the integration action monitors the GitHub Actions run for you viareportWorkflowStatus.
First, let's create a GitLab project that will store our new scaffolder pipeline - Go to your GitLab account and create a new project.
Next, let's create the necessary token and secrets:
-
Go to your Port application, click on your profile picture
, then click Credentials. Copy yourClient IDandClient secret. -
Go to your root group, and follow the steps here to create a new group access token with the following permission scopes:
api, read_api, read_repository, write_repository, then save its value as it will be required in the next step.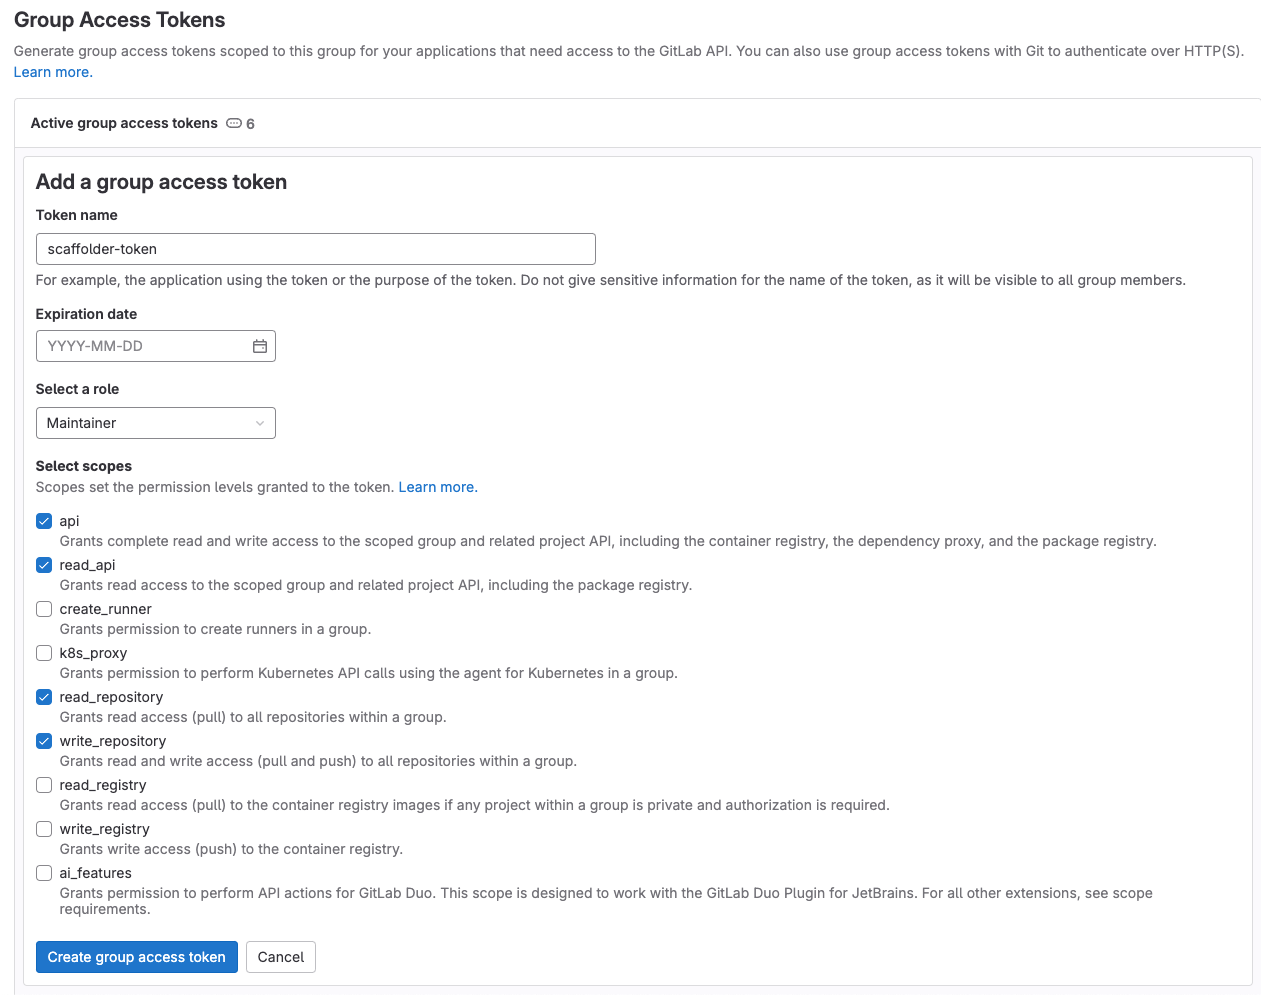
-
Go to the new GitLab project you created, from the
Settingsmenu in the sidebar on the left, selectCI/CD. -
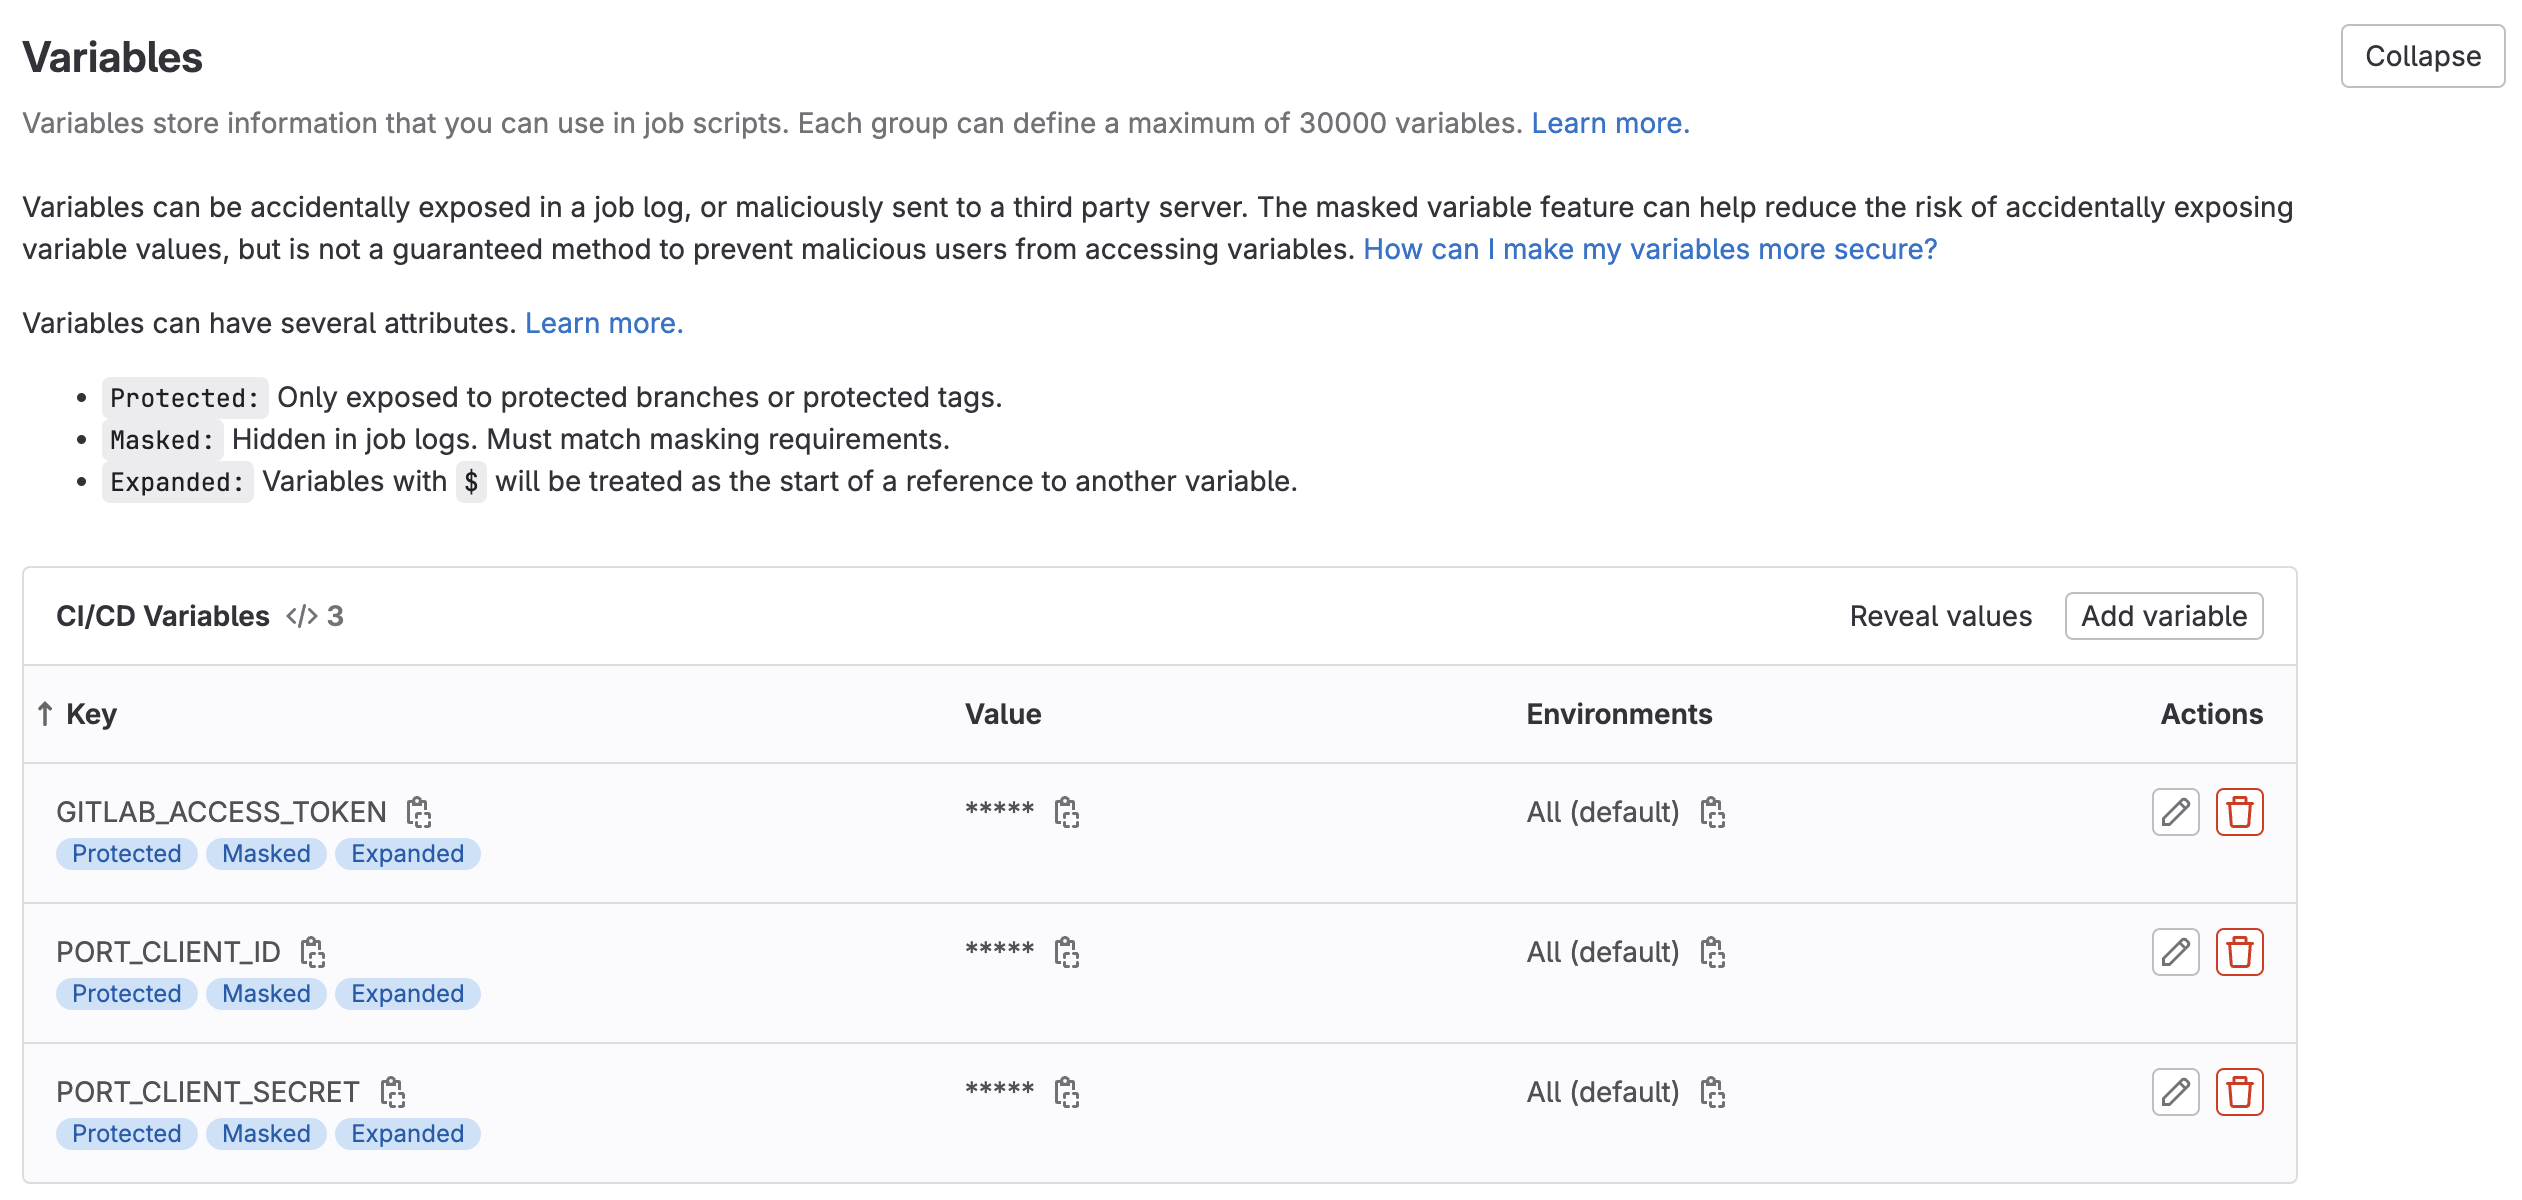
Expand the
Variablessection and save the following secrets:PORT_CLIENT_ID- Your Port client ID.PORT_CLIENT_SECRET- Your Port client secret.GITLAB_ACCESS_TOKEN- The GitLab group access token you created in the previous step.
-
Expand the
Pipeline trigger tokenssection and add a new token, give it a meaningful description such asScaffolder tokenand save its value.-
You will store this token as a Port secret named
GITLAB_TRIGGER_TOKENin the Build the workflow section.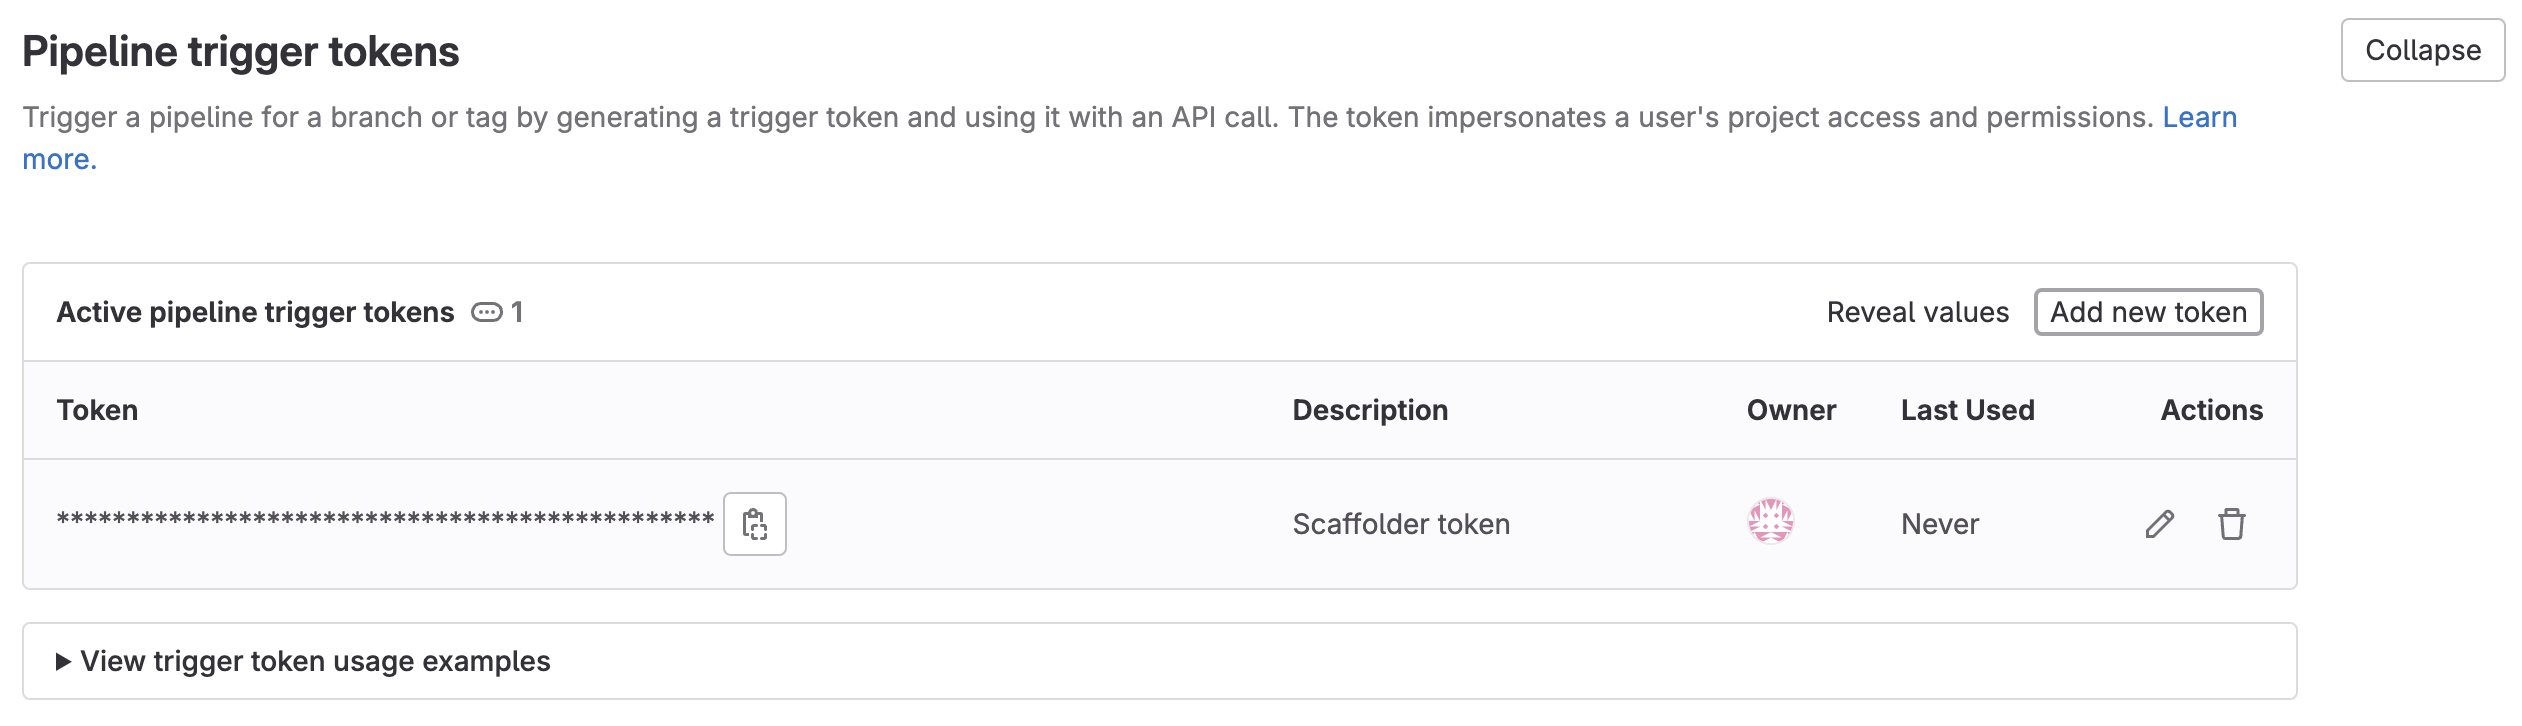
-
You will also need your GitLab project ID for the Build the workflow section. To find it, browse to the GitLab page of the project you created, click the vertical 3 dots button at the top right corner (next to Fork) and select Copy project ID.
Now let's create the pipeline file that contains our logic.
In the root of your new GitLab project, create a new file named .gitlab-ci.yml and use the following snippet as its content:GitLab pipeline (click to expand)
First, let's create the necessary tokens and secrets:
-
Go to your Port application, click on your profile picture
, then click Credentials. Copy yourClient IDandClient secret. -
Configure the following as Jenkins credentials:
-
BITBUCKET_USERNAME- a user with access to the Bitbucket workspace and project. -
BITBUCKET_APP_PASSWORD- an App Password with theRepositories:ReadandRepositories:Writepermissions. -
PORT_CLIENT_ID- Your Port client ID. -
PORT_CLIENT_SECRET- Your Port client secret.

-
Next, create a Jenkins pipeline with the following configuration:
-
Define the value of the
tokenfield, the token you specify will be used to trigger the scaffold pipeline specifically. For example, you can usescaffolder-token. You will reference this token in the webhook URL in the Build the workflow section. -
Define variables for the pipeline: define the
SERVICE_NAME,BITBUCKET_WORKSPACE_NAME, andBITBUCKET_PROJECT_KEYvariables. Scroll down to thePost content parametersand for each variable add configuration like so (look at the table below for the full variable list):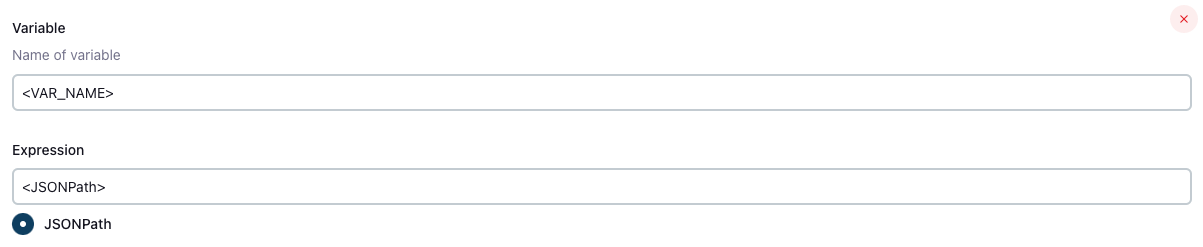
Create the following variables and their related JSONPath expression:
| Variable Name | JSONPath Expression |
|---|---|
| SERVICE_NAME | $.service_name |
| BITBUCKET_WORKSPACE_NAME | $.bitbucket_workspace_name |
| BITBUCKET_PROJECT_KEY | $.bitbucket_project_key |
Add the following content to the new Jenkins pipeline:Jenkins pipeline (click to expand)
-
Create an Azure DevOps repository called
Port-actionsin your Azure DevOps Organization/Project. -
Configure Service Connection and Webhook:
- Go to your Azure DevOps project.
- Navigate to
Project Settings>Service connections. - Click on
New service connection. - Select
Incoming Webhook. - Use the same name for both
Webhook NameandService connection name. You will reference this webhook name in the webhook URL in the Build the workflow section.
-
Create Azure Pipeline in
Port-actionsRepository.
In your Port-actions Azure DevOps repository, create an Azure Pipeline file named azure-pipelines.yml in the root of the repo's main branch with the following content:Azure DevOps Pipeline Script
Replace SERVICE_CONNECTION_NAME with the name of the service connection you created in Azure DevOps
and WEBHOOK_NAME with the name of the webhook you created in Azure DevOps which should be the same as the service connection name.
-
Configure the Pipeline:
- In your Azure DevOps project, navigate to
Pipelines>Create Pipeline. - Select
Azure Repos Gitand choose thePort-actionsrepository. - Click
Save(in the "Run" dropdown menu).
- In your Azure DevOps project, navigate to
-
Create the necessary tokens and secrets:
- Go to your Port application, click on your profile picture , then click
Credentials. Copy yourClient IDandClient secret.
- Go to your Port application, click on your profile picture
-
Configure the following as Variables for the
azure-pipelines.yml:- Go to pipelines and select the
Port-actionspipeline. - Click on
Editand thenVariables. - Add the following variables:
PORT_CLIENT_ID- Your Portclient ID.PORT_CLIENT_SECRET- Your Portclient secret.PERSONAL_ACCESS_TOKEN- Your Azure DevOps personal access token.
- Go to pipelines and select the
Having issues with Azure DevOps integration or pipelines? See the Azure DevOps Troubleshooting Guide for step-by-step help.
The cookiecutter templates provided in the pipelines are just examples, you can replace them with any other cookiecutter template you want to use, by changing the value of the relevant template variable in the pipeline.
Build the workflow
Now we will create the workflow that triggers the backend and registers the service in Port.
-
Go to the Workflows page of your portal.
-
Click on the
+ Workflowbutton in the top-right corner. -
Fill and submit the form for creating the new workflow.
-
Copy and paste the workflow JSON below into the editor to replace the example workflow:
- GitHub
- GitLab
- Bitbucket (Jenkins)
- Azure DevOps
For this example, the workflow sends one detail that our backend needs to know - the service name. Note that the service name will be the same as the repository name.
Scaffold service workflow JSON (click to expand)
{"identifier": "scaffold_new_service","title": "Scaffold a new service","icon": "Microservice","description": "Create a new repository and register a service in Port","nodes": [{"identifier": "trigger","config": {"type": "SELF_SERVE_TRIGGER","userInputs": {"properties": {"service_name": {"type": "string","title": "Service name","description": "The name of the new service"}},"required": ["service_name"]},"published": true}},{"identifier": "create_repo","title": "Create repository","icon": "Github","config": {"type": "INTEGRATION_ACTION","installationId": "YOUR_GITHUB_OCEAN_INSTALLATION_ID","integrationProvider": "github-ocean","integrationInvocationType": "dispatch_workflow","integrationActionExecutionProperties": {"org": "YOUR_GITHUB_ORGANIZATION","repo": "YOUR_BACKEND_REPO","workflow": "port-create-service.yml","workflowInputs": {"service_name": "{{ .outputs.trigger.service_name }}"},"reportWorkflowStatus": true}}},{"identifier": "create_service","title": "Register service in Port","config": {"type": "UPSERT_ENTITY","blueprintIdentifier": "service","mapping": {"identifier": "{{ .outputs.trigger.service_name }}_service","title": "{{ .outputs.trigger.service_name }} Service","relations": {"github_repository": "{{ .outputs.trigger.service_name }}"}}}}],"connections": [{ "sourceIdentifier": "trigger", "targetIdentifier": "create_repo" },{"sourceIdentifier": "create_repo","targetIdentifier": "create_service"}]}Replace
YOUR_GITHUB_OCEAN_INSTALLATION_IDwith your integration's installation ID (found in the Data sources page),YOUR_GITHUB_ORGANIZATIONwith your GitHub organization name, andYOUR_BACKEND_REPOwith the repository that holds theport-create-service.ymlworkflow.The workflow triggers your GitLab pipeline using a webhook node. The pipeline reads the request body as
$TRIGGER_PAYLOADand creates the repository and entities.Scaffold service workflow JSON (click to expand)
{"identifier": "scaffold_new_service","title": "Scaffold a new service","icon": "Microservice","description": "Create a new GitLab repository and register a service in Port","nodes": [{"identifier": "trigger","config": {"type": "SELF_SERVE_TRIGGER","userInputs": {"properties": {"service_name": {"type": "string","title": "Service name","description": "The name of the new service"}},"required": ["service_name"]},"published": true}},{"identifier": "trigger_pipeline","title": "Trigger GitLab pipeline","icon": "Gitlab","config": {"type": "WEBHOOK","url": "https://gitlab.com/api/v4/projects/YOUR_GITLAB_PROJECT_ID/ref/main/trigger/pipeline?token={{ .secrets[\"GITLAB_TRIGGER_TOKEN\"] }}","method": "POST","body": {"service_name": "{{ .outputs.trigger.service_name }}"}}}],"connections": [{ "sourceIdentifier": "trigger", "targetIdentifier": "trigger_pipeline" }]}Replace
YOUR_GITLAB_PROJECT_IDwith the ID of the GitLab project that stores your.gitlab-ci.ymlpipeline.
Before publishing, add a Port secret namedGITLAB_TRIGGER_TOKENwith the trigger token you created in the Set up the backend section (see Add secrets to Port below).When executing this workflow, developers provide the service name and two additional Bitbucket inputs. The workflow triggers your Jenkins pipeline using a webhook node.
Scaffold service workflow JSON (click to expand)
{"identifier": "scaffold_new_service","title": "Scaffold a new service","icon": "Microservice","description": "Create a new Bitbucket repository and register a service in Port","nodes": [{"identifier": "trigger","config": {"type": "SELF_SERVE_TRIGGER","userInputs": {"properties": {"service_name": {"type": "string","title": "Service name","description": "The name of the new service"},"bitbucket_workspace_name": {"type": "string","title": "Bitbucket Workspace Name","description": "The name of the workspace in which to create the new repository"},"bitbucket_project_key": {"type": "string","title": "Bitbucket Project Key","description": "The key of the Bitbucket project in which to create the new repository"}},"required": ["service_name","bitbucket_workspace_name","bitbucket_project_key"]},"published": true}},{"identifier": "trigger_pipeline","title": "Trigger Jenkins pipeline","icon": "Jenkins","config": {"type": "WEBHOOK","url": "https://YOUR_JENKINS_URL/generic-webhook-trigger/invoke?token=scaffolder-token","method": "POST","headers": {"Content-Type": "application/json"},"body": {"service_name": "{{ .outputs.trigger.service_name }}","bitbucket_workspace_name": "{{ .outputs.trigger.bitbucket_workspace_name }}","bitbucket_project_key": "{{ .outputs.trigger.bitbucket_project_key }}"}}}],"connections": [{ "sourceIdentifier": "trigger", "targetIdentifier": "trigger_pipeline" }]}Replace
YOUR_JENKINS_URLwith your Jenkins instance URL, and make sure thetokenquery parameter matches the token you defined for the pipeline.When executing this workflow, developers provide the service name and additional Azure DevOps inputs. The workflow triggers your Azure pipeline using a webhook node that posts to your Azure DevOps incoming webhook.
Scaffold service workflow JSON (click to expand)
{"identifier": "scaffold_new_service","title": "Scaffold a new service","icon": "Microservice","description": "Create a new Azure DevOps repository and register a service in Port","nodes": [{"identifier": "trigger","config": {"type": "SELF_SERVE_TRIGGER","userInputs": {"properties": {"service_name": {"type": "string","title": "Service Name","description": "The name of the new service"},"azure_organization": {"type": "string","title": "Azure Organization"},"azure_project": {"type": "string","format": "entity","blueprint": "project","title": "Azure Project"},"description": {"type": "string","title": "Description"}},"required": ["service_name", "azure_organization", "azure_project"]},"published": true}},{"identifier": "trigger_pipeline","title": "Trigger Azure pipeline","icon": "AzureDevops","config": {"type": "WEBHOOK","url": "https://dev.azure.com/YOUR_AZURE_ORGANIZATION/_apis/public/distributedtask/webhooks/YOUR_WEBHOOK_NAME?api-version=6.0-preview","method": "POST","headers": {"Content-Type": "application/json"},"body": {"properties": {"service_name": "{{ .outputs.trigger.service_name }}","azure_organization": "{{ .outputs.trigger.azure_organization }}","description": "{{ .outputs.trigger.description }}","azure_project": "{{ .outputs.trigger.azure_project }}"}}}}],"connections": [{ "sourceIdentifier": "trigger", "targetIdentifier": "trigger_pipeline" }]}Replace
YOUR_AZURE_ORGANIZATIONwith your Azure DevOps organization name andYOUR_WEBHOOK_NAMEwith the incoming webhook name you created in the Set up the backend section. -
Click
Publishto save the workflow.
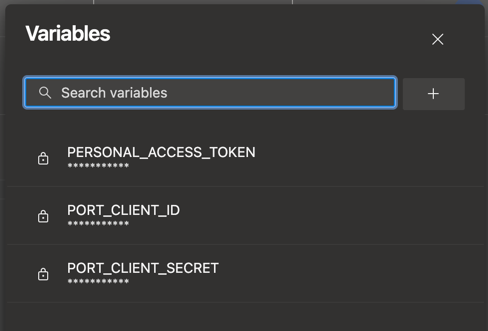
Add secrets to Port
For the providers that use a webhook node (GitLab, Bitbucket, and Azure DevOps), store any required tokens as Port secrets so the workflow can reference them via {{ .secrets["<name>"] }}.
-
Go to your portal's Settings page.
-
Navigate to Credentials and add the secrets your workflow references, for example:
GITLAB_TRIGGER_TOKEN- the GitLab pipeline trigger token (GitLab only).
Secrets are not supported with integration actions. The GitHub workflow above authenticates automatically through your installed integration, so it does not need a secret. Secrets are used only in the webhook nodes for GitLab, Bitbucket, and Azure DevOps.
All done! The workflow is ready to be used 🚀
Execute the workflow
Head to the Self-Service page of your Port application:
-
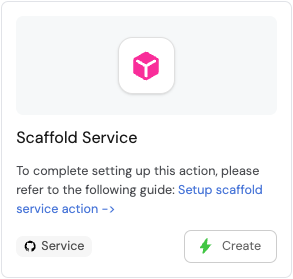
Find Scaffold a new service and click on it to begin executing the workflow.
-
Enter a name for your new repository.
Repository name restrictionsSome Git providers (for example, GitHub) do not allow spaces in repository names.
We recommend using underscores or hyphens instead of spaces. -
For some of the available Git providers, additional inputs are required when executing the workflow.
- Bitbucket (Jenkins)
- Azure DevOps
When executing the Bitbucket scaffolder, you will need to provide two additional inputs:
Bitbucket Workspace Name- the name of the workspace to create the new repository in.Bitbucket Project Key- the key of the Bitbucket project to create the new repository in.- To find the Bitbucket project key, go to
https://bitbucket.org/YOUR_BITBUCKET_WORKSPACE/workspace/projects/, find the desired project in the list, and copy the value seen in theKeycolumn in the table.
- To find the Bitbucket project key, go to
When executing the Azure DevOps scaffolder, you will need to provide the following additional inputs:
Azure Organization- the name of the Azure DevOps organization.Azure Project- select the Azure DevOps project you want the repo to be created in.Description- a brief description of the repository. (Optional)
-
Click
Execute. -
Follow the workflow's progress in the Workflow runs tab. Each node shows its status, and you can expand a node to inspect its output and logs.
-
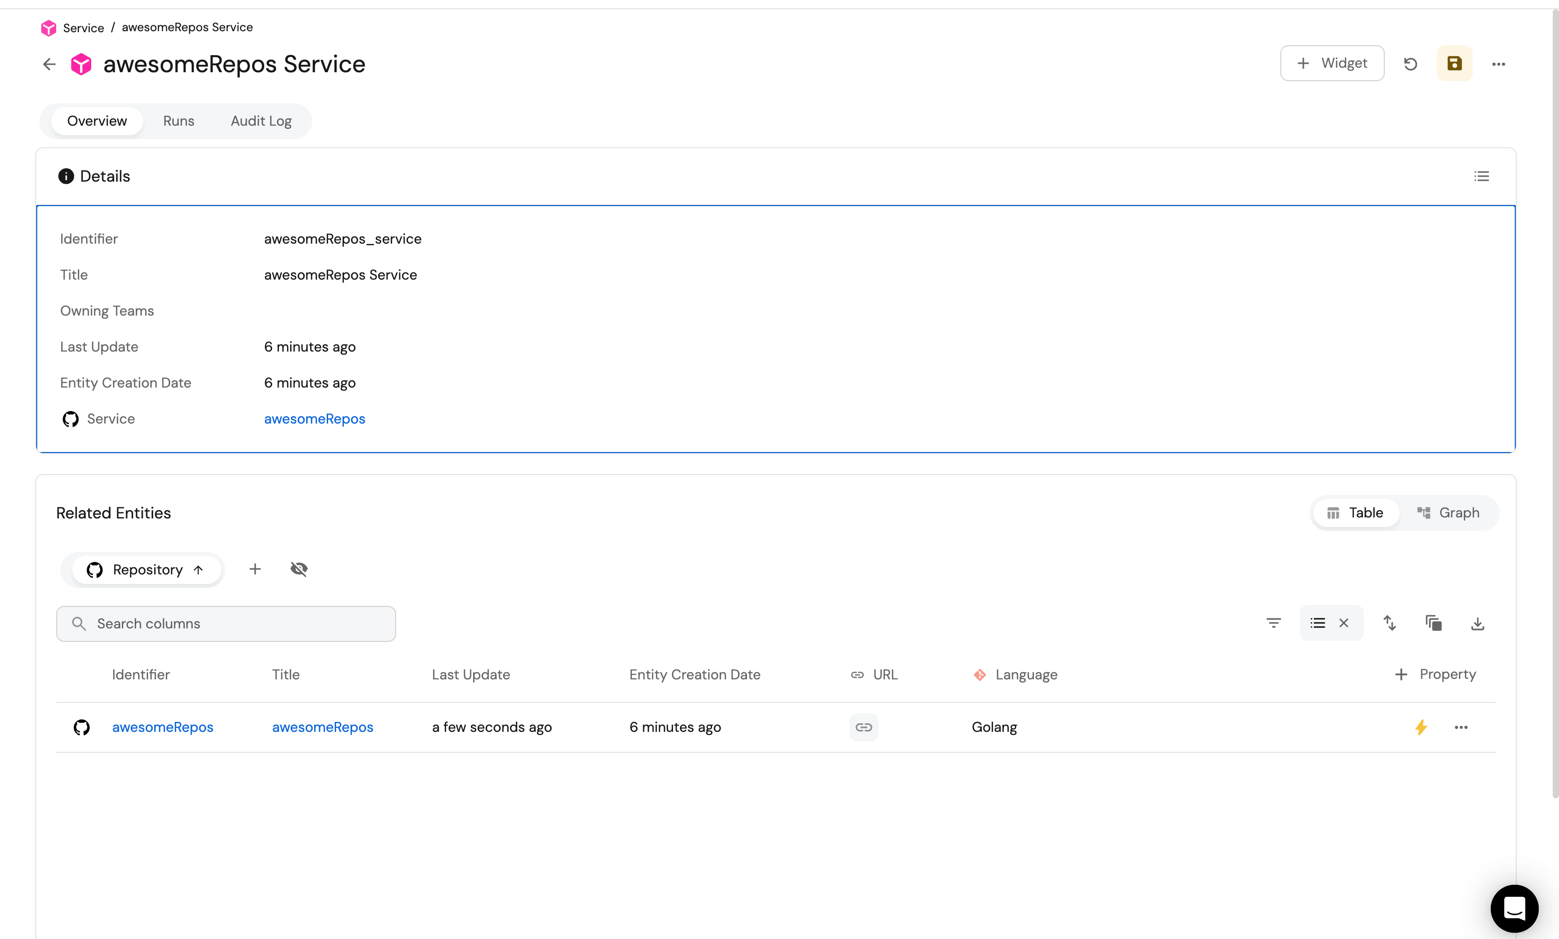
Head over to the service catalog and you will see a service entity created with the repository linked to it:
Congratulations! You can now create services easily from Port 💪🏽
Possible daily routine integrations
- Send a slack message in the R&D channel to let everyone know that a new service was created, using an additional webhook node.
- Send a weekly/monthly report for managers showing all the new services created in this timeframe and their owners.
Conclusion
Creating a service is not just a periodic task developers undertake, but a vital step that can occur on a monthly basis. However, it's crucial to recognize that this is only a fragment of the broader experience that we're striving to create for developers.
Our ultimate goal is to facilitate a seamless transition from ideation to production. In doing so, we aim to eliminate the need for developers to navigate through a plethora of tools, reducing friction and accelerating the time-to-production.
In essence, we're not just building a tool, but sculpting an ecosystem that empowers developers to bring new features to life with utmost efficiency.