Scaffold a new service with Actions
Send this guide to your coding agent.
Prerequisite: Install Port MCP
Open plan mode. Implement this Port guide in my org via MCP:

https://docs.port.io/guides/all/scaffold-a-new-service

Goal: get the guide's core flow working end-to-end in my org; adapting it to fit my existing setup takes priority over matching the guide 1:1.

Plan:
1. Confirm MCP is connected, in the right org, with sufficient permissions.
2. Diff the guide's data model (blueprints, properties, relations, actions, agents, automations, integrations, secrets) against mine.
3. Propose adaptations for gaps, reusing existing blueprints/relations over guide-named duplicates.
4. Flag what needs a UI click, credential, or secret from me, testing MCP capability empirically before ruling anything out.
5. Stop on any blocker and give me options. Approving this plan authorizes the writes it lists; pause only for writes beyond what's listed.

Build:
- Extend blueprint schema additively when upserting; don't remove or overwrite existing properties, and treat type conflicts as a blocker, not an auto-fix.
- List any mock data in the plan, minimal and labeled mock; once approved, seed it without re-asking, and tell me what you seeded.
- For anything the guide writes downstream (e.g. a webhook target), use a real entity, not a mock.
- For pages/widgets, use the real page identifier from the app URL, not a guessed slug.
- When you hit a UI step confirmed (not assumed) unsupported via MCP, pause, give exact clicks, then resume via MCP.
- Validate and give links after each meaningful step (only a tool-returned URL, no guessed paths); don't proceed if the last run wasn't a success.

Done:
- Confirm the guide's expected output exists and runs in Port.
- Summarize adaptations, seeded data, what was mocked or skipped, remaining UI steps, and how to verify.
This guide demonstrates how to set up a self-service action that allows developers to scaffold a new service.
A service in Port is a flexible concept, allowing you to represent a piece of software and its related components in a way that makes sense for you.
Port Workflows are now available (open beta) and are recommended for building self-service experiences visually.
Check out the Scaffold a new service guide built using workflows.
The action we will create in this guide will:
- Create a new Git repository.
- Create a new service in Port, and relate it to the new repository, giving it its context.
Common use cases
- Enable developers to independently spin up new microservices with boilerplate code.
- Reduce friction for developers and prevent implementation differences by defining the logic of scaffolding a service and providing developers with an action they can simply execute.
- Track created services using a wide array of visualizations.
Prerequisites
- A Port account with permissions to create self-service actions.
- The Git Integration that is relevant for you needs to be installed.
- A repository in your Git provider in which you can create a workflow/pipeline.
Set up scaffolding action
Set up the action's frontend
-
Head to the Self-service page of your portal.
-
Click on the
+ Actionbutton in the top-right corner (or in the middle if there are no actions yet):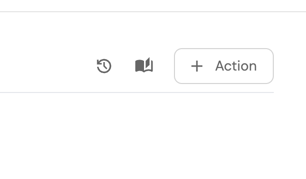
-
Fill the basic form with the Title and Description and select
CreateandServicefor the Operation and Blueprint respectively.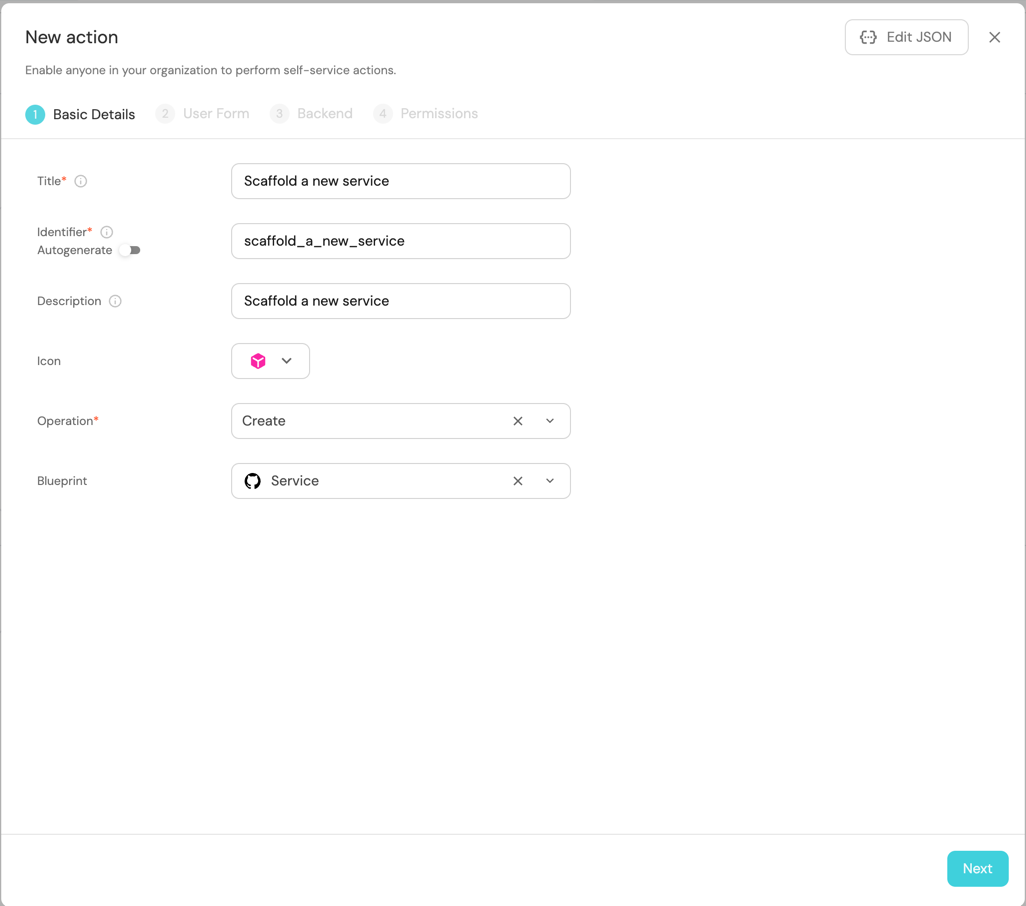
-
Click
Nextto proceed to theUser Formtab, then click on+ Input. -
Enter
Service nameas the Title, selectTextfor the Type, set Required toTrue, and click on theCreatebutton.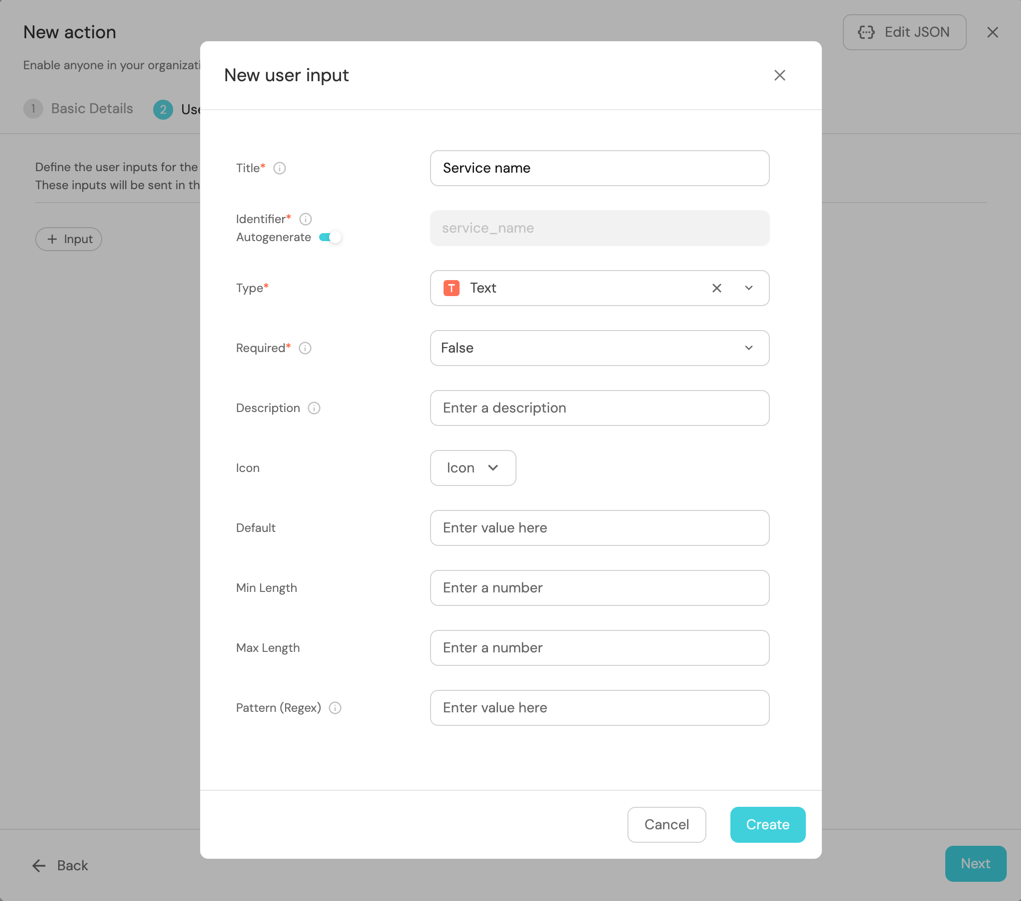
- Bitbucket (Jenkins)
- Azure DevOps
If using Bitbucket, you will need to create these two additional inputs:
Bitbucket requirements (Click to expand)
Input Name Type Required Additional Information Bitbucket Workspace Name String Yes The name of the workspace in which to create the new repository. Bitbucket Project Key String Yes The key of the Bitbucket project in which to create the new repository. If using Azure DevOps, you will need to create these additional inputs:
Azure DevOps requirements (Click to expand)
Input Name Type Required Additional Information Service Name Text Yes Azure Organization String Yes Azure Project Entity Selection Yes Select Project as the blueprint Description String No -
Click
Nextto configure the Backend.
Define backend type
Now we'll define the backend of the action. Port supports multiple invocation types, depending on the Git provider you are using.
- GitHub
- GitLab
- Bitbucket (Jenkins)
- Azure DevOps
Fill out the form with your values:
-
Replace the
Repositoryvalue with your value (this is where the workflow will reside and run). -
Name the workflow
port-create-service.yml. -
Fill out your workflow details:
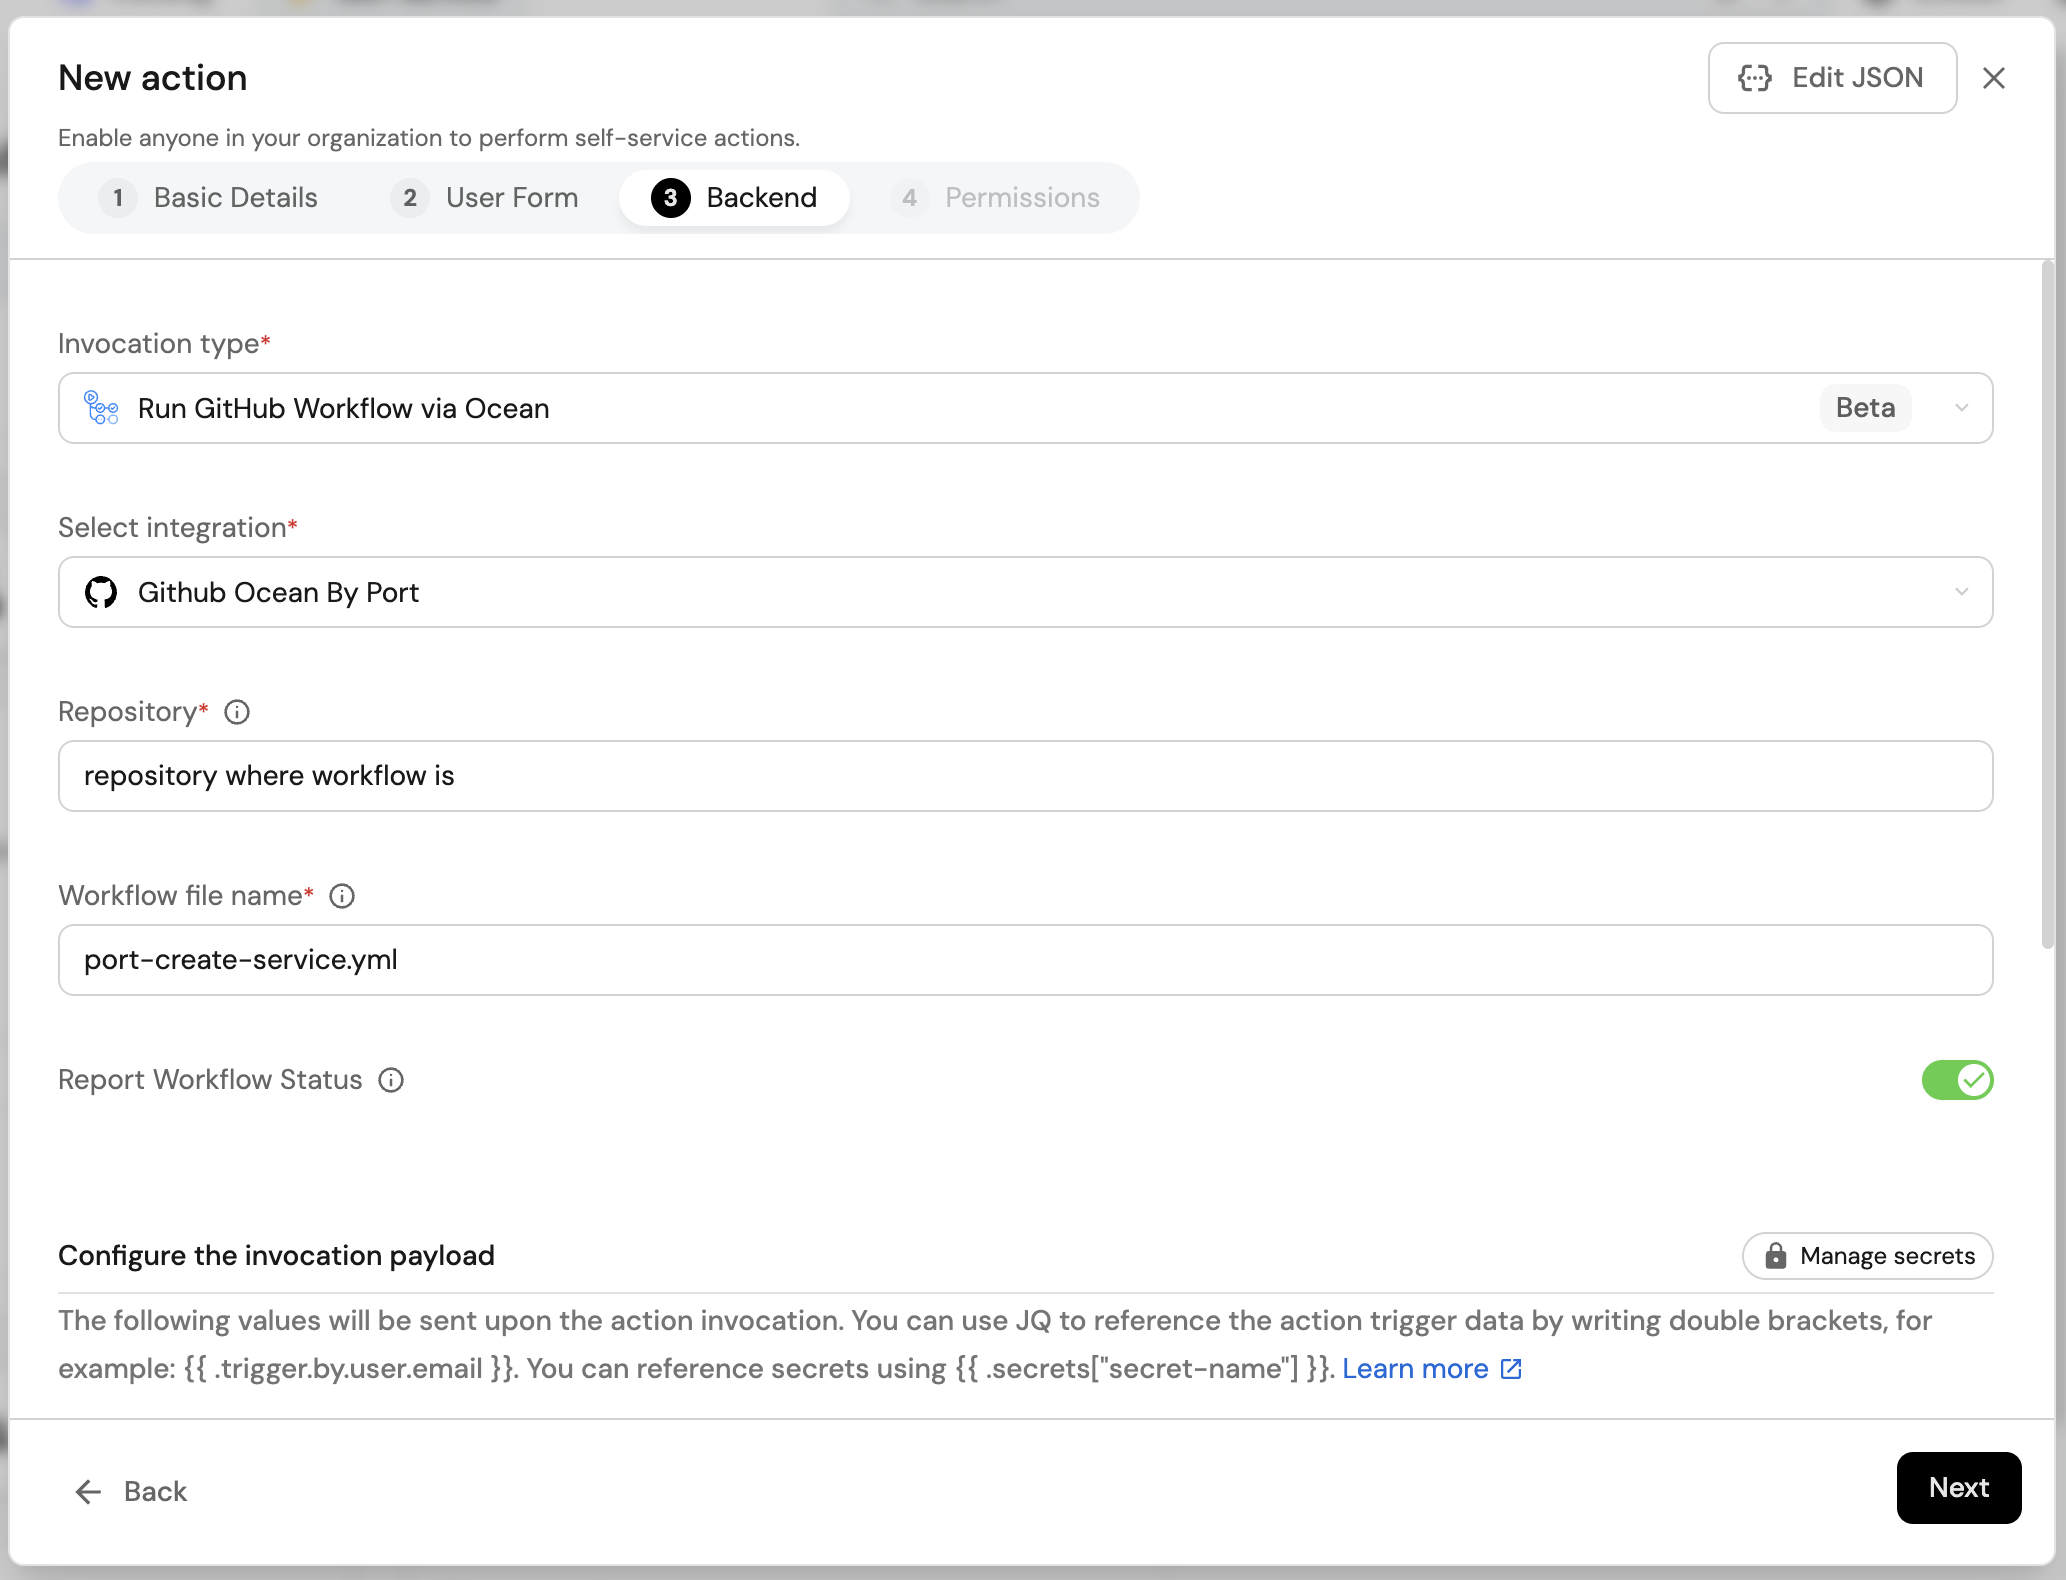
-
Scroll down to the
Configure the invocation payloadsection.
This is where you can define which data will be sent to your backend each time the action is executed.For this example, we will send two details that our backend needs to know - the service name, and the id of the action run. Note that the service name will be the same as the repository name. Copy the following JSON snippet and paste it in the payload code box:
{"port_context": {"runId": "{{ .run.id }}"},"service_name": "{{ .inputs.service_name }}"}
You will need a few parameters for this part that are generated in the setup the action's backend section, it is recommended to complete the steps there and then follow the instructions here with all of the required information in hand.
First, choose Trigger Webhook URL as the invocation type, then fill out the form:
-
For the
Endpoint URLyou need to add a URL in the following format:https://gitlab.com/api/v4/projects/{GITLAB_PROJECT_ID}/ref/main/trigger/pipeline?token={GITLAB_TRIGGER_TOKEN}- The value for
{GITLAB_PROJECT_ID}is the ID of the GitLab group that you create in the setup the action's backend section which stores the.gitlab-ci.ymlpipeline file.- To find the project ID, browse to the GitLab page of the group you created, at the top right corner of the page, click on the vertical 3 dots button (next to
Fork) and selectCopy project ID
- To find the project ID, browse to the GitLab page of the group you created, at the top right corner of the page, click on the vertical 3 dots button (next to
- The value for
{GITLAB_TRIGGER_TOKEN}is the trigger token you create in the setup the action's backend section.
- The value for
-
Set
HTTP methodtoPOST. -
Set
Request typetoAsync. -
Set
Use self-hosted agenttoNo.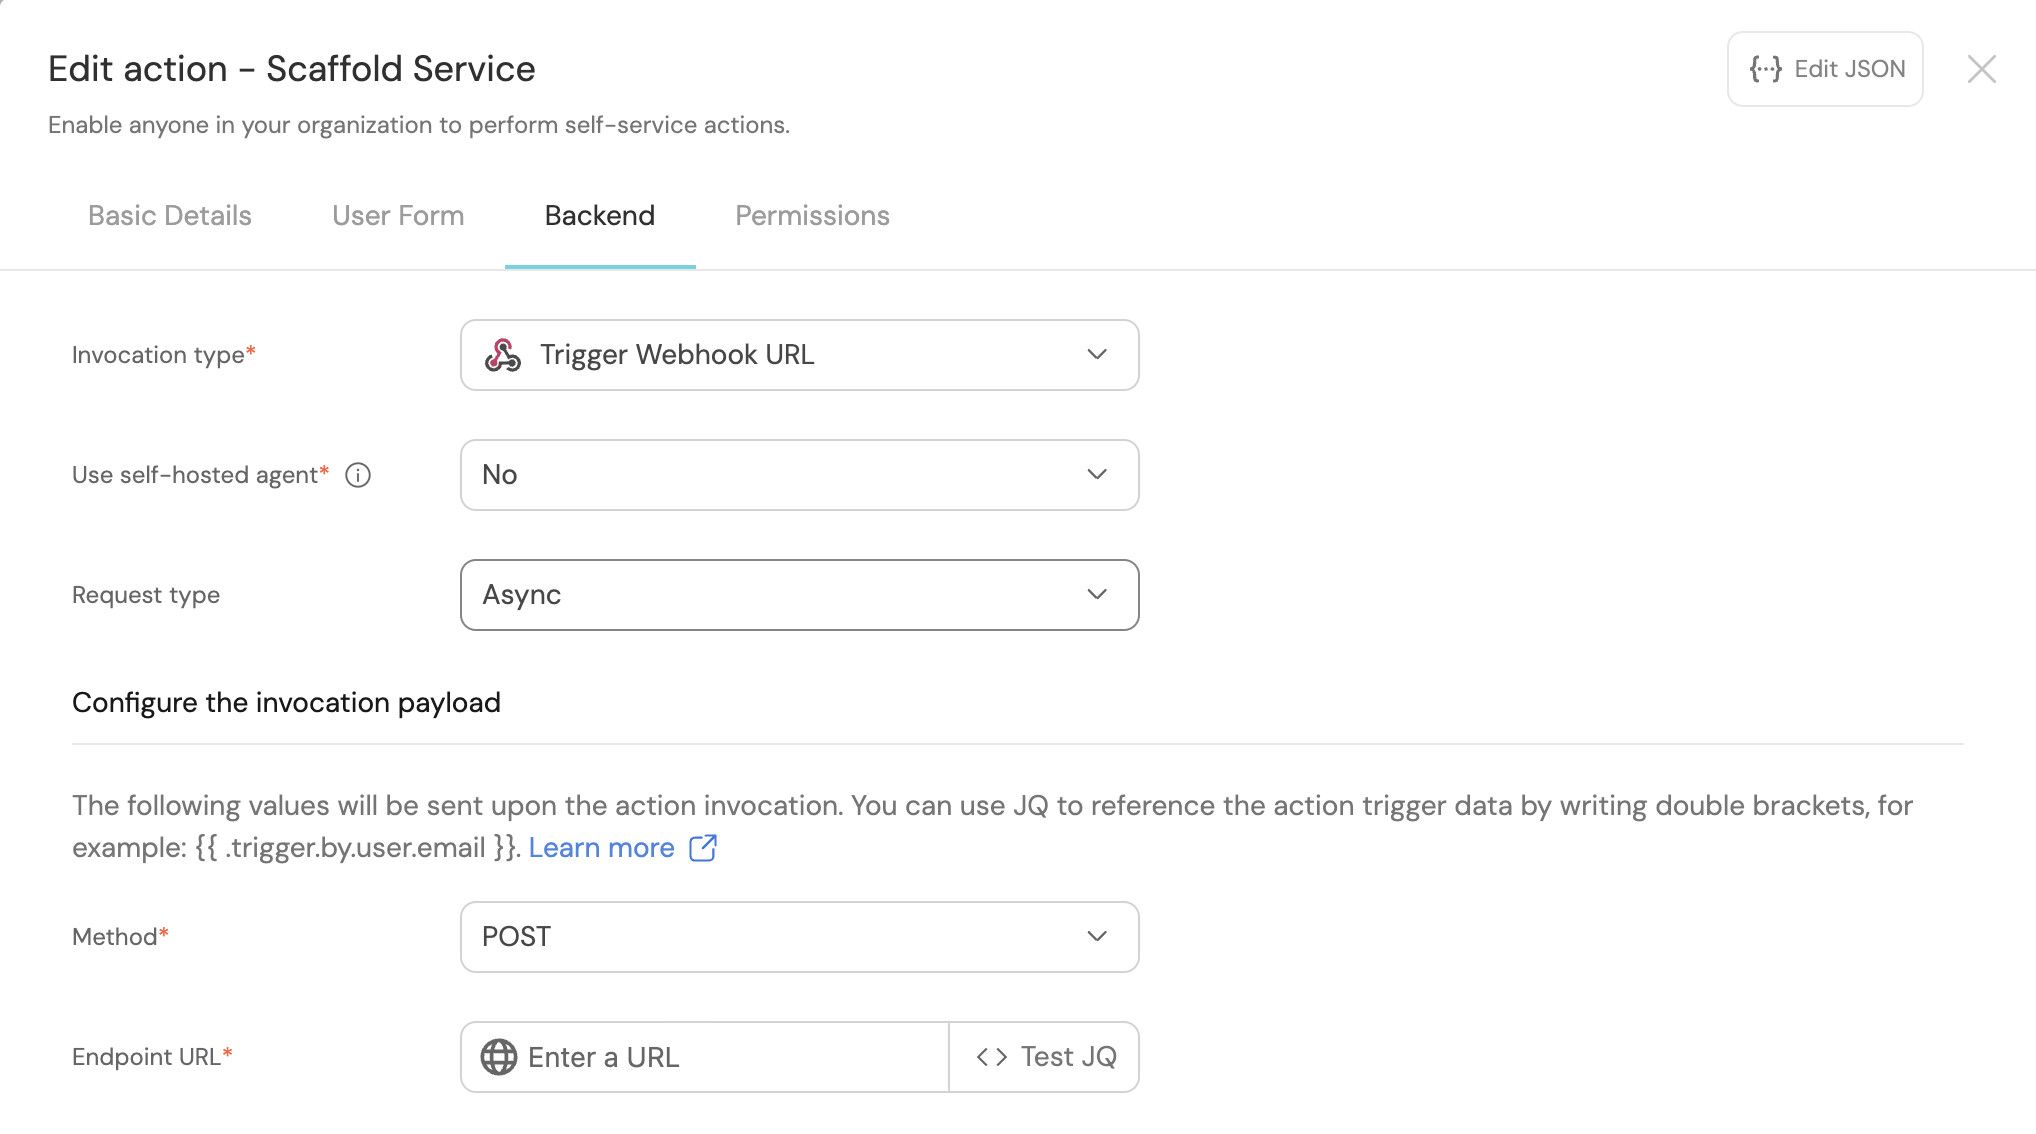
-
Scroll down to the
Configure the invocation payloadsection.
This is where you can define which data will be sent to your backend each time the action is executed.For this example, we will send some details that our backend needs to know, including the service name and the id of the action run.
Copy the following JSON snippet and paste it in the "Body" code box:{"port_context": {"runId": "{{ .run.id }}","user": {"firstName": "{{ .trigger.by.user.firstName }}","lastName": "{{ .trigger.by.user.lastName }}","email": "{{ .trigger.by.user.email }}",}},"service_name": "{{ .inputs.service_name }}",}
First, choose Jenkins as the invocation type.
- Follow the instructions under
Define a webhook to trigger a Jenkins jobto obtain your webhook URL.
Then, fill out your workflow details:
-
Replace the
Webhook URLwith your value (this is where the pipeline will reside and run). -
Leave the
Use self-hosted agentoption set toNo.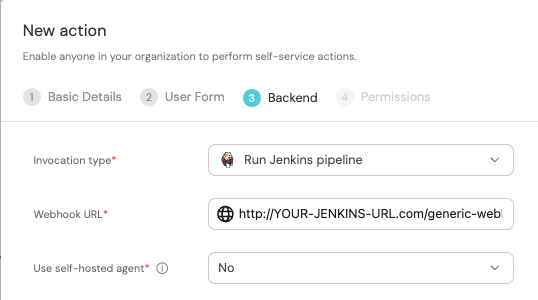
-
Scroll down to the
Configure the invocation payloadsection.
This is where you can define which data will be sent to your backend each time the action is executed.For this example, we will send some details that our backend needs to know - the user inputs, and the id of the action run.
Copy the following JSON snippet and paste it in the payload code box:{"port_context": {"runId": "{{ .run.id }}",},"service_name": "{{ .inputs.service_name }}","bitbucket_workspace_name": "{{ .inputs.bitbucket_workspace_name }}","bitbucket_project_key": "{{ .inputs.bitbucket_project_key }}",}
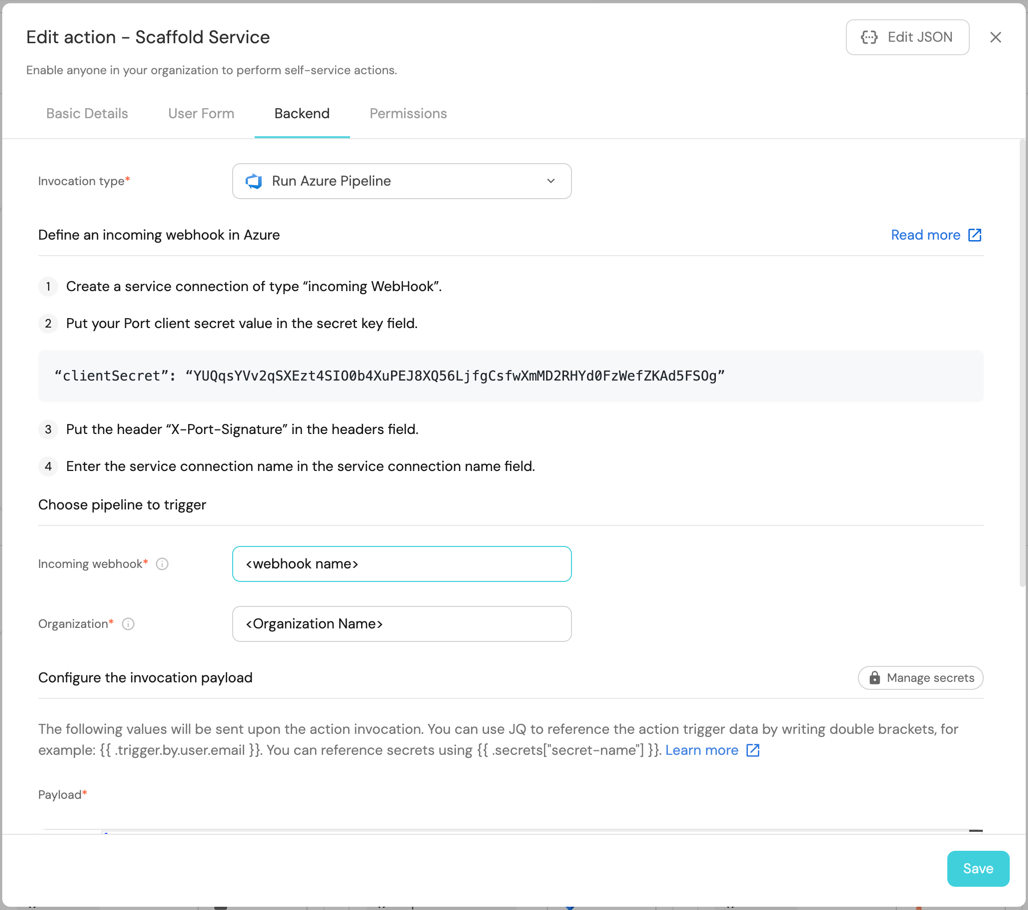
First, choose Run Azure Pipeline as the invocation type. Then fill out the form:
- Replace
Incoming Webhookwith the name of your webhook trigger. - Replace
Organizationwith your Azure DevOps organization name. - Under
Payload, we will define the data sent to the backend. Copy the following JSON snippet and paste it in thePayloadcode box:
{
    "properties": {
        "service_name": "{{.inputs.\"service_name\"}}",
        "azure_organization": "{{.inputs.\"azure_organization\"}}",
        "description": "{{.inputs.\"description\"}}",
        "azure_project": "{{.inputs.\"azure_project\"}}"
    },
    "port_context": {
        "runId": "{{.run.id}}",
        "trigger": "{{ .trigger }}"
    }
}
The last step is customizing the action's permissions. For simplicity's sake, we will use the default settings. For more information, see the permissions page. Click Create.
The action's frontend is now ready 🥳
Set up the action's backend
Now we want to write the logic that our action will trigger.
- GitHub
- GitLab
- Bitbucket (Jenkins)
- Azure DevOps
If the GitHub organization which will house your workflow is not the same as the one you'll create the new repository in, install GitHub ocean in the other organization as well.
-
First, let's create the necessary token and secrets:
-
Go to your GitHub tokens page, create a personal access token (classic) with
repo,admin:repo_hookandadmin:orgscope, and copy it (this token is needed to create a repo from our workflow). SAML SSO
If your organization uses SAML SSO, you will need to authorize your token. Follow these instructions and then continue this guide.
-
Go to your Port application, click on your profile picture
 , then click
 Credentials. Copy yourClient IDandClient secret.
-
-
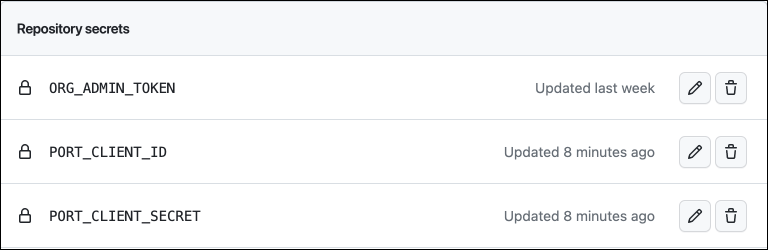
In the repository where your workflow will reside, create 3 new secrets under
Settings->Secrets and variables->Actions:ORG_ADMIN_TOKEN- the personal access token you created in the previous step.PORT_CLIENT_ID- the client ID you copied from your Port app.PORT_CLIENT_SECRET- the client secret you copied from your Port app.
-
Now let's create the workflow file that contains our logic.
First, ensure that you have a.github/workflowsdirectory, then create a new file namedport-create-service.ymland use the following snippet as its content (remember to change<YOUR-ORG-NAME>to your GitHub organization name):Personal (user) account noteIf you are scaffolding repositories under a personal GitHub account (user-owned repositories), the integration cannot rely on organization-level webhooks to discover newly created repositories immediately.
To avoid
githubRepositoryrelation 404s when creating theserviceentity, setcreatePortEntity: truein your workflow under the step that usesport-labs/cookiecutter-gha@..., so the repository entity is created in Port as part of the scaffold.GitHub workflow (Click to expand)
port-create-service.ymlname: Scaffold a new serviceon:workflow_dispatch:inputs:service_name:required: truedescription: The name of the new servicetype: stringdescription:required: falsedescription: Description of the servicetype: stringport_context:required: truedescription: Includes the action's run idtype: stringjobs:scaffold-service:runs-on: ubuntu-latestenv:ORG_NAME: <YOUR-ORG-NAME>steps:- uses: actions/checkout@v6- name: Extract runId from port_contextrun: |echo "PORT_RUN_ID=$(echo '${{ inputs.port_context }}' | jq -r .runId)" >> $GITHUB_ENV- name: Create a log messageuses: port-labs/port-github-action@v1with:clientId: ${{ secrets.PORT_CLIENT_ID }}clientSecret: ${{ secrets.PORT_CLIENT_SECRET }}baseUrl: https://api.port.iooperation: PATCH_RUNrunId: ${{ env.PORT_RUN_ID }}logMessage: "Starting scaffolding of service and repository: ${{ inputs.service_name }}"- name: Create GitHub Repositoryuses: port-labs/cookiecutter-gha@v1.1.1with:portClientId: ${{ secrets.PORT_CLIENT_ID }}portClientSecret: ${{ secrets.PORT_CLIENT_SECRET }}token: ${{ secrets.ORG_ADMIN_TOKEN }}portRunId: ${{ fromJson(inputs.port_context).runId }}repositoryName: ${{ inputs.service_name }}portUserInputs: '{"cookiecutter_app_name": "${{ inputs.service_name }}" }'cookiecutterTemplate: https://github.com/lacion/cookiecutter-golangblueprintIdentifier: "githubRepository"organizationName: ${{ env.ORG_NAME }}createPortEntity: false- name: Create Service in Port with Repository Relationuses: port-labs/port-github-action@v1with:clientId: ${{ secrets.PORT_CLIENT_ID }}clientSecret: ${{ secrets.PORT_CLIENT_SECRET }}baseUrl: https://api.port.iooperation: UPSERTidentifier: "${{ inputs.service_name }}_service"title: "${{ inputs.service_name }} Service"blueprint: "service"createMissingRelatedEntities: truerelations: |{ "github_repository": "${{ inputs.service_name }}" }- name: Create a log messageuses: port-labs/port-github-action@v1with:clientId: ${{ secrets.PORT_CLIENT_ID }}clientSecret: ${{ secrets.PORT_CLIENT_SECRET }}baseUrl: https://api.port.iooperation: PATCH_RUNrunId: ${{ env.PORT_RUN_ID }}logMessage: "Finished scaffolding of service and repository: ${{ inputs.service_name }}"- name: Report action status to Portuses: port-labs/port-github-action@v1with:clientId: ${{ secrets.PORT_CLIENT_ID }}clientSecret: ${{ secrets.PORT_CLIENT_SECRET }}baseUrl: https://api.port.iooperation: PATCH_RUNrunId: ${{ env.PORT_RUN_ID }}status: "SUCCESS"summary: "Scaffolding of service and repository finished successfully"- name: Report failure status to Portif: failure()uses: port-labs/port-github-action@v1with:clientId: ${{ secrets.PORT_CLIENT_ID }}clientSecret: ${{ secrets.PORT_CLIENT_SECRET }}baseUrl: https://api.port.iooperation: PATCH_RUNrunId: ${{ env.PORT_RUN_ID }}status: "FAILURE"summary: "Failed to scaffold service and repository"
First, let's create a GitLab project that will store our new scaffolder pipeline - Go to your GitLab account and create a new project.
Next, let's create the necessary token and secrets:
-
Go to your Port application, click on your profile picture
, then click Credentials. Copy yourClient IDandClient secret. -
Go to your root group, and follow the steps here to create a new group access token with the following permission scopes:
api, read_api, read_repository, write_repository, then save its value as it will be required in the next step.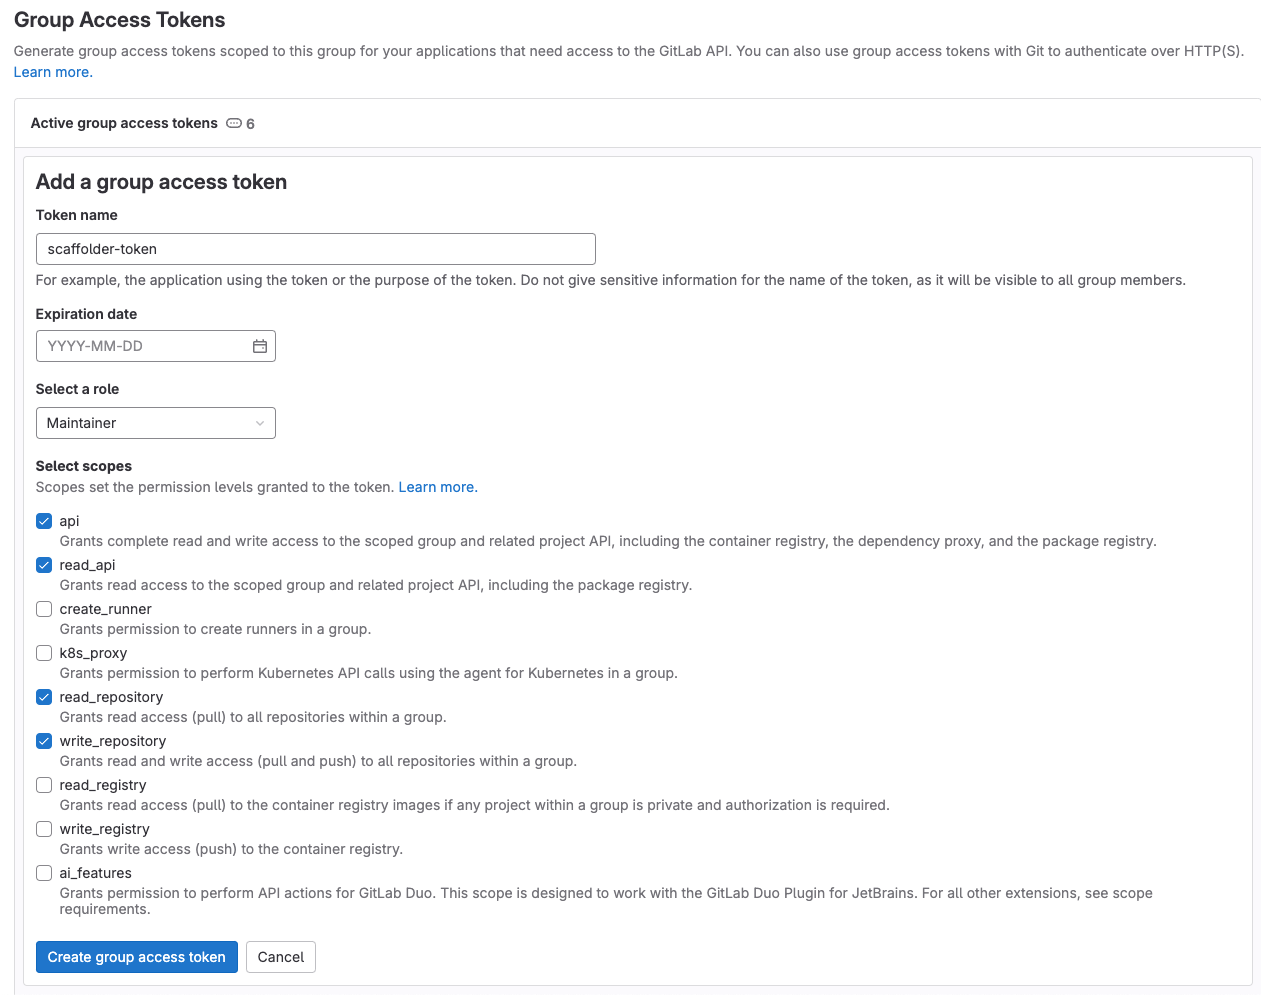
-
Go to the new GitLab project you created, from the
Settingsmenu in the sidebar on the left, selectCI/CD. -
Expand the
Variablessection and save the following secrets:PORT_CLIENT_ID- Your Port client ID.PORT_CLIENT_SECRET- Your Port client secret.GITLAB_ACCESS_TOKEN- The GitLab group access token you created in the previous step.
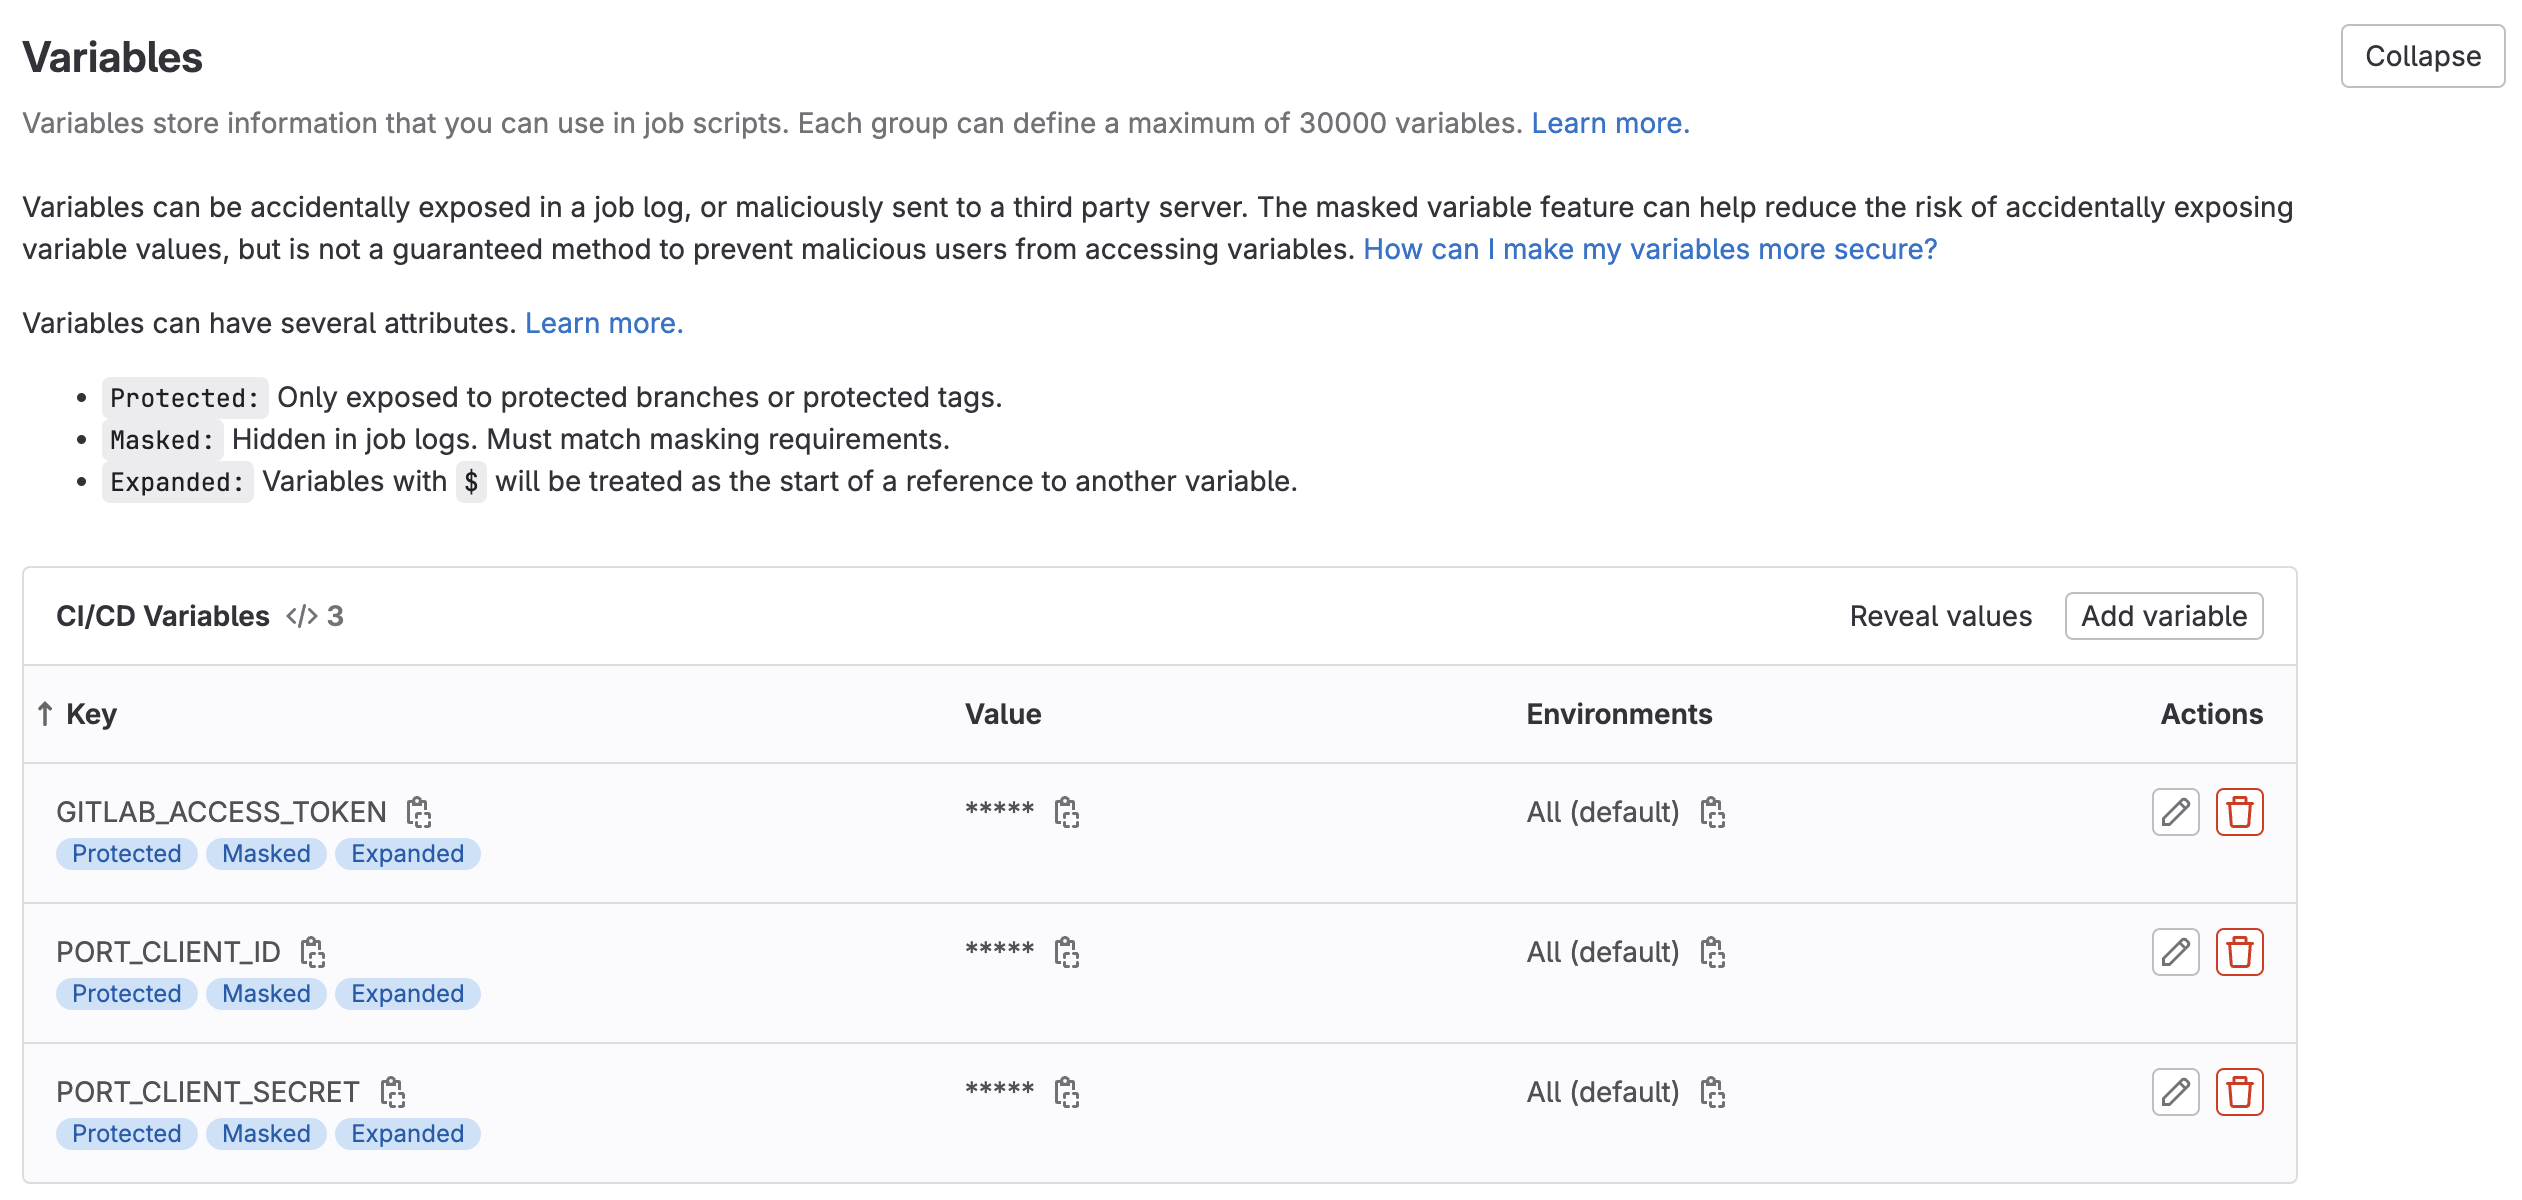
-
Expand the
Pipeline trigger tokenssection and add a new token, give it a meaningful description such asScaffolder tokenand save its value-
This is the
{GITLAB_TRIGGER_TOKEN}that you need for the define backend type section.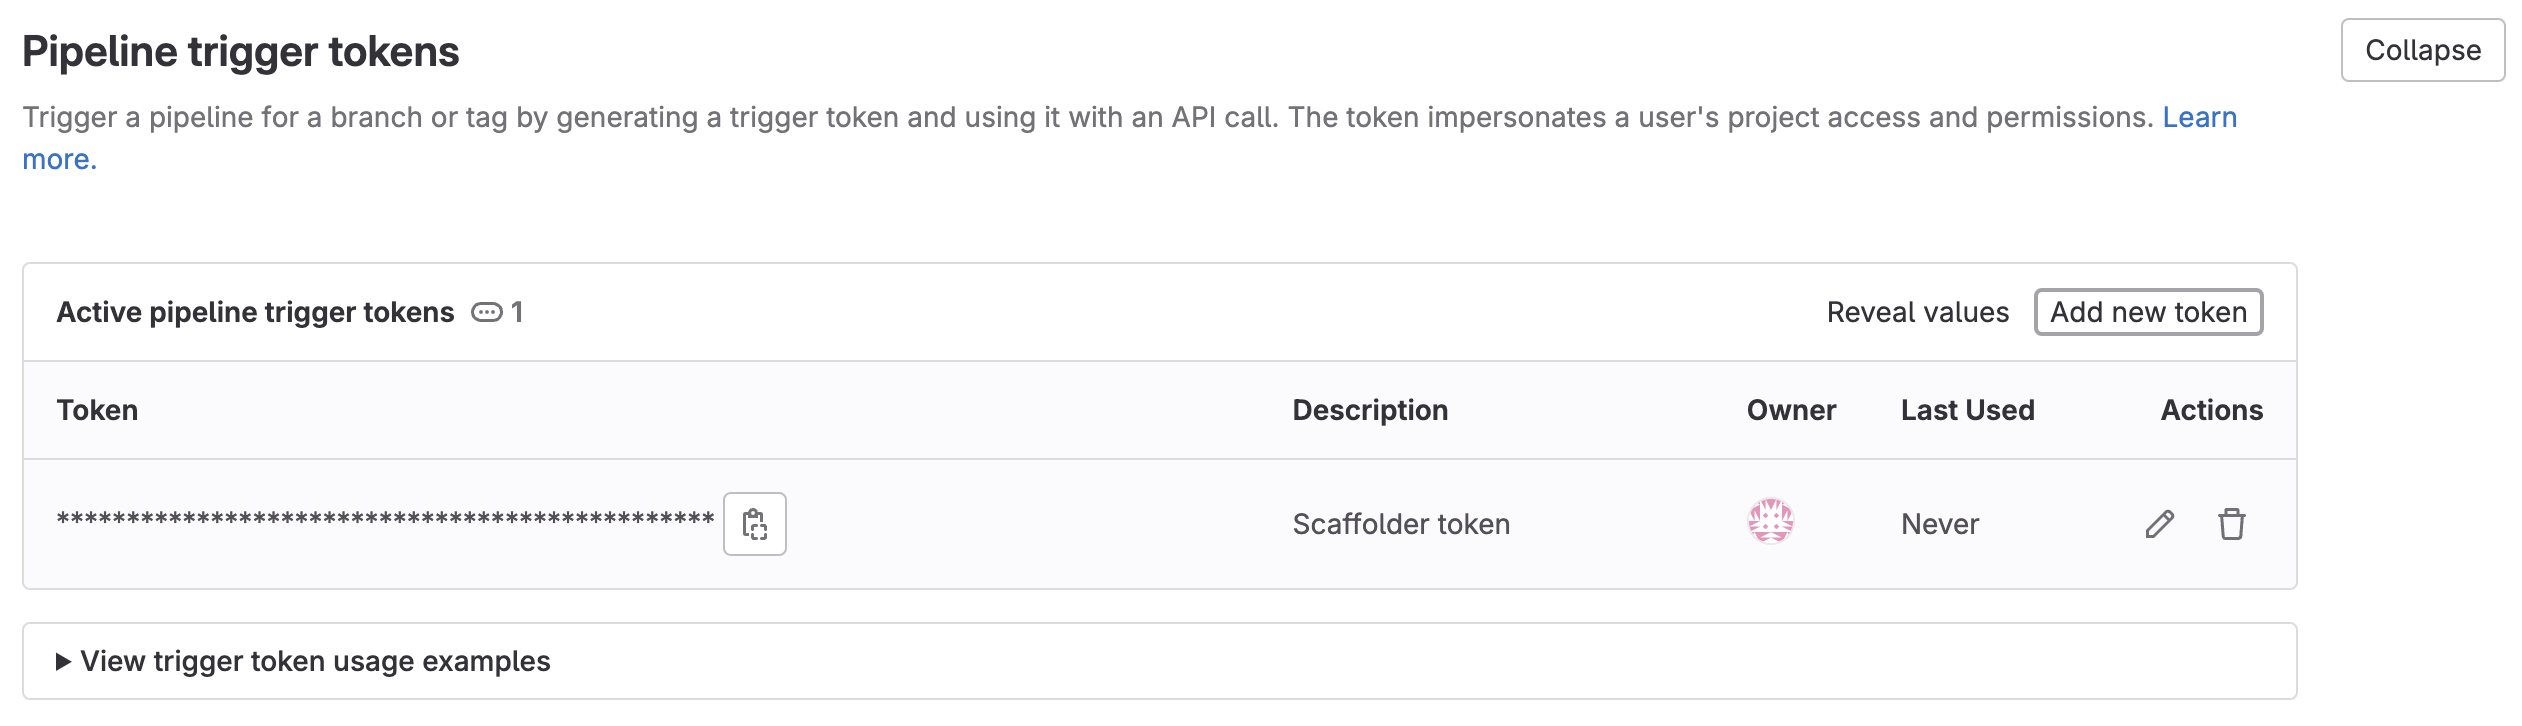
-
Now that you have both the new GitLab project and its respective trigger token, you can go to the define backend type section and complete the action configuration in Port.
Now let's create the pipeline file that contains our logic.
In the root of your new GitLab project, create a new file named .gitlab-ci.yml and use the following snippet as its content:GitLab pipeline (Click to expand)
First, let's create the necessary tokens and secrets:
-
Go to your Port application, click on your profile picture
, then click Credentials. Copy yourClient IDandClient secret. -
Configure the following as Jenkins credentials:
BITBUCKET_USERNAME- a user with access to the Bitbucket workspace and project.BITBUCKET_APP_PASSWORD- an App Password with theRepositories:ReadandRepositories:Writepermissions permissions.PORT_CLIENT_ID- Your Port client ID.PORT_CLIENT_SECRET- Your Port client secret.

Next, create a Jenkins pipeline with the following configuration:
-
Define the value of the
tokenfield, the token you specify will be used to trigger the scaffold pipeline specifically. For example, you can usescaffolder-token. -
Define variables for the pipeline: define the
SERVICE_NAME,BITBUCKET_WORKSPACE_NAME,BITBUCKET_PROJECT_KEY, andRUN_IDvariables. Scroll down to thePost content parametersand for each variable add configuration like so (look at the table below for the full variable list):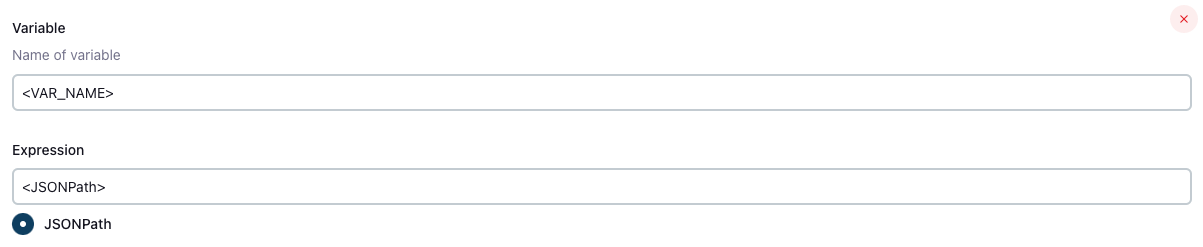
Create the following variables and their related JSONPath expression:
| Variable Name | JSONPath Expression |
|---|---|
| SERVICE_NAME | $.service_name |
| BITBUCKET_WORKSPACE_NAME | $.bitbucket_workspace_name |
| BITBUCKET_PROJECT_KEY | $.bitbucket_project_key |
| RUN_ID | $.port_context.runId |
Add the following content to the new Jenkins pipeline:Jenkins pipeline (Click to expand)
-
Create an Azure DevOps repository called
Port-actionsin your Azure DevOps Organization/Project. -
Configure Service Connection and Webhook:
- Go to your Azure DevOps project.
- Navigate to
Project Settings>Service connections. - Click on
New service connection. - Select
Incoming Webhook. - Use the same name for both
Webhook NameandService connection name.
-
Create Azure Pipeline in
Port-actionsRepository
In your Port-actions Azure DevOps repository, create an Azure Pipeline file named azure-pipelines.yml in the root of the repo's main branch with the following content:Azure DevOps pipeline script (Click to expand)
Replace <SERVICE_CONNECTION_NAME> with the name of the service connection you created in Azure DevOps
and <WEBHOOK NAME> with the name of the webhook you created in Azure DevOps which should be the same as the service connection name.
-
Configure the Pipeline:
- In your Azure DevOps project, navigate to
Pipelines>Create Pipeline. - Select
Azure Repos Gitand choose thePort-actionsrepository. - Click
Save(in the "Run" dropdown menu).
- In your Azure DevOps project, navigate to
-
Create the necessary tokens and secrets:
- Go to your Port application, click on your profile picture , then click
Credentials. Copy yourClient IDandClient secret.
- Go to your Port application, click on your profile picture
-
Configure the following as Variables for the
azure-pipelines.yml:- Go to pipelines and select the
Port-actionspipeline. - Click on
Editand thenVariables. - Add the following variables:
PORT_CLIENT_ID- Your Portclient ID.PORT_CLIENT_SECRET- Your Portclient secret.PERSONAL_ACCESS_TOKEN- Your Azure DevOps personal access token.
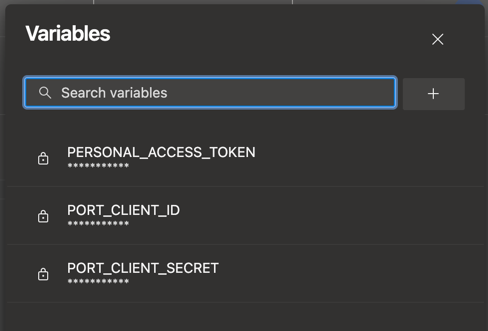
- Go to pipelines and select the
Having issues with Azure DevOps integration or pipelines? See the Azure DevOps Troubleshooting Guide for step-by-step help.
The cookiecutter templates provided in the workflows are just examples, you can replace them with any other cookiecutter template you want to use, by changing the value of the relevant template variable in the workflow.
All done! The action is ready to be used 🚀
Execute the action
Head back to the Self-service page of your Port application:
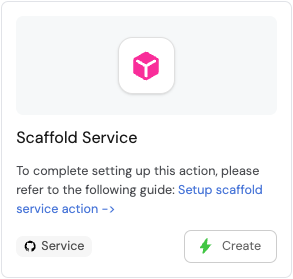
-
Click on
Createto begin executing the action. -
Enter a name for your new repository.
Repository name restrictionsSome Git providers (for example, GitHub) do not allow spaces in repository names.
We recommend using underscores or hyphens instead of spaces. -
For some of the available Git providers, additional inputs are required when executing the action.
- Bitbucket (Jenkins)
- Azure DevOps
When executing the Bitbucket scaffolder, you will need to provide two additional inputs:
Bitbucket Workspace Name- the name of the workspace to create the new repository in.Bitbucket Project Key- the key of the Bitbucket project to create the new repository in.- To find the Bitbucket project key, go to
https://bitbucket.org/YOUR_BITBUCKET_WORKSPACE/workspace/projects/, find the desired project in the list, and copy the value seen in theKeycolumn in the table.
- To find the Bitbucket project key, go to
When executing the Azure DevOps scaffolder, you will need to provide the following additional inputs:
Azure Organization- the name of the Azure DevOps organization.Azure Project- select the Azure DevOps project you want the repo to be created in.Description- a brief description of the repository. (Optional)
-
Click
Execute. Click the button to view the action's progress.
 -
This page provides details about the action run. As you can see, the backend returned
Successand the repo was successfully created (this can take a few moments):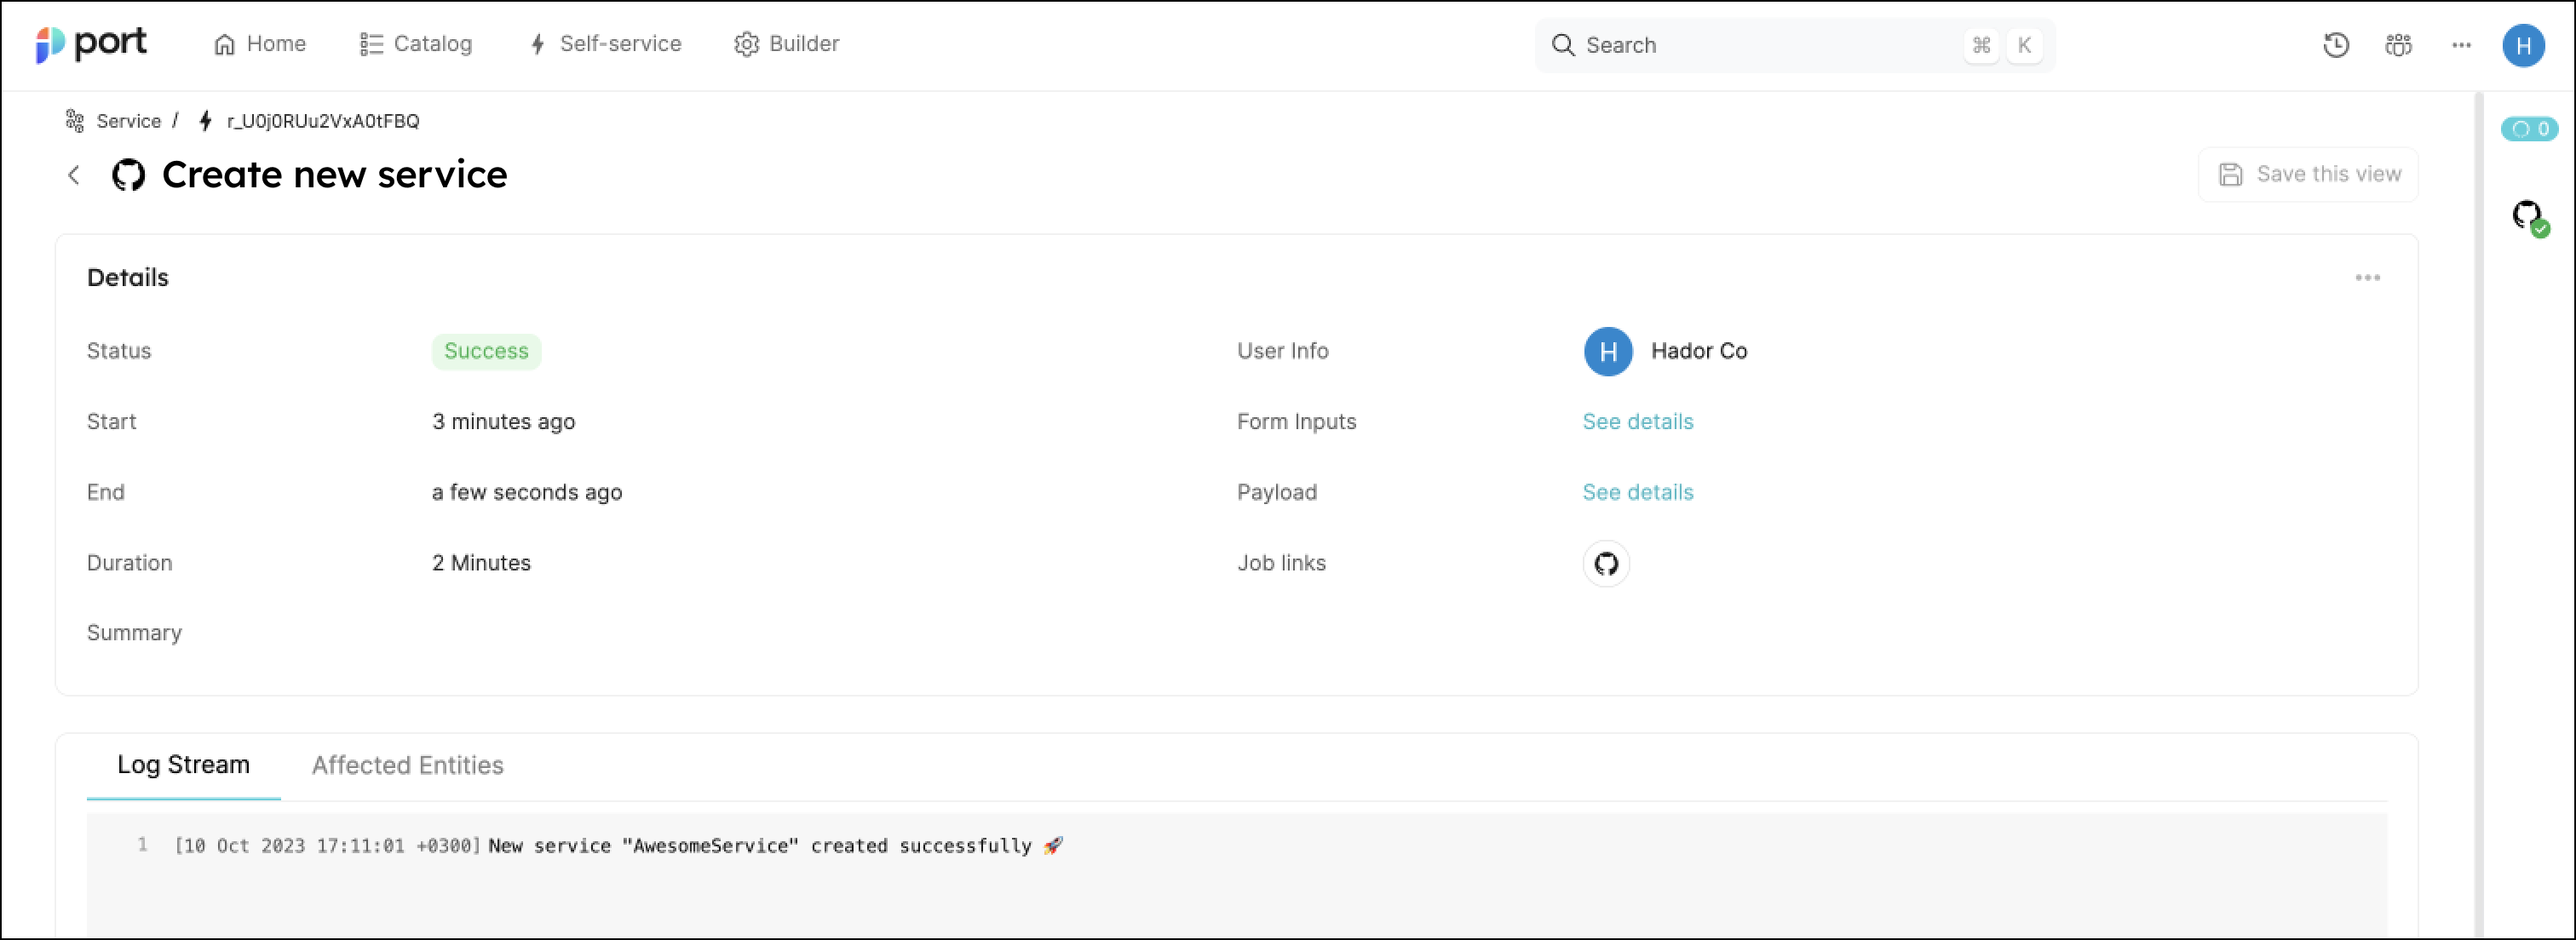
Logging action progress💡 Note the
Log streamat the bottom, this can be used to report progress, results and errors. Click here to learn more. -
Head over to the service catalog and you will see a microservice entity created with the repository linked to it:
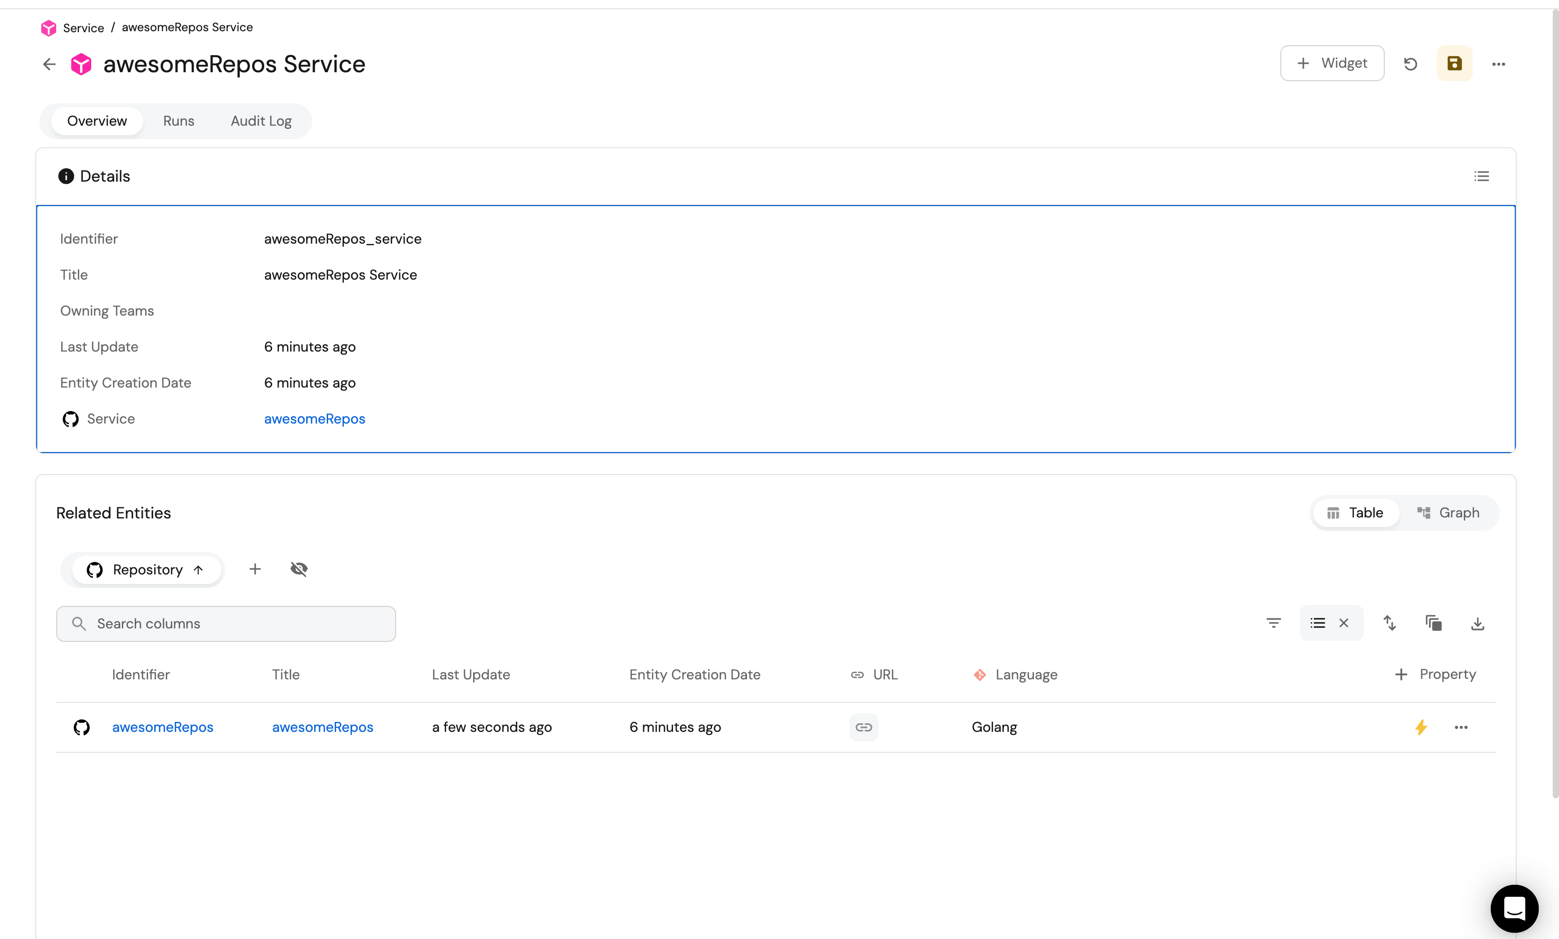
Congratulations! You can now create services easily from Port.
Create pull requests for follow-up infrastructure changes
After a service is scaffolded, teams often need to add infrastructure code or configuration to the service repository. Use this optional flow to create a GitHub pull request from Port that appends a Terraform resource block to main.tf.
This example adds an Azure storage account resource, but you can replace the Terraform template with any resource your golden path needs.
Set up self-service action
Follow the steps below to create a self-service action that triggers a GitHub workflow.
-
Go to the Self-service page of your portal.
-
Click on the
+ New Actionbutton. -
Click on the
{...} Edit JSONbutton. -
Copy and paste the following JSON configuration into the editor:
Open GitHub PR action (Click to expand)
Replace the variables<GITHUB_ORG>- Your GitHub organization or user name.<GITHUB_REPO>- The repository where the workflow file is stored.<YOUR_GITHUB_OCEAN_INTEGRATION_ID>- Your GitHub Ocean integration installation ID.
{"identifier": "open_github_pr","title": "Open GitHub PR","icon": "Microservice","description": "Open a pull request after modifying a Terraform file.","trigger": {"type": "self-service","operation": "DAY-2","userInputs": {"properties": {"storage_name": {"type": "string","title": "Storage name"},"storage_location": {"type": "string","title": "Storage location"}},"required": ["storage_name","storage_location"],"order": ["storage_name","storage_location"]},"blueprintIdentifier": "service"},"invocationMethod": {"type": "INTEGRATION_ACTION","installationId": "<YOUR_GITHUB_OCEAN_INTEGRATION_ID>","integrationActionType": "dispatch_workflow","integrationActionExecutionProperties": {"org": "<GITHUB_ORG>","repo": "<GITHUB_REPO>","workflow": "create-github-pr.yml","workflowInputs": {"storage_name": "{{ .inputs.storage_name }}","storage_location": "{{ .inputs.storage_location }}","repo_url": "{{ .entity.properties.url }}","port_context": {"blueprint": "{{ .action.blueprint }}","entity": "{{ .entity }}","runId": "{{ .run.id }}","trigger": "{{ .trigger }}"}},"reportWorkflowStatus": true}},"requiredApproval": false} -
Click Save to create the action.
Create Terraform templates
In the target service repository, create a templates/create-azure-storage.tf file:
Azure storage account template (Click to expand)
resource "azurerm_storage_account" "storage_account" {
  name                     = "{{ storage_name }}"
  resource_group_name      = "YourResourcesGroup"
  location                 = "{{ storage_location }}"
  account_tier             = "Standard"
  account_replication_type = "LRS"
  account_kind             = "StorageV2"
}
Add a main.tf file in the root of the repository if it does not already exist:
Terraform provider configuration (Click to expand)
terraform {
  required_providers {
    azurerm = {
      source  = "hashicorp/azurerm"
      version = "~> 3.0.2"
    }
  }

  required_version = ">= 1.1.0"
}

provider "azurerm" {
  features {}
}
Create the GitHub workflow
Create .github/workflows/create-github-pr.yml in the workflows repository. Add the following repository secrets before running it:
PORT_CLIENT_ID- Your Port client ID.PORT_CLIENT_SECRET- Your Port client secret.GH_TOKEN- A classic personal access token with thereposcope.
Create GitHub PR workflow (Click to expand)
name: Create GitHub PR

on:
  workflow_dispatch:
    inputs:
      storage_name:
        required: true
        type: string
      storage_location:
        required: true
        type: string
      repo_url:
        required: true
        type: string
      port_context:
        required: true
        type: string

jobs:
  create-pr:
    runs-on: ubuntu-latest
    steps:
      - name: Inform starting
        uses: port-labs/port-github-action@v1
        with:
          clientId: ${{ secrets.PORT_CLIENT_ID }}
          clientSecret: ${{ secrets.PORT_CLIENT_SECRET }}
          operation: PATCH_RUN
          runId: ${{ fromJson(inputs.port_context).runId }}
          logMessage: |
            Creating a GitHub pull request for a new Terraform resource.

      - name: Extract repository information
        run: |
          REPO_PATH=$(echo "${{ inputs.repo_url }}" | sed 's|https://github.com/||' | sed 's|git@github.com:||' | sed 's|.git||')
          echo "REPO_PATH=$REPO_PATH" >> $GITHUB_ENV

      - name: Checkout target repository
        uses: actions/checkout@v6
        with:
          repository: ${{ env.REPO_PATH }}
          token: ${{ secrets.GH_TOKEN }}
          ref: main

      - name: Make Terraform changes
        run: |
          sed "s/{{ storage_name }}/${{ inputs.storage_name }}/g; s/{{ storage_location }}/${{ inputs.storage_location }}/g" templates/create-azure-storage.tf >> main.tf

      - name: Create branch and push
        run: |
          git config user.name "github-actions[bot]"
          git config user.email "github-actions[bot]@users.noreply.github.com"
          git checkout -b "infra/new-resource-${{ inputs.storage_name }}"
          git add main.tf
          git commit -m "Add a new Terraform resource block"
          git push origin "infra/new-resource-${{ inputs.storage_name }}"

      - name: Create pull request
        run: |
          gh pr create --base main --head "infra/new-resource-${{ inputs.storage_name }}" \
            --title "Add resource block ${{ inputs.storage_name }}" \
            --body "This pull request adds a new Terraform resource block to the project."
        env:
          GH_TOKEN: ${{ secrets.GH_TOKEN }}

      - name: Notify Port
        uses: port-labs/port-github-action@v1
        with:
          clientId: ${{ secrets.PORT_CLIENT_ID }}
          clientSecret: ${{ secrets.PORT_CLIENT_SECRET }}
          operation: PATCH_RUN
          runId: ${{ fromJson(inputs.port_context).runId }}
          status: SUCCESS
          logMessage: |
            Created GitHub pull request for new Terraform resource ${{ inputs.storage_name }}.
Deploy with Jenkins
Use Jenkins if your organization already manages GitOps automation through Jenkins pipelines.
First, create a second self-service action that invokes Jenkins:
Open GitHub PR with Jenkins action (Click to expand)
YOUR_JENKINS_URL- The URL of your Jenkins server.JOB_TOKEN- The token of the Jenkins job.
{
  "identifier": "open_github_pr_with_jenkins",
  "title": "Open GitHub PR with Jenkins",
  "icon": "Microservice",
  "description": "Open a pull request after modifying a Terraform file using Jenkins.",
  "trigger": {
    "type": "self-service",
    "operation": "DAY-2",
    "userInputs": {
      "properties": {
        "storage_name": {
          "type": "string",
          "title": "Storage name"
        },
        "storage_location": {
          "type": "string",
          "title": "Storage location"
        }
      },
      "required": [
        "storage_name",
        "storage_location"
      ],
      "order": [
        "storage_name",
        "storage_location"
      ]
    },
    "blueprintIdentifier": "service"
  },
  "invocationMethod": {
    "type": "JENKINS",
    "url": "http://YOUR_JENKINS_URL/generic-webhook-trigger/invoke?token=<JOB_TOKEN>",
    "agent": false,
    "body": {
      "{{ spreadValue() }}": "{{ .inputs }}",
      "port_context": {
        "runId": "{{ .run.id }}",
        "blueprint": "{{ .action.blueprint }}",
        "entity": "{{ .entity }}"
      }
    }
  },
  "requiredApproval": false
}
Then configure Jenkins credentials:
port-credentials- A Jenkins Username with password credential where the username isPORT_CLIENT_IDand the password isPORT_CLIENT_SECRET.WEBHOOK_TOKEN- The webhook token used by the Generic Webhook Trigger plugin.GITHUB_TOKEN- A GitHub personal access token with permissions to create pull requests.
Create the GitHub personal access token from your GitHub tokens page, and grant it the repo and admin:org scopes.
Before adding the Jenkinsfile, configure the Jenkins job:
- Enable the webhook trigger for the pipeline.
- Define variables for the pipeline:
STORAGE_NAME,STORAGE_LOCATION,REPO_URL, andPORT_RUN_ID. - Set the job token to match the
JOB_TOKENconfigured in the Port action.
Create a Jenkins pipeline that receives the Port payload, appends the Terraform template to main.tf, opens a pull request, and reports the run status back to Port:
Jenkins pipeline (Click to expand)
import groovy.json.JsonSlurper

pipeline {
    agent any

    environment {
        GITHUB_TOKEN = credentials("GITHUB_TOKEN")
        NEW_BRANCH_PREFIX = "infra/new-resource"
        NEW_BRANCH_NAME = "${NEW_BRANCH_PREFIX}-${STORAGE_NAME}"
        TEMPLATE_FILE = "templates/create-azure-storage.tf"
        PORT_ACCESS_TOKEN = ""
        REPO = ""
    }

    triggers {
        GenericTrigger(
            genericVariables: [
                [key: "STORAGE_NAME", value: "$.payload.properties.storage_name"],
                [key: "STORAGE_LOCATION", value: "$.payload.properties.storage_location"],
                [key: "REPO_URL", value: "$.payload.entity.properties.url"],
                [key: "PORT_RUN_ID", value: "$.context.runId"]
            ],
            causeString: "Triggered by Port",
            allowSeveralTriggersPerBuild: true,
            regexpFilterExpression: "",
            regexpFilterText: "",
            printContributedVariables: true,
            printPostContent: true
        )
    }

    stages {
        stage("Checkout") {
            steps {
                script {
                    def path = REPO_URL.substring(REPO_URL.indexOf("/") + 1)
                    REPO = path.replace("/github.com/", "")
                }

                git branch: "main", credentialsId: "github", url: "git@github.com:${REPO}.git"
            }
        }

        stage("Make changes") {
            steps {
                script {
                    sh """cat ${TEMPLATE_FILE} | sed "s/{{ storage_name }}/${STORAGE_NAME}/g; s/{{ storage_location }}/${STORAGE_LOCATION}/g" >> main.tf"""
                }
            }
        }

        stage("Create branch and commit") {
            steps {
                script {
                    sh "git checkout -b ${NEW_BRANCH_NAME}"
                    sh "git add main.tf"
                    sh "git commit -m 'Add a new Terraform resource block'"
                    sh "git push origin ${NEW_BRANCH_NAME}"
                }
            }
        }

        stage("Create pull request") {
            steps {
                script {
                    createPullRequestCurl(
                        REPO,
                        NEW_BRANCH_NAME,
                        "main",
                        "Add resource block ${STORAGE_NAME}",
                        "This pull request adds a new Terraform resource block to the project."
                    )
                }
            }
        }

        stage("Get access token") {
            steps {
                withCredentials([usernamePassword(
                    credentialsId: "port-credentials",
                    usernameVariable: "PORT_CLIENT_ID",
                    passwordVariable: "PORT_CLIENT_SECRET"
                )]) {
                    script {
                        def result = sh(returnStdout: true, script: """
                            accessTokenPayload=\$(curl -X POST \
                                -H "Content-Type: application/json" \
                                -d '{"clientId": "${PORT_CLIENT_ID}", "clientSecret": "${PORT_CLIENT_SECRET}"}' \
                                -s "https://api.port.io/v1/auth/access_token")
                            echo \$accessTokenPayload
                        """)

                        def jsonSlurper = new JsonSlurper()
                        def payloadJson = jsonSlurper.parseText(result.trim())
                        PORT_ACCESS_TOKEN = payloadJson.accessToken
                    }
                }
            }
        }

        stage("Notify Port") {
            steps {
                script {
                    sh """
                        curl -X PATCH \
                          -H "Content-Type: application/json" \
                          -H "Authorization: Bearer ${PORT_ACCESS_TOKEN}" \
                          -d '{"status":"SUCCESS", "message": {"run_status": "Jenkins run completed successfully"}}' \
                          "https://api.port.io/v1/actions/runs/${PORT_RUN_ID}"
                    """
                }
            }
        }
    }

    post {
        failure {
            script {
                sh """
                    curl -X PATCH \
                      -H "Content-Type: application/json" \
                      -H "Authorization: Bearer ${PORT_ACCESS_TOKEN}" \
                      -d '{"status":"FAILURE", "message": {"run_status": "Failed to create Terraform resource ${STORAGE_NAME}"}}' \
                      "https://api.port.io/v1/actions/runs/${PORT_RUN_ID}"
                """
            }
        }

        always {
            cleanWs(cleanWhenNotBuilt: false, deleteDirs: true, disableDeferredWipeout: false, notFailBuild: true)
        }
    }
}

def createPullRequestCurl(repo, headBranch, baseBranch, title, body) {
    curlCommand = "curl -X POST https://api.github.com/repos/$repo/pulls -H 'Authorization: Bearer ${GITHUB_TOKEN}' -d '{ \"head\": \"$headBranch\", \"base\": \"$baseBranch\", \"title\": \"$title\", \"body\": \"$body\", \"draft\": false }'"

    try {
        response = sh(script: curlCommand)

        if (response.contains("201 Created")) {
            println "Pull request created successfully"
        } else {
            println "Failed to create pull request"
            println response
        }
    } catch (Exception e) {
        println "Error occurred during CURL request: ${e.getMessage()}"
    }
}
Test the pull request flow
-
Go to the Self-service page of your portal.
-
Click the Open GitHub PR action, or Open GitHub PR with Jenkins if you use the Jenkins path.
-
Enter a name for the Azure storage account and a location.
-
Select the relevant service and click Execute.
-
Open the action run details and verify that the run succeeded.
-
Check the GitHub repository and confirm that the pull request was created with the Terraform changes.
To trigger resource deployment after the pull request is merged, use the Jenkins Terraform Azure pipeline example.
Possible daily routine integrations
- Send a Slack message in the R&D channel to let everyone know that a new service was created.
- Send a weekly or monthly report for managers showing all the new services created in this timeframe and their owners.