Orchestrate incident response with AI
When incidents occur, engineers waste critical minutes manually coordinating response logistics instead of fixing the actual problem. They need to create dedicated Slack channels, set up Zoom meetings for war rooms, create tracking tickets in Jira, and notify the right people, all while gathering context about affected services.
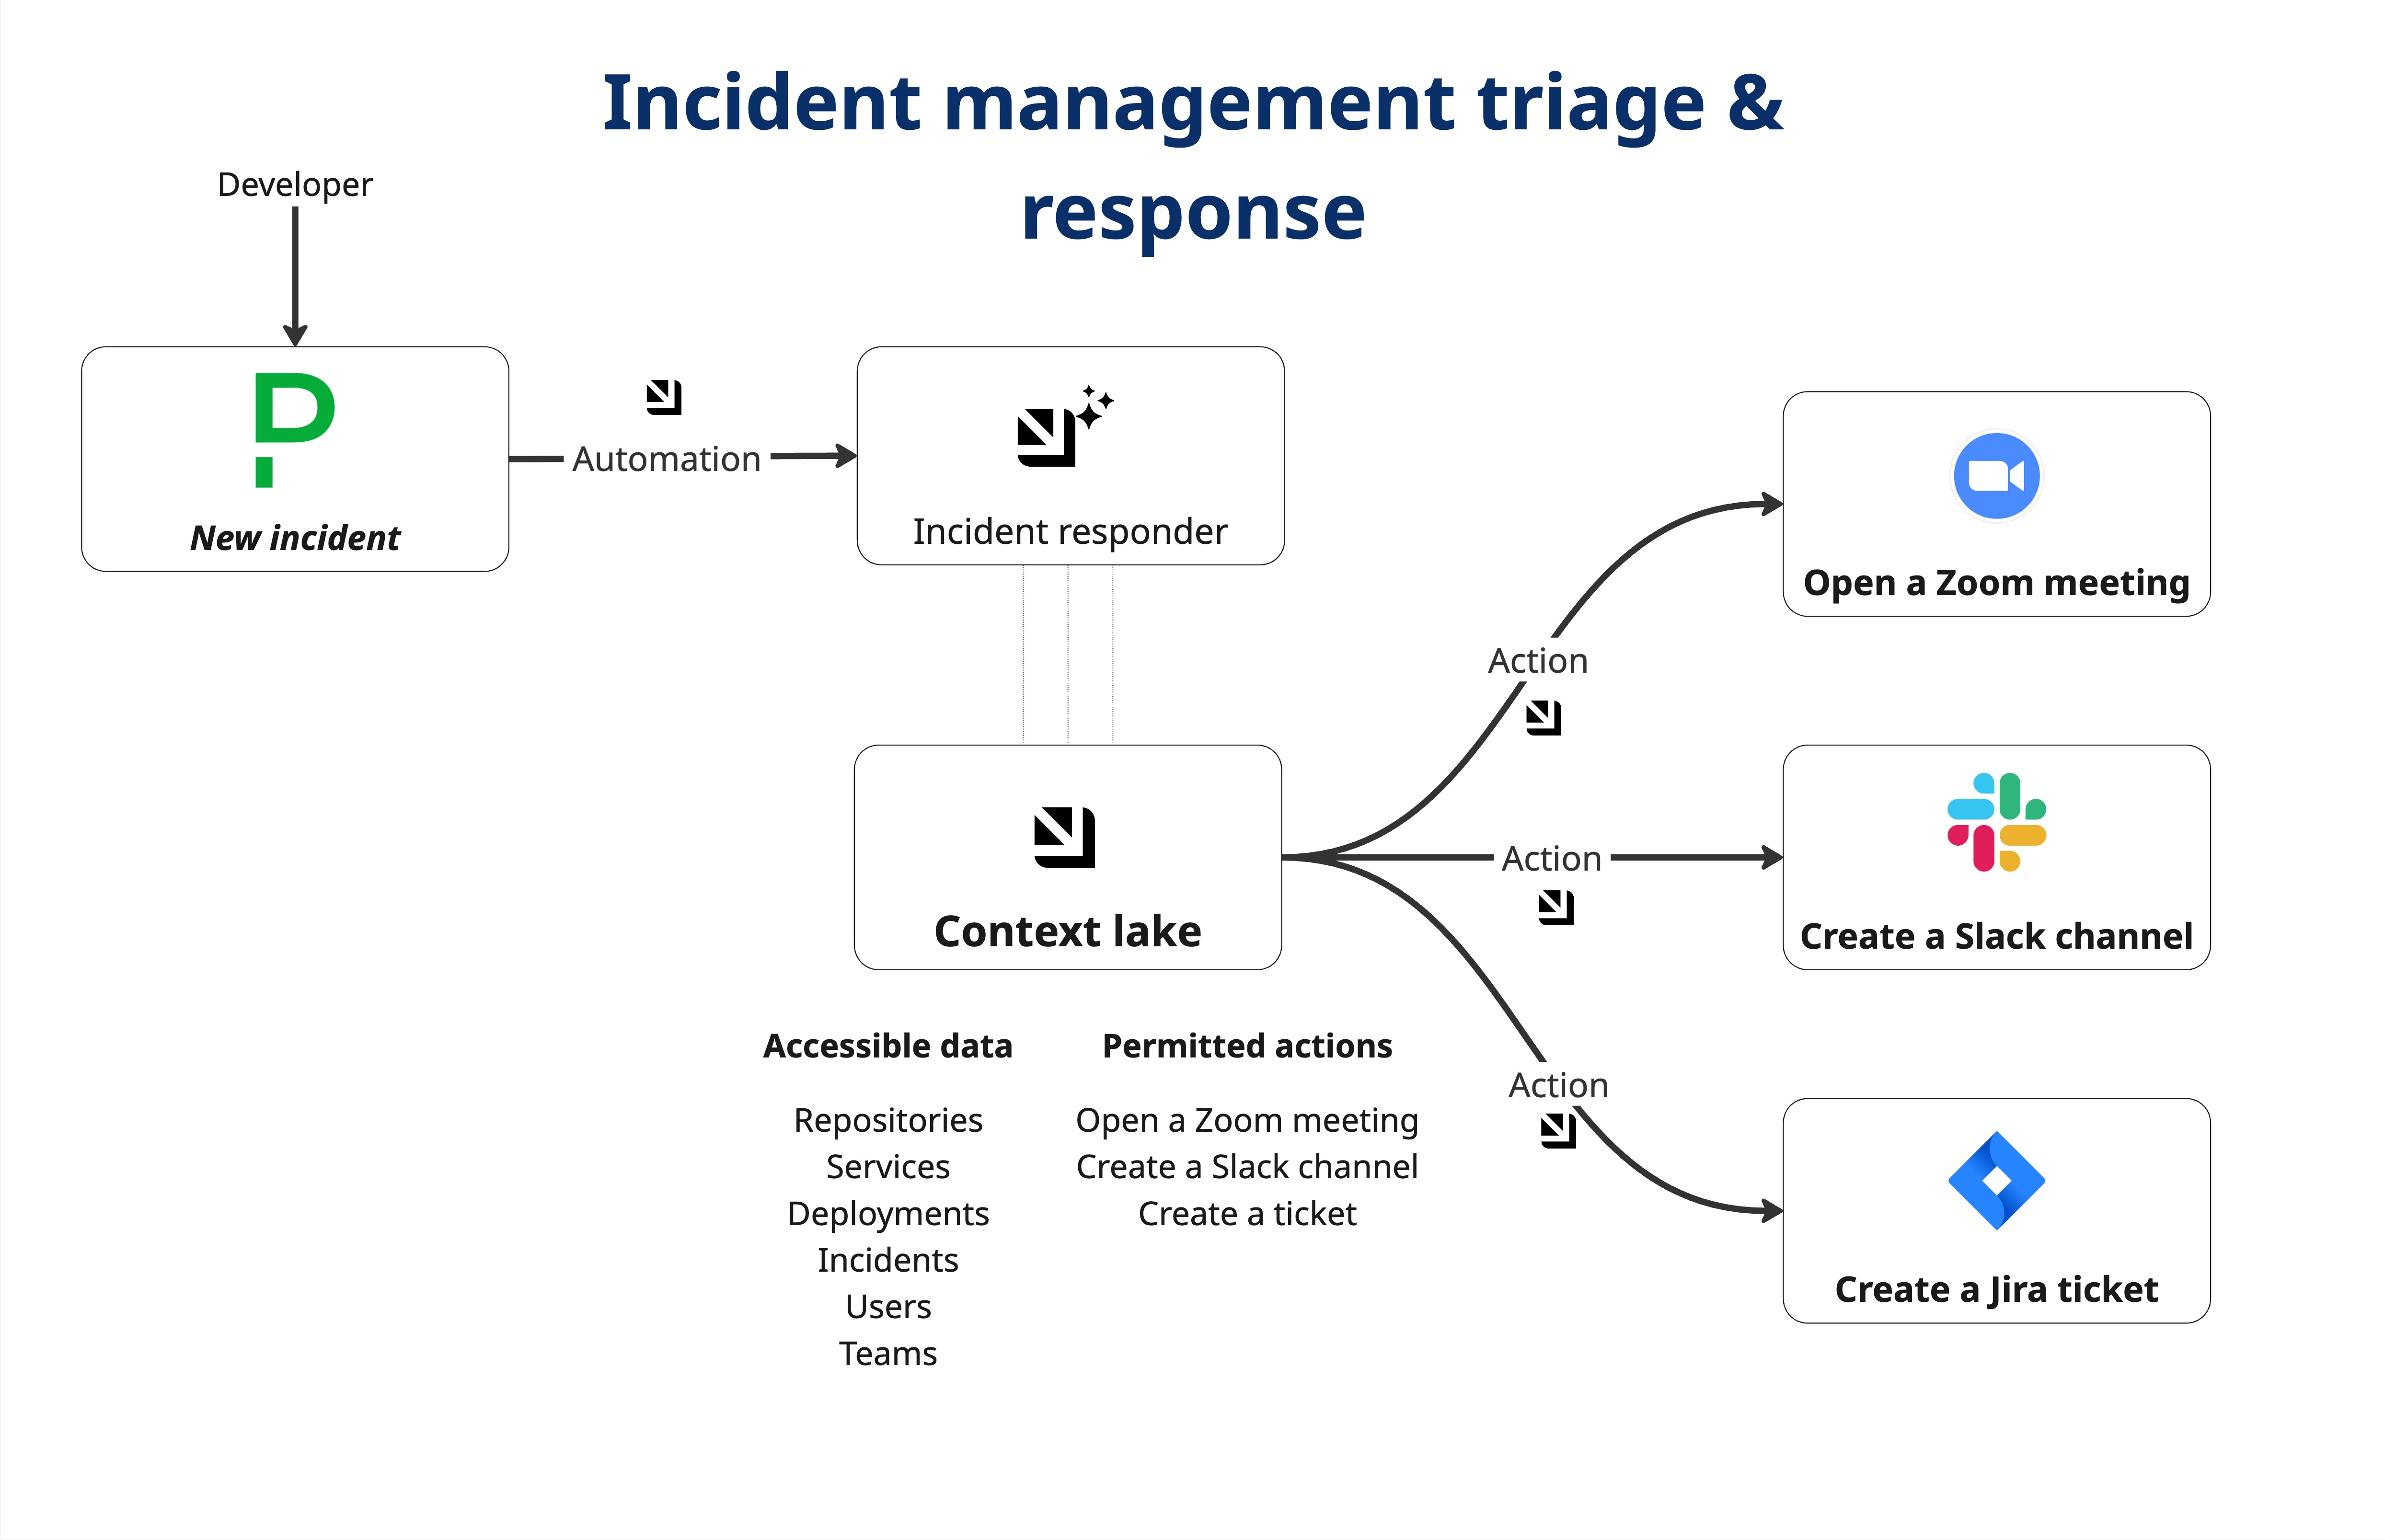
This guide demonstrates how to implement an AI-powered incident response system in Port. When an incident is created, orchestration can run in one of two ways:
-
Workflow: A single workflow runs a fixed sequence of steps (Slack channel, Zoom meeting, Jira ticket, notifications) based on severity.
-
Actions & Automations: An AI agent has access to Port actions and automatically chooses and runs the right sequence based on the incident context.
Both approaches use the same data model, external tools, and secrets. Only the implementation (workflow vs. actions + automations + AI agent) differs.
Common use cases
- Eliminate manual coordination delays by automating incident setup tasks
- Ensure consistent incident response with standardized communication channels and tracking
- Scale incident management across teams without requiring every engineer to know all setup steps
- Accelerate time to resolution by removing logistics overhead during high-stress situations
Prerequisites
This guide assumes the following:
- You have a Port account and have completed the onboarding process
- You have access to one of Port's incident management integrations (we'll use PagerDuty in this guide)
- You have access to a Slack developer account with permissions to create apps
- You have access to a Zoom developer account with permissions to create Server-to-Server OAuth apps
- You have access to a Jira instance with API access
- For the Workflow option: you have access to workflows in Port. Workflows are currently in open beta and available to all users.
While this guide uses PagerDuty for incident management, you can adapt it for other incident management tools like FireHydrant, Incident.io, or Opsgenie. The same principles apply regardless of the incident source.
Set up data model
We will configure the necessary blueprint to support our AI-powered incident orchestration workflow.
Create PagerDuty incident blueprint
The incident blueprint will store incident data from your incident management tool and track orchestration results.
-
Go to the builder page of your portal.
-
Click on
+ Blueprint. -
Click on the
{...} Edit JSONbutton. -
Copy and paste the following JSON configuration:
PagerDuty incident blueprint (click to expand)
{"identifier": "pagerdutyIncident","description": "This blueprint represents a PagerDuty incident in our software catalog","title": "PagerDuty Incident","icon": "pagerduty","schema": {"properties": {"status": {"icon": "DefaultProperty","title": "Incident Status","type": "string","enum": ["triggered","annotated","acknowledged","reassigned","escalated","reopened","resolved","escalated to human"],"enumColors": {"triggered": "red","annotated": "blue","acknowledged": "yellow","reassigned": "blue","escalated": "yellow","reopened": "red","resolved": "green","escalated to human": "bronze"}},"url": {"type": "string","format": "url","title": "Incident URL"},"urgency": {"title": "Incident Urgency","type": "string","enum": ["high", "low"],"enumColors": {"high": "red","low": "green"}},"priority": {"title": "Priority","type": "string"},"severity": {"type": "string","title": "Severity","enum": ["Critical", "High", "Medium", "Low"],"enumColors": {"Critical": "red","High": "red","Medium": "yellow","Low": "lime"}},"description": {"type": "string","title": "Description"},"assignees": {"title": "Assignees","type": "array","items": {"type": "string","format": "user"}},"escalation_policy": {"type": "string","title": "Escalation Policy"},"created_at": {"title": "Created At","type": "string","format": "date-time"},"updated_at": {"title": "Updated At","type": "string","format": "date-time"},"resolved_at": {"title": "Incident Resolution Time","type": "string","format": "date-time","description": "The timestamp when the incident was resolved"},"recovery_time": {"title": "Time to Recovery","type": "number","description": "The time (in minutes) between the incident being triggered and resolved"},"triggered_by": {"type": "string","title": "Triggered By"},"slack_channel": {"type": "string","title": "Slack Channel","description": "The Slack channel created for this incident","icon": "Slack"},"zoom_meeting_link": {"type": "string","title": "Zoom Meeting Link","description": "The Zoom meeting link for the war room","icon": "Team","format": "url"},"jira_tracking_ticket": {"type": "string","title": "Jira Tracking Ticket","icon": "Jira","format": "url","description": "The Jira ticket created to track this incident"}},"required": []},"mirrorProperties": {},"calculationProperties": {},"relations": {"pagerdutyService": {"title": "PagerDuty Service","target": "pagerdutyService","required": false,"many": false}}} -
Click
Createto save the blueprint.
Port's PagerDuty integration creates a pagerdutyIncident blueprint by default. You can extend this existing blueprint by adding the following properties to enable orchestration tracking:
-
Go to the builder page of your portal.
-
Select the
PagerDuty Incidentblueprint. -
Click on the
{...} Edit JSONbutton. -
Add the following properties under the
propertiesschema:PagerDuty incident blueprint extended properties (click to expand)
"slack_channel": {"type": "string","title": "Slack Channel","description": "The Slack channel created for this incident"},"zoom_meeting_link": {"type": "string","format": "url","title": "Zoom Meeting Link","description": "The Zoom meeting link for the war room"},"jira_tracking_ticket": {"type": "string","format": "url","title": "Jira Tracking Ticket","description": "The Jira ticket created to track this incident"}
The rest of this guide will reference pagerdutyIncident as the blueprint identifier.
Set up external tools
We need to configure integrations with Slack, Zoom, and Jira to enable the orchestration actions.
Set up Slack App
-
Create a Slack app and install it on a workspace.
-
Add the following permissions to the Slack app:
-
Create channel (Required):
channels:managegroups:writeim:writempim:write
-
Find a user with an email address (Optional):
users:read.email
-
Invite users to channel (Optional):
channels:write.invitesgroups:write.invitesmpim:write.invites
-
Send messages (Required):
chat:writechat:write.public
User permissionsWithout scopes for
Find a user with an email addressandInvite users to channel, the channel will be created but users will not be added to it automatically. -
-
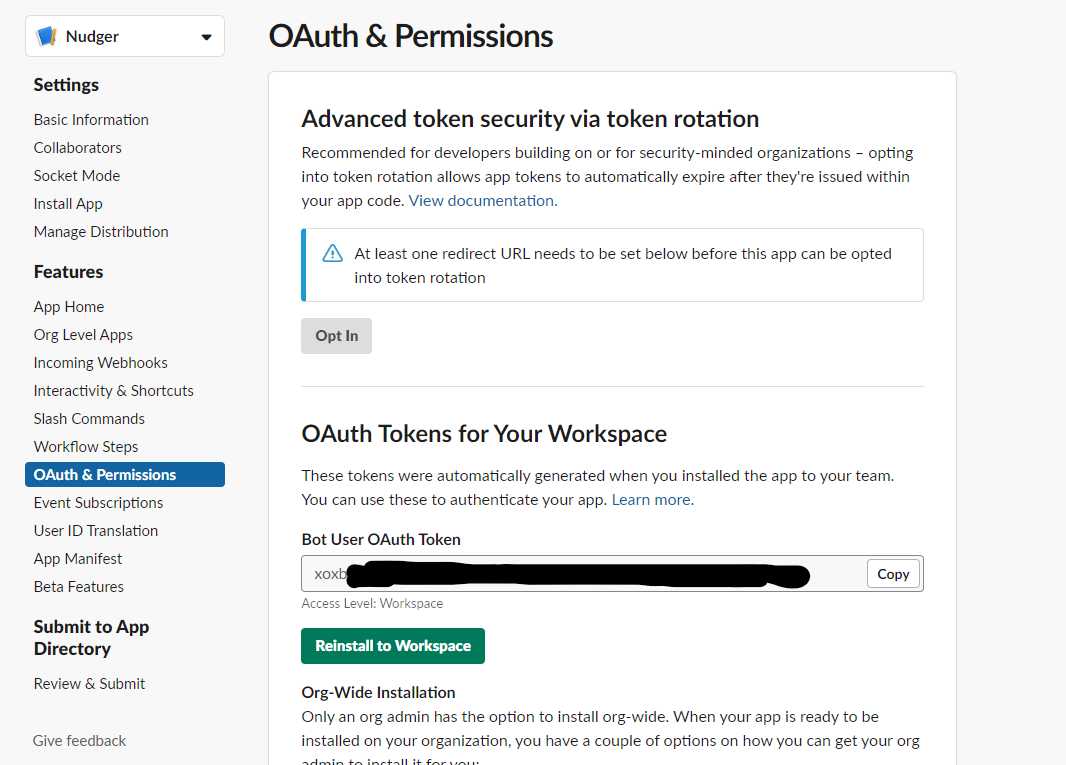
Navigate back to the OAuth & Permissions page. You will see an access token under OAuth Tokens for Your Workspace that you will use in the
SLACK_BOT_TOKENPort secret.
Set up Zoom Meeting
Create a Server-to-Server OAuth app:
-
Go to Zoom Marketplace.
-
Click Develop → Build App → select Server-to-Server OAuth.
-
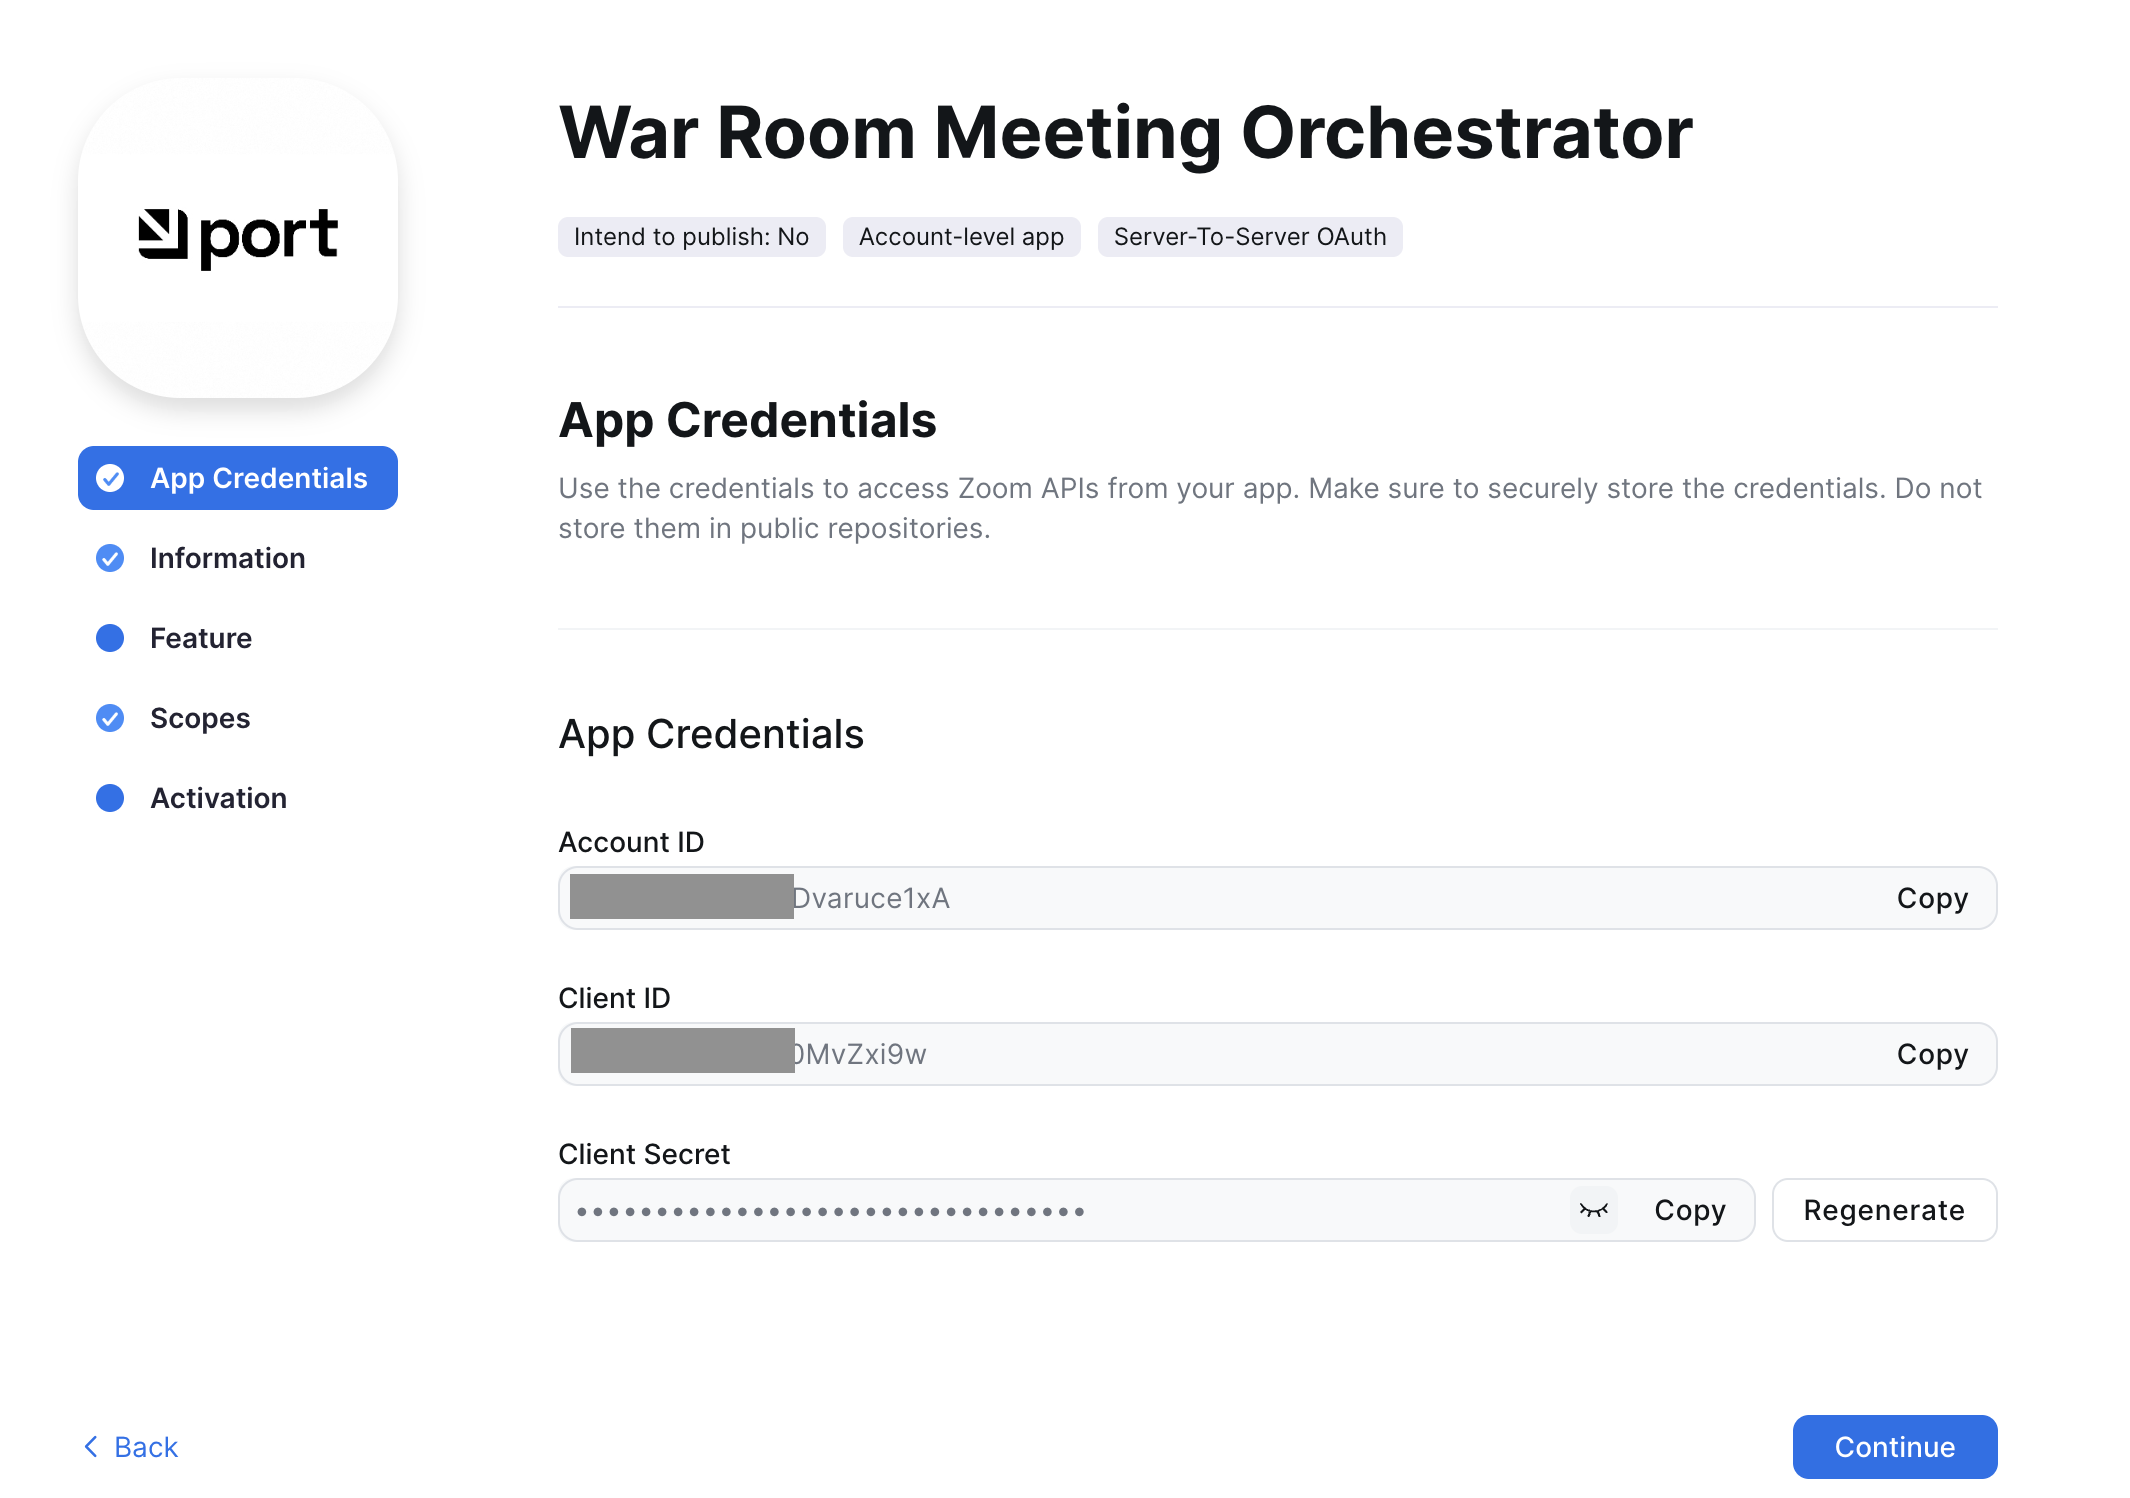
Fill in the app details and make note of:
- Account ID
- Client ID
- Client Secret
-
Under Scopes, add:
meeting:writemeeting:read- (optionally)
user:read
Set up Jira API access
-
Log in to your Jira instance.
-
Generate an API token:
- Go to Atlassian Account Settings
- Click Create API token
- Copy the generated token (you will need this for the Port secret)
Add Port secrets
To add secrets to your portal:
-
In your Port application, click on your profile picture
 .
. -
Click on Credentials.
-
Click on the
Secretstab. -
Click on
+ Secretand add the following secrets:SLACK_BOT_TOKEN- Your Slack bot token from the OAuth & Permissions pageZOOM_ACCOUNT_ID- Your Zoom account IDZOOM_CLIENT_ID- Your Zoom client IDZOOM_CLIENT_SECRET- Your Zoom client secretJIRA_AUTH- Base64 encoded string of your Jira credentials. Generate this by running:Replaceecho -n "your-email@domain.com:your-api-token" | base64your-email@domain.comwith your Jira email andyour-api-tokenwith your Jira API token.
Orchestration implementation in Port
Choose one implementation. The data model and external tools above are the same for both.
- Workflow: One workflow defines the full sequence. When an incident is created, the workflow runs and branches by severity (critical/high, medium, low). No AI agent, the flow is deterministic and visible in the workflow editor.
- Actions & Automations: You create separate actions (Slack, Zoom, Jira, notify) and automations that trigger an AI agent and update the incident when actions complete. The AI agent decides which actions to run based on incident context.
- Workflow
- Actions & Automations
Build the workflow
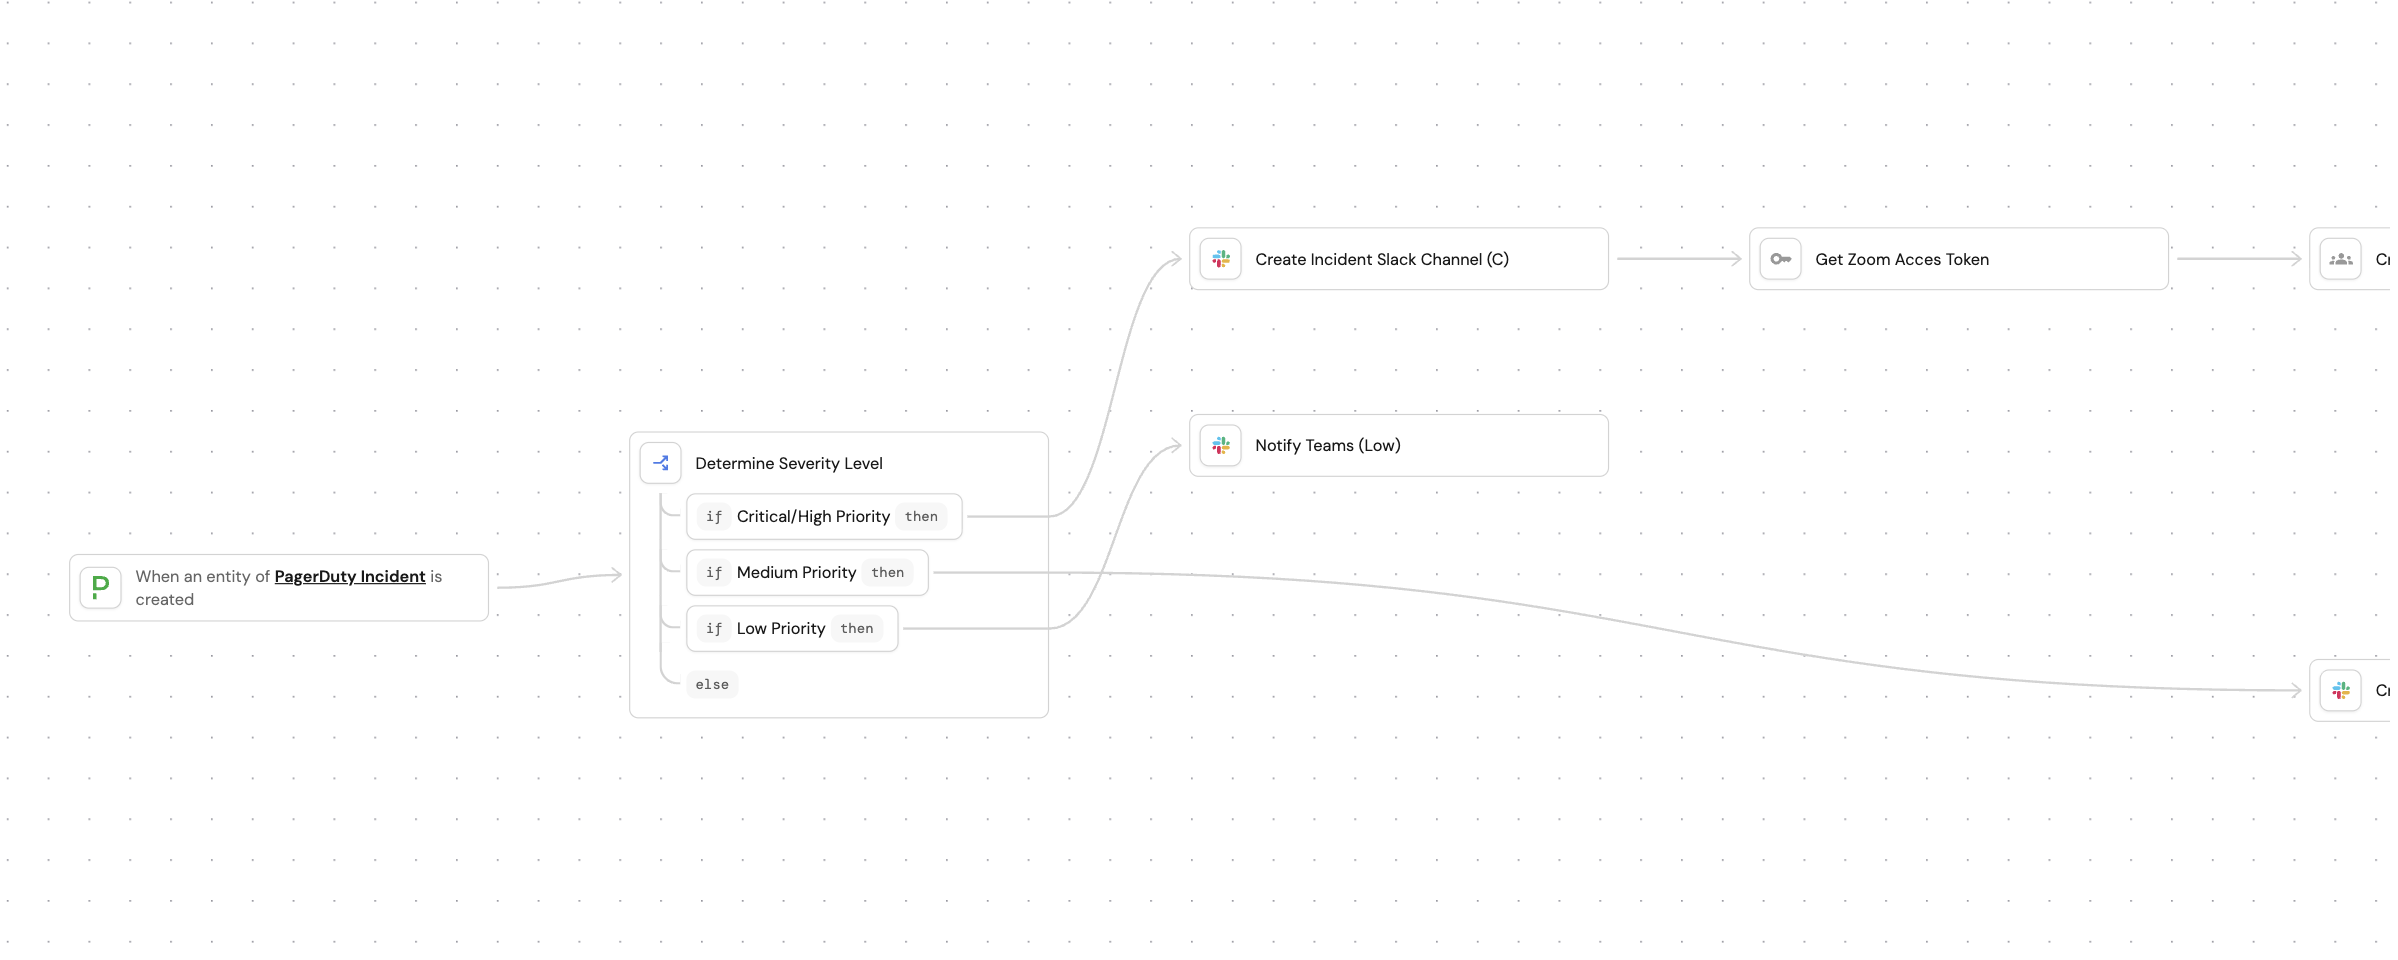
Use Port's workflow feature to chain nodes (Slack, Zoom, Jira, notifications, entity update) in a single workflow. The workflow runs automatically when a PagerDuty incident is created.
We will build the workflow using the workflow editor and the AI assistant to generate the initial structure. You can also skip the AI assistant and paste the workflow template directly.
-
Go to the workflows page of your portal.
-
Click + Workflow button in the top-right corner.
-
Click on Skip to editor to open the workflow editor.
-
Copy and paste this JSON template directly into the workflow editor.
Incident orchestration workflow template (click to expand)
{"identifier": "incident_orchestration_workflow","title": "Automated Incident Orchestration","icon": "Alert","description": "Automatically orchestrates incident response by creating Slack channels, Zoom meetings, Jira tickets, and notifications based on incident severity. Updates the incident entity with all created resources in a single bulk update.","allowAnyoneToViewRuns": true,"nodes": [{"identifier": "create_jira_ticket_critical","title": "Create Jira Tracking Ticket","icon": "Jira","description": "Creates Jira bug ticket for critical/high incidents","config": {"type": "WEBHOOK","url": "<YOUR_JIRA_ORGANIZATION_URL>/rest/api/3/issue","agent": false,"synchronized": true,"method": "POST","headers": {"Content-Type": "application/json","Authorization": "Basic {{ .secrets.JIRA_AUTH }}"},"body": {"fields": {"labels": ["port-workflow", "incident"],"project": {"key": "<YOUR_JIRA_PROJECT>"},"summary": "{{.outputs.trigger.incident_title}}","issuetype": {"name": "Bug"},"description": {"type": "doc","content": [{"type": "paragraph","content": [{"text": "Incident Details\n\n- Priority: {{ .outputs.trigger.incident_priority }}\n- Urgency: {{ .outputs.trigger.incident_urgency }}\n- Status: {{ .outputs.trigger.incident_status }}\n- PagerDuty URL: {{ .outputs.trigger.incident_url }}\n\nDescription:\n{{ .outputs.trigger.incident_description }}\n\nResponse Resources:\n- Slack Channel: {{ .outputs.create_slack_channel_critical.slack_channel_name }}\n- Zoom Meeting: {{.outputs.create_zoom_meeting_critical.zoom_meeting_url }}","type": "text"}]}],"version": 1}}}},"variables": {"jira_ticket_url": "https://{{ (.response.data.self | capture(\"https://(?<domain>[^/]+)\") ).domain }}/browse/{{ .response.data.key }}"}},{"identifier": "create_jira_ticket_medium","title": "Create Jira Tracking Ticket","icon": "Jira","description": "Creates Jira bug ticket for medium priority incidents","config": {"type": "WEBHOOK","url": "<YOUR_JIRA_ORGANIZATION_URL>/rest/api/3/issue","agent": false,"synchronized": true,"method": "POST","headers": {"Content-Type": "application/json","Authorization": "Basic {{ .secrets.JIRA_AUTH }}"},"body": {"fields": {"labels": ["port-workflow", "incident"],"project": {"key": "<YOUR_JIRA_PROJECT>"},"summary": "{{.outputs.trigger.incident_title}}","issuetype": {"name": "Bug"},"description": {"type": "doc","content": [{"type": "paragraph","content": [{"text": "Incident Details\n\n- Priority: {{ .outputs.trigger.incident_priority }}\n- Urgency: {{ .outputs.trigger.incident_urgency }}\n- Status: {{ .outputs.trigger.incident_status }}\n- PagerDuty URL: {{ .outputs.trigger.incident_url }}\n\nDescription:\n{{ .outputs.trigger.incident_description }}\n\nResponse Resources:\n- Slack Channel: {{ .outputs.create_slack_channel_medium.slack_channel_name }}","type": "text"}]}],"version": 1}}}},"variables": {"jira_ticket_url": "https://{{ (.response.data.self | capture(\"https://(?<domain>[^/]+)\") ).domain }}/browse/{{ .response.data.key }}"}},{"identifier": "create_slack_channel_critical","title": "Create Incident Slack Channel (C)","icon": "Slack","description": "Creates dedicated Slack channel for critical/high incidents","config": {"type": "WEBHOOK","url": "https://slack.com/api/conversations.create","agent": false,"synchronized": true,"method": "POST","headers": {"Content-Type": "application/json","Authorization": "Bearer {{ .secrets.SLACK_BOT_TOKEN }}"},"body": {"name": "{{ .outputs.trigger.incident_id | ascii_downcase }}","is_private": false}},"variables": {"slack_channel_name": "#{{ .response.data.channel.name }}"}},{"identifier": "create_slack_channel_medium","title": "Create Incident Slack Channel (M)","icon": "Slack","description": "Creates dedicated Slack channel for medium priority incidents","config": {"type": "WEBHOOK","url": "https://slack.com/api/conversations.create","agent": false,"synchronized": true,"method": "POST","headers": {"Content-Type": "application/json","Authorization": "Bearer {{ .secrets.SLACK_BOT_TOKEN }}"},"body": {"name": "{{ .outputs.trigger.incident_id | ascii_downcase }}","is_private": false}},"variables": {"slack_channel_name": "#{{ .response.data.channel.name }}"}},{"identifier": "create_zoom_meeting_critical","title": "Create War Room Meeting","icon": "Team","description": "Set up a Zoom meeting for the war room after obtaining access token","config": {"type": "WEBHOOK","url": "https://api.zoom.us/v2/users/me/meetings","agent": false,"synchronized": true,"method": "POST","headers": {"Content-Type": "application/json","Authorization": "Bearer {{ .outputs.get_zoom_meeting_access_token.zoom_access_token }}"},"body": {"type": 2,"topic": "{{ .outputs.trigger.incident_title }}","duration": 60,"settings": {"mute_upon_entry": true,"join_before_host": true},"timezone": "UTC","start_time": "{{ now | todateiso8601 }}"}},"variables": {"zoom_meeting_url": "{{ .response.data.join_url }}"}},{"identifier": "determine_severity","title": "Determine Severity Level","icon": null,"description": "Evaluates priority and urgency to determine response level","config": {"type": "CONDITION","options": [{"identifier": "critical_high","title": "Critical/High Priority","expression": "(.outputs.trigger.incident_priority == \"P1\" or .outputs.trigger.incident_priority == \"P2\" or .outputs.trigger.incident_urgency == \"Critical\" or .outputs.trigger.incident_urgency == \"High\" or .outputs.trigger.incident_urgency == \"high\")"},{"identifier": "medium","title": "Medium Priority","expression": "(.outputs.trigger.incident_priority == \"P3\" or .outputs.trigger.incident_urgency == \"Medium\" or .outputs.trigger.incident_urgency == \"medium\")"},{"identifier": "low","title": "Low Priority","expression": "(.outputs.trigger.incident_priority == \"P4\" or .outputs.trigger.incident_urgency == \"Low\" or .outputs.trigger.incident_urgency == \"low\")"}]},"variables": {}},{"identifier": "get_zoom_meeting_access_token","title": "Get Zoom Access Token","icon": "Key","description": "Set up a Zoom meeting for the war room by first obtaining access token and then proceeding to call the create zoom meeting link","config": {"type": "WEBHOOK","url": "https://zoom.us/oauth/token","agent": false,"synchronized": true,"method": "POST","headers": {"Content-Type": "application/x-www-form-urlencoded","Authorization": "Basic {{ .secrets.ZOOM_CLIENT_ID + \":\" + .secrets.ZOOM_CLIENT_SECRET | @base64 }}"},"body": {"account_id": "{{ .secrets.ZOOM_ACCOUNT_ID }}","grant_type": "account_credentials"}},"variables": {"zoom_access_token": "{{ .response.data.access_token }}"}},{"identifier": "notify_teams_critical","title": "Notify Teams (Critical/High)","icon": "Slack","description": "Sends comprehensive Slack notification for critical/high incidents","config": {"type": "WEBHOOK","url": "https://slack.com/api/chat.postMessage","agent": false,"synchronized": true,"method": "POST","headers": {"Content-Type": "application/json; charset=utf-8","Authorization": "Bearer {{ .secrets.SLACK_BOT_TOKEN }}"},"body": {"blocks": [{"text": "🚨 *INCIDENT ALERT* 🚨\n\n*Incident:* {{ .outputs.trigger.incident_title }}\n*Priority:* `{{ .outputs.trigger.incident_priority }}` | *Urgency:* `{{ .outputs.trigger.incident_urgency }}`\n*Status:* {{ .outputs.trigger.incident_status }}\n\n📋 *Response Resources Created:*\n• Slack Channel: {{ .outputs.create_slack_channel_critical.slack_channel_name }} \n• Jira Ticket: <{{ .outputs.create_jira_ticket_critical.jira_ticket_url }}|View ticket in Jira>\n• PagerDuty: <{{ .outputs.trigger.incident_url }}|View incident in PagerDuty>\n• Zoom meeting: <{{ .outputs.create_zoom_meeting_critical.zoom_meeting_url}}|Join Zoom>\n\n <{{.outputs.trigger.incident_url}}|View incident in Port>⚡ *Action Required:* Join the Slack channel and Zoom meeting immediately!","type": "markdown"}],"channel": "{{ .outputs.create_slack_channel_critical.slack_channel_name }}"}},"variables": {}},{"identifier": "notify_teams_low","title": "Notify Teams (Low)","icon": "Slack","description": "Sends simple Slack notification for low priority incidents","config": {"type": "WEBHOOK","url": "https://slack.com/api/chat.postMessage","agent": false,"synchronized": true,"method": "POST","headers": {"Content-Type": "application/json; charset=utf-8","Authorization": "Bearer {{ .secrets.SLACK_BOT_TOKEN }}"},"body": {"blocks": [{"text": "ℹ️ *Low Priority Incident*\n\n*Incident:* {{ .outputs.trigger.incident_title }}\n*Priority:* `{{ .outputs.trigger.incident_priority }}` | *Urgency:* `{{ .outputs.trigger.incident_urgency }}`\n*Status:* {{ .outputs.trigger.incident_status }}\n\n🔗 <{{ .outputs.trigger.incident_url }}|View incident in Port>\n\n📝 No immediate action required. Monitor as needed.","type": "markdown"}],"channel": "#isaac-test"}},"variables": {}},{"identifier": "notify_teams_medium","title": "Notify Teams (Medium)","icon": "Slack","description": "Sends Slack notification for medium priority incidents","config": {"type": "WEBHOOK","url": "https://slack.com/api/chat.postMessage","agent": false,"synchronized": true,"method": "POST","headers": {"Content-Type": "application/json; charset=utf-8","Authorization": "Bearer {{ .secrets.SLACK_BOT_TOKEN }}"},"body": {"blocks": [{"text": "⚠️ *Incident Alert*\n\n*Incident:* {{ .outputs.trigger.incident_title }}\n*Priority:* `{{ .outputs.trigger.incident_priority }}` | *Urgency:* `{{ .outputs.trigger.incident_urgency }}`\n*Status:* {{ .outputs.trigger.incident_status }}\n\n📋 *Response Resources Created:*\n• Slack Channel: {{ .outputs.create_slack_channel_medium.slack_channel_name }} \n• Jira Ticket: <{{ .outputs.create_jira_ticket_medium.jira_ticket_url }}|View in Jira>\n• PagerDuty: <{{ .outputs.trigger.incident_url }}|View in PagerDuty>\n\n:link: <{{.outputs.trigger.incident_url}}|View incident in Port>👀 Please review and coordinate in the Slack channel.","type": "markdown"}],"channel": "{{ .outputs.create_slack_channel_medium.slack_channel_name }}"}},"variables": {}},{"identifier": "trigger","title": "Incident Created","icon": null,"description": "Triggers when a PagerDuty incident is created","config": {"type": "EVENT_TRIGGER","event": {"type": "ENTITY_CREATED","blueprintIdentifier": "pagerdutyIncident"}},"variables": {"service_id": "{{ .diff.after.relations.pagerdutyService }}","incident_id": "{{ .diff.after.identifier }}","incident_url": "{{ .diff.after.properties.url }}","incident_title": "{{ .diff.after.title }}","incident_status": "{{ .diff.after.properties.status }}","incident_urgency": "{{ .diff.after.properties.urgency }}","incident_priority": "{{ .diff.after.properties.priority }}","incident_description": "{{ .diff.after.properties.description }}"}},{"identifier": "update_incident_critical","title": "Update Incident (All Resources)","icon": null,"description": "Bulk updates the incident entity with Slack, Zoom, and Jira URLs","config": {"type": "UPSERT_ENTITY","blueprintIdentifier": "pagerdutyIncident","mapping": {"identifier": "{{ .outputs.trigger.incident_id }}","properties": {"slack_channel": "{{ .outputs.create_slack_channel_critical.slack_channel_name // .outputs.create_slack_channel_medium.slack_channel_name}}","zoom_meeting_link": "{{ .outputs.create_zoom_meeting_critical.zoom_meeting_url }}","jira_tracking_ticket": "{{ .outputs.create_jira_ticket_critical.jira_ticket_url // .outputs.create_jira_ticket_medium.jira_ticket_url }}"}}},"variables": {}}],"connections": [{"description": "Analyze incident severity","sourceIdentifier": "trigger","targetIdentifier": "determine_severity"},{"description": "Critical/High → Create Slack channel","sourceIdentifier": "determine_severity","targetIdentifier": "create_slack_channel_critical","sourceOptionIdentifier": "critical_high"},{"description": "Then get Zoom API acces token","sourceIdentifier": "create_slack_channel_critical","targetIdentifier": "get_zoom_meeting_access_token"},{"description": "Then create Zoom meeting","sourceIdentifier": "get_zoom_meeting_access_token","targetIdentifier": "create_zoom_meeting_critical"},{"description": "Then create Jira ticket","sourceIdentifier": "create_zoom_meeting_critical","targetIdentifier": "create_jira_ticket_critical"},{"description": "Then notify teams","sourceIdentifier": "create_jira_ticket_critical","targetIdentifier": "notify_teams_critical"},{"description": "Finally Bulk update incident with all resources","sourceIdentifier": "notify_teams_critical","targetIdentifier": "update_incident_critical"},{"description": "Medium → Create Slack channel","sourceIdentifier": "determine_severity","targetIdentifier": "create_slack_channel_medium","sourceOptionIdentifier": "medium"},{"description": "Then create Jira ticket","sourceIdentifier": "create_slack_channel_medium","targetIdentifier": "create_jira_ticket_medium"},{"description": "Then notify team","sourceIdentifier": "create_jira_ticket_medium","targetIdentifier": "notify_teams_medium"},{"description": "Finally update incident with Slack & Jira","sourceIdentifier": "notify_teams_medium","targetIdentifier": "update_incident_critical"},{"description": "Low → Notify only","sourceIdentifier": "determine_severity","targetIdentifier": "notify_teams_low","sourceOptionIdentifier": "low"}]} -
Click Publish in the top right corner of the editor. If you encounter validation errors, refer to the troubleshooting page.
Configure the workflow
After publishing, replace placeholder values in the workflow nodes.
Specify Jira project key
- In the
create_jira_ticket_criticalandcreate_jira_ticket_mediumnodes:- Replace
<YOUR_JIRA_ORGANIZATION_URL>in the webhook URL with your Jira organization URL (e.g.,example.atlassian.net). - Set the
<YOUR_JIRA_PROJECT>value to your Jira project key. - Ensure that the Jira authorization header is set to
Basic {{ .secrets.JIRA_AUTH }}.
- Replace
Configure Slack
- In the
create_slack_channel_critical,create_slack_channel_medium, andnotify_teams_lownodes:- Set the authorization header to
Bearer {{ .secrets.SLACK_BOT_TOKEN }}. - Update the low-priority channel name if needed.
- Set the authorization header to
Configure Zoom
In the get_zoom_meeting_access_token node, set the authorization header to Basic {{ .secrets.ZOOM_CLIENT_ID + ":" + .secrets.ZOOM_CLIENT_SECRET | @base64 }}.
Create self-service actions
We will create self-service actions that the AI agent can invoke to orchestrate incident response setup.
Create incident Slack channel
This action creates a dedicated Slack channel for the incident.
-
Go to the self-service page of your portal.
-
Click on
+ New Action. -
Click on the
{...} Edit JSONbutton. -
Copy and paste the following JSON configuration:
Create incident Slack channel (click to expand)
{"identifier": "create_incident_slack_channel","title": "Create Incident Slack Channel","icon": "Slack","trigger": {"type": "self-service","operation": "DAY-2","userInputs": {"properties": {},"required": [],"order": []},"blueprintIdentifier": "pagerdutyIncident"},"invocationMethod": {"type": "WEBHOOK","url": "https://slack.com/api/conversations.create","agent": false,"synchronized": true,"method": "POST","headers": {"RUN_ID": "{{ .run.id }}","Content-Type": "application/json","Authorization": "Bearer {{ .secrets.SLACK_BOT_TOKEN }}"},"body": {"name": "{{ .entity.identifier | ascii_downcase }}","is_private": false}},"requiredApproval": false,"description": "Creates a dedicated Slack channel for an incident"} -
Click
Saveto create the action.
Create Zoom meeting link initializer
This action obtains a Zoom access token and then triggers the meeting creation.
-
Go back to the self-service page of your portal.
-
Click on
+ New Action. -
Click on the
{...} Edit JSONbutton. -
Copy and paste the following JSON configuration:
Create Zoom meeting link initializer (click to expand)
{"identifier": "create_zoom_meeting_link_initializer","title": "Initialize Zoom Meeting Setup","icon": "Team","description": "Obtain Zoom access token and prepare for meeting creation","trigger": {"type": "self-service","operation": "DAY-2","userInputs": {"properties": {},"required": [],"order": []},"blueprintIdentifier": "pagerdutyIncident"},"invocationMethod": {"type": "WEBHOOK","url": "https://zoom.us/oauth/token","agent": false,"synchronized": true,"method": "POST","headers": {"RUN_ID": "{{ .run.id }}","Content-Type": "application/x-www-form-urlencoded","INCIDENT_ENTITY": "{{ .entity.identifier }}","Authorization": "Basic {{ .secrets.ZOOM_CLIENT_ID + \":\" + .secrets.ZOOM_CLIENT_SECRET | @base64 }}"},"body": {"grant_type": "account_credentials","account_id": "{{ .secrets.ZOOM_ACCOUNT_ID }}"}}} -
Click
Saveto create the action.
Create Zoom meet link
This action creates the actual Zoom meeting using the access token.
-
Go back to the self-service page of your portal.
-
Click on
+ New Action. -
Click on the
{...} Edit JSONbutton. -
Copy and paste the following JSON configuration:
Create Zoom meet link (click to expand)
{"identifier": "create_zoom_meet_link","title": "Create Zoom Meeting Link","icon": "Team","description": "Creates a Zoom meeting link for the incident war room","trigger": {"type": "self-service","operation": "CREATE","userInputs": {"properties": {"zoom_access_token": {"title": "Zoom Access Token","icon": "DefaultProperty","type": "string"},"incident": {"title": "Incident","icon": "DefaultProperty","type": "string","blueprint": "pagerdutyIncident","format": "entity"}},"required": ["zoom_access_token", "incident"],"order": ["zoom_access_token", "incident"]}},"invocationMethod": {"type": "WEBHOOK","url": "https://api.zoom.us/v2/users/me/meetings","agent": false,"synchronized": true,"method": "POST","headers": {"RUN_ID": "{{ .run.id }}","Content-Type": "application/json","INCIDENT_ENTITY": "{{ .inputs.incident.identifier }}","Authorization": "Bearer {{ .inputs.zoom_access_token }}"},"body": {"topic": "{{ .inputs.incident.title }}","type": 2,"start_time": "{{ now | todateiso8601 }}","duration": 60,"timezone": "UTC","settings": {"join_before_host": true,"mute_upon_entry": true}}}} -
Click
Saveto create the action.
Create Jira tracking ticket
This action creates a Jira ticket to track the incident.
-
Go back to the self-service page of your portal.
-
Click on
+ New Action. -
Click on the
{...} Edit JSONbutton. -
Copy and paste the following JSON configuration:
Create Jira tracking ticket (click to expand)
{"identifier": "create_jira_tracking_ticket","title": "Create Jira Tracking Ticket","icon": "Jira","description": "Creates a Jira tracking ticket from an incident","trigger": {"type": "self-service","operation": "DAY-2","userInputs": {"properties": {"title": {"type": "string","title": "Title","description": "Title of the issue"},"description": {"type": "string","title": "Description","description": "Detailed description about the issue"},"issue_type": {"icon": "DefaultProperty","title": "Issue Type","type": "string","default": "Bug","enum": ["Epic", "Task", "Bug"],"enumColors": {"Epic": "green","Task": "lightGray","Bug": "red"}}},"required": ["title"],"order": ["title", "description", "issue_type"]},"blueprintIdentifier": "pagerdutyIncident"},"invocationMethod": {"type": "WEBHOOK","url": "https://<YOUR_JIRA_ORGANIZATION_URL>/rest/api/3/issue","agent": false,"synchronized": true,"method": "POST","headers": {"RUN_ID": "{{ .run.id }}","Content-Type": "application/json","Authorization": "Basic {{.secrets.JIRA_AUTH}}"},"body": {"fields": {"project": {"key": "<YOUR_JIRA_PROJECT>"},"summary": "{{.inputs.title}}","description": {"type": "doc","version": 1,"content": [{"type": "paragraph","content": [{"type": "text","text": "{{.inputs.description}}"}]}]},"issuetype": {"name": "{{.inputs.issue_type}}"},"labels": ["port-ai"]}}},"requiredApproval": false}Configure your Jira environmentReplace
<YOUR_JIRA_ORGANIZATION_URL>in the webhook URL with your Jira organization URL (e.g.,example.atlassian.net). Also replace<YOUR_JIRA_PROJECT>with your actual Jira project key. -
Click
Saveto create the action.
Send Slack message action
This action sends notification messages to Slack channels.
-
Go back to the self-service page of your portal.
-
Click on
+ New Action. -
Click on the
{...} Edit JSONbutton. -
Copy and paste the following JSON configuration:
Send Slack message (click to expand)
{"identifier": "send_a_slack_message","title": "Send Slack Message","icon": "Slack","description": "Sends a notification message to a Slack channel","trigger": {"type": "self-service","operation": "CREATE","userInputs": {"properties": {"channel": {"title": "Channel ID","icon": "DefaultProperty","type": "string","description": "The Slack channel ID where the message will be sent"},"message": {"title": "Message","icon": "DefaultProperty","type": "string","description": "The message content to send"}},"required": ["channel", "message"],"order": ["channel", "message"]}},"invocationMethod": {"type": "WEBHOOK","url": "https://slack.com/api/chat.postMessage","agent": false,"synchronized": true,"method": "POST","headers": {"RUN_ID": "{{ .run.id }}","Content-Type": "application/json","Authorization": "Bearer {{ .secrets.SLACK_BOT_TOKEN }}"},"body": {"channel": "{{ .inputs.channel }}","text": "{{ .inputs.message }}"}},"requiredApproval": false} -
Click
Saveto create the action.
Set up automations
We will create automations to orchestrate the complete incident response workflow:
-
Trigger the AI agent when incidents are created.
-
Update the incident with Slack channel ID after creation.
-
Create Zoom meeting after obtaining access token.
-
Update incident with Zoom meeting link.
-
Update incident with Jira ticket link.
Trigger incident orchestrator agent
This automation invokes the Incident Orchestrator agent as soon as an incident is created.
-
Go to the automations page of your portal.
-
Click on
+ Automation. -
Copy and paste the following JSON schema:
Trigger incident orchestrator agent automation (click to expand)
{"identifier": "trigger_incident_orchestrator_agent","title": "Trigger Incident Orchestrator Agent","description": "Automation to invoke the Incident Response Orchestrator agent as soon as an incident is created","trigger": {"type": "automation","event": {"type": "ENTITY_CREATED","blueprintIdentifier": "pagerdutyIncident"},"condition": {"type": "JQ","expressions": [],"combinator": "and"}},"invocationMethod": {"type": "WEBHOOK","url": "https://api.port.io/v1/agent/incident_orchestrator_agent/invoke","agent": false,"synchronized": true,"method": "POST","headers": {"RUN_ID": "{{ .run.id }}","Content-Type": "application/json"},"body": {"prompt": "Here is the created Incident:\n Incident identifier: {{.event.diff.after.identifier}}\n\nIncident Title:{{.event.diff.after.title}}\n\nFull Incident Entity: {{.event.diff.after.properties}}\n","labels": {"source": "auto_orchestrate_incident_response","incident_id": "{{ .event.diff.after.identifier }}"}}},"publish": true} -
Click
Createto save the automation.
Set incident Slack channel ID
This automation updates the incident with the Slack channel ID after the channel has been created.
-
Go back to the automations page of your portal.
-
Click on
+ Automation. -
Copy and paste the following JSON schema:
Set incident Slack channel ID automation (click to expand)
{"identifier": "set_incident_slack_channel_id_on_creation","title": "Set Incident Slack Channel ID on Creation","description": "This automation updates an incident with the slack channel ID after a Slack channel has been created","icon": "Slack","trigger": {"type": "automation","event": {"type": "RUN_UPDATED","actionIdentifier": "create_incident_slack_channel"},"condition": {"type": "JQ","expressions": [".diff.before.status== \"IN_PROGRESS\"",".diff.after.status== \"SUCCESS\"",".diff.after.response.ok == true"],"combinator": "and"}},"invocationMethod": {"type": "UPSERT_ENTITY","blueprintIdentifier": "pagerdutyIncident","mapping": {"identifier": "{{.event.diff.after.entity.identifier}}","properties": {"slack_channel": "{{ .event.diff.after.response.channel.name }}"}}},"publish": true} -
Click
Createto save the automation.
Create war room meeting
This automation calls the Zoom API to create the meeting after obtaining the access token.
-
Go back to the automations page of your portal.
-
Click on
+ Automation. -
Copy and paste the following JSON schema:
Create war room meeting automation (click to expand)
{"identifier": "create_war_room_meeting","title": "Create War Room Meeting","description": "Calls Zoom API to create the meeting after getting the access token","icon": "Team","trigger": {"type": "automation","event": {"type": "RUN_UPDATED","actionIdentifier": "create_zoom_meeting_link_initializer"},"condition": {"type": "JQ","expressions": [".diff.before.status== \"IN_PROGRESS\"",".diff.after.status== \"SUCCESS\""],"combinator": "and"}},"invocationMethod": {"type": "WEBHOOK","url": "https://api.port.io/v1/actions/create_zoom_meet_link/runs","agent": false,"synchronized": true,"method": "POST","headers": {"RUN_ID": "{{ .run.id }}","Content-Type": "application/json"},"body": {"properties": {"zoom_access_token": "{{ .event.diff.after.response.access_token }}","incident": "{{ .event.diff.before.entity.identifier }}"}}},"publish": true} -
Click
Createto save the automation.
Upsert meeting link on success
This automation updates the incident with the created Zoom meeting link.
-
Go back to the automations page of your portal.
-
Click on
+ Automation. -
Copy and paste the following JSON schema:
Upsert meeting link on success automation (click to expand)
{"identifier": "upsert_meeting_link_on_success","title": "Upsert Meeting Link on Success","description": "Updates the incident with the created zoom meeting link","trigger": {"type": "automation","event": {"type": "RUN_UPDATED","actionIdentifier": "create_zoom_meet_link"},"condition": {"type": "JQ","expressions": [".diff.before.status== \"IN_PROGRESS\"",".diff.after.status== \"SUCCESS\""],"combinator": "and"}},"invocationMethod": {"type": "UPSERT_ENTITY","blueprintIdentifier": "pagerdutyIncident","mapping": {"identifier": "{{.event.diff.before.properties.incident.identifier}}","properties": {"zoom_meeting_link": "{{ .event.diff.after.response.join_url }}"}}},"publish": true} -
Click
Createto save the automation.
Update incident with Jira ticket
This automation updates the incident with the response of the created Jira ticket.
-
Go back to the automations page of your portal.
-
Click on
+ Automation. -
Copy and paste the following JSON schema:
Update incident with Jira ticket automation (click to expand)
{"identifier": "update_incident_with_jira_ticket","title": "Update Incident With Jira Ticket","description": "automation to update the incident with the response of the created Jira ticket","icon": "Jira","trigger": {"type": "automation","event": {"type": "RUN_UPDATED","actionIdentifier": "create_jira_tracking_ticket"},"condition": {"type": "JQ","expressions": [".diff.before.status== \"IN_PROGRESS\"",".diff.after.status== \"SUCCESS\""],"combinator": "and"}},"invocationMethod": {"type": "UPSERT_ENTITY","blueprintIdentifier": "pagerdutyIncident","mapping": {"identifier": "{{.event.diff.after.entity.identifier}}","properties": {"jira_tracking_ticket": "https://{{ (.event.diff.after.response.self | capture(\"https://(?<domain>[^/]+)\") ).domain }}/browse/{{ .event.diff.after.response.key }}"}}},"publish": true} -
Click
Createto save the automation.
Create AI agent
Now we will create the AI agent that orchestrates the incident response setup.
-
Go to the AI Agents page of your portal.
-
Click on
+ AI Agent. -
Toggle
Json modeon. -
Copy and paste the following JSON schema:
Incident orchestrator AI agent (click to expand)
{"identifier": "incident_orchestrator_agent","title": "Incident Orchestrator Agent","icon": "Details","team": [],"properties": {"description": "AI agent to orchestrate incident management","status": "active","prompt": "You are an AI Incident Orchestrator responsible for automating incident response setup. When an incident is triggered, your role is to analyze its severity, affected services, and context — then immediately execute the appropriate actions (create Slack channel, generate meeting link, create Jira tracking ticket, notify teams) using the available tools.\n\nYour goal is to remove all manual coordination delays. You must not just recommend or summarize actions — you must autonomously invoke the correct self-service actions in real time.\n\nCore Responsibilities:\n1. Analyze the incident payload (severity, affected service, owner, tier, assignee, etc.) to determine response scope.\n2. Decide and EXECUTE the correct actions based on severity/urgency/priority:\n - **Critical or High** → ALWAYS run all these 4 actions `create_incident_slack_channel`, `create_zoom_meeting_link_initializer`, `create_jira_tracking_ticket`, and `send_a_slack_message` to notify all relevant teams.\n - **Medium** → ALWAYS run `create_incident_slack_channel`, `create_jira_tracking_ticket` and `send_a_slack_message`; skip zoom meet link setup unless escalation occurs.\n - **Low** → run `send_a_slack_message` only.\n3. Each action must be invoked directly — do not output instructions or links for humans to click.\n4. After execution, summarize the outcome: which actions were triggered, resource names/links, and any context derived from the incident.\n\n#IMPORTANT\n1. NEVER FORGET to call the create the Zoom meeting action for HIGH/CRITICAL incidents (DO NOT SKIP IT).\n2. When creating a Slack channel, derive the channel name from the incident identifier by converting it to lowercase and replacing any invalid characters with hyphens (only lowercase letters, numbers, hyphens, and underscores are allowed). Capture the exact channel id/name returned by the `create_incident_slack_channel` action response and use that channel id when invoking `send_a_slack_message`. Never invent or guess channel ids or names — if the create-channel tool fails to return one, reuse the sanitized incident identifier as the channel name and report the issue in the summary.\n3. In case you run into errors when calling an action, use the available tools to describe the action details to understand the required properties and parameters.\n\nOperate decisively, execute autonomously, and provide a concise summary once orchestration is complete.","execution_mode": "Automatic","tools": ["^(list|search|track|describe)_.*","run_create_incident_slack_channel","run_create_jira_tracking_ticket","run_create_zoom_meeting_link_initializer","run_send_a_slack_message"]},"relations": {}} -
Click
Createto save the agent.
Test the implementation
After you complete either the Workflow or the Actions & Automations setup, use the steps below to verify that orchestration runs correctly.
Create a test incident
-
Go to your PagerDuty instance and create a new incident, or use Port's API to create a test incident entity.
-
Verify that the incident appears in your Port catalog.
Verify execution
If you used Workflow: Open the run from the Audit log and confirm each node completed successfully. Check node outputs for Slack, Zoom, and Jira responses.
If you used Actions & Automations: Check the AI agent's execution logs in the AI Invocation page. Verify that the agent analyzed the incident severity and executed the appropriate actions (Slack channel, Zoom meeting for high/critical, Jira ticket, notifications).
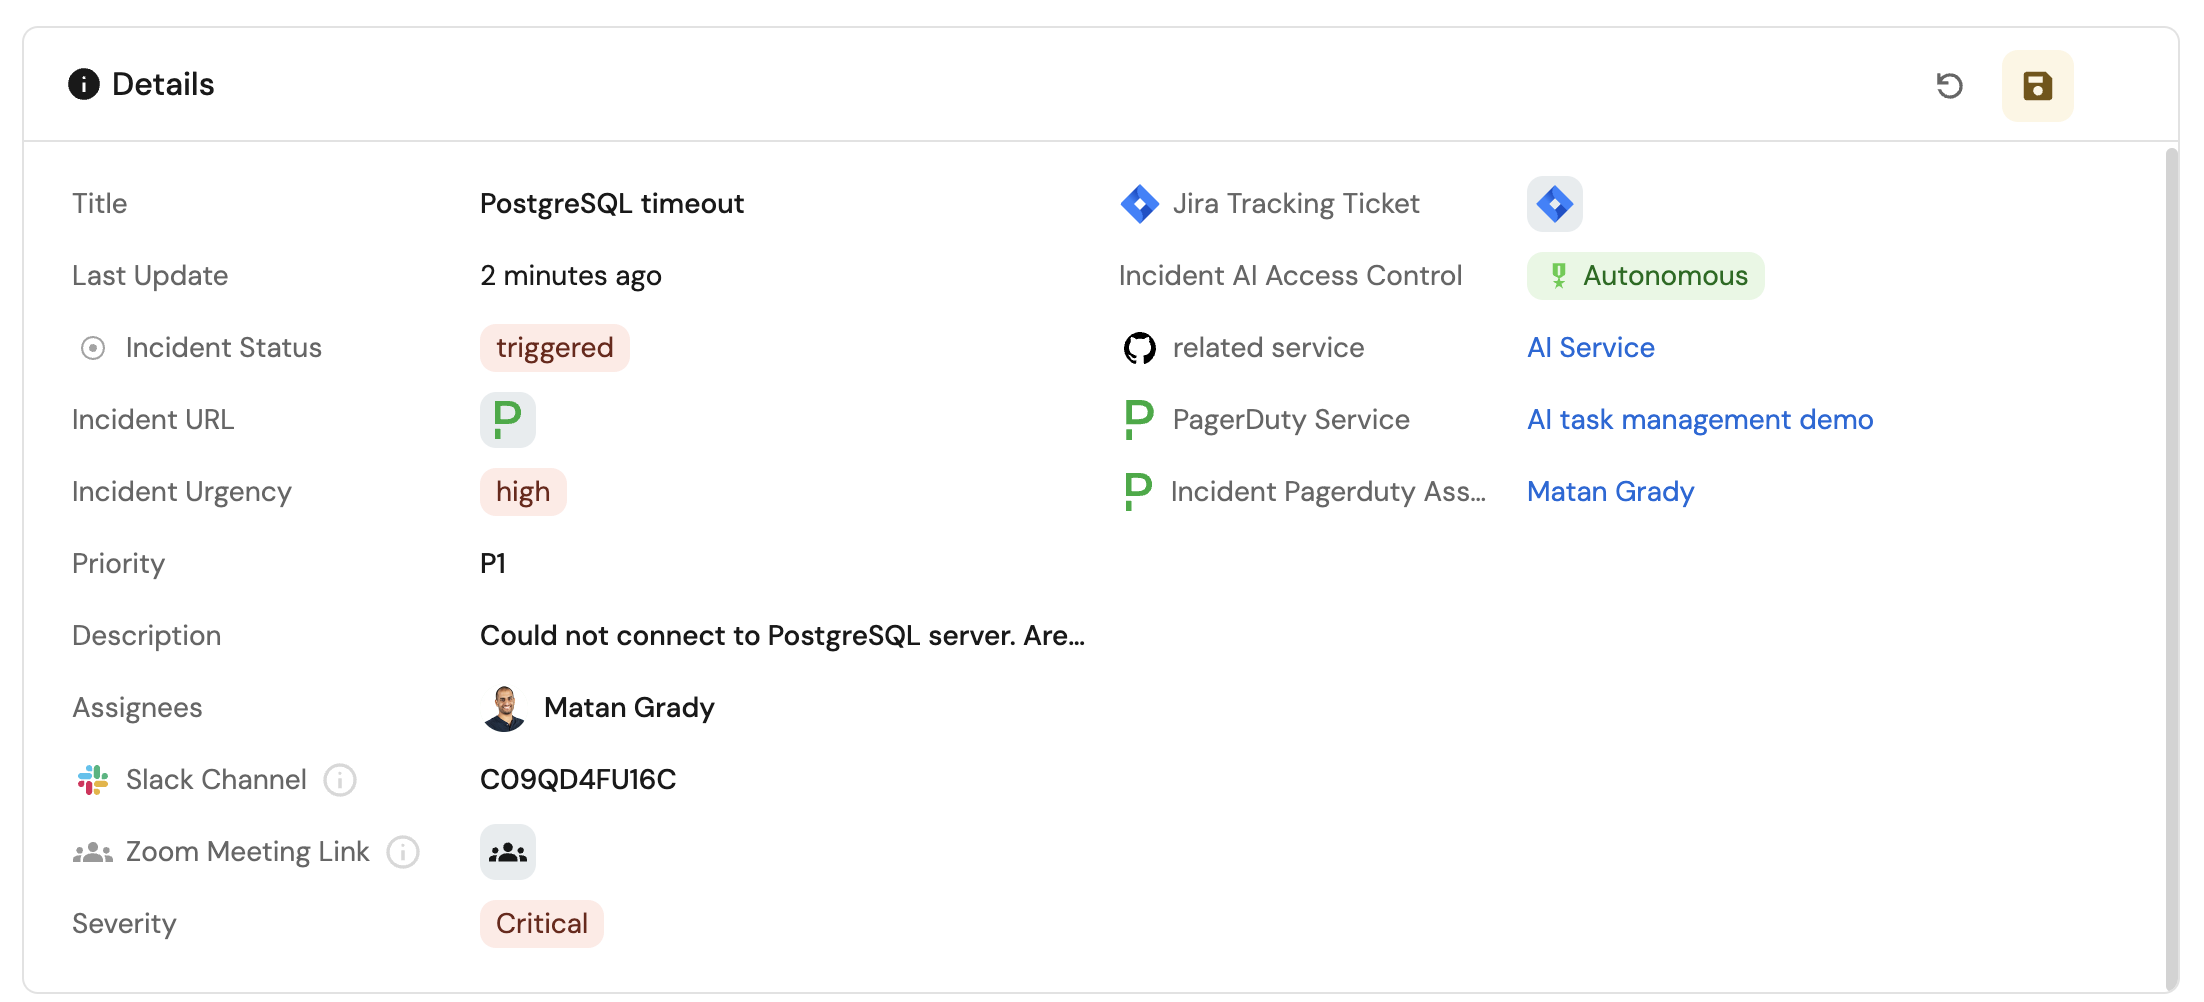
Verify incident updates
-
Go to your Port catalog and find the incident entity.
-
Check that the incident has been updated with:
- Slack channel ID
- Zoom meeting link (if applicable)
- Jira tracking ticket URL
-
Verify the links are functional and accessible.
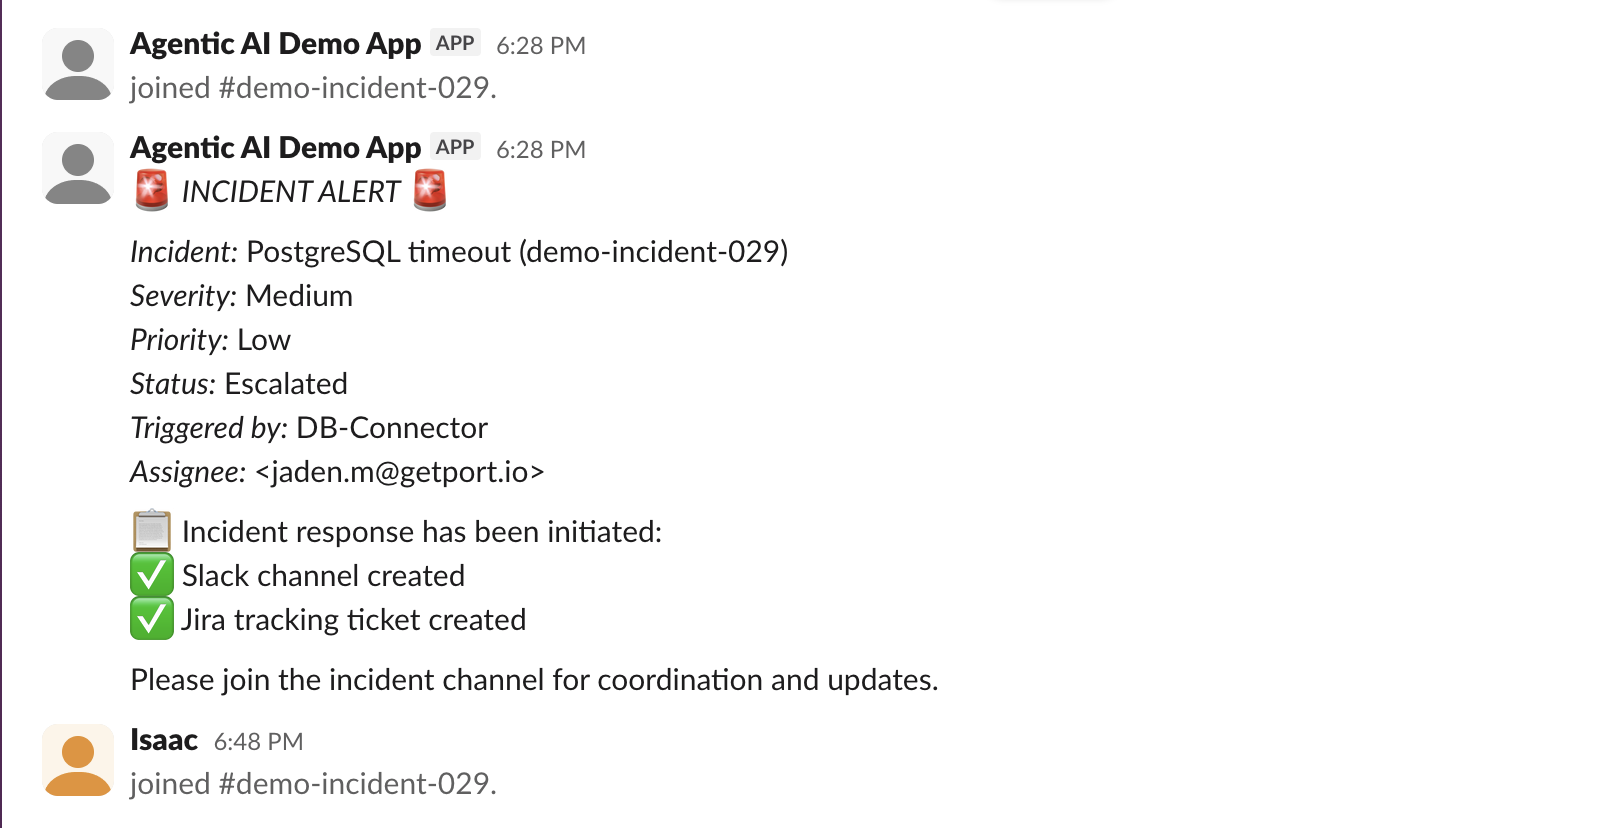
Test in Slack
-
Go to your Slack workspace.
-
Verify that:
- A new channel was created with the incident identifier
- Notification messages were posted to the channel
- The channel contains relevant incident information