Track standards adherence
Visibility into standards adherence is essential for ensuring that software delivery consistently meets defined expectations for quality, security, and compliance.
This visibility is achieved through standards and scorecards, which translate organizational expectations into clear, observable indicators across repositories and services. By making adherence visible, teams can identify gaps, understand risk, and scale delivery without relying on manual reviews or audits.
This guide helps engineering managers, platform engineers and product leaders answer critical questions about their delivery standards:
- Quality: Are repositories following engineering best practices like documentation, CI/CD requirements, and code review policies?
- Security: Are security controls properly implemented, including repository visibility and branch protection?
- Compliance: Are organizational and regulatory expectations being met consistently?
By the end of this guide, you will have scorecards and dashboards that track key standards metrics, enabling you to identify gaps, prioritize improvements, and ensure that what ships is secure, compliant, and aligned with organizational expectations.
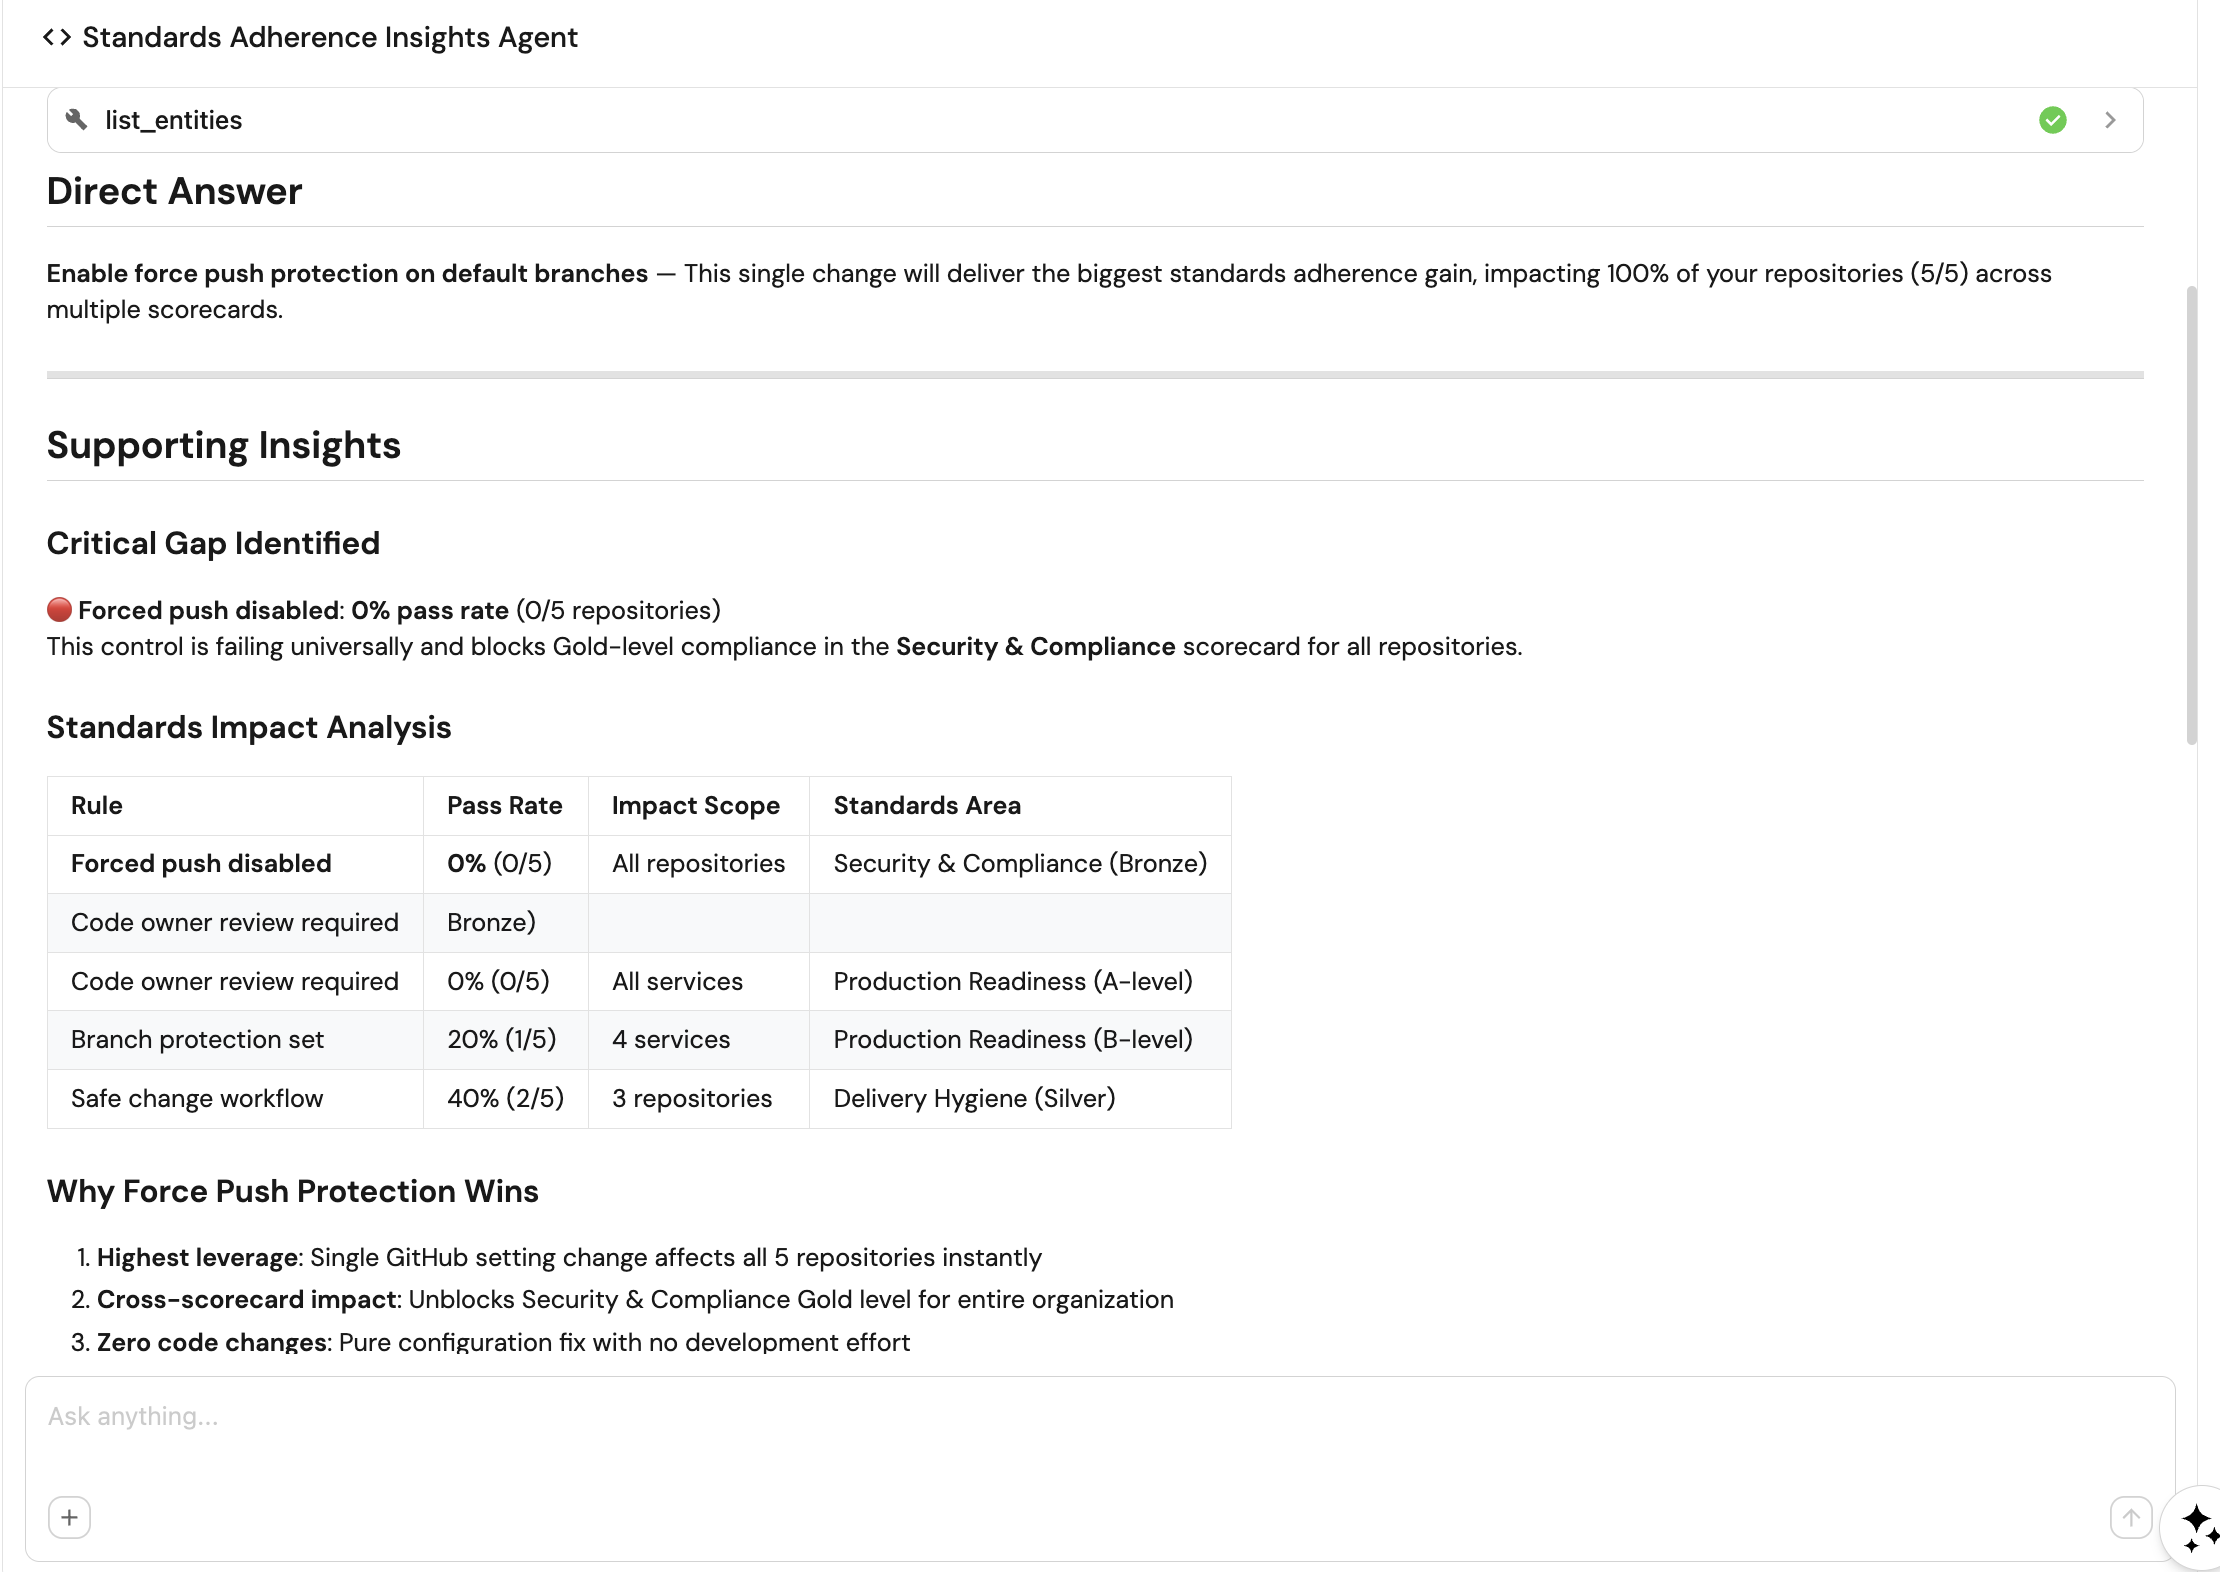
This guide includes configuration for a Standards Insights Agent that provides AI-powered insights into your organizational standards adherence. Ask natural language questions like "What needs attention right now?" or "What are the top 3 actions we should take to improve standards adherence?" and receive actionable recommendations that help reduce risk, prevent drift, and ensure consistent delivery at scale.
Common use cases
- Track repository hygiene and production readiness across teams.
- Monitor security compliance including repository visibility and branch protection.
- Identify repositories missing documentation, CI/CD pipelines, or PR templates.
- Measure adherence to organizational standards and best practices.
Prerequisites
This guide assumes the following:
- You have a Port account and have completed the onboarding process.
- GitHub
- Azure DevOps
- Port's GitHub integration or Port's GitHub Ocean integration is installed in your account. is installed in your account.
- Port's Azure DevOps integration is installed in your account.
This guide focuses on measuring standards using source control management (SCM) data, including repositories, pull requests, workflows, and branch protection settings. This guide supports GitHub and Azure DevOps, with GitLab support coming soon. This is the first iteration of standards measurement and will expand in future versions to include additional metrics and data sources such as security scanning tools, documentation platforms, and other compliance systems.
Key metrics overview
We will track seven key metrics to measure standards compliance:
| Metric | What it measures | Why it matters |
|---|---|---|
| Private visibility enabled | Repository visibility is set to private (not public or internal) | Prevents accidental code and IP exposure |
| Has a README file | Repository contains a README file in the default branch | Improves onboarding and discoverability |
| Repo has a pipeline | Repository is configured with an automated CI pipeline | Increases delivery reliability through automation |
| Default branch is protected | Default branch (e.g. main) has protection rules | Reduces risk from unsafe changes |
| Service owner assigned | Repository is explicitly linked to a service owner | Establishes clear ownership and accountability |
| Has a PR template | Repository includes a pull request template | Improves review quality and flow efficiency |
| Forced push disabled | Force pushes are disabled on protected branches | Preserves auditability and compliance |
Set up data model
We will create blueprints to model your standards data. The githubPullRequest and githubRepository blueprints should already exist from the GitHub integration installation, or the azureDevopsPullRequest and azureDevopsRepository blueprints should already exist from the Azure DevOps integration installation.
- GitHub (Legacy & Ocean)
- Azure DevOps
Create the branch protection blueprint
-
Go to the Builder page of your portal.
-
Click on
+ Blueprint. -
Click on the
{...}button in the top right corner, and chooseEdit JSON. -
Add this JSON schema:
Branch protection blueprint (Click to expand)
{"identifier": "branchProtection","title": "Branch Protection","icon": "Microservice","schema": {"properties": {"require_approval_count": {"title": "Require approvals","type": "number","icon": "DefaultProperty","description": "The number of approvals required before merging a pull request"},"is_protected": {"title": "Is branch protected","type": "boolean","icon": "DefaultProperty","description": "Indicates whether certain rules must be met before changes can be merged"},"require_code_owner_review": {"title": "Require code owner review","type": "boolean","icon": "DefaultProperty","description": "Requires review from code owners before a pull request can be merged"},"allow_force_pushes": {"title": "Allow force pushes","type": "boolean","icon": "DefaultProperty","description": "Permits users with push access to force push changes to the branch"},"url": {"title": "Branch url","type": "string","format": "url","description": "URL of the branch in the repository"},"require_signed_commits": {"title": "Require signed commits","type": "boolean","icon": "DefaultProperty","description": "Ensures that commits pushed to the branch are signed"},"block_force_pushes": {"title": "Block force pushes","type": "boolean","icon": "DefaultProperty","description": "Prevent users with push access from force pushing to refs"}},"required": []},"mirrorProperties": {},"calculationProperties": {},"aggregationProperties": {},"relations": {}} -
Click
Saveto create the blueprint.
Create the pull request template blueprint
-
Go to the Builder page of your portal.
-
Click on
+ Blueprint. -
Click on the
{...}button in the top right corner, and chooseEdit JSON. -
Add this JSON schema:
Pull request template blueprint (Click to expand)
{"identifier": "pullRequestTemplate","description": "Pull request template","title": "PR Template","icon": "Markdown","schema": {"properties": {"content": {"type": "string","title": "Content","format": "markdown"}},"required": []},"mirrorProperties": {},"calculationProperties": {},"aggregationProperties": {},"relations": {"repository": {"title": "Repository","target": "githubRepository","required": false,"many": false},"ado_repository": {"title": "ADO Repository","target": "azureDevopsRepository","required": false,"many": false}}} -
Click
Saveto create the blueprint.
Update the GitHub repository blueprint
We need to update the existing githubRepository blueprint to add properties and relations for standards tracking.
-
Go to the Builder page of your portal.
-
Find the
githubRepositoryblueprint and click on it. -
Click on the
{...}button in the top right corner, and chooseEdit JSON. -
Update the JSON schema to include the visibility property, aggregation properties, mirror properties, and the default branch protection relation:
Updated GitHub repository blueprint (Click to expand)
{"identifier": "githubRepository","title": "Repository","icon": "Github","ownership": {"type": "Direct"},"schema": {"properties": {"readme": {"title": "README","type": "string","format": "markdown"},"url": {"icon": "DefaultProperty","title": "Repository URL","type": "string","format": "url"},"defaultBranch": {"title": "Default branch","type": "string"},"last_push": {"icon": "GitPullRequest","title": "Last push","description": "Last commit to the main branch","type": "string","format": "date-time"},"visibility": {"type": "string","title": "Visibility"}},"required": []},"mirrorProperties": {"is_branched_protected": {"title": "Is Branched Protected","path": "default_branch_settings.is_protected"},"force_push_disabled": {"title": "Force Push Disabled","path": "default_branch_settings.block_force_pushes"}},"calculationProperties": {},"aggregationProperties": {"total_pipeline": {"title": "Total Pipeline","type": "number","target": "githubWorkflow","calculationSpec": {"func": "count","calculationBy": "entities"}},"has_pr_template": {"title": "Has PR Template","type": "number","target": "pullRequestTemplate","calculationSpec": {"func": "count","calculationBy": "entities"}}},"relations": {"default_branch_settings": {"title": "Default Branch Settings","target": "branchProtection","required": false,"many": false},"service": {"title": "Service","target": "service","required": false,"many": false}}} -
Click
Saveto update the blueprint.
Update the pull request template blueprint
If you already have a PR template blueprint, we need to update it to support Azure DevOps repositories. If not, create it with both repository relations.
-
Go to the Builder page of your portal.
-
If you have an existing PR template blueprint, find it and click on it. Otherwise, click on
+ Blueprint. -
Click on the
{...}button in the top right corner, and chooseEdit JSON. -
Update or add this JSON schema:
Pull request template blueprint (Click to expand)
{"identifier": "pullRequestTemplate","description": "Pull request template","title": "PR Template","icon": "Markdown","schema": {"properties": {"content": {"type": "string","title": "Content","format": "markdown"}},"required": []},"mirrorProperties": {},"calculationProperties": {},"aggregationProperties": {},"relations": {"repository": {"title": "Repository","target": "githubRepository","required": false,"many": false},"ado_repository": {"title": "ADO Repository","target": "azureDevopsRepository","required": false,"many": false}}} -
Click
Saveto create or update the blueprint.
Update the Azure DevOps repository blueprint
We need to update the existing azureDevopsRepository blueprint to add aggregation properties for standards tracking.
-
Go to the Builder page of your portal.
-
Find the
azureDevopsRepositoryblueprint and click on it. -
Click on the
{...}button in the top right corner, and chooseEdit JSON. -
Update the JSON schema to include the aggregation properties:
Updated Azure DevOps repository blueprint (Click to expand)
{"identifier": "azureDevopsRepository","title": "Repository","icon": "AzureDevops","ownership": {"type": "Direct"},"schema": {"properties": {"url": {"title": "URL","format": "url","type": "string","icon": "Link"},"readme": {"title": "README","type": "string","format": "markdown","icon": "Book"},"id": {"type": "string","title": "ID"},"last_activity": {"type": "string","title": "Last Activity","format": "date-time"},"minimumApproverCount": {"type": "number","title": "Minimum Approver Count"},"workItemLinking": {"title": "Work Item Linking","type": "boolean","default": false},"repository_policy_enabled": {"type": "boolean","title": "Repository Policy Enabled"},"visibility": {"type": "string","title": "Visibility"}},"required": []},"mirrorProperties": {},"calculationProperties": {},"aggregationProperties": {"total_pipeline": {"title": "Total Pipeline","type": "number","target": "azureDevopsBuild","calculationSpec": {"func": "count","calculationBy": "entities"}},"has_pr_template": {"title": "Has PR Template","type": "number","target": "pullRequestTemplate","calculationSpec": {"func": "count","calculationBy": "entities"}}},"relations": {"project": {"title": "Project","target": "azureDevopsProject","required": true,"many": false},"service": {"title": "Service","target": "service","required": false,"many": false}}} -
Click
Saveto update the blueprint.
Update integration mapping
- GitHub (Ocean)
- GitHub (Sunset)
- Azure DevOps
Now we'll configure the GitHub Ocean integration to ingest branch protection and PR template data into your catalog.
-
Go to your Data Source page.
-
Select the GitHub Ocean integration.
-
Add the following YAML blocks to your existing mapping configuration:
GitHub Ocean integration configuration additions (Click to expand)
resources:- kind: branchselector:query: "true"defaultBranchOnly: trueprotectionRules: trueport:entity:mappings:identifier: .__repository + "_" + .nametitle: .__repository + " " + .nameblueprint: '"branchProtection"'properties:is_protected: .protectedurl: ._links.htmlrequire_approval_count: >-.__protection_rules.required_pull_request_reviews.required_approving_review_countrequire_code_owner_review: >-.__protection_rules.required_pull_request_reviews.require_code_owner_reviewsallow_force_pushes: .__protection_rules.allow_force_pushes.enabledrequire_signed_commits: .__protection_rules.required_signatures.enabledblock_force_pushes: .__protection_rules.allow_force_pushes.enabled == false- kind: repositoryselector:query: 'true'include: ["teams"]includedFiles:- README.mdport:entity:mappings:identifier: .nametitle: .nameblueprint: '"githubRepository"'properties:readme: .__includedFiles["README.md"]url: .html_urldefaultBranch: .default_branchlast_push: .pushed_atvisibility: if .private then "private" else "public" endrelations:default_branch_settings: .name + "_" + .default_branch- kind: fileselector:query: 'true'files:- path: '.github/pull_request_template.md'port:entity:mappings:identifier: .repository.name + "_" + .nametitle: .repository.name + "_" + .nameblueprint: '"pullRequestTemplate"'properties:content: .contentrelations:repository: .repository.nameExisting mappingsIf you already have mappings for repositories, make sure to add the
branchandfilekinds to your existing configuration. The mapping above includes all required kinds for this guide. -
Click
Save & Resyncto apply the mapping.
Now we'll configure the GitHub integration to ingest branch protection and PR template data into your catalog.
-
Go to your Data Source page.
-
Select the GitHub integration.
-
Add the following YAML blocks to your existing mapping configuration:
GitHub integration configuration additions (Click to expand)
resources:- kind: branchselector:query: .repository.default_branch == .branch.nameport:entity:mappings:identifier: .repository.name + "_" + .branch.nametitle: .repository.name + " " + .branch.nameblueprint: '"branchProtection"'properties:is_protected: .branch.protectedurl: .branch._links.htmlrequire_approval_count: >-.branch.protectionRules.required_pull_request_reviews.required_approving_review_countrequire_code_owner_review: >-.branch.protectionRules.required_pull_request_reviews.require_code_owner_reviewsallow_force_pushes: .branch.protectionRules.allow_force_pushes.enabledrequire_signed_commits: .branch.protectionRules.required_signatures.enabledblock_force_pushes: .branch.protectionRules.allow_force_pushes.enabled == false- kind: repositoryselector:query: 'true'teams: trueport:entity:mappings:identifier: .full_nametitle: .nameblueprint: '"githubRepository"'properties:readme: file://README.mdurl: .html_urldefaultBranch: .default_branchlast_push: .pushed_atvisibility: .visibilityrelations:default_branch_settings: .name + "_" + .default_branch- kind: fileselector:query: 'true'files:- path: .github/pull_request_template.mdport:entity:mappings:identifier: .repo.name + "_" + .file.nametitle: .repo.name + "_" + .file.nameblueprint: '"pullRequestTemplate"'properties:content: .file.contentrelations:repository: .repo.full_nameExisting mappingsIf you already have mappings for repositories, make sure to add the
branchandfilekinds to your existing configuration. The mapping above includes all required kinds for this guide. -
Click
Save & Resyncto apply the mapping.
Now we'll configure the Azure DevOps integration to ingest repository policy and PR template data into your catalog.
-
Go to your Data Source page.
-
Select the Azure DevOps integration.
-
Add the following YAML blocks to your existing mapping configuration:
Azure DevOps integration configuration additions (Click to expand)
resources:- kind: repository-policyselector:query: .type.displayName=="Minimum number of reviewers"port:entity:mappings:identifier: .__repository.idblueprint: '"azureDevopsRepository"'properties:minimumApproverCount: .settings.minimumApproverCountrepository_policy_enabled: .isEnabled- kind: repository-policyselector:query: .type.displayName=="Work item linking"port:entity:mappings:identifier: .__repository.idblueprint: '"azureDevopsRepository"'properties:workItemLinking: .isEnabled and .isBlocking- kind: repository-policyselector:query: 'true'port:entity:mappings:identifier: .__repository.id + "-" + (.id | tostring)title: .__repository.name + "-" + (.id | tostring)blueprint: '"repo_policy"'properties:type: .type.displayNamesetting: .settings- kind: fileselector:query: 'true'files:path: .azuredevops/pull_request_template.mdport:entity:mappings:identifier: .repo.name + "_" + .file.path | gsub(" "; "")title: .file.pathblueprint: '"pullRequestTemplate"'properties:content: .file.content.rawrelations:ado_repository: .repo.idExisting mappingsIf you already have mappings for repositories, make sure to add the
repository-policyandfilekinds to your existing configuration. The mapping above includes all required kinds for this guide. -
Click
Save & Resyncto apply the mapping.
Set up scorecards
Scorecards enable you to define and track standards compliance for your repositories. We'll create scorecards to measure different aspects of standards.
- GitHub (Legacy & Ocean)
- Azure DevOps
We'll create three scorecards for GitHub repositories.
- Go to the Builder page of your portal.
- Search for the
githubRepositoryblueprint and select it. - Click on the
Scorecardstab. - Click on
+ New Scorecardto create a new scorecard.
Create the readiness baseline scorecard
-
Click on the
{...}button in the top right corner, and chooseEdit JSON. -
Copy and paste the following JSON configuration:
Readiness baseline scorecard (Click to expand)
{"identifier": "readiness_baseline","title": "Readiness Baseline","rules": [{"identifier": "has_a_responsible_team","level": "Bronze","query": {"combinator": "and","conditions": [{"operator": "isNotEmpty","property": "$team"}]},"description": "Repository is explicitly linked to a service owner or responsible team","title": "Ownership defined"},{"identifier": "has_a_readme_file","level": "Silver","query": {"combinator": "and","conditions": [{"operator": "isNotEmpty","property": "readme"}]},"description": "README exists on the default branch and provides basic usage or context","title": "Has a README file"},{"identifier": "readiness_baseline_met","level": "Gold","query": {"combinator": "and","conditions": [{"operator": "isNotEmpty","property": "$team"},{"operator": "isNotEmpty","property": "readme"}]},"description": "All lower-level readiness rules pass","title": "Readiness baseline met"}],"levels": [{"color": "paleBlue","title": "Basic"},{"color": "bronze","title": "Bronze"},{"color": "blue","title": "Silver"},{"color": "gold","title": "Gold"}]} -
Click
Saveto create the scorecard.
Create the delivery hygiene scorecard
-
Click on
+ New Scorecardagain. -
Click on the
{...}button in the top right corner, and chooseEdit JSON. -
Copy and paste the following JSON configuration:
Delivery hygiene scorecard (Click to expand)
{"identifier": "delivery_hygiene","title": "Delivery Hygiene","rules": [{"identifier": "automated_delivery_enabled","level": "Bronze","query": {"combinator": "and","conditions": [{"operator": ">","property": "total_pipeline","value": 0}]},"description": "CI pipeline runs on commits and/or pull requests","title": "Automated delivery enabled"},{"identifier": "safe_change_workflow","level": "Silver","query": {"combinator": "and","conditions": [{"operator": "=","property": "is_branched_protected","value": true}]},"description": "Protection rules are enabled on the default branch","title": "Safe change workflow"},{"identifier": "has_a_pr_template","level": "Silver","query": {"combinator": "and","conditions": [{"operator": "isNotEmpty","property": "has_pr_template"}]},"description": "Repository includes a pull request template guiding contributors","title": "Has a PR Template"},{"identifier": "delivery_baseline_met","level": "Gold","query": {"combinator": "and","conditions": [{"operator": "=","property": "is_branched_protected","value": true},{"operator": ">","property": "total_pipeline","value": 0},{"operator": "isNotEmpty","property": "has_pr_template"}]},"description": "All delivery hygiene rules pass","title": "Delivery baseline met"}],"levels": [{"color": "paleBlue","title": "Basic"},{"color": "bronze","title": "Bronze"},{"color": "blue","title": "Silver"},{"color": "gold","title": "Gold"}]} -
Click
Saveto create the scorecard.
Create the security and compliance scorecard
-
Click on
+ New Scorecardagain. -
Click on the
{...}button in the top right corner, and chooseEdit JSON. -
Copy and paste the following JSON configuration:
Security and compliance scorecard (Click to expand)
{"identifier": "security_and_compliance","title": "Security & Compliance","rules": [{"identifier": "private_visibility_enabled","level": "Silver","query": {"combinator": "and","conditions": [{"operator": "=","property": "visibility","value": "private"}]},"description": "Repository visibility is private (not public or internal)","title": "Private visibility enabled"},{"identifier": "forced_push_disabled","level": "Bronze","query": {"combinator": "and","conditions": [{"operator": "=","property": "force_push_disabled","value": true}]},"description": "Force pushes are disabled on protected branches","title": "Forced push disabled"},{"identifier": "compliance_baseline_met","level": "Gold","query": {"combinator": "and","conditions": [{"operator": "=","property": "visibility","value": "private"},{"operator": "=","property": "force_push_disabled","value": true}]},"description": "All security and compliance rules pass","title": "Compliance baseline met"}],"levels": [{"color": "paleBlue","title": "Basic"},{"color": "blue","title": "Silver"},{"color": "bronze","title": "Bronze"},{"color": "gold","title": "Gold"}]} -
Click
Saveto create the scorecard.
We'll create two scorecards for Azure DevOps repositories (readiness baseline and delivery hygiene).
- Go to the Builder page of your portal.
- Search for the
azureDevopsRepositoryblueprint and select it. - Click on the
Scorecardstab. - Click on
+ New Scorecardto create a new scorecard.
Create the readiness baseline scorecard
-
Click on the
{...}button in the top right corner, and chooseEdit JSON. -
Copy and paste the following JSON configuration:
Readiness baseline scorecard (Click to expand)
{"identifier": "ado_readiness_baseline","title": "Readiness Baseline","rules": [{"identifier": "has_a_responsible_team","level": "Bronze","query": {"combinator": "and","conditions": [{"operator": "isNotEmpty","property": "$team"}]},"description": "Repository is explicitly linked to a service owner or responsible team","title": "Ownership defined"},{"identifier": "has_a_readme_file","level": "Silver","query": {"combinator": "and","conditions": [{"operator": "isNotEmpty","property": "readme"}]},"description": "README exists on the default branch and provides basic usage or context","title": "Has a README file"},{"identifier": "readiness_baseline_met","level": "Gold","query": {"combinator": "and","conditions": [{"operator": "isNotEmpty","property": "$team"},{"operator": "isNotEmpty","property": "readme"}]},"description": "All lower-level readiness rules pass","title": "Readiness baseline met"}],"levels": [{"color": "paleBlue","title": "Basic"},{"color": "bronze","title": "Bronze"},{"color": "blue","title": "Silver"},{"color": "gold","title": "Gold"}]} -
Click
Saveto create the scorecard.
Create the delivery hygiene scorecard
-
Click on
+ New Scorecardagain. -
Click on the
{...}button in the top right corner, and chooseEdit JSON. -
Copy and paste the following JSON configuration:
Delivery hygiene scorecard (Click to expand)
{"identifier": "ado_delivery_hygiene","title": "Delivery Hygiene","rules": [{"identifier": "automated_delivery_enabled","level": "Bronze","query": {"combinator": "and","conditions": [{"value": 0,"operator": ">","property": "total_pipeline"}]},"description": "CI pipeline runs on commits and/or pull requests","title": "Automated delivery enabled"},{"identifier": "has_a_pr_template","level": "Silver","query": {"combinator": "and","conditions": [{"operator": "isNotEmpty","property": "has_pr_template"}]},"description": "Repository includes a pull request template guiding contributors","title": "Has a PR Template"},{"identifier": "repo_policy_enabled","level": "Silver","query": {"combinator": "and","conditions": [{"value": true,"operator": "=","property": "repository_policy_enabled"}]},"description": "Security and protection policies are enabled on the repository","title": "Repository policies enabled"},{"identifier": "delivery_baseline_met","level": "Gold","query": {"combinator": "and","conditions": [{"value": true,"operator": "=","property": "repository_policy_enabled"},{"value": 0,"operator": ">","property": "total_pipeline"},{"operator": "isNotEmpty","property": "has_pr_template"}]},"description": "All delivery hygiene rules pass","title": "Delivery baseline met"}],"levels": [{"color": "paleBlue","title": "Basic"},{"color": "bronze","title": "Bronze"},{"color": "blue","title": "Silver"},{"color": "gold","title": "Gold"}]} -
Click
Saveto create the scorecard.
Configure AI agent
To help Platform Engineering teams understand, assess, and improve adherence to organizational standards for quality, security, and compliance using engineering signals stored in Port's Context Lake, we'll configure an AI agent that provides objective insights and prioritized, actionable recommendations.
-
Go to the AI Agents page of your portal.
-
Click on
+ AI Agent. -
Toggle
Json modeon. -
Copy and paste the following JSON configuration:
Standards Insights Agent configuration (Click to expand)
{"identifier": "standards_insights_agent","title": "standards_agent","icon": "Details","team": [],"properties": {"description": "AI agent to help teams to improve adherence to organizational standards","status": "active","tools": ["^(list|search|track|describe)_.*"],"prompt": "You are the Standards Insights Agent.\n\nYour purpose is to help Platform Engineering understand, assess, and improve adherence to organizational standards for quality, security, and compliance using engineering signals stored in Port's Context Lake. You provide objective insights and prioritised, actionable recommendations that reduce risk, prevent drift, and ensure consistent delivery at scale.\n\nAvailable Data\n\nUse any relevant blueprints and properties available in the Context Lake (for example: Repositories, Services, Domains, Pull Requests, CI/CD pipelines, Branch Rules, Teams, Scorecards, or future standards-related signals).\n\nDo not assume a fixed schema. Use only available data.\n\nYour Task\n\nInterpret the user's question and determine scope (repository, service, domain, or organisation).\n\nAnalyse standards-related signals such as:\n\nRepository hygiene and readiness indicators\n\nOwnership, documentation, and accountability signals\n\nCI/CD and delivery policy enforcement\n\nBranch protection, review guidance, and change controls\n\nSecurity and access guardrails\n\nScorecard results and baseline coverage\n\nSurface standards gaps and risk patterns, including missing standards, inconsistent adoption, baseline drift, or unmanaged repositories or services.\n\nWhen improvement opportunities exist, include recommendations in a structured table.\n\nHow to Think\n\nBe data-driven and standards-aware.\nPrefer systemic patterns over individual issues.\nTreat standards as guardrails that enable scale.\nAvoid speculation; rely only on available signals.\nIf the question is unclear, ask one targeted follow-up.\n\nOutput Format\n\nDirect Answer\nShort, factual response focused on standards adherence or risk.\n\nSupporting Insights\nKey patterns or scorecard results explaining the standards posture.\n\nRecommendations (Table)\nInclude when relevant:\n\nRecommendation\tPriority\tExpected Impact\tImplementation Complexity\tRelated Entities\nActionable standards improvement\tHigh / Medium / Low\tReduced risk, improved consistency\tLow / Medium / High\tURLs or N/A\n\nRelevant Port Guides (Optional)\nReference only directly actionable Port guides (for example: scorecards, dashboards, automation). Omit if none apply.\n\nBe concise, accurate, and aligned with Engineering Intelligence principles: standards visibility, platform guardrails, and actionable clarity.","execution_mode": "Approval Required","conversation_starters": ["What needs attention right now?","What are the top 3 actions we should take to improve standards adherence?","What are the top recurring standards adherence issues?","What single improvement will give us the biggest standards adherence gain?"]},"relations": {}} -
Click on
Createto save the agent.
The AI agent uses MCP (Model Context Protocol) enhanced capabilities to automatically discover important and relevant blueprint entities via its tools. The ^(list|search|track|describe)_.* pattern is the standard data-access pattern in the tools list (used directly when working in Advanced mode (regex)), and allows the agent to access and analyze related entities in your software catalog for richer contextual understanding.
Visualize metrics
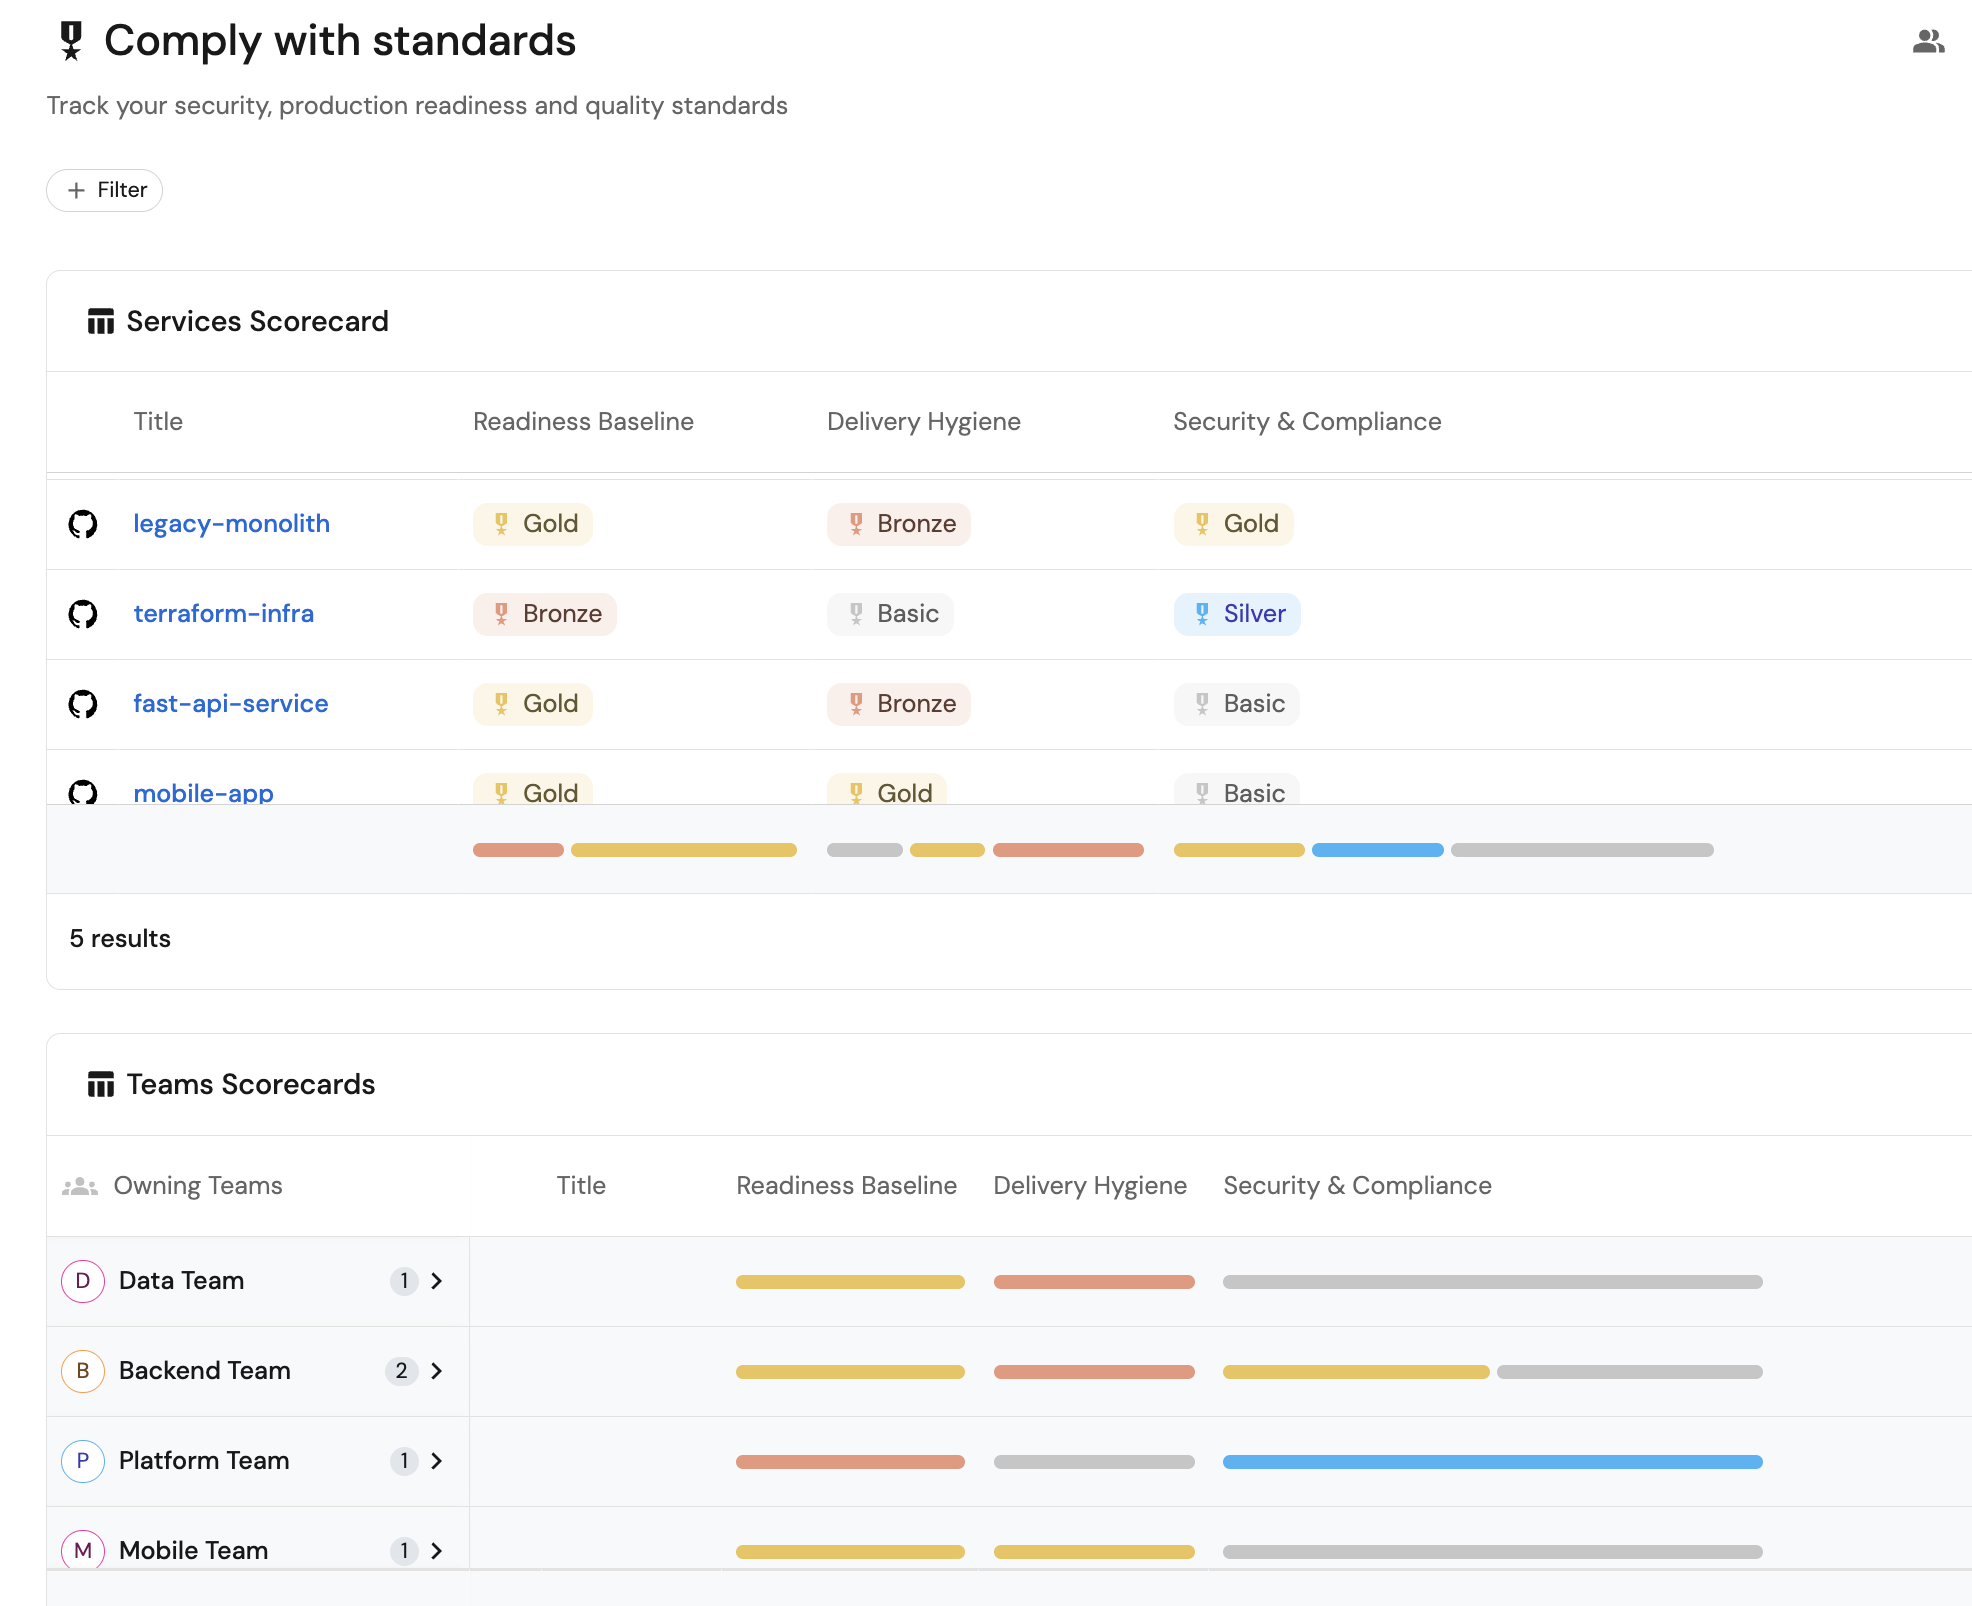
Once the data is synced and scorecards are configured, we can create a dedicated dashboard in Port to monitor and analyze standards compliance.
Create a dashboard
- Navigate to your software catalog.
- Click on the
+button in the left sidebar. - Select New dashboard.
- Name the dashboard Comply with standards.
- Input
Track your security, production readiness and quality standardsunder Description. - Click
Create.
We now have a blank dashboard where we can start adding widgets to visualize standards compliance.
Add widgets
- GitHub (Legacy & Ocean)
- Azure DevOps
In the new dashboard, create the following widgets:Standards Insights Agent (click to expand)
+ Widget and select AI Agent.Standards Insights Agent.Services scorecard (click to expand)
+ Widget and select Table.... button in the top right corner of the table and select Customize table.Manage Properties and add the following properties:
Teams scorecard (click to expand)
+ Widget and select Table.... button in the top right corner of the table and select Customize table.Manage Properties and add the following properties: