Measure AI feedback
This guide demonstrates how to build a feedback measurement system for AI initiatives using Port.
You will learn how to collect developer feedback on AI tools, analyze it using AI agents, and visualize insights in a dashboard.
By the end of this guide, you will have:
- A feedback collection mechanism triggered from GitHub PR comments.
- An AI agent that analyzes raw feedback and extracts structured insights.
- A dashboard to visualize feedback trends and compare AI tools.
Common use cases
- Compare different AI code review tools (Qodo, CodeRabbit, etc.) based on developer feedback.
- Track sentiment trends for AI-assisted workflows over time.
- Identify friction points in AI-driven SDLC processes.
- Measure the effectiveness of coding agents, PR reviewers, and AI notifications.
- Make data-driven decisions about which AI tools to adopt.
Prerequisites
This guide assumes the following:
- You have a Port account and have completed the onboarding process.
- Port's GitHub integration is installed in your account:
- GitHub (Ocean)
- GitHub (Sunset)
- GitHub Ocean is installed in your account.
- Port's GitHub app is installed in your account.
Set up data model
We will create a blueprint to store feedback data from developers.
Create the AI feedback blueprint
-
Go to the Builder page of your portal.
-
Click on
+ Blueprint. -
Click on the
{...}button in the top right corner, and chooseEdit JSON. -
Copy and paste the following JSON schema:
AI Feedback blueprint (click to expand)
{"identifier": "aiFeedback","title": "AI Feedback","icon": "Star","description": "Feedback collected from developers on AI tools and initiatives","schema": {"properties": {"raw_feedback": {"type": "string","title": "Raw Feedback","description": "The original feedback text submitted by the developer"},"ai_tool": {"type": "string","title": "AI Tool","description": "The AI tool being evaluated","enum": ["Qodo", "CodeRabbit", "GitHub Copilot", "Cursor", "Other"],"enumColors": {"Qodo": "blue","CodeRabbit": "green","GitHub Copilot": "purple","Cursor": "orange","Other": "lightGray"}},"feedback_type": {"type": "string","title": "Feedback Type","description": "The type of AI feature being evaluated","enum": ["PR Review", "Code Generation", "Code Completion", "Documentation", "Other"],"enumColors": {"PR Review": "blue","Code Generation": "green","Code Completion": "purple","Documentation": "orange","Other": "lightGray"}},"pr_url": {"type": "string","title": "PR URL","format": "url","description": "Link to the pull request where feedback was submitted"},"pr_number": {"type": "number","title": "PR Number","description": "The pull request number"},"author": {"type": "string","title": "Author","description": "The developer who submitted the feedback"},"submitted_at": {"type": "string","title": "Submitted At","format": "date-time","description": "When the feedback was submitted"},"sentiment": {"type": "string","title": "Sentiment","description": "Overall sentiment of the feedback","enum": ["Positive", "Negative", "Mixed", "Neutral"],"enumColors": {"Positive": "green","Negative": "red","Mixed": "yellow","Neutral": "lightGray"}},"numeric_rating": {"type": "number","title": "Numeric Rating","description": "Rating from 1 to 5 based on feedback analysis","minimum": 1,"maximum": 5},"categories": {"type": "array","title": "Categories","description": "Aspects of the AI tool mentioned in the feedback","items": {"type": "string","enum": ["helpfulness", "accuracy", "tone", "relevance", "speed", "coverage"]}},"summary": {"type": "string","title": "Summary","description": "AI-generated summary of the feedback"},"analyzed": {"type": "boolean","title": "Analyzed","description": "Whether the feedback has been analyzed by the AI agent","default": false}},"required": ["raw_feedback", "ai_tool"]},"mirrorProperties": {},"calculationProperties": {},"aggregationProperties": {},"relations": {"repository": {"title": "Repository","target": "githubRepository","required": false,"many": false}}} -
Click
Saveto create the blueprint.
Set up GitHub workflow
We will create a GitHub workflow that captures feedback from PR comments and sends it to Port.
Add GitHub secrets
In your GitHub repository, go to Settings > Secrets and add the following secrets:
PORT_CLIENT_ID- Port Client ID. Learn more.PORT_CLIENT_SECRET- Port Client Secret. Learn more.
Create the feedback capture workflow
Create the file .github/workflows/capture-ai-feedback.yml in the .github/workflows folder of your repository.
We recommend creating a dedicated repository for the workflows that are used by Port actions.
- GitHub (Ocean)
- GitHub (Sunset)
Capture AI feedback workflow (click to expand)
name: Capture AI Feedback

on:
  issue_comment:
    types: [created]

permissions:
  pull-requests: write
  issues: write

jobs:
  capture-feedback:
    if: |
      github.event.issue.pull_request &&
      startsWith(github.event.comment.body, '/feedback')
    runs-on: ubuntu-latest
    steps:
      - name: Extract feedback text
        id: extract
        run: |
          COMMENT_BODY="${{ github.event.comment.body }}"
          # Remove the /feedback prefix and trim whitespace
          FEEDBACK_TEXT=$(echo "$COMMENT_BODY" | sed 's|^/feedback[[:space:]]*||')

          # Escape special characters for JSON
          FEEDBACK_TEXT=$(echo "$FEEDBACK_TEXT" | jq -Rs '.')

          echo "feedback=$FEEDBACK_TEXT" >> $GITHUB_OUTPUT
          echo "Extracted feedback: $FEEDBACK_TEXT"

      - name: Get Port access token
        id: port-auth
        run: |
          TOKEN=$(curl -s -X POST \
            -H "Content-Type: application/json" \
            -d '{"clientId": "${{ secrets.PORT_CLIENT_ID }}", "clientSecret": "${{ secrets.PORT_CLIENT_SECRET }}"}' \
            https://api.port.io/v1/auth/access_token | jq -r '.accessToken')
          echo "token=$TOKEN" >> $GITHUB_OUTPUT

      - name: Send feedback to Port
        run: |
          FEEDBACK=${{ steps.extract.outputs.feedback }}

          curl -X POST \
            -H "Authorization: Bearer ${{ steps.port-auth.outputs.token }}" \
            -H "Content-Type: application/json" \
            -d "{
              \"identifier\": \"feedback-${{ github.event.comment.id }}\",
              \"title\": \"Feedback from ${{ github.event.comment.user.login }} on PR #${{ github.event.issue.number }}\",
              \"properties\": {
                \"raw_feedback\": $FEEDBACK,
                \"ai_tool\": \"Qodo\",
                \"feedback_type\": \"PR Review\",
                \"pr_url\": \"${{ github.event.issue.html_url }}\",
                \"pr_number\": ${{ github.event.issue.number }},
                \"author\": \"${{ github.event.comment.user.login }}\",
                \"submitted_at\": \"${{ github.event.comment.created_at }}\",
                \"analyzed\": false
              },
              \"relations\": {
                \"repository\": \"${{ github.repository }}\"
              }
            }" \
            "https://api.port.io/v1/blueprints/aiFeedback/entities?upsert=true"

      - name: Acknowledge feedback
        env:
          GITHUB_TOKEN: ${{ secrets.GITHUB_TOKEN }}
        run: |
          gh pr comment ${{ github.event.issue.number }} \
            --repo ${{ github.repository }} \
            --body "Thanks for your feedback! It has been recorded and will help us evaluate AI tools."
Capture AI feedback workflow (click to expand)
name: Capture AI Feedback

on:
  issue_comment:
    types: [created]

permissions:
  pull-requests: write
  issues: write

jobs:
  capture-feedback:
    if: |
      github.event.issue.pull_request &&
      startsWith(github.event.comment.body, '/feedback')
    runs-on: ubuntu-latest
    steps:
      - name: Extract feedback text
        id: extract
        run: |
          COMMENT_BODY="${{ github.event.comment.body }}"
          # Remove the /feedback prefix and trim whitespace
          FEEDBACK_TEXT=$(echo "$COMMENT_BODY" | sed 's|^/feedback[[:space:]]*||')

          # Escape special characters for JSON
          FEEDBACK_TEXT=$(echo "$FEEDBACK_TEXT" | jq -Rs '.')

          echo "feedback=$FEEDBACK_TEXT" >> $GITHUB_OUTPUT
          echo "Extracted feedback: $FEEDBACK_TEXT"

      - name: Get Port access token
        id: port-auth
        run: |
          TOKEN=$(curl -s -X POST \
            -H "Content-Type: application/json" \
            -d '{"clientId": "${{ secrets.PORT_CLIENT_ID }}", "clientSecret": "${{ secrets.PORT_CLIENT_SECRET }}"}' \
            https://api.port.io/v1/auth/access_token | jq -r '.accessToken')
          echo "token=$TOKEN" >> $GITHUB_OUTPUT

      - name: Send feedback to Port
        run: |
          FEEDBACK=${{ steps.extract.outputs.feedback }}

          curl -X POST \
            -H "Authorization: Bearer ${{ steps.port-auth.outputs.token }}" \
            -H "Content-Type: application/json" \
            -d "{
              \"identifier\": \"feedback-${{ github.event.comment.id }}\",
              \"title\": \"Feedback from ${{ github.event.comment.user.login }} on PR #${{ github.event.issue.number }}\",
              \"properties\": {
                \"raw_feedback\": $FEEDBACK,
                \"ai_tool\": \"Qodo\",
                \"feedback_type\": \"PR Review\",
                \"pr_url\": \"${{ github.event.issue.html_url }}\",
                \"pr_number\": ${{ github.event.issue.number }},
                \"author\": \"${{ github.event.comment.user.login }}\",
                \"submitted_at\": \"${{ github.event.comment.created_at }}\",
                \"analyzed\": false
              },
              \"relations\": {
                \"repository\": \"${{ github.repository }}\"
              }
            }" \
            "https://api.port.io/v1/blueprints/aiFeedback/entities?upsert=true"

      - name: Acknowledge feedback
        env:
          GITHUB_TOKEN: ${{ secrets.GITHUB_TOKEN }}
        run: |
            gh pr comment ${{ github.event.issue.number }} \
            --repo ${{ github.repository }} \
            --body "Thanks for your feedback! It has been recorded and will help us evaluate AI tools."
The workflow above defaults to Qodo as the AI tool. You can modify the ai_tool value based on which tool you are currently evaluating, or make it dynamic by parsing the comment for tool-specific keywords.
Set up self-service action
We will create a self-service action that the AI agent can call to update the feedback entity with analysis results. This approach provides reliable entity updates and can also be triggered manually.
-
Go to the self-service page of your portal.
-
Click on
+ New Action. -
Click on the
{...} Edit JSONbutton. -
Copy and paste the following JSON configuration:
Update feedback with analysis action (click to expand)
{"identifier": "update_feedback_analysis","title": "Update Feedback with Analysis","icon": "Star","description": "Updates a feedback entity with AI-generated analysis results","trigger": {"type": "self-service","operation": "DAY-2","userInputs": {"properties": {"sentiment": {"title": "Sentiment","type": "string","enum": ["Positive", "Negative", "Mixed", "Neutral"]},"numeric_rating": {"title": "Numeric Rating","type": "number","minimum": 1,"maximum": 5},"categories": {"title": "Categories","type": "array","items": {"type": "string","enum": ["helpfulness", "accuracy", "tone", "relevance", "speed", "coverage"]}},"summary": {"title": "Summary","type": "string"}},"required": ["sentiment", "numeric_rating", "summary"],"order": ["sentiment", "numeric_rating", "categories", "summary"]},"blueprintIdentifier": "aiFeedback"},"invocationMethod": {"type": "WEBHOOK","url": "https://api.port.io/v1/blueprints/aiFeedback/entities/{{ .entity.identifier }}","agent": false,"synchronized": true,"method": "PATCH","headers": {"RUN_ID": "{{ .run.id }}","Content-Type": "application/json"},"body": {"properties": {"sentiment": "{{ .inputs.sentiment }}","numeric_rating": "{{ .inputs.numeric_rating }}","categories": "{{ .inputs.categories }}","summary": "{{ .inputs.summary }}","analyzed": true}}},"requiredApproval": false} -
Click
Saveto create the action.
Create the AI agent
We will create an AI agent that analyzes raw feedback and extracts structured insights like sentiment, ratings, and categories.
Create the feedback analyzer agent
-
Go to the AI Agents page of your portal.
-
Click on
+ AI Agent. -
Toggle
Json modeon. -
Copy and paste the following JSON schema:
Feedback Analyzer agent configuration (click to expand)
{"identifier": "feedback_analyzer_agent","title": "Feedback Analyzer","icon": "Star","properties": {"description": "AI agent that analyzes developer feedback on AI tools and extracts structured insights, then updates the feedback entity with the results","status": "active","tools": ["^(list|get|search)_.*","run_update_feedback_analysis"],"prompt": "You are a feedback analyst for AI coding tools. When triggered, you will:\n\n1. First, retrieve the feedback entity using the identifier provided in your input\n2. Analyze the raw_feedback text\n3. Update the feedback entity by running the 'update_feedback_analysis' action\n\n## Analysis Criteria\n\nDetermine the following from the feedback:\n\n**sentiment**: The overall sentiment - must be exactly one of: \"Positive\", \"Negative\", \"Mixed\", or \"Neutral\"\n\n**numeric_rating**: A score from 1-5 based on overall satisfaction:\n- 1 = Very negative, the tool was harmful or completely unhelpful\n- 2 = Somewhat negative, more problems than benefits\n- 3 = Neutral or mixed, some good and some bad\n- 4 = Somewhat positive, helpful with minor issues\n- 5 = Very positive, the tool was excellent\n\n**categories**: Which aspects of the AI tool does the feedback mention? Only include categories that are explicitly or clearly implied. Choose from:\n- helpfulness: Was the tool useful?\n- accuracy: Were suggestions correct?\n- tone: How did the AI communicate?\n- relevance: Were comments on-topic?\n- speed: How fast was the response?\n- coverage: Did it review enough?\n\n**summary**: A one-sentence summary of the feedback\n\n## Required Action\n\nAfter analyzing, you MUST run the 'update_feedback_analysis' action to save the results. Provide:\n- sentiment (one of: Positive, Negative, Mixed, Neutral)\n- numeric_rating (1-5)\n- categories (array of applicable categories)\n- summary (one sentence)\n\nThe action will automatically set analyzed to true.","execution_mode": "Automatic"}} -
Click on
Createto save the agent.
The tools property defines which MCP tools the agent can use. The pattern ^(list|get|search)_.* allows read-only access to query data. Additionally, run_update_feedback_analysis explicitly grants the agent permission to execute the self-service action that updates the feedback entity. For more details on tool selection, see Tool Selection in API Interaction.
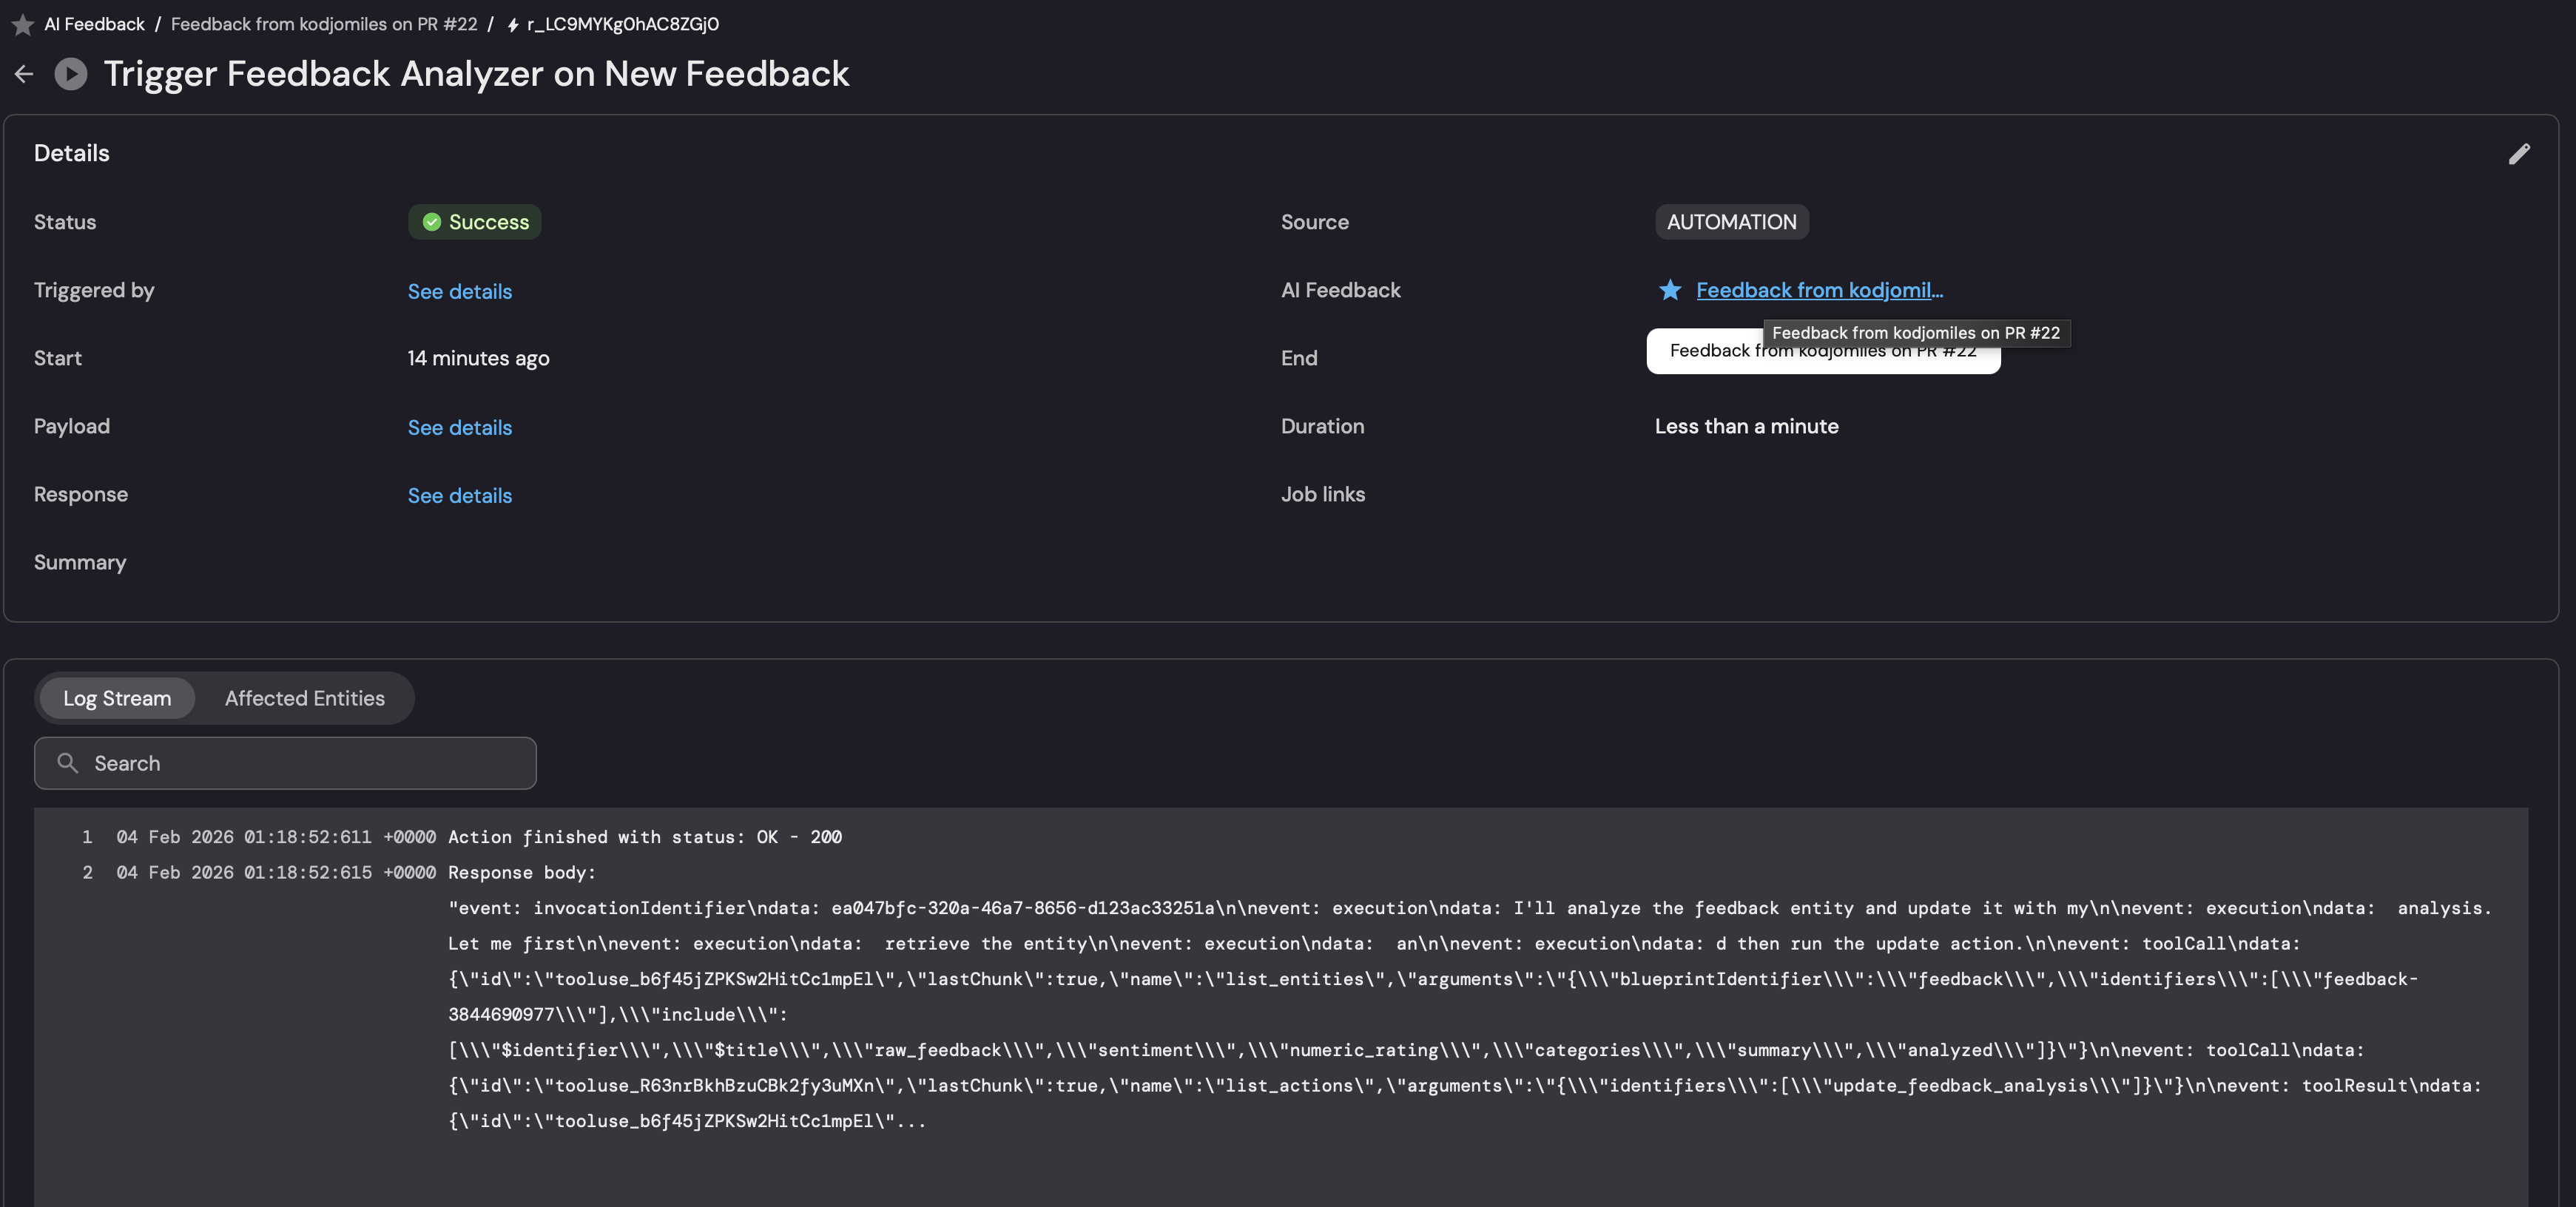
Create an automation
We need an automation to trigger the AI agent when new feedback is created. The agent will analyze the feedback and call the update_feedback_analysis action to save the results.
Trigger feedback analyzer on new feedback
-
Go to the Automations page.
-
Click on
+ Automation. -
Copy and paste the following JSON schema:
Trigger feedback analyzer automation (click to expand)
{"identifier": "trigger_feedback_analyzer","title": "Trigger Feedback Analyzer on New Feedback","description": "When new AI feedback is created, trigger the feedback analyzer agent","trigger": {"type": "automation","event": {"type": "ENTITY_CREATED","blueprintIdentifier": "aiFeedback"},"condition": {"type": "JQ","expressions": [".diff.after.properties.analyzed == false"],"combinator": "and"}},"invocationMethod": {"type": "WEBHOOK","url": "https://api.port.io/v1/agent/feedback_analyzer_agent/invoke","synchronized": true,"body": {"prompt": "Analyze the feedback entity with identifier '{{ .event.diff.after.identifier }}'. The raw feedback is: '{{ .event.diff.after.properties.raw_feedback }}'. Return your analysis as a JSON object.","labels": {"source": "Automation","feedbackId": "{{ .event.diff.after.identifier }}"}}},"publish": true} -
Click on
Createto save the automation.
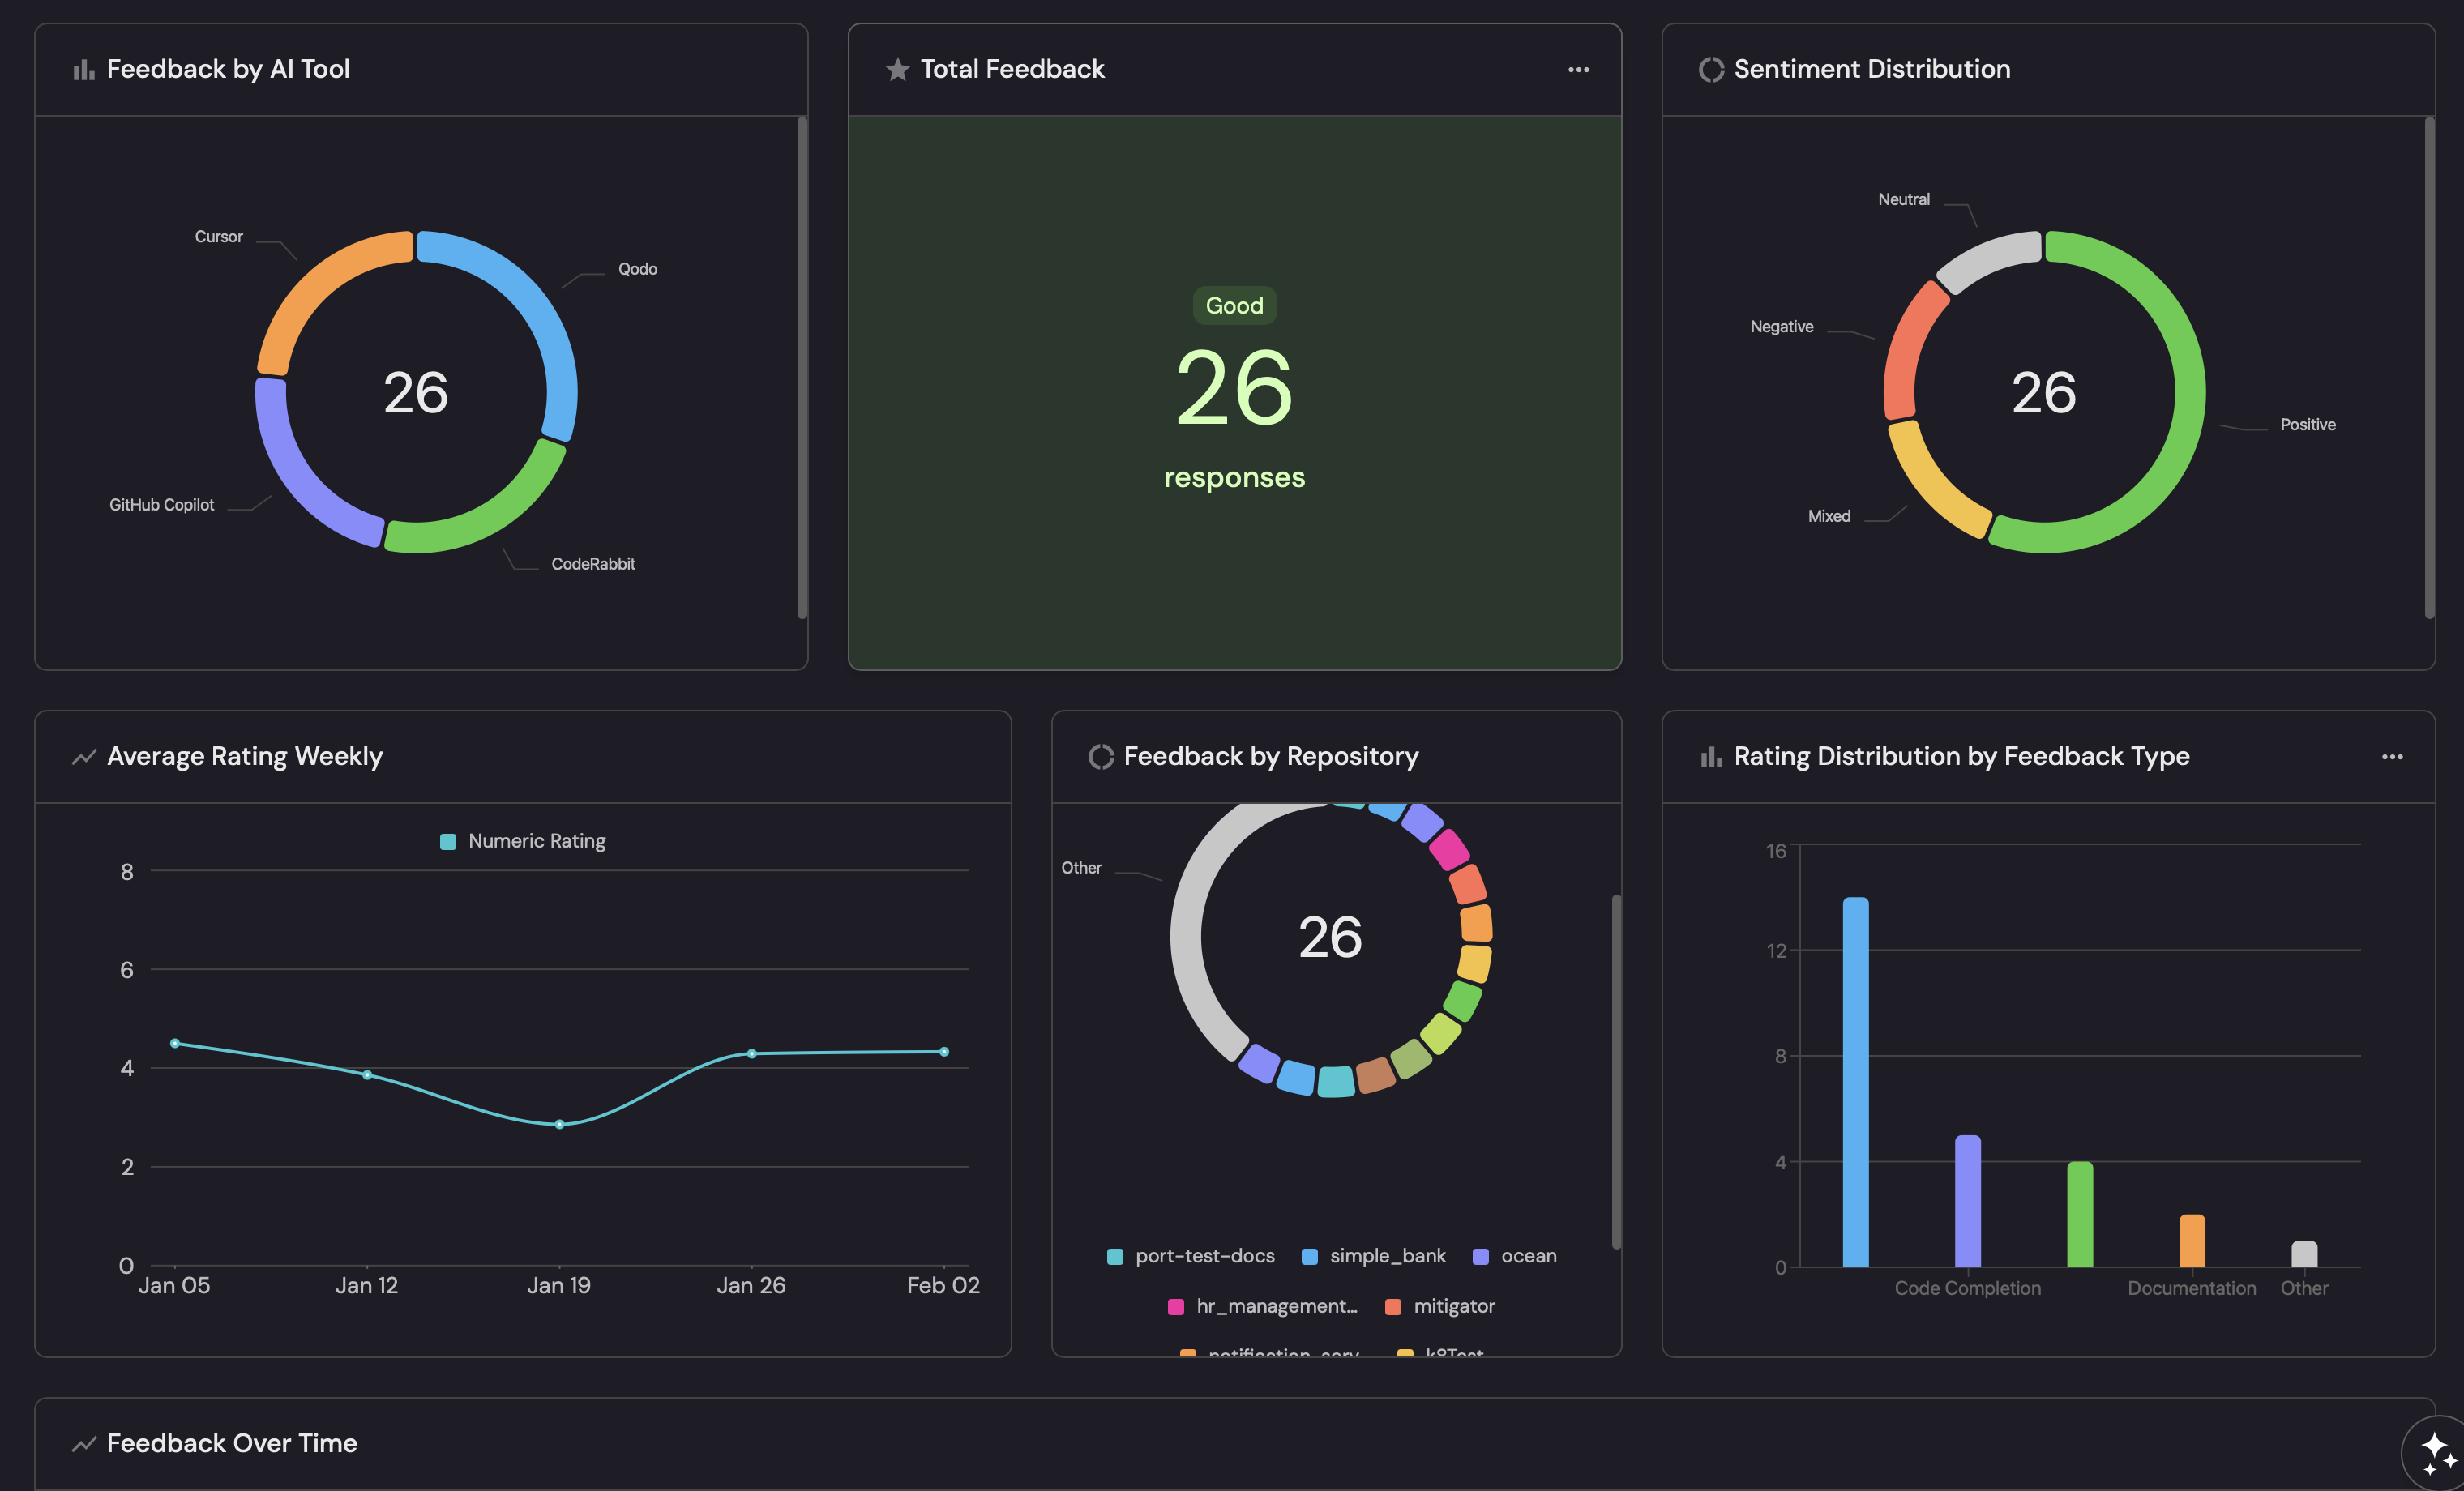
Visualize metrics
With feedback data flowing into Port, we can create a dashboard to visualize trends and insights.
Create a dashboard
-
Navigate to the Catalog page of your portal.
-
Click on the
+button in the left sidebar. -
Select New dashboard.
-
Name the dashboard AI Feedback Insights.
-
Input
Track and analyze feedback on AI toolsunder Description. -
Select the
Staricon. -
Click
Create.
Add widgets
In the new dashboard, create the following widgets:
Total feedback count (click to expand)
-
Click
+ Widgetand select Number Chart. -
Title:
Total Feedback(add theStaricon). -
Select
Count entitiesas the Chart type and choose AI Feedback as the Blueprint. -
Select
countfor the Function. -
Select
customas the Unit and inputresponsesas the Custom unit. -
Click
Save.
Feedback by AI tool (click to expand)
-
Click
+ Widgetand select Pie chart. -
Title:
Feedback by AI Tool(add theBaricon). -
Choose the AI Feedback blueprint.
-
Under
Breakdown by property, select the AI Tool property. -
Click
Save.
Sentiment distribution (click to expand)
-
Click
+ Widgetand select Pie chart. -
Title:
Sentiment Distribution(add theDefaultPropertyicon). -
Choose the AI Feedback blueprint.
-
Under
Breakdown by property, select the Sentiment property. -
Click
Save.
Average rating weekly (click to expand)
-
Click
+ Widgetand select Line Chart. -
Title:
Average Rating Weekly(add theStaricon). -
Set X axis:
- Title:
Date. - Time interval:
Week. - Time range:
In the past 30 days.
- Title:
-
Set Y axis title:
Rating. -
Click + Line and configure:
- Title:
Average Rating. - Chart type:
Aggregate by property. - Blueprint:
AI Feedback. - Property:
Numeric Rating. - Function:
Average. - Measure time by:
Submitted At.
- Title:
-
Click
Save.
Rating distribution by feedback type (click to expand)
-
Click
+ Widgetand select Bar Chart. -
Title:
Rating Distribution by Feedback Type(add theStaricon). -
Select
Count entitiesas the Chart type. -
Choose the AI Feedback blueprint.
-
Under Breakdown by property, select the Feedback Type property.
-
Click
Save.
Feedback by repository (click to expand)
-
Click
+ Widgetand select Pie chart. -
Title:
Feedback by Repository(add theGitRepositoryicon). -
Choose the AI Feedback blueprint.
-
Under
Breakdown by property, select the Repository relation. -
Click
Save.
Feedback over time (click to expand)
-
Click
+ Widgetand select Line chart. -
Title:
Feedback Over Time(add theDefaultPropertyicon). -
Set X axis:
- Title:
Date. - Time interval:
Week. - Time range:
In the past 30 days.
- Title:
-
Set Y axis title:
Feedback Count. -
Click + Line and configure:
- Title:
Feedback Count. - Chart type:
Count entities. - Blueprint:
AI Feedback. - Function:
Count. - Measure time by:
Submitted At.
- Title:
-
Click
Save.
Let's test it
Now that you have set up the feedback collection system, test it to ensure everything works correctly.
-
Go to a pull request in your repository.
-
Add a comment with the
/feedbackprefix: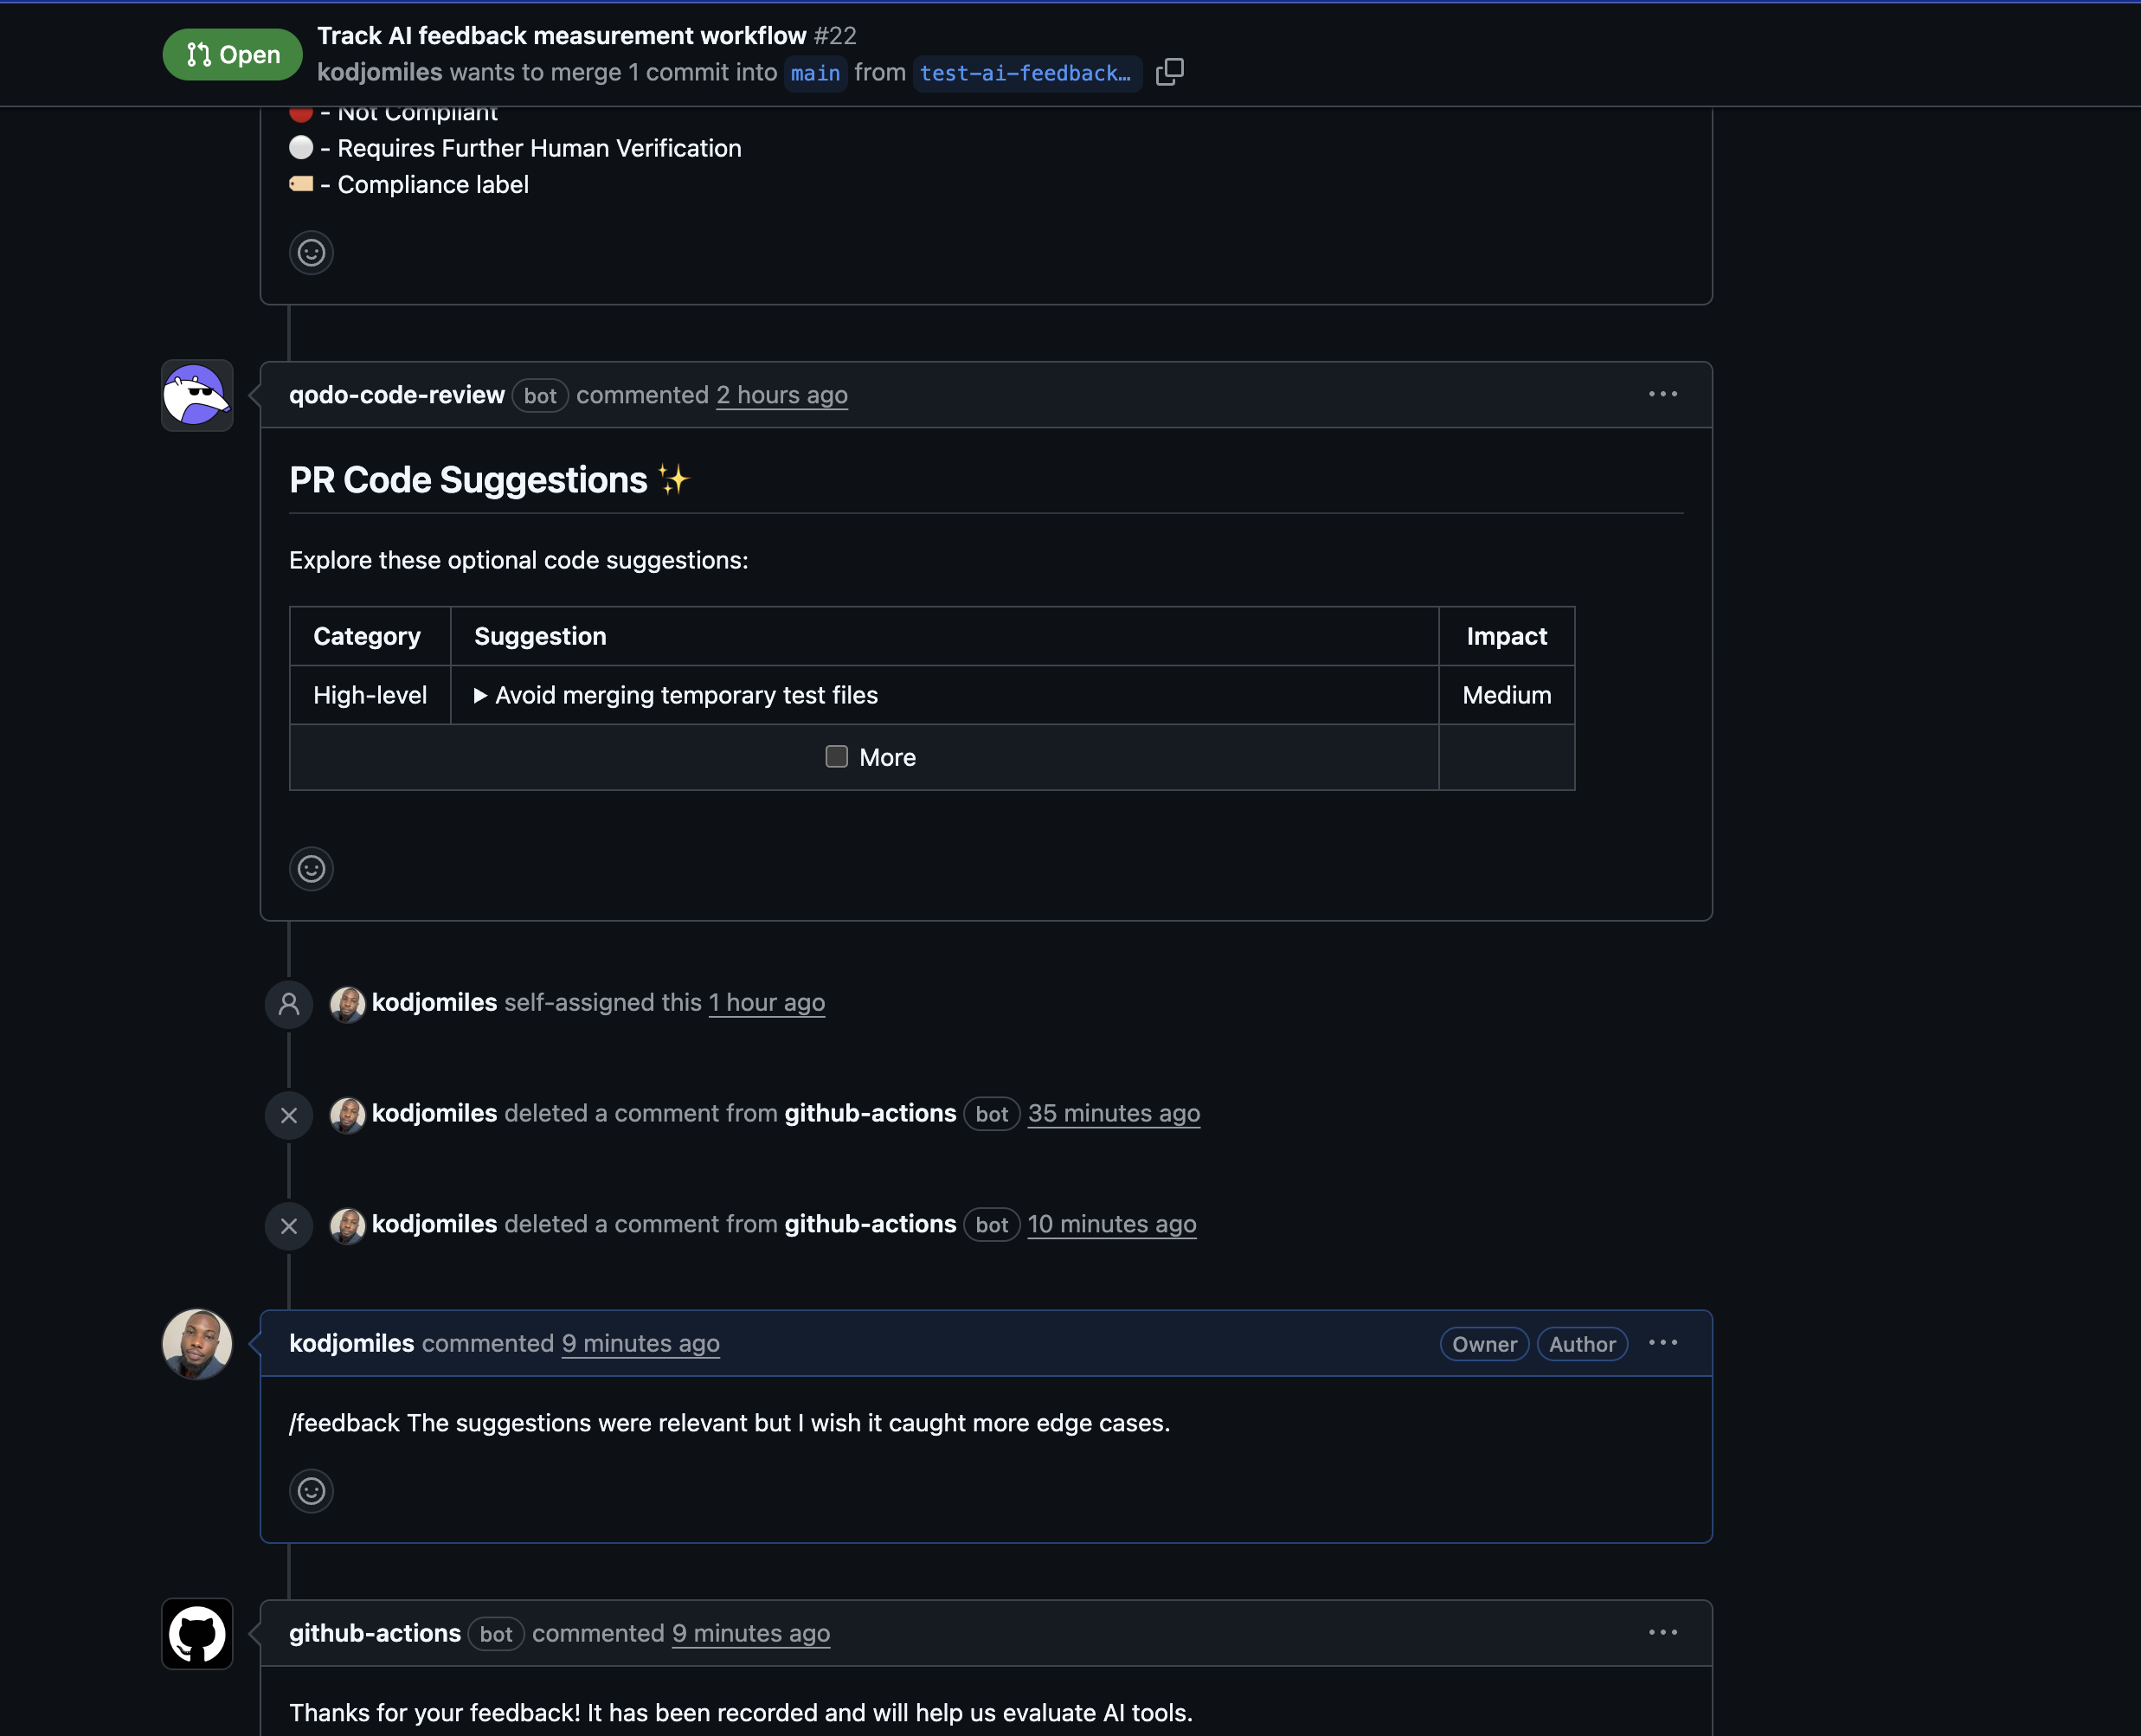
-
Wait for the GitHub workflow to run. You should see:
-
A confirmation comment on the PR when the workflow runs successfully.
-
A new entity in the AI Feedback catalog in Port.

-
-
Check the AI Invocations page to see the feedback analyzer agent processing the feedback.
-
Navigate to your AI Feedback Insights dashboard to see the feedback visualized.