Map external tool users and teams to Port accounts
This guide demonstrates how to map external users from Git, Jira, Slack, ServiceNow, and HiBob to existing Port user accounts using Port Workflows.
Common use cases
- Maintain a complete inventory of external user and team identities in Port.
- Connect tool-specific identities to one Port account for each user or team.
- Keep ownership and role-based access control aligned with external team structures.
- Route self-service actions and automations to the correct users and teams.
Match external identities
Port uses the _user and _team system blueprints as the canonical accounts for people and teams. Each integration also creates tool-specific entities, such as a GitHub user or an Okta group.
The user mappings in this guide use an email address as the _user identifier. If the email matches an existing Port user, the mapping connects that account to the external user entity. If no account matches, Port creates a disabled user account that an administrator can activate.
The team mappings use the GitHub team slug or Okta group name as the _team identifier. When that identifier matches an existing Port team, the mapping connects it to the external team entity. Adjust the identifier expression if your Port teams use a different naming convention to avoid creating duplicate teams.
Prerequisites
Before you start, make sure:
- You have a Port account and have completed the onboarding process.
- You have permissions to create or update blueprints and workflows in Port.
- You have installed the relevant integration or have admin/API access to the external tool you want to map.
How it works
All five integration paths follow the same pattern, implemented with Port Workflows:
- Git and Jira: the integration mapping links external users to Port users during every sync. A small workflow with an event trigger completes the mapping whenever a new Port user is created.
- Slack, ServiceNow, and HiBob: a single workflow with three triggers does all the work:
- A self-service trigger runs a bulk sync on demand. The workflow fetches all users from the external API and forwards them to a custom webhook data source, which creates the user entities and links matching Port users.
- A schedule trigger runs the same bulk sync automatically every day.
- An event trigger fires when a new Port user is created, looks up the matching external user by email, and links the two entities directly.
Every resource in this guide can be created from Port's UI or via Port's API. Each tab ends with a Set up via API section that scripts the entire setup, which is useful for automation or when implementing this guide with an AI agent.
Map users by integration
Choose the tab for the external tool you want to map. Each tab is an implementation path for the same outcome: linking external users to Port user accounts.
- Git (GitHub / GitLab / Azure DevOps)
- Jira
- Slack
- ServiceNow
- HiBob
Git users
Use this option to map GitHub, GitLab, and Azure DevOps users to Port user accounts by matching email addresses.
In this tab we will create the following resources:
| Resource | Name | Purpose |
|---|---|---|
| Integration mapping update | GitHub Ocean / GitLab / Azure DevOps | Links Git users to Port users on every sync. |
| Workflow | sync_port_user_for_git_users | Maps Git users when a new Port user is created. |
Set up Git prerequisites
Install and configure the relevant Git integration:
-
You have permissions to create workflows in Port.
Set up data model
The relations between Git users and Port users are created automatically when we install the relevant Git integrations. If you haven't installed them yet, please do so first.
Optional: Add mirror properties to the Port User blueprint
If you want to display some Git user attributes e.g. username, email, etc. in the Port User blueprint, you can add a mirror property to the Port User blueprint.
Follow the steps below to add a mirror property to the Port User blueprint:
-
Go to the Data model page in Port.
-
Find the
Userblueprint and click on it. -
Click on the Edit JSON button in the top right corner.
-
Add the following mirror properties to the
mirrorPropertiesobject to display Git user information:Port User blueprint mirror properties (click to expand)
"mirrorProperties": {"github_login": {"title": "GitHub login","path": "githubUser.login"},"gitlab_username": {"title": "GitLab username","path": "gitlabUser.username"},"azuredevops_display_name": {"title": "Azure DevOps display name","path": "azureDevopsUser.displayName"}} -
Click on Save to update the blueprint.
You can add more mirror properties to display other Git user attributes or customize which properties are most relevant for your organization. Only add the mirror properties for the Git platforms you're using.
Update integration mapping
Now we'll update the integration mapping to include the relation, so the workflow below has a Git user to link against when a new Port user is added.
- GitHub (Ocean)
- GitLab
- Azure DevOps
To update the GitHub Ocean integration mapping, follow the steps below:
-
Go to the Data sources page.
-
Under Exporters, click on your installed GitHub Ocean integration.
-
In the mapping configuration, add a new mapping for Port User entities to establish the relation with GitHub users:
Updated GitHub Ocean integration mapping (click to expand)
# Keep existing githubUser mapping- kind: userselector:query: 'true'port:entity:mappings:identifier: .logintitle: .loginblueprint: '"githubUser"'properties:email: .email# Add new mapping for Port Users with relation to GitHub users- kind: userselector:query: '.email != null'port:entity:mappings:identifier: .emailblueprint: '"_user"'relations:githubUser: .login -
Click on Save & Resync to apply the changes.
To update the GitLab integration mapping, follow the steps below:
-
Go to the Data sources page.
-
Find your GitLab integration and click on it.
-
In the mapping configuration, add a new mapping for Port User entities to establish the relation with GitLab users:
Updated GitLab integration mapping (click to expand)
# Keep existing gitlabMember mapping- kind: memberselector:query: 'true'port:entity:mappings:identifier: .usernametitle: .nameblueprint: '"gitlabMember"'properties:url: .web_urlstate: .stateemail: .emaillocked: .locked# Add new mapping for Port Users with relation to GitLab users- kind: memberselector:query: '.email != null'port:entity:mappings:identifier: .emailblueprint: '"_user"'relations:gitlabUser: .username -
Click on Save & Resync to apply the changes
To update the Azure DevOps integration mapping, follow the steps below:
-
Go to the Data sources page.
-
Find your Azure DevOps integration and click on it.
-
In the mapping configuration, add a new mapping for Port User entities to establish the relation with Azure DevOps users:
Updated Azure DevOps integration mapping (click to expand)
# Keep existing azureDevopsMember mapping- kind: userselector:query: 'true'port:entity:mappings:identifier: .idtitle: .user.displayNameblueprint: '"azureDevopsMember"'properties:url: .user.urlemail: .user.mailAddress# Add new mapping for Port Users with relation to Azure DevOps users- kind: userselector:query: '.user.mailAddress != null'port:entity:mappings:identifier: .user.mailAddressblueprint: '"_user"'relations:azureDevopsUser: .id -
Click on Save & Resync to apply the changes.
Build the workflow
To ensure new Port users are automatically mapped to their corresponding Git user accounts when a new Port user is created, we'll build a workflow that triggers when a new Port user is created and links the relations via Port's API.
-
Go to the Workflows page in Port.
-
Click on the
+ Workflowbutton in the top-right corner. -
Click on the
Skip to editorbutton. -
Copy and paste the workflow JSON below into the editor to replace the example workflow:
Sync Port User for Git Users workflow JSON (click to expand)
{"identifier": "sync_port_user_for_git_users","title": "Sync Port User for Git Users","icon": "Git","description": "Automatically maps Port users to their corresponding Git user accounts across all platforms","nodes": [{"identifier": "trigger","title": "On Port user created","config": {"type": "EVENT_TRIGGER","event": {"type": "ENTITY_CREATED","blueprintIdentifier": "_user"}}},{"identifier": "map_git_relations","title": "Map Git user relations","config": {"type": "WEBHOOK","url": "https://api.port.io/v1/entities/_user/{{ .outputs.trigger.diff.after.identifier }}/relations","method": "POST","headers": {"Content-Type": "application/json"},"body": {"relations": {"githubUser": {"combinator": "and","rules": [{"property": "$identifier","operator": "=","value": "{{ .outputs.trigger.diff.after.identifier }}"}]},"gitlabUser": {"combinator": "and","rules": [{"property": "$identifier","operator": "=","value": "{{ .outputs.trigger.diff.after.identifier }}"}]},"azureDevopsUser": {"combinator": "and","rules": [{"property": "$identifier","operator": "=","value": "{{ .outputs.trigger.diff.after.identifier }}"}]}}}}}],"connections": [{"sourceIdentifier": "trigger","targetIdentifier": "map_git_relations"}]}Select the relevant Git integrationIn this workflow example, we show how to map Port users to all supported Git platforms (GitHub, GitLab, and Azure DevOps) at once. In practice, you should only configure the relation for the Git platform your organization actually uses. For example, if your users are only in GitHub, include the
githubUserrelation and remove the others. Adjust the configuration to match your organization's setup. -
Click
Saveto save the workflow.
The workflow should look like this in the editor:
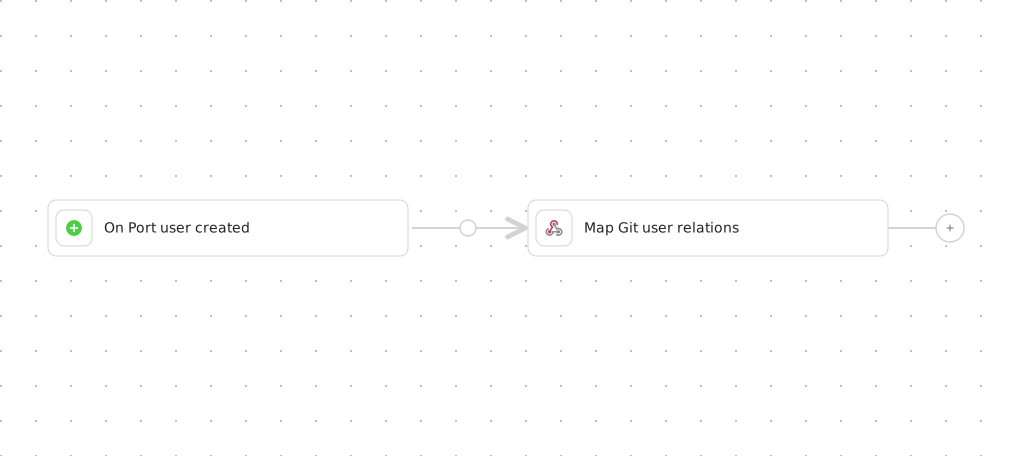
Since this workflow calls https://api.port.io, it's automatically authenticated with your organization's credentials, so no secrets are needed.
Optional: Set up via API
Instead of using the UI, you can create the resources in this tab with Port's API. The integration mapping update is organization specific, so update it from the Data sources page as shown above. Save the workflow JSON above to The API setup script (click to expand)
sync_port_user_for_git_users.json, then run:port_region, port.baseUrl, portBaseUrl, port_base_url and OCEAN__PORT__BASE_URL parameters select which Port API instance to use:
https://api.port.iohttps://api.us.port.io
Let's test it!
-
Go to your Context lake page
-
Search for a Git user entity (e.g.,
GitHub User,GitLab User, orAzure DevOps User) -
Verify that the user has a relationship with the corresponding Port user account.
-
Check that the relationship is established automatically for new Git users, and follow the run in the Workflow runs tab.
Jira users
Use this option to map Jira users to Port user accounts by matching email addresses.
In this tab we will create the following resources:
| Resource | Name | Purpose |
|---|---|---|
| Integration mapping update | Jira | Links Jira users to Port users on every sync. |
| Workflow | sync_port_user_for_jira_user | Maps Jira users when a new Port user is created. |
Set up Jira prerequisites
- You have Port's Jira integration installed and configured.
- You have permissions to create workflows in Port.
Set up data model
The relation between Jira users and Port users is created automatically when we install the Jira integration. If you haven't installed it yet, please do so first.
Optional: Add mirror properties to the Port User blueprint
If you want to display some Jira user attributes e.g. display name, account type, time zone, etc. in the Port User blueprint, you can add a mirror property to the Port User blueprint.
Follow the steps below to add a mirror property to the Port User blueprint:
-
Go to the Data model page in Port.
-
Find the
Userblueprint and click on it. -
Click on the Edit JSON button in the top right corner.
-
Add the following mirror property to the
mirrorPropertiesobject to display the Jira display name:Port User blueprint mirror property (click to expand)
"mirrorProperties": {"jira_display_name": {"title": "Jira display name","path": "jiraUser.displayName"}} -
Click on Save to update the blueprint.
You can add more mirror properties to display other Jira user attributes like timezone (jiraUser.timeZone), account type (jiraUser.accountType), or any other property from the Jira User blueprint that would be useful for your organization.
Update Jira integration mapping
-
Go to the data sources page.
-
Find your Jira integration and click on it.
-
In the mapping configuration, add a new mapping for Port User entities to establish the relation with Jira users.
Updated Jira integration mapping (click to expand)
# Keep existing jiraUser mapping- kind: userselector:query: 'true'port:entity:mappings:identifier: .accountIdtitle: .displayNameblueprint: '"jiraUser"'properties:emailAddress: .emailAddressactive: .activeaccountType: .accountTypetimeZone: .timeZonelocale: .localeavatarUrl: .avatarUrls["48x48"]# Add new mapping for Port Users with relation to Jira users- kind: userselector:query: '.emailAddress != null'port:entity:mappings:identifier: .emailAddressblueprint: '"_user"'relations:jiraUser: .accountId -
Click on Save & Resync to apply the changes.
Build the workflow
To ensure new Port users are automatically mapped to their corresponding Jira user accounts when a new Port user is created, we'll build a workflow that triggers when a new Port user is created and links the relation via Port's API.
-
Go to the Workflows page in Port.
-
Click on the
+ Workflowbutton in the top-right corner. -
Click on the
Skip to editorbutton. -
Copy and paste the workflow JSON below into the editor to replace the example workflow:
Sync Port User for Jira User workflow JSON (click to expand)
{"identifier": "sync_port_user_for_jira_user","title": "Sync Port User for Jira User","icon": "Jira","description": "Automatically maps Port users to their corresponding Jira user accounts","nodes": [{"identifier": "trigger","title": "On Port user created","config": {"type": "EVENT_TRIGGER","event": {"type": "ENTITY_CREATED","blueprintIdentifier": "_user"}}},{"identifier": "map_jira_relation","title": "Map Jira user relation","config": {"type": "WEBHOOK","url": "https://api.port.io/v1/entities/_user/{{ .outputs.trigger.diff.after.identifier }}/relations","method": "POST","headers": {"Content-Type": "application/json"},"body": {"relations": {"jiraUser": {"combinator": "and","rules": [{"property": "$identifier","operator": "=","value": "{{ .outputs.trigger.diff.after.identifier }}"}]}}}}}],"connections": [{"sourceIdentifier": "trigger","targetIdentifier": "map_jira_relation"}]} -
Click
Saveto save the workflow.
The workflow should look like this in the editor:
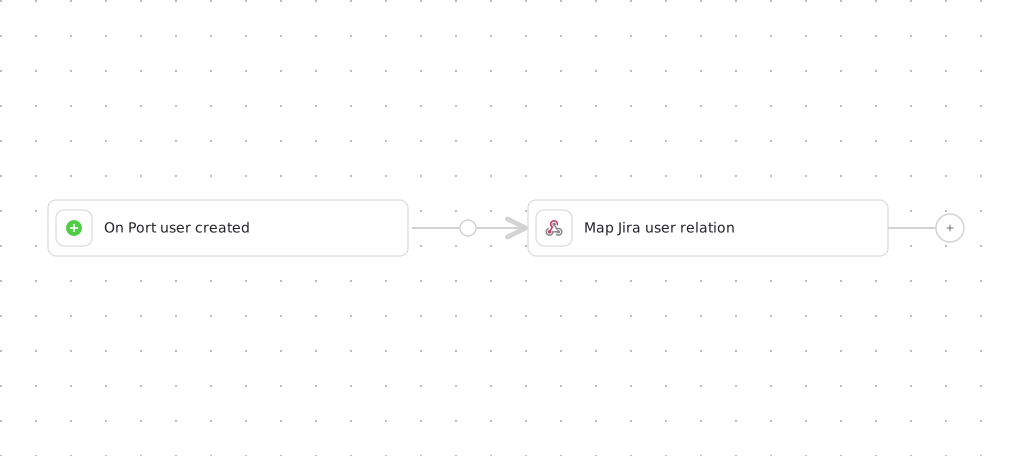
Since this workflow calls https://api.port.io, it's automatically authenticated with your organization's credentials, so no secrets are needed.
Optional: Set up via API
Instead of using the UI, you can create the resources in this tab with Port's API. The integration mapping update is organization specific, so update it from the Data sources page as shown above. Save the workflow JSON above to The API setup script (click to expand)
sync_port_user_for_jira_user.json, then run:port_region, port.baseUrl, portBaseUrl, port_base_url and OCEAN__PORT__BASE_URL parameters select which Port API instance to use:
https://api.port.iohttps://api.us.port.io
Let's test it
-
Go to the Catalog page in Port.
-
Search for a Jira user entity.
-
Verify that the user has a relationship with the corresponding Port user account.
-
Check that the relationship is established automatically for new Jira users, and follow the run in the Workflow runs tab.
Slack users
Use this option to ingest Slack users through a webhook integration and map them to Port user accounts.
In this tab we will create the following resources:
| Resource | Name | Purpose |
|---|---|---|
| Blueprint | slack_user | Stores Slack user data. |
| Blueprint update | _user | Adds the slack_user relation and a mirror property. |
| Secret | SLACK_BOT_TOKEN | Authenticates calls to the Slack API. |
| Webhook data source | Slack Users Sync | Bulk-ingests Slack users and links matching Port users. |
| Workflow | sync_slack_users | Runs the bulk sync and maps new Port users. |
Set up Slack prerequisites
- You have Slack workspace permissions to create apps and generate bot tokens. See the Slack app quickstart.
- You have permissions to create blueprints and workflows in Port.
Set up data model
To represent Slack users in Port, we need to create a Slack User blueprint that can store Slack user data and optionally link to Port user accounts.
Create the Slack user blueprint
-
Go to the Data model page in Port.
-
Click on + Blueprint.
-
Click on the Edit JSON button in the top right corner.
-
Copy and paste the following JSON schema:
Slack user blueprint (click to expand)
{"identifier": "slack_user","description": "Slack User","title": "Slack User","icon": "Slack","schema": {"properties": {"tz": {"type": "string","description": "The user's time zone."},"is_restricted": {"type": "boolean","description": "Indicates if the user is restricted."},"is_primary_owner": {"type": "boolean","description": "Indicates if the user is the primary owner."},"real_name": {"type": "string","description": "The user's real name."},"team_id": {"type": "string","description": "The user's team ID."},"is_admin": {"type": "boolean","description": "Indicates if the user is an admin."},"is_app_user": {"type": "boolean","description": "Indicates if the user is an app user."},"deleted": {"type": "boolean","description": "Indicates if the user is deleted."},"is_bot": {"type": "boolean","description": "Indicates if the user is a bot."},"email": {"type": "string","title": "Email","description": "The user's email address"}},"required": []},"mirrorProperties": {},"calculationProperties": {},"aggregationProperties": {},"relations": {}} -
Click on Save to create the blueprint.
Enhance the Port User blueprint
Now we need to enhance the Port User blueprint to add a relation to the Slack User blueprint and mirror properties to display Slack information.
-
Go to the Data model page in Port.
-
Find the
Userblueprint and click on it. -
Click on the Edit JSON button in the top right corner.
-
Add the following relation to the
relationsobject:Port User blueprint relation (click to expand)
"relations": {"slack_user": {"title": "Slack User","target": "slack_user","required": false,"many": false}} -
Add the following mirror property to the
mirrorPropertiesobject to display the Slack real name:Port User blueprint mirror property (click to expand)
"mirrorProperties": {"slack_real_name": {"title": "Slack real name","path": "slack_user.real_name"}} -
Click on Save to update the blueprint.
You can add more mirror properties to display other Slack user attributes like timezone (slack_user.tz), admin status (slack_user.is_admin), or any other property from the Slack User blueprint that would be useful for your organization.
Add Port secrets
Now let's add your Slack bot token to Port's secrets:
-
Open the Credentials modal.
-
Click on the Secrets tab.
-
Click on + Secret and add the following secret:
SLACK_BOT_TOKEN- Your Slack bot token withusers:readandusers:read.emailscopes. How to get the token
Workflow webhook nodes reference Port secrets using the {{ .secrets["NAME"] }} syntax, as shown in the workflow JSON below.
Set up webhook integration
We'll create a webhook integration that ingests the bulk list of Slack users and automatically establishes relationships with existing Port users.
Follow the steps below to create the webhook integration:
-
Go to the Data Sources page.
-
Click on + Data Source.
-
Select Webhook and click on Custom integration.
-
Name it "Slack Users Sync".
-
Copy the webhook URL - you'll need this for the workflow below.
-
Copy and paste the following mapping into the Map the data from the external system into Port field:
Slack users webhook mapping (click to expand)
[{"blueprint": "slack_user","operation": "create","filter": "(.body.response | has(\"members\")) and (.body.response.members | type == \"array\")","itemsToParse": ".body.response.members | map(select(.deleted == false))","entity": {"identifier": ".item.id | tostring","title": ".item.name | tostring","properties": {"tz": ".item.tz","is_restricted": ".item.is_restricted","is_primary_owner": ".item.is_primary_owner","real_name": ".item.real_name","team_id": ".item.team_id","is_admin": ".item.is_admin","is_app_user": ".item.is_app_user","deleted": ".item.deleted","is_bot": ".item.is_bot","email": ".item.profile.email"}}},{"blueprint": "_user","operation": "create","filter": "(.body.response | has(\"members\")) and (.body.response.members | type == \"array\")","itemsToParse": ".body.response.members | map(select(.deleted == false and .profile.email != null))","entity": {"identifier": ".item.profile.email","relations": {"slack_user": ".item.id | tostring"}}}] -
Click on Save.
When the webhook processes Slack users, it will automatically create Port User entities for any Slack users that don't already exist in your Port organization. These newly created Port users will have a Disabled status by default, meaning they won't receive email invitations and won't be able to access Port until an admin manually activates their accounts.
Build the workflow
We'll build a single workflow with the three entry points described in How it works: an on-demand bulk sync, a daily scheduled sync, and automatic mapping when a new Port user is created.
-
Go to the Workflows page in Port.
-
Click on the
+ Workflowbutton in the top-right corner. -
Click on the
Skip to editorbutton. -
Copy and paste the workflow JSON below into the editor to replace the example workflow:
Sync Slack Users workflow JSON (click to expand)
Replace the webhook URLReplace
<YOUR_WEBHOOK_URL>with the webhook URL you copied in the previous step.{"identifier": "sync_slack_users","title": "Sync Slack Users","icon": "Slack","description": "Sync Slack users to Port in bulk, and map new Port users to their Slack account","nodes": [{"identifier": "trigger_bulk_sync","title": "Sync Slack Users","config": {"type": "SELF_SERVE_TRIGGER","userInputs": {"properties": {},"required": []}}},{"identifier": "trigger_scheduled","title": "Daily scheduled sync","config": {"type": "SCHEDULE_TRIGGER","cron": "0 0 * * *"}},{"identifier": "trigger_new_user","title": "On Port user created","config": {"type": "EVENT_TRIGGER","event": {"type": "ENTITY_CREATED","blueprintIdentifier": "_user"}}},{"identifier": "fetch_slack_users","title": "Fetch all Slack users","config": {"type": "WEBHOOK","url": "https://slack.com/api/users.list","method": "GET","headers": {"Content-Type": "application/json","Authorization": "Bearer {{ .secrets[\"SLACK_BOT_TOKEN\"] }}"}}},{"identifier": "ingest_slack_users","title": "Send Slack users to webhook","config": {"type": "WEBHOOK","url": "<YOUR_WEBHOOK_URL>","method": "POST","headers": {"Content-Type": "application/json"},"body": {"response": "{{ .outputs.fetch_slack_users.response.data }}"}}},{"identifier": "fetch_slack_user","title": "Look up Slack user by email","config": {"type": "WEBHOOK","url": "https://slack.com/api/users.lookupByEmail?email={{ .outputs.trigger.diff.after.identifier }}","method": "GET","headers": {"Content-Type": "application/json","Authorization": "Bearer {{ .secrets[\"SLACK_BOT_TOKEN\"] }}"}},"variables": {"found": "{{ .result.response.data.ok == true }}","id": "{{ .result.response.data.user.id }}","name": "{{ .result.response.data.user.name }}","tz": "{{ .result.response.data.user.tz }}","is_restricted": "{{ .result.response.data.user.is_restricted }}","is_primary_owner": "{{ .result.response.data.user.is_primary_owner }}","real_name": "{{ .result.response.data.user.real_name }}","team_id": "{{ .result.response.data.user.team_id }}","is_admin": "{{ .result.response.data.user.is_admin }}","is_app_user": "{{ .result.response.data.user.is_app_user }}","deleted": "{{ .result.response.data.user.deleted }}","is_bot": "{{ .result.response.data.user.is_bot }}","email": "{{ .result.response.data.user.profile.email }}"}},{"identifier": "check_user_found","title": "Slack user found?","config": {"type": "CONDITION","outlets": [{"identifier": "found","title": "Found","expression": ".outputs.fetch_slack_user.found == true"}]}},{"identifier": "upsert_slack_user","title": "Upsert Slack user entity","config": {"type": "UPSERT_ENTITY","blueprintIdentifier": "slack_user","mapping": {"identifier": "{{ .outputs.fetch_slack_user.id }}","title": "{{ .outputs.fetch_slack_user.name }}","properties": {"tz": "{{ .outputs.fetch_slack_user.tz }}","is_restricted": "{{ .outputs.fetch_slack_user.is_restricted }}","is_primary_owner": "{{ .outputs.fetch_slack_user.is_primary_owner }}","real_name": "{{ .outputs.fetch_slack_user.real_name }}","team_id": "{{ .outputs.fetch_slack_user.team_id }}","is_admin": "{{ .outputs.fetch_slack_user.is_admin }}","is_app_user": "{{ .outputs.fetch_slack_user.is_app_user }}","deleted": "{{ .outputs.fetch_slack_user.deleted }}","is_bot": "{{ .outputs.fetch_slack_user.is_bot }}","email": "{{ .outputs.fetch_slack_user.email }}"}}}},{"identifier": "link_port_user","title": "Link Slack user to Port user","config": {"type": "UPSERT_ENTITY","blueprintIdentifier": "_user","mapping": {"identifier": "{{ .outputs.trigger.diff.after.identifier }}","relations": {"slack_user": "{{ .outputs.fetch_slack_user.id }}"}}}}],"connections": [{"sourceIdentifier": "trigger_bulk_sync","targetIdentifier": "fetch_slack_users"},{"sourceIdentifier": "trigger_scheduled","targetIdentifier": "fetch_slack_users"},{"sourceIdentifier": "fetch_slack_users","targetIdentifier": "ingest_slack_users"},{"sourceIdentifier": "trigger_new_user","targetIdentifier": "fetch_slack_user"},{"sourceIdentifier": "fetch_slack_user","targetIdentifier": "check_user_found"},{"sourceIdentifier": "check_user_found","targetIdentifier": "upsert_slack_user","sourceOutletIdentifier": "found"},{"sourceIdentifier": "upsert_slack_user","targetIdentifier": "link_port_user"}]} -
Click
Saveto save the workflow.
The workflow should look like this in the editor:
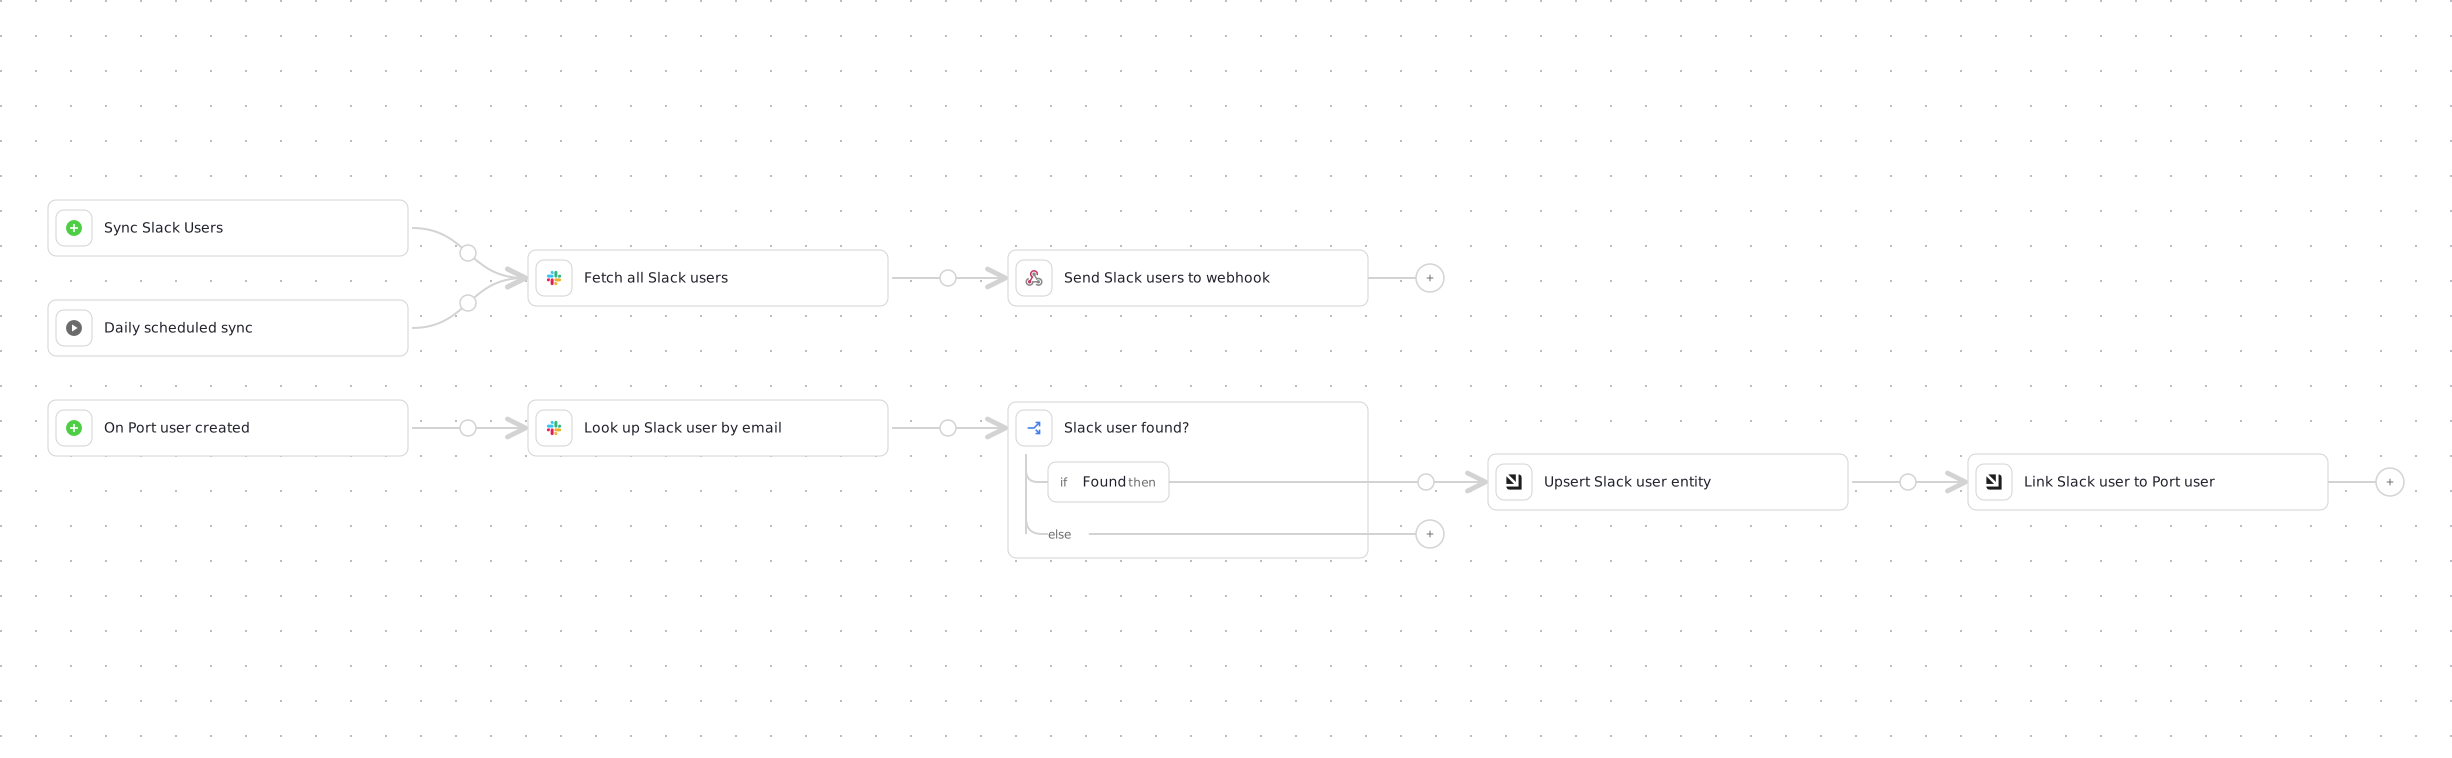
Here is how the workflow handles the three entry points:
- The
trigger_bulk_syncself-service trigger fetches the full Slack member list and forwards it to the custom webhook data source, which creates or updatesslack_userentities and links any matching Port users. - The
trigger_scheduledschedule trigger runs the same bulk path every day at midnight UTC. Adjust the cron expression, or remove the node if you prefer manual syncs only. - The
trigger_new_userevent trigger looks up the newly created Port user's email directly against Slack. Thecheck_user_foundcondition node only continues to the upsert branch when Slack returns a match, so runs for emails with no Slack account simply end after the lookup.
Optional: Set up via API
Instead of using the UI, you can create every resource in this tab with Port's API. Creating the webhook data source via API returns its ingest URL in the response, so the script wires the workflow to it automatically with no manual copying. Save the blueprint, webhook mapping, and workflow JSONs above to The API setup script (click to expand)
slack_user.json, slack_users_mapping.json, and sync_slack_users.json, then run:port_region, port.baseUrl, portBaseUrl, port_base_url and OCEAN__PORT__BASE_URL parameters select which Port API instance to use:
https://api.port.iohttps://api.us.port.io
Let's test it
-
Go to the Self-service page.
-
Find the "Sync Slack Users" workflow.
-
Click Execute.
-
Follow the run in the Workflow runs tab.
-
Verify that Slack users are created in your catalog with proper relationships.
-
Create a new Port user whose email matches an existing Slack account, and verify that the relationship is established automatically.
ServiceNow users
Use this option to ingest ServiceNow users through a webhook integration and map them to Port user accounts by matching email addresses.
In this tab we will create the following resources:
| Resource | Name | Purpose |
|---|---|---|
| Blueprint | servicenow_user | Stores ServiceNow user data. |
| Blueprint update | _user | Adds the servicenow_user relation and a mirror property. |
| Secrets | SERVICENOW_INSTANCE_URL, SERVICENOW_API_TOKEN | Authenticate calls to the ServiceNow API. |
| Webhook data source | ServiceNow Users Sync | Bulk-ingests ServiceNow users and links matching Port users. |
| Workflow | sync_servicenow_users | Runs the bulk sync and maps new Port users. |
Set up ServiceNow prerequisites
- You have a ServiceNow instance with admin permissions to access the user table. Learn about ServiceNow REST API.
- You have permissions to create blueprints and workflows in Port.
Set up data model
To represent ServiceNow users in Port, we need to create a ServiceNow User blueprint that can store ServiceNow user data and optionally link to Port user accounts.
Create the ServiceNow user blueprint
-
Go to the Data model page in Port.
-
Click on + Blueprint.
-
Click on the Edit JSON button in the top right corner.
-
Copy and paste the following JSON schema:
ServiceNow user blueprint (click to expand)
{"identifier": "servicenow_user","description": "ServiceNow User","title": "ServiceNow User","icon": "Servicenow","schema": {"properties": {"user_name": {"type": "string","title": "Username","description": "The user's login name"},"name": {"type": "string","title": "Full Name","description": "The user's full display name"},"first_name": {"type": "string","title": "First Name","description": "The user's first name"},"last_name": {"type": "string","title": "Last Name","description": "The user's last name"},"email": {"type": "string","title": "Email","description": "The user's email address"},"employee_number": {"type": "string","title": "Employee Number","description": "The user's employee number"},"active": {"type": "boolean","title": "Active","description": "Indicates if the user is active"},"locked_out": {"type": "boolean","title": "Locked Out","description": "Indicates if the user account is locked"},"vip": {"type": "boolean","title": "VIP","description": "Indicates if the user has VIP status"},"password_needs_reset": {"type": "boolean","title": "Password Reset Required","description": "Indicates if the user's password needs to be reset"},"last_login": {"type": "string","title": "Last Login","description": "The user's last login time"},"phone": {"type": "string","title": "Phone","description": "The user's phone number"},"mobile_phone": {"type": "string","title": "Mobile Phone","description": "The user's mobile phone number"},"department": {"type": "string","title": "Department","description": "The user's department"},"title": {"type": "string","title": "Job Title","description": "The user's job title"},"manager": {"type": "string","title": "Manager","description": "The user's manager"},"location": {"type": "string","title": "Location","description": "The user's location"},"company": {"type": "string","title": "Company","description": "The user's company"},"roles": {"type": "string","title": "Roles","description": "The user's roles and permissions"},"time_zone": {"type": "string","title": "Time Zone","description": "The user's time zone"},"sys_created_on": {"type": "string","title": "Created On","description": "When the user was created"},"sys_updated_on": {"type": "string","title": "Updated On","description": "When the user was last updated"},"sys_updated_by": {"type": "string","title": "Updated By","description": "Who last updated the user record"},"failed_attempts": {"type": "string","title": "Failed Login Attempts","description": "Number of failed login attempts"}},"required": []},"mirrorProperties": {},"calculationProperties": {},"aggregationProperties": {},"relations": {}} -
Click on Save to create the blueprint.
Enhance the Port User blueprint
Now we need to enhance the Port User blueprint to add a relation to the ServiceNow User blueprint and mirror properties to display ServiceNow information.
-
Go to the Data model page in Port.
-
Find the
Userblueprint and click on it. -
Click on the Edit JSON button in the top right corner.
-
Add the following relation to the
relationsobject:Port User blueprint relation (click to expand)
"relations": {"servicenow_user": {"title": "ServiceNow User","target": "servicenow_user","required": false,"many": false}} -
Add the following mirror property to the
mirrorPropertiesobject to display the ServiceNow full name:Port User blueprint mirror property (click to expand)
"mirrorProperties": {"servicenow_full_name": {"title": "ServiceNow full name","path": "servicenow_user.name"}} -
Click on Save to update the blueprint.
You can add more mirror properties to display other ServiceNow user attributes like department (servicenow_user.department), job title (servicenow_user.title), or any other property from the ServiceNow User blueprint that would be useful for your organization.
Add Port secrets
Now let's add your ServiceNow credentials to Port's secrets:
- Open the Credentials modal.
- Click on the Secrets tab.
- Click on + Secret and add the following secrets:
SERVICENOW_INSTANCE_URL- Your ServiceNow instance URL (e.g., https://your-instance.service-now.com)SERVICENOW_API_TOKEN- A base64 encoded string of your ServiceNow credentials generated as:echo -n "your-instance-username:your-instance-password" | base64
Workflow webhook nodes reference Port secrets using the {{ .secrets["NAME"] }} syntax, as shown in the workflow JSON below.
Set up webhook integration
We'll create a webhook integration that ingests the bulk list of ServiceNow users and automatically establishes relationships with existing Port users.
Follow the steps below to create the webhook integration:
-
Go to the Data Sources page.
-
Click on + Data Source.
-
Select Webhook and click on Custom integration.
-
Name it "ServiceNow Users Sync".
-
Copy the webhook URL - you'll need this for the workflow below.
-
Copy and paste the following mapping into the Map the data from the external system into Port field:
ServiceNow users webhook mapping (click to expand)
[{"blueprint": "servicenow_user","operation": "create","filter": "(.body.response | has(\"result\")) and (.body.response.result | type == \"array\")","itemsToParse": ".body.response.result | map(select(.active == \"true\"))","entity": {"identifier": ".item.sys_id | tostring","title": ".item.user_name | tostring","properties": {"user_name": ".item.user_name","name": ".item.name","first_name": ".item.first_name","last_name": ".item.last_name","email": ".item.email","employee_number": ".item.employee_number","active": ".item.active","locked_out": ".item.locked_out","vip": ".item.vip","failed_attempts": ".item.failed_attempts","password_needs_reset": ".item.password_needs_reset","last_login": ".item.last_login","phone": ".item.phone","mobile_phone": ".item.mobile_phone","department": "if .item.department | type == \"object\" then .item.department.value else .item.department end","title": ".item.title","manager": "if .item.manager | type == \"object\" then .item.manager.value else .item.manager end","location": "if .item.location | type == \"object\" then .item.location.value else .item.location end","company": "if .item.company | type == \"object\" then .item.company.value else .item.company end","roles": ".item.roles","time_zone": ".item.time_zone","sys_created_on": ".item.sys_created_on","sys_updated_on": ".item.sys_updated_on","sys_updated_by": ".item.sys_updated_by"}}},{"blueprint": "_user","operation": "create","filter": "(.body.response | has(\"result\")) and (.body.response.result | type == \"array\")","itemsToParse": ".body.response.result | map(select(.active == \"true\" and .email != null))","entity": {"identifier": ".item.email","relations": {"servicenow_user": ".item.sys_id | tostring"}}}] -
Click on Save.
When the webhook processes ServiceNow users, it will automatically create Port User entities for any ServiceNow users that don't already exist in your Port organization. These newly created Port users will have a Disabled status by default, meaning they won't receive email invitations and won't be able to access Port until an admin manually activates their accounts.
Build the workflow
We'll build a single workflow with the three entry points described in How it works: an on-demand bulk sync, a daily scheduled sync, and automatic mapping when a new Port user is created.
-
Go to the Workflows page in Port.
-
Click on the
+ Workflowbutton in the top-right corner. -
Click on the
Skip to editorbutton. -
Copy and paste the workflow JSON below into the editor to replace the example workflow:
Sync ServiceNow Users workflow JSON (click to expand)
Replace the webhook URLReplace
<YOUR_WEBHOOK_URL>with the webhook URL you copied in the previous step.{"identifier": "sync_servicenow_users","title": "Sync ServiceNow Users","icon": "Servicenow","description": "Sync ServiceNow users to Port in bulk, and map new Port users to their ServiceNow account","nodes": [{"identifier": "trigger_bulk_sync","title": "Sync ServiceNow Users","config": {"type": "SELF_SERVE_TRIGGER","userInputs": {"properties": {"sysparm_limit": {"type": "number","title": "Results returned per page","description": "The maximum number of results returned per page (default: 10,000)"}},"required": []}}},{"identifier": "trigger_scheduled","title": "Daily scheduled sync","config": {"type": "SCHEDULE_TRIGGER","cron": "0 0 * * *"}},{"identifier": "trigger_new_user","title": "On Port user created","config": {"type": "EVENT_TRIGGER","event": {"type": "ENTITY_CREATED","blueprintIdentifier": "_user"}}},{"identifier": "fetch_servicenow_users","title": "Fetch all ServiceNow users","config": {"type": "WEBHOOK","url": "{{ .secrets[\"SERVICENOW_INSTANCE_URL\"] }}/api/now/table/sys_user?sysparm_query=ORDERBYDESCsys_created_on&sysparm_limit={{ .outputs.trigger.sysparm_limit // 10000 }}","method": "GET","headers": {"Content-Type": "application/json","Accept": "application/json","Authorization": "Basic {{ .secrets[\"SERVICENOW_API_TOKEN\"] }}"}}},{"identifier": "ingest_servicenow_users","title": "Send ServiceNow users to webhook","config": {"type": "WEBHOOK","url": "<YOUR_WEBHOOK_URL>","method": "POST","headers": {"Content-Type": "application/json"},"body": {"response": "{{ .outputs.fetch_servicenow_users.response.data }}"}}},{"identifier": "fetch_servicenow_user","title": "Look up ServiceNow user by email","config": {"type": "WEBHOOK","url": "{{ .secrets[\"SERVICENOW_INSTANCE_URL\"] }}/api/now/table/sys_user?sysparm_query=email={{ .outputs.trigger.diff.after.identifier }}&sysparm_limit=1","method": "GET","headers": {"Content-Type": "application/json","Accept": "application/json","Authorization": "Basic {{ .secrets[\"SERVICENOW_API_TOKEN\"] }}"}},"variables": {"found": "{{ (.result.response.data.result // []) | length > 0 }}","sys_id": "{{ .result.response.data.result[0].sys_id }}","user_name": "{{ .result.response.data.result[0].user_name }}","name": "{{ .result.response.data.result[0].name }}","first_name": "{{ .result.response.data.result[0].first_name }}","last_name": "{{ .result.response.data.result[0].last_name }}","email": "{{ .result.response.data.result[0].email }}","employee_number": "{{ .result.response.data.result[0].employee_number }}","active": "{{ .result.response.data.result[0].active }}","locked_out": "{{ .result.response.data.result[0].locked_out }}","vip": "{{ .result.response.data.result[0].vip }}","failed_attempts": "{{ .result.response.data.result[0].failed_attempts }}","password_needs_reset": "{{ .result.response.data.result[0].password_needs_reset }}","last_login": "{{ .result.response.data.result[0].last_login }}","phone": "{{ .result.response.data.result[0].phone }}","mobile_phone": "{{ .result.response.data.result[0].mobile_phone }}","department": "{{ if (.result.response.data.result[0].department | type) == \"object\" then .result.response.data.result[0].department.value else .result.response.data.result[0].department end }}","title": "{{ .result.response.data.result[0].title }}","manager": "{{ if (.result.response.data.result[0].manager | type) == \"object\" then .result.response.data.result[0].manager.value else .result.response.data.result[0].manager end }}","location": "{{ if (.result.response.data.result[0].location | type) == \"object\" then .result.response.data.result[0].location.value else .result.response.data.result[0].location end }}","company": "{{ if (.result.response.data.result[0].company | type) == \"object\" then .result.response.data.result[0].company.value else .result.response.data.result[0].company end }}","roles": "{{ .result.response.data.result[0].roles }}","time_zone": "{{ .result.response.data.result[0].time_zone }}","sys_created_on": "{{ .result.response.data.result[0].sys_created_on }}","sys_updated_on": "{{ .result.response.data.result[0].sys_updated_on }}","sys_updated_by": "{{ .result.response.data.result[0].sys_updated_by }}"}},{"identifier": "check_user_found","title": "ServiceNow user found?","config": {"type": "CONDITION","outlets": [{"identifier": "found","title": "Found","expression": ".outputs.fetch_servicenow_user.found == true"}]}},{"identifier": "upsert_servicenow_user","title": "Upsert ServiceNow user entity","config": {"type": "UPSERT_ENTITY","blueprintIdentifier": "servicenow_user","mapping": {"identifier": "{{ .outputs.fetch_servicenow_user.sys_id }}","title": "{{ .outputs.fetch_servicenow_user.user_name }}","properties": {"user_name": "{{ .outputs.fetch_servicenow_user.user_name }}","name": "{{ .outputs.fetch_servicenow_user.name }}","first_name": "{{ .outputs.fetch_servicenow_user.first_name }}","last_name": "{{ .outputs.fetch_servicenow_user.last_name }}","email": "{{ .outputs.fetch_servicenow_user.email }}","employee_number": "{{ .outputs.fetch_servicenow_user.employee_number }}","active": "{{ .outputs.fetch_servicenow_user.active }}","locked_out": "{{ .outputs.fetch_servicenow_user.locked_out }}","vip": "{{ .outputs.fetch_servicenow_user.vip }}","failed_attempts": "{{ .outputs.fetch_servicenow_user.failed_attempts }}","password_needs_reset": "{{ .outputs.fetch_servicenow_user.password_needs_reset }}","last_login": "{{ .outputs.fetch_servicenow_user.last_login }}","phone": "{{ .outputs.fetch_servicenow_user.phone }}","mobile_phone": "{{ .outputs.fetch_servicenow_user.mobile_phone }}","department": "{{ .outputs.fetch_servicenow_user.department }}","title": "{{ .outputs.fetch_servicenow_user.title }}","manager": "{{ .outputs.fetch_servicenow_user.manager }}","location": "{{ .outputs.fetch_servicenow_user.location }}","company": "{{ .outputs.fetch_servicenow_user.company }}","roles": "{{ .outputs.fetch_servicenow_user.roles }}","time_zone": "{{ .outputs.fetch_servicenow_user.time_zone }}","sys_created_on": "{{ .outputs.fetch_servicenow_user.sys_created_on }}","sys_updated_on": "{{ .outputs.fetch_servicenow_user.sys_updated_on }}","sys_updated_by": "{{ .outputs.fetch_servicenow_user.sys_updated_by }}"}}}},{"identifier": "link_port_user","title": "Link ServiceNow user to Port user","config": {"type": "UPSERT_ENTITY","blueprintIdentifier": "_user","mapping": {"identifier": "{{ .outputs.trigger.diff.after.identifier }}","relations": {"servicenow_user": "{{ .outputs.fetch_servicenow_user.sys_id }}"}}}}],"connections": [{"sourceIdentifier": "trigger_bulk_sync","targetIdentifier": "fetch_servicenow_users"},{"sourceIdentifier": "trigger_scheduled","targetIdentifier": "fetch_servicenow_users"},{"sourceIdentifier": "fetch_servicenow_users","targetIdentifier": "ingest_servicenow_users"},{"sourceIdentifier": "trigger_new_user","targetIdentifier": "fetch_servicenow_user"},{"sourceIdentifier": "fetch_servicenow_user","targetIdentifier": "check_user_found"},{"sourceIdentifier": "check_user_found","targetIdentifier": "upsert_servicenow_user","sourceOutletIdentifier": "found"},{"sourceIdentifier": "upsert_servicenow_user","targetIdentifier": "link_port_user"}]} -
Click
Saveto save the workflow.
The workflow should look like this in the editor:
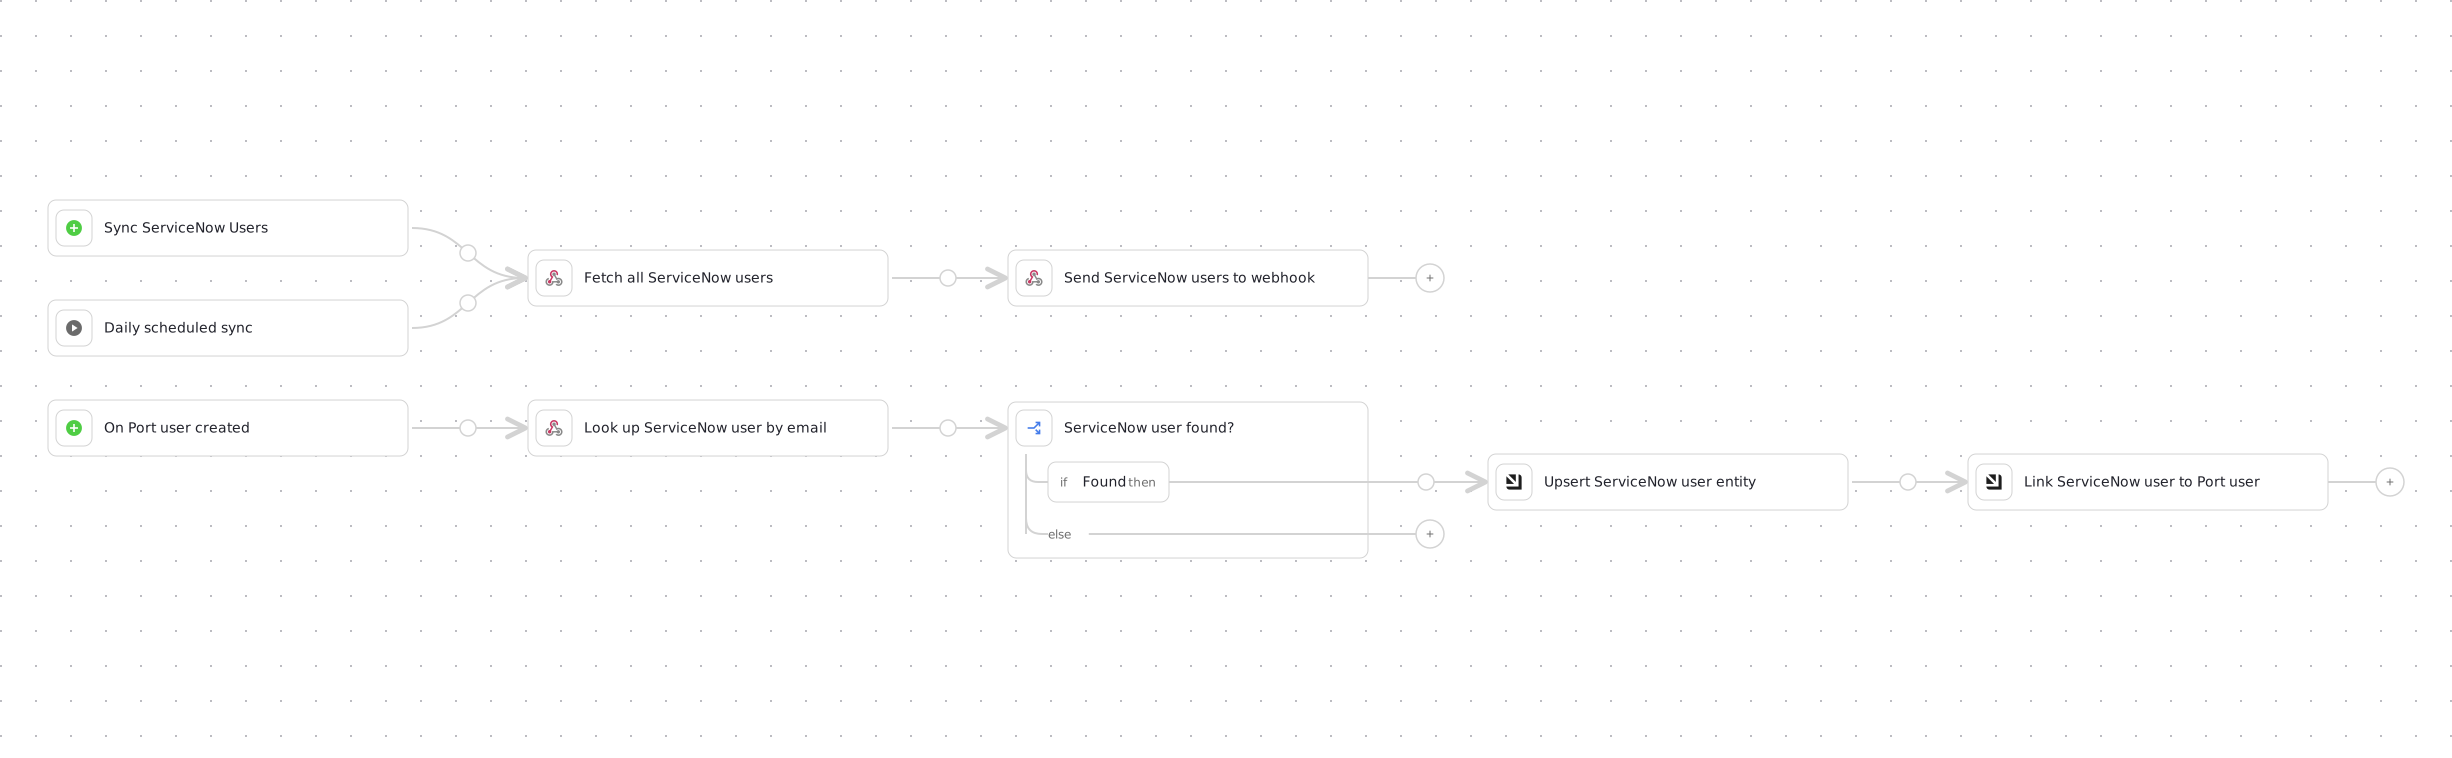
Here is how the workflow handles the three entry points:
- The
trigger_bulk_syncself-service trigger fetches ServiceNow users and forwards the raw response to the custom webhook data source, which creates or updatesservicenow_userentities and links any matching Port users. - The
trigger_scheduledschedule trigger runs the same bulk path every day at midnight UTC with the default page size of 10,000 records. Adjust the cron expression, or remove the node if you prefer manual syncs only. - The
trigger_new_userevent trigger looks up the newly created Port user's email directly against ServiceNow. Thecheck_user_foundcondition node only continues to the upsert branch when a matching record exists, so runs for emails with no ServiceNow account simply end after the lookup.
Optional: Set up via API
Instead of using the UI, you can create every resource in this tab with Port's API. Creating the webhook data source via API returns its ingest URL in the response, so the script wires the workflow to it automatically with no manual copying. Save the blueprint, webhook mapping, and workflow JSONs above to The API setup script (click to expand)
servicenow_user.json, servicenow_users_mapping.json, and sync_servicenow_users.json, then run:port_region, port.baseUrl, portBaseUrl, port_base_url and OCEAN__PORT__BASE_URL parameters select which Port API instance to use:
https://api.port.iohttps://api.us.port.io
Let's test it
-
Go to the Self-service page.
-
Find the "Sync ServiceNow Users" workflow.
-
Enter the number of records you want to fetch and click Execute.
-
Follow the run in the Workflow runs tab.
-
Verify that ServiceNow users are created in your catalog with proper relationships.
-
Create a new Port user whose email matches an existing ServiceNow account, and verify that the relationship is established automatically.
HiBob users
Use this option to ingest HiBob users through a webhook integration and map them to Port user accounts by matching email addresses.
In this tab we will create the following resources:
| Resource | Name | Purpose |
|---|---|---|
| Blueprint | hibob_user | Stores HiBob user data. |
| Blueprint update | _user | Adds the hibob_user relation and a mirror property. |
| Secrets | HIBOB_API_URL, HIBOB_BASIC_AUTH | Authenticate calls to the HiBob API. |
| Webhook data source | HiBob Users Sync | Bulk-ingests HiBob users and links matching Port users. |
| Workflow | sync_hibob_users | Runs the bulk sync and maps new Port users. |
Set up HiBob prerequisites
- You have a HiBob instance with admin permissions to create service users and configure permissions. Learn about HiBob API Service Users.
- You have created a HiBob service user with appropriate permissions to access employee data via the People search API.
- You have permissions to create blueprints and workflows in Port.
Set up data model
To represent HiBob users in Port, we need to create a HiBob User blueprint that can store HiBob user data and optionally link to Port user accounts.
Create the HiBob user blueprint
-
Go to the Data model page in Port.
-
Click on + Blueprint.
-
Click on the Edit JSON button in the top right corner.
-
Copy and paste the following JSON schema:
HiBob user blueprint (click to expand)
{"identifier": "hibob_user","description": "HiBob User","title": "HiBob User","icon": "User","schema": {"properties": {"id": {"type": "string","title": "ID","description": "The user's unique identifier"},"firstName": {"type": "string","title": "First Name","description": "The user's first name"},"email": {"type": "string","title": "Email","description": "The user's email address"},"department": {"type": "string","title": "Department","description": "The user's department"},"isManager": {"type": "string","title": "Is Manager","description": "Indicates if the user is a manager"},"work_title": {"type": "string","title": "Job Title","description": "The user's job title"},"fullName": {"type": "string","title": "Full Name","description": "The user's full name"},"displayName": {"type": "string","title": "Display Name","description": "The user's display name"}},"required": []},"mirrorProperties": {},"calculationProperties": {},"aggregationProperties": {},"relations": {}} -
Click on Save to create the blueprint.
Enhance the Port User blueprint
Now we need to enhance the Port User blueprint to add a relation to the HiBob User blueprint and mirror properties to display HiBob information.
-
Go to the Data model page in Port.
-
Find the
Userblueprint and click on it. -
Click on the Edit JSON button in the top right corner.
-
Add the following relation to the
relationsobject:Port User blueprint relation (click to expand)
"relations": {"hibob_user": {"title": "HiBob User","target": "hibob_user","required": false,"many": false}} -
Add the following mirror property to the
mirrorPropertiesobject to display the HiBob display name:Port User blueprint mirror property (click to expand)
"mirrorProperties": {"hibob_display_name": {"title": "HiBob display name","path": "hibob_user.displayName"}} -
Click on Save to update the blueprint.
You can add more mirror properties to display other HiBob user attributes like job title (hibob_user.work_title), department (hibob_user.department), manager status (hibob_user.isManager), or any other property from the HiBob User blueprint that would be useful for your organization.
Add Port secrets
Now let's add your HiBob credentials to Port's secrets:
- Open the Credentials modal.
- Click on the Secrets tab.
- Click on + Secret and add the following secrets:
-
HIBOB_API_URL- Your HiBob API base URL (e.g., https://api.hibob.com/v1) -
HIBOB_BASIC_AUTH- Your base64 encoded credentials (base64(HIBOB_SERVICE_USER_ID:HIBOB_SERVICE_USER_TOKEN))echo -n "HIBOB_SERVICE_USER_ID:HIBOB_SERVICE_USER_TOKEN" | base64
-
HiBob uses Basic Authentication with base64 encoding. You'll need to create a service user in HiBob with appropriate permissions to access employee data, then encode the credentials as base64(service_user_id:service_user_token). Learn more about creating HiBob service users.
Workflow webhook nodes reference these Port secrets using the {{ .secrets["NAME"] }} syntax, as shown in the workflow JSON below.
Set up webhook integration
We'll create a webhook integration that ingests the bulk list of HiBob users and automatically establishes relationships with existing Port users.
Follow the steps below to create the webhook integration:
-
Go to the Data Sources page.
-
Click on + Data Source.
-
Select Webhook and click on Custom integration.
-
Name it "HiBob Users Sync".
-
Copy the webhook URL - you'll need this for the workflow below.
-
Copy and paste the following mapping into the Map the data from the external system into Port field:
HiBob users webhook mapping (click to expand)
[{"blueprint": "hibob_user","operation": "create","filter": "(.body.response | has(\"employees\")) and (.body.response.employees | type == \"array\")","itemsToParse": ".body.response.employees | map(select(.email != null))","entity": {"identifier": ".item.id | tostring","title": ".item.displayName | tostring","properties": {"id": ".item.id","firstName": ".item.firstName","email": ".item.email","department": ".item.work.department","isManager": ".item.work.isManager","work_title": ".item.work.title","fullName": ".item.fullName","displayName": ".item.displayName"}}},{"blueprint": "_user","operation": "create","filter": "(.body.response | has(\"employees\")) and (.body.response.employees | type == \"array\")","itemsToParse": ".body.response.employees | map(select(.email != null))","entity": {"identifier": ".item.email","relations": {"hibob_user": ".item.id | tostring"}}}] -
Click on Save.
When the webhook processes HiBob users, it will automatically create Port User entities for any HiBob users that don't already exist in your Port organization. These newly created Port users will have a Disabled status by default, meaning they won't receive email invitations and won't be able to access Port until an admin manually activates their accounts.
Build the workflow
We'll build a single workflow with the three entry points described in How it works: an on-demand bulk sync, a daily scheduled sync, and automatic mapping when a new Port user is created.
-
Go to the Workflows page in Port.
-
Click on the
+ Workflowbutton in the top-right corner. -
Click on the
Skip to editorbutton. -
Copy and paste the workflow JSON below into the editor to replace the example workflow:
Sync HiBob Users workflow JSON (click to expand)
Replace the webhook URLReplace
<YOUR_WEBHOOK_URL>with the webhook URL you copied in the previous step.{"identifier": "sync_hibob_users","title": "Sync HiBob Users","icon": "User","description": "Sync HiBob users to Port in bulk, and map new Port users to their HiBob account","nodes": [{"identifier": "trigger_bulk_sync","title": "Sync HiBob Users","config": {"type": "SELF_SERVE_TRIGGER","userInputs": {"properties": {},"required": []}}},{"identifier": "trigger_scheduled","title": "Daily scheduled sync","config": {"type": "SCHEDULE_TRIGGER","cron": "0 0 * * *"}},{"identifier": "trigger_new_user","title": "On Port user created","config": {"type": "EVENT_TRIGGER","event": {"type": "ENTITY_CREATED","blueprintIdentifier": "_user"}}},{"identifier": "fetch_hibob_users","title": "Fetch all HiBob users","config": {"type": "WEBHOOK","url": "{{ .secrets[\"HIBOB_API_URL\"] }}/people/search","method": "POST","headers": {"Content-Type": "application/json","Authorization": "Basic {{ .secrets[\"HIBOB_BASIC_AUTH\"] }}"},"body": {"showInactive": false,"fields": ["root.id","root.firstName","root.email","work.department","work.isManager","work.title","root.fullName","root.displayName"],"humanReadable": "REPLACE"}}},{"identifier": "ingest_hibob_users","title": "Send HiBob users to webhook","config": {"type": "WEBHOOK","url": "<YOUR_WEBHOOK_URL>","method": "POST","headers": {"Content-Type": "application/json"},"body": {"response": "{{ .outputs.fetch_hibob_users.response.data }}"}}},{"identifier": "fetch_hibob_user","title": "Look up HiBob user by email","config": {"type": "WEBHOOK","url": "{{ .secrets[\"HIBOB_API_URL\"] }}/people/search","method": "POST","headers": {"Content-Type": "application/json","Authorization": "Basic {{ .secrets[\"HIBOB_BASIC_AUTH\"] }}"},"body": {"showInactive": false,"fields": ["root.id","root.firstName","root.email","work.department","work.isManager","work.title","root.fullName","root.displayName"],"filters": [{"fieldPath": "root.email","operator": "equals","values": ["{{ .outputs.trigger.diff.after.identifier }}"]}]}},"variables": {"found": "{{ (.result.response.data.employees // []) | length > 0 }}","id": "{{ .result.response.data.employees[0].id }}","firstName": "{{ .result.response.data.employees[0].firstName }}","email": "{{ .result.response.data.employees[0].email }}","department": "{{ .result.response.data.employees[0].work.department }}","isManager": "{{ .result.response.data.employees[0].work.isManager }}","work_title": "{{ .result.response.data.employees[0].work.title }}","fullName": "{{ .result.response.data.employees[0].fullName }}","displayName": "{{ .result.response.data.employees[0].displayName }}"}},{"identifier": "check_user_found","title": "HiBob user found?","config": {"type": "CONDITION","outlets": [{"identifier": "found","title": "Found","expression": ".outputs.fetch_hibob_user.found == true"}]}},{"identifier": "upsert_hibob_user","title": "Upsert HiBob user entity","config": {"type": "UPSERT_ENTITY","blueprintIdentifier": "hibob_user","mapping": {"identifier": "{{ .outputs.fetch_hibob_user.id }}","title": "{{ .outputs.fetch_hibob_user.displayName }}","properties": {"id": "{{ .outputs.fetch_hibob_user.id }}","firstName": "{{ .outputs.fetch_hibob_user.firstName }}","email": "{{ .outputs.fetch_hibob_user.email }}","department": "{{ .outputs.fetch_hibob_user.department }}","isManager": "{{ .outputs.fetch_hibob_user.isManager }}","work_title": "{{ .outputs.fetch_hibob_user.work_title }}","fullName": "{{ .outputs.fetch_hibob_user.fullName }}","displayName": "{{ .outputs.fetch_hibob_user.displayName }}"}}}},{"identifier": "link_port_user","title": "Link HiBob user to Port user","config": {"type": "UPSERT_ENTITY","blueprintIdentifier": "_user","mapping": {"identifier": "{{ .outputs.trigger.diff.after.identifier }}","relations": {"hibob_user": "{{ .outputs.fetch_hibob_user.id }}"}}}}],"connections": [{"sourceIdentifier": "trigger_bulk_sync","targetIdentifier": "fetch_hibob_users"},{"sourceIdentifier": "trigger_scheduled","targetIdentifier": "fetch_hibob_users"},{"sourceIdentifier": "fetch_hibob_users","targetIdentifier": "ingest_hibob_users"},{"sourceIdentifier": "trigger_new_user","targetIdentifier": "fetch_hibob_user"},{"sourceIdentifier": "fetch_hibob_user","targetIdentifier": "check_user_found"},{"sourceIdentifier": "check_user_found","targetIdentifier": "upsert_hibob_user","sourceOutletIdentifier": "found"},{"sourceIdentifier": "upsert_hibob_user","targetIdentifier": "link_port_user"}]} -
Click
Saveto save the workflow.
The workflow should look like this in the editor:
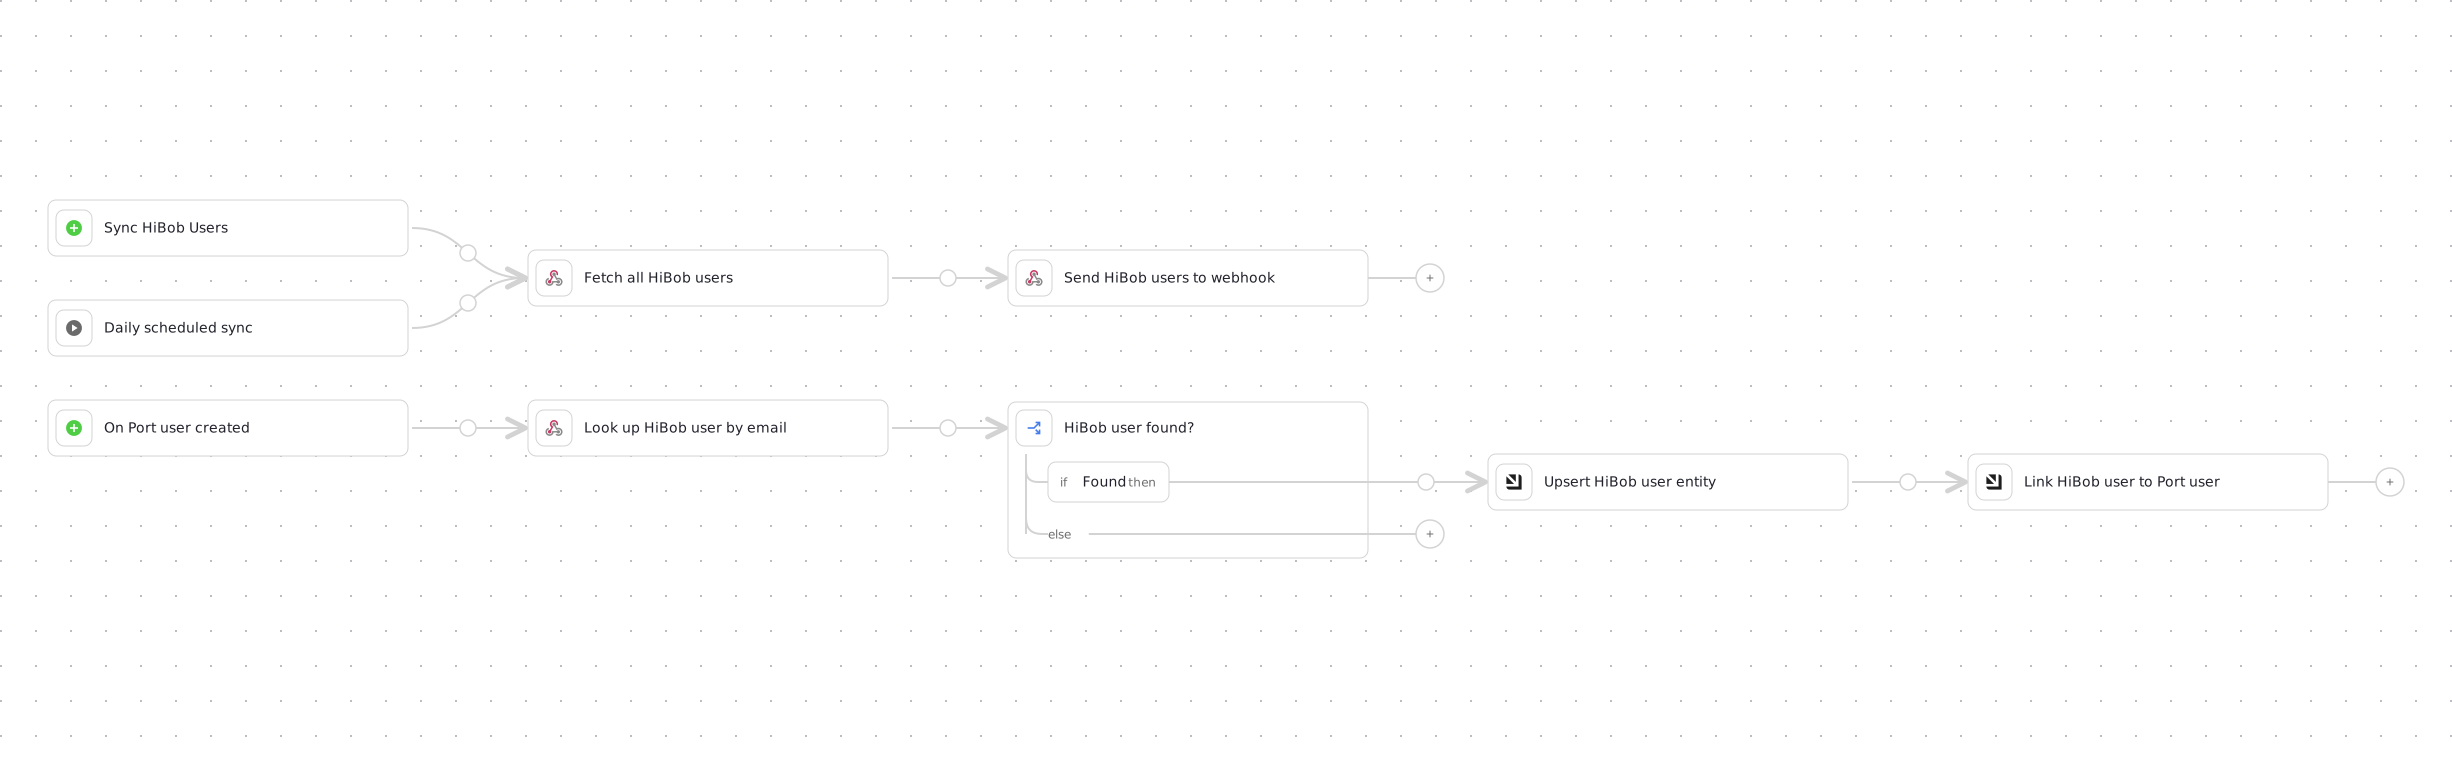
Here is how the workflow handles the three entry points:
- The
trigger_bulk_syncself-service trigger fetches HiBob employees and forwards the raw response to the custom webhook data source, which creates or updateshibob_userentities and links any matching Port users. - The
trigger_scheduledschedule trigger runs the same bulk path every day at midnight UTC. Adjust the cron expression, or remove the node if you prefer manual syncs only. - The
trigger_new_userevent trigger looks up the newly created Port user's email directly against HiBob. Thecheck_user_foundcondition node only continues to the upsert branch when a matching employee exists, so runs for emails with no HiBob account simply end after the lookup.
Optional: Set up via API
Instead of using the UI, you can create every resource in this tab with Port's API. Creating the webhook data source via API returns its ingest URL in the response, so the script wires the workflow to it automatically with no manual copying. Save the blueprint, webhook mapping, and workflow JSONs above to The API setup script (click to expand)
hibob_user.json, hibob_users_mapping.json, and sync_hibob_users.json, then run:port_region, port.baseUrl, portBaseUrl, port_base_url and OCEAN__PORT__BASE_URL parameters select which Port API instance to use:
https://api.port.iohttps://api.us.port.io
Let's test it
-
Go to the Self-service page.
-
Find the "Sync HiBob Users" workflow.
-
Click Execute.
-
Follow the run in the Workflow runs tab.
-
Verify that HiBob users are created in your catalog with proper relationships.
-
Create a new Port user whose email matches an existing HiBob employee, and verify that the relationship is established automatically.
Map teams
Choose the tab for the external team source you want to map. Each option links a tool-specific team entity to the corresponding Port _team entity.
- GitHub
- Okta
Meet the GitHub prerequisites
- You have installed and configured the GitHub integration.
- Your Port team identifiers match the corresponding GitHub team slugs, or you know how to adapt the identifier mapping.
- You have permission to update the Team blueprint and the GitHub integration mapping.
Add the GitHub team relation
The GitHub integration creates a githubTeam blueprint for GitHub team data. Add a relation from Port's Team blueprint to that blueprint so each Port team can reference its GitHub identity.
If the githubTeam relation already exists on your Team blueprint, skip these steps and continue to the GitHub integration mapping.
-
Go to the Data model page in Port.
-
Select the Team blueprint.
-
Click Edit JSON.
-
Add the following relation to the blueprint's
relationsobject:GitHub team relation (click to expand)
"githubTeam": {"title": "GitHub team","target": "githubTeam","required": false,"many": false} -
Click Save to update the blueprint.
Update the GitHub mapping
Add a second team resource to the GitHub integration mapping. This resource uses the GitHub team slug as the Port team identifier and links the resulting _team entity to the existing githubTeam entity.
-
Go to the data sources page.
-
Select your GitHub integration.
-
Add the following YAML block to the integration mapping:
GitHub team-to-Port team mapping (click to expand)
- kind: teamselector:query: 'true'port:entity:mappings:identifier: .slugtitle: .nameblueprint: '"_team"'relations:githubTeam: .databaseId | tostring -
Click Save & Resync to apply the mapping.
This mapping expects each Port team identifier to match the GitHub team slug. If your identifiers use another convention, update the identifier expression before resyncing to prevent duplicate Port teams.
Test the GitHub team mapping
-
Go to the Teams page.
-
Select a team whose identifier matches a GitHub team slug.
-
Verify that its GitHub team relation points to the corresponding
githubTeamentity. -
Confirm that the resync did not create duplicate Port teams.
Meet the Okta prerequisites
- You have installed and configured the Okta integration.
- Your Port team identifiers match the corresponding Okta group names, or you know how to adapt the identifier mapping.
- You have permission to update the Team blueprint and the Okta integration mapping.
Add the Okta group relation
The Okta integration creates an okta-group blueprint for group data. Add a relation from Port's Team blueprint to that blueprint so each Port team can reference its Okta group.
If the oktaGroup relation already exists on your Team blueprint, skip these steps and continue to the Okta integration mapping.
-
Go to the Data model page in Port.
-
Select the Team blueprint.
-
Click Edit JSON.
-
Add the following relation to the blueprint's
relationsobject:Okta group relation (click to expand)
"oktaGroup": {"title": "Okta group","target": "okta-group","required": false,"many": false} -
Click Save to update the blueprint.
Update the Okta mapping
Add a second okta-group resource to the Okta integration mapping. This resource uses the Okta group name as the Port team identifier and links the resulting _team entity to the existing okta-group entity.
-
Go to the data sources page.
-
Select your Okta integration.
-
Add the following YAML block to the integration mapping:
Okta group-to-Port team mapping (click to expand)
- kind: okta-groupselector:query: 'true'port:entity:mappings:identifier: .profile.nametitle: .profile.nameblueprint: '"_team"'relations:oktaGroup: .id -
Click Save & Resync to apply the mapping.
This mapping expects each Port team identifier to match the Okta group name. If your identifiers use another convention, update the identifier expression before resyncing to prevent duplicate Port teams.
Test the Okta team mapping
-
Go to the Teams page.
-
Select a team whose identifier matches an Okta group name.
-
Verify that its Okta group relation points to the corresponding
okta-groupentity. -
Confirm that the resync did not create duplicate Port teams.
Extend identity mapping
Add each future user or team mapping source, such as Microsoft Entra ID, Workday, or BambooHR, as another tab in the relevant section of this guide.