Manage PagerDuty on-call schedules
This guide demonstrates how to bring your on-call management experience into Port using PagerDuty and Port workflows.
You will learn how to:
- Build self-service workflows to manage on-call schedules (view the current on-call user, change on-call users, and delete overrides).
- Build dashboards in Port to visualize on-call coverage, rotation schedules, and team assignments.
- Track on-call engineers across different teams and services.
Common use cases
- On-call visibility: Get a centralized view of who's on-call across all teams and services.
- Schedule management: Easily change on-call assignments and create temporary overrides.
- Team coordination: Track on-call rotations and ensure proper coverage across services.
- Escalation planning: Visualize escalation policies and on-call hierarchies.
- Burnout prevention: Monitor on-call frequency and distribute responsibilities fairly.
Prerequisites
This guide assumes the following:
- You have a Port account and have completed the onboarding process.
- Port's PagerDuty integration is installed in your account.
- You have access to your PagerDuty organization with permissions to manage schedules and on-call assignments.
- You have a PagerDuty API token so the workflows can call the PagerDuty API.
How it works
You will build three self-service workflows, each triggered on demand and calling the PagerDuty API directly:
- View current on-call user - a self-service trigger collects the schedule, then a webhook node queries the PagerDuty on-calls API and returns the current on-call engineer.
- Change on-call user - a self-service trigger collects the schedule, new on-call user, and time window. Webhook nodes look up the user and create a PagerDuty override, and an upsert entity node syncs the updated schedule back to Port.
- Delete schedule override - a self-service trigger collects the schedule and override ID, then a webhook node deletes the override and an upsert entity node syncs the updated schedule back to Port.
Set up data model
If you haven't installed the PagerDuty integration, you'll need to create blueprints for PagerDuty schedules and users.
However, we highly recommend you install the PagerDuty integration to have these automatically set up for you.
Create the PagerDuty Schedule blueprint
-
Go to the Data model page in Port.
-
Click on
+ Blueprint. -
Click on the
{...} Edit JSONbutton. -
Copy and paste the following JSON configuration:
PagerDuty Schedule Blueprint (click to expand)
{"identifier": "pagerdutySchedule","description": "This blueprint represents a PagerDuty schedule in our context lake","title": "PagerDuty Schedule","icon": "pagerduty","schema": {"properties": {"url": {"type": "string","format": "url","title": "Schedule URL"},"timezone": {"type": "string","title": "Timezone"},"description": {"type": "string","title": "Description"},"users": {"title": "Users","type": "array","items": {"type": "string","format": "user"}}},"required": []},"mirrorProperties": {},"calculationProperties": {},"relations": {"pagerdutyService": {"title": "PagerDuty Service","target": "pagerdutyService","required": false,"many": true}}} -
Click
Save.
Create the PagerDuty User blueprint
-
Go to the Data model page in Port.
-
Click on
+ Blueprint. -
Click on the
{...} Edit JSONbutton. -
Copy and paste the following JSON configuration:
PagerDuty User Blueprint (click to expand)
{"identifier": "pagerdutyUser","description": "This blueprint represents a PagerDuty user in our context lake","title": "PagerDuty User","icon": "pagerduty","schema": {"properties": {"email": {"type": "string","format": "email","title": "Email"},"time_zone": {"type": "string","title": "Time Zone"},"color": {"type": "string","title": "Color"},"role": {"type": "string","title": "Role"},"avatar_url": {"type": "string","format": "url","title": "Avatar URL"},"description": {"type": "string","title": "Description"}},"required": []},"mirrorProperties": {},"calculationProperties": {},"relations": {"pagerdutyTeam": {"title": "PagerDuty Team","target": "pagerdutyTeam","required": false,"many": true}}} -
Click
Save.
Add Port secrets
The workflows call the PagerDuty API, so add your PagerDuty API token as a Port secret.
- Open the Credentials modal.
- Click on the Secrets tab.
- Click on + Secret and add the following secret:
_PAGERDUTY_TOKEN- Your PagerDuty API token.
If you have already installed Port's PagerDuty integration, these secrets should already exist in Port. To view your existing secrets:
- Open the Credentials modal.
- Click on the
Secretstab.
Build the workflows
Now let's build the three self-service workflows that manage your PagerDuty on-call schedules directly from Port. Each workflow reuses the _PAGERDUTY_TOKEN secret you added above.
To build each workflow:
-
Go to the workflows page in Port.
-
Click + Workflow.
-
Fill out the Create new workflow form. For Name, enter the workflow name from the matching section below, then click Confirm.
-
Click the
{...}button to open the JSON editor and paste the workflow JSON below: -
Click Apply changes.
View current on-call user
This workflow collects a schedule and queries the PagerDuty on-calls API to return the current on-call engineer.
View current on-call user workflow (click to expand)
{
  "identifier": "view_current_oncall",
  "title": "View current on-call user",
  "icon": "pagerduty",
  "description": "Get information about who is currently on-call for a PagerDuty schedule",
  "nodes": [
    {
      "identifier": "trigger",
      "title": "View Current Oncall",
      "icon": "pagerduty",
      "description": "Select the PagerDuty schedule to look up",
      "config": {
        "type": "SELF_SERVE_TRIGGER",
        "userInputs": {
          "properties": {
            "schedule": {
              "type": "string",
              "format": "entity",
              "blueprint": "pagerdutySchedule",
              "title": "PagerDuty schedule",
              "description": "The schedule to look up the current on-call user for"
            }
          },
          "required": ["schedule"],
          "order": ["schedule"]
        }
      },
      "variables": {}
    },
    {
      "identifier": "get_oncall",
      "title": "Get current on-call",
      "icon": "pagerduty",
      "description": "Query the PagerDuty on-calls API for the selected schedule",
      "config": {
        "type": "WEBHOOK",
        "url": "https://api.pagerduty.com/oncalls?schedule_ids[]={{ .outputs.trigger.schedule }}",
        "method": "GET",
        "headers": {
          "Content-Type": "application/json",
          "Accept": "application/vnd.pagerduty+json;version=2",
          "Authorization": "Token token={{ .secrets[\"_PAGERDUTY_TOKEN\"] }}"
        }
      },
      "variables": {
        "onCallUser": "{{ .result.response.data.oncalls[0].user.summary // \"No one currently on-call\" }}",
        "start": "{{ .result.response.data.oncalls[0].start // \"N/A\" }}",
        "end": "{{ .result.response.data.oncalls[0].end // \"N/A\" }}",
        "escalationLevel": "{{ .result.response.data.oncalls[0].escalation_level // \"N/A\" }}"
      }
    }
  ],
  "connections": [
    {
      "sourceIdentifier": "trigger",
      "targetIdentifier": "get_oncall"
    }
  ]
}
Change on-call user
This workflow looks up a PagerDuty user by email, creates an override for the selected time window, and then syncs the updated schedule back to Port.
Change on-call user workflow (click to expand)
{
  "identifier": "change_oncall_user",
  "title": "Change on-call user",
  "icon": "pagerduty",
  "description": "Create a PagerDuty override to change the current on-call user, then sync the schedule to Port",
  "nodes": [
    {
      "identifier": "trigger",
      "title": "Override Oncall Details",
      "icon": "pagerduty",
      "description": "Collect the schedule, new on-call user, and override time window",
      "config": {
        "type": "SELF_SERVE_TRIGGER",
        "userInputs": {
          "properties": {
            "schedule": {
              "type": "string",
              "format": "entity",
              "blueprint": "pagerdutySchedule",
              "title": "PagerDuty schedule"
            },
            "new_on_call_user": {
              "type": "string",
              "format": "user",
              "title": "New on-call user email",
              "description": "Email address of the user who will take over the on-call duty"
            },
            "start_time": {
              "type": "string",
              "format": "date-time",
              "title": "Start time",
              "description": "Override start time"
            },
            "end_time": {
              "type": "string",
              "format": "date-time",
              "title": "End time",
              "description": "Override end time"
            }
          },
          "required": ["schedule", "new_on_call_user", "start_time", "end_time"],
          "order": ["schedule", "new_on_call_user", "start_time", "end_time"]
        }
      },
      "variables": {}
    },
    {
      "identifier": "find_user",
      "title": "Find PagerDuty user",
      "icon": "pagerduty",
      "description": "Look up the PagerDuty user by email",
      "config": {
        "type": "WEBHOOK",
        "url": "https://api.pagerduty.com/users?query={{ .outputs.trigger.new_on_call_user }}",
        "method": "GET",
        "headers": {
          "Content-Type": "application/json",
          "Accept": "application/vnd.pagerduty+json;version=2",
          "Authorization": "Token token={{ .secrets[\"_PAGERDUTY_TOKEN\"] }}"
        }
      },
      "variables": {
        "userId": "{{ .result.response.data.users[0].id }}"
      }
    },
    {
      "identifier": "create_override",
      "title": "Create override",
      "icon": "pagerduty",
      "description": "Create the override in PagerDuty for the selected user and time window",
      "config": {
        "type": "WEBHOOK",
        "url": "https://api.pagerduty.com/schedules/{{ .outputs.trigger.schedule }}/overrides",
        "method": "POST",
        "headers": {
          "Content-Type": "application/json",
          "Accept": "application/vnd.pagerduty+json;version=2",
          "Authorization": "Token token={{ .secrets[\"_PAGERDUTY_TOKEN\"] }}"
        },
        "body": {
          "override": {
            "start": "{{ .outputs.trigger.start_time }}",
            "end": "{{ .outputs.trigger.end_time }}",
            "user": {
              "id": "{{ .outputs.find_user.userId }}",
              "type": "user_reference"
            }
          }
        }
      },
      "variables": {}
    },
    {
      "identifier": "fetch_schedule",
      "title": "Fetch updated schedule",
      "icon": "pagerduty",
      "description": "Get the updated schedule from PagerDuty",
      "config": {
        "type": "WEBHOOK",
        "url": "https://api.pagerduty.com/schedules/{{ .outputs.trigger.schedule }}",
        "method": "GET",
        "headers": {
          "Content-Type": "application/json",
          "Accept": "application/vnd.pagerduty+json;version=2",
          "Authorization": "Token token={{ .secrets[\"_PAGERDUTY_TOKEN\"] }}"
        }
      },
      "variables": {}
    },
    {
      "identifier": "sync_schedule",
      "title": "Sync schedule to Port",
      "icon": "pagerduty",
      "description": "Update the PagerDuty schedule entity in Port",
      "config": {
        "type": "UPSERT_ENTITY",
        "blueprintIdentifier": "pagerdutySchedule",
        "mapping": {
          "identifier": "{{ .outputs.fetch_schedule.response.data.schedule.id }}",
          "title": "{{ .outputs.fetch_schedule.response.data.schedule.name }}",
          "properties": {
            "url": "{{ .outputs.fetch_schedule.response.data.schedule.html_url }}",
            "timezone": "{{ .outputs.fetch_schedule.response.data.schedule.time_zone }}",
            "description": "{{ .outputs.fetch_schedule.response.data.schedule.description }}"
          }
        }
      },
      "variables": {}
    }
  ],
  "connections": [
    {
      "sourceIdentifier": "trigger",
      "targetIdentifier": "find_user"
    },
    {
      "sourceIdentifier": "find_user",
      "targetIdentifier": "create_override"
    },
    {
      "sourceIdentifier": "create_override",
      "targetIdentifier": "fetch_schedule"
    },
    {
      "sourceIdentifier": "fetch_schedule",
      "targetIdentifier": "sync_schedule"
    }
  ]
}
The Find PagerDuty user node looks up the user by the email you provide. Make sure the email matches a valid PagerDuty user, otherwise the override creation will fail because no user ID is found.
Delete schedule override
This workflow deletes an existing override from a schedule and then syncs the updated schedule back to Port.
PagerDuty override IDs are not shown in the PagerDuty web UI, so you need to fetch them from the PagerDuty API. Query the schedule for a time range that includes the override:
curl -s 'https://api.pagerduty.com/schedules/<SCHEDULE_ID>/overrides?since=<START_TIME>&until=<END_TIME>' \
  -H 'Accept: application/vnd.pagerduty+json;version=2' \
  -H 'Authorization: Token token=<_PAGERDUTY_TOKEN>'
Each override in the response includes its id, along with the start, end, and assigned user. Copy the id of the override you want to remove and use it as the Override ID input.
Delete schedule override workflow (click to expand)
{
  "identifier": "delete_schedule_override",
  "title": "Delete schedule override",
  "icon": "pagerduty",
  "description": "Delete a PagerDuty schedule override, then sync the schedule to Port",
  "nodes": [
    {
      "identifier": "trigger",
      "title": "Delete Pagerduty Override",
      "icon": "pagerduty",
      "description": "Collect the schedule and the override to delete",
      "config": {
        "type": "SELF_SERVE_TRIGGER",
        "userInputs": {
          "properties": {
            "schedule": {
              "type": "string",
              "format": "entity",
              "blueprint": "pagerdutySchedule",
              "title": "PagerDuty schedule"
            },
            "override_id": {
              "type": "string",
              "title": "Override ID",
              "description": "The ID of the override to delete"
            }
          },
          "required": ["schedule", "override_id"],
          "order": ["schedule", "override_id"]
        }
      },
      "variables": {}
    },
    {
      "identifier": "delete_override",
      "title": "Delete override",
      "icon": "pagerduty",
      "description": "Delete the override from PagerDuty",
      "config": {
        "type": "WEBHOOK",
        "url": "https://api.pagerduty.com/schedules/{{ .outputs.trigger.schedule }}/overrides/{{ .outputs.trigger.override_id }}",
        "method": "DELETE",
        "headers": {
          "Content-Type": "application/json",
          "Accept": "application/vnd.pagerduty+json;version=2",
          "Authorization": "Token token={{ .secrets[\"_PAGERDUTY_TOKEN\"] }}"
        }
      },
      "variables": {}
    },
    {
      "identifier": "fetch_schedule",
      "title": "Fetch updated schedule",
      "icon": "pagerduty",
      "description": "Get the updated schedule from PagerDuty",
      "config": {
        "type": "WEBHOOK",
        "url": "https://api.pagerduty.com/schedules/{{ .outputs.trigger.schedule }}",
        "method": "GET",
        "headers": {
          "Content-Type": "application/json",
          "Accept": "application/vnd.pagerduty+json;version=2",
          "Authorization": "Token token={{ .secrets[\"_PAGERDUTY_TOKEN\"] }}"
        }
      },
      "variables": {}
    },
    {
      "identifier": "sync_schedule",
      "title": "Sync schedule to Port",
      "icon": "pagerduty",
      "description": "Update the PagerDuty schedule entity in Port",
      "config": {
        "type": "UPSERT_ENTITY",
        "blueprintIdentifier": "pagerdutySchedule",
        "mapping": {
          "identifier": "{{ .outputs.fetch_schedule.response.data.schedule.id }}",
          "title": "{{ .outputs.fetch_schedule.response.data.schedule.name }}",
          "properties": {
            "url": "{{ .outputs.fetch_schedule.response.data.schedule.html_url }}",
            "timezone": "{{ .outputs.fetch_schedule.response.data.schedule.time_zone }}",
            "description": "{{ .outputs.fetch_schedule.response.data.schedule.description }}"
          }
        }
      },
      "variables": {}
    }
  ],
  "connections": [
    {
      "sourceIdentifier": "trigger",
      "targetIdentifier": "delete_override"
    },
    {
      "sourceIdentifier": "delete_override",
      "targetIdentifier": "fetch_schedule"
    },
    {
      "sourceIdentifier": "fetch_schedule",
      "targetIdentifier": "sync_schedule"
    }
  ]
}
Let's test it!
Each workflow appears as a self-service action in your portal. To run them:
-
Head to the self-service page in Port.
-
Test viewing current on-call user:
- Run the
View current on-call userworkflow. - Select a PagerDuty schedule.
- Click
Execute. - Open the workflow run and review the
Get current on-callnode output to see who is currently on-call.
- Run the
-
Test changing on-call user:
- Run the
Change on-call userworkflow. - Fill in the required information:
- PagerDuty schedule: the schedule to override.
- New on-call user email: PagerDuty user email to assign.
- Start time: when the override should begin.
- End time: when the override should end.
- Click
Execute, then confirm the override was created in PagerDuty and the schedule entity was updated in Port.
- Run the
-
Test deleting schedule override:
- Run the
Delete schedule overrideworkflow. - Select the schedule and enter the Override ID you want to remove.
- Click
Execute, then confirm the override was removed in PagerDuty.
- Run the
Visualize metrics
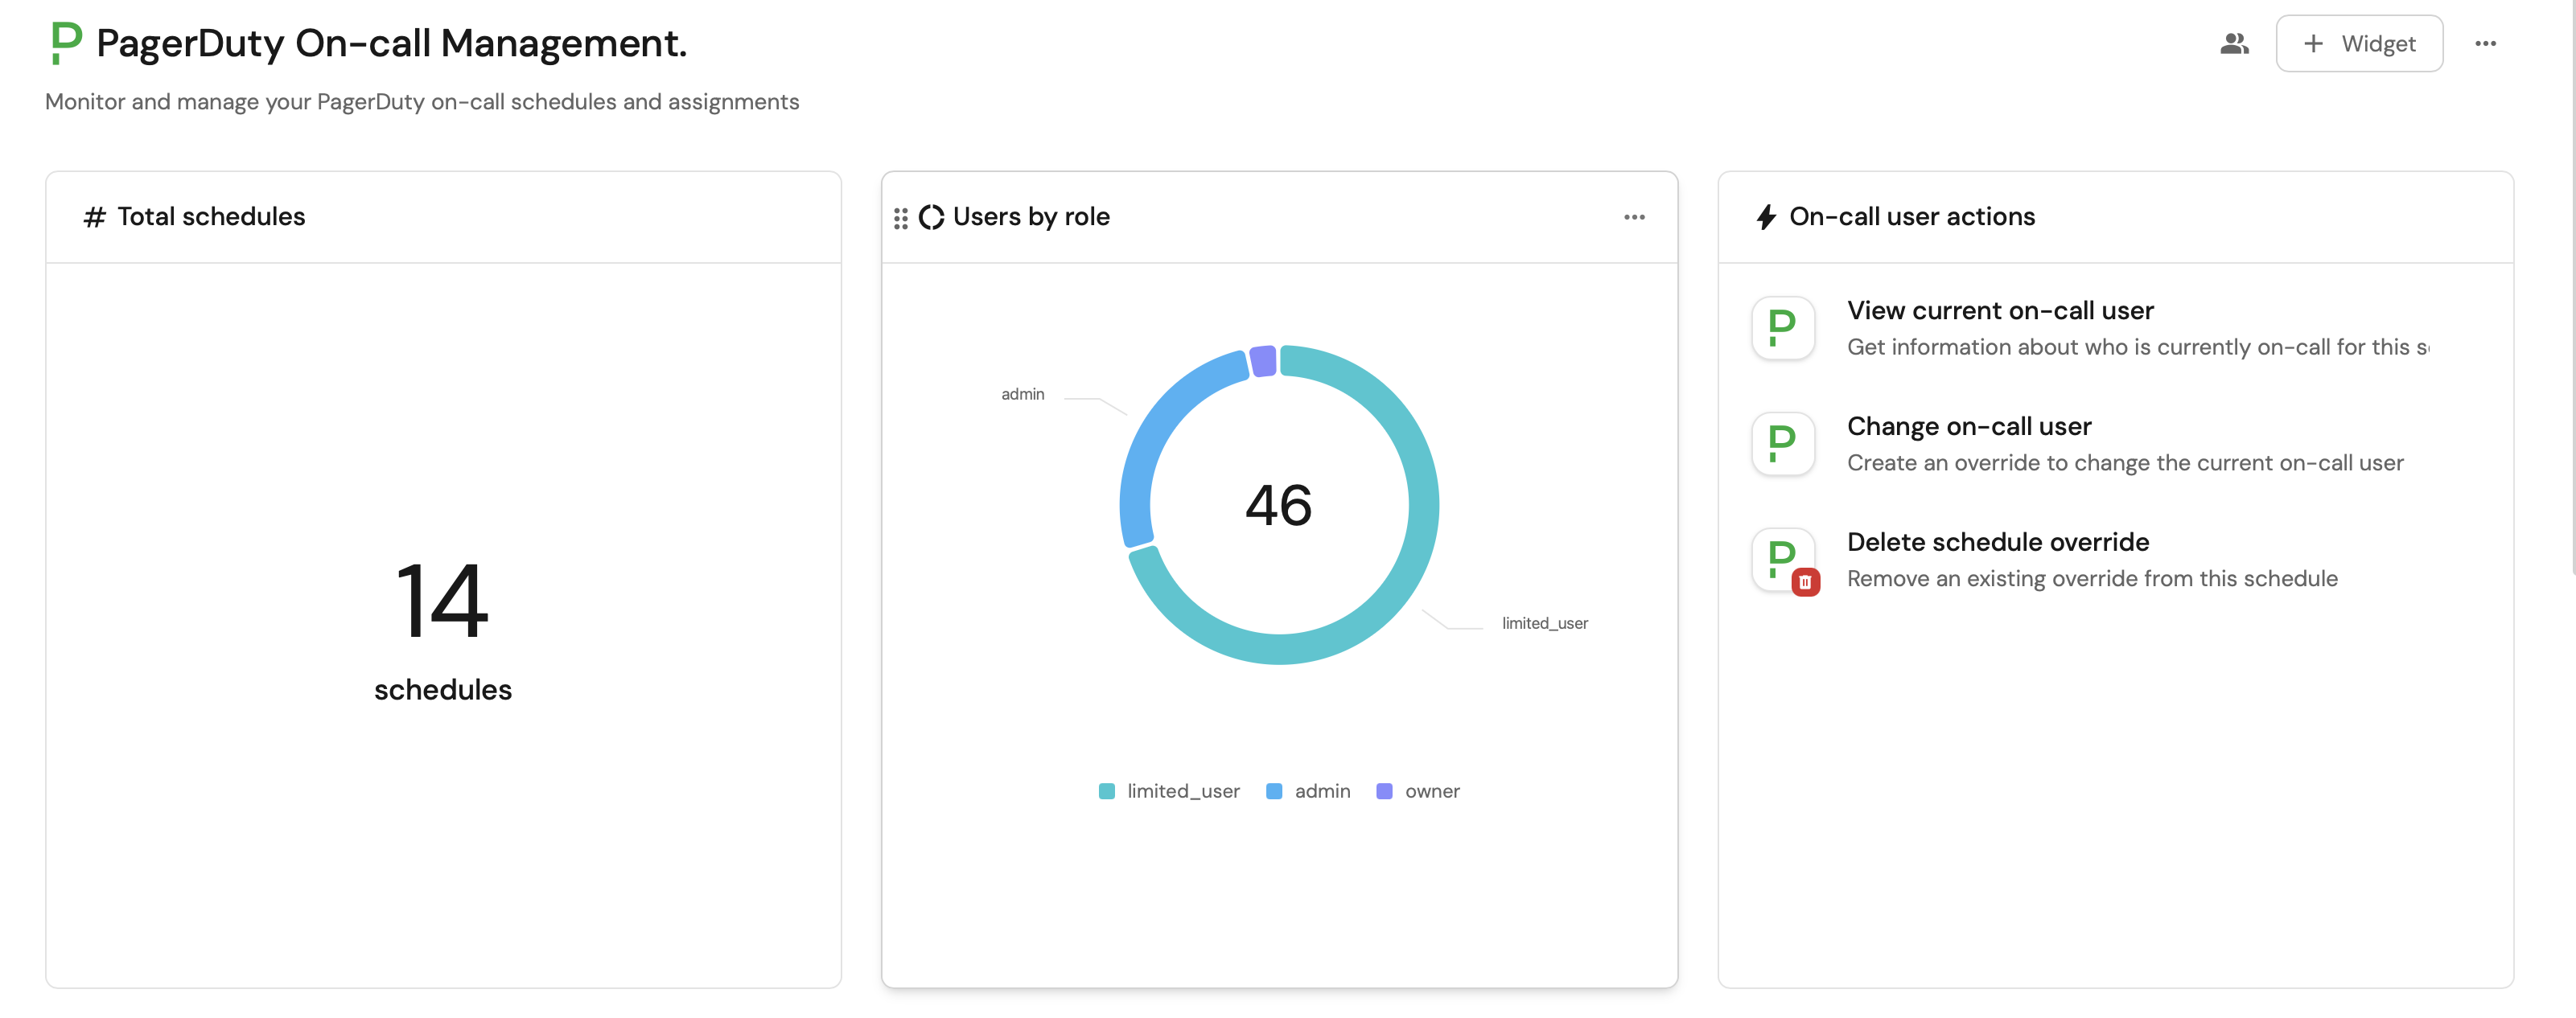
With your on-call management workflows in place and data flowing, we can create a dedicated dashboard in Port to visualize on-call coverage, schedules, and team assignments.
Create a dashboard
-
Navigate to your context lake.
-
Click on the
+button in the left sidebar. -
Select New dashboard.
-
Name the dashboard PagerDuty On-call Management.
-
Input
Monitor and manage your PagerDuty on-call schedules and assignmentsunder Description. -
Select the
PagerDutyicon. -
Click
Create.
We now have a blank dashboard where we can start adding widgets to visualize insights from our PagerDuty on-call data.
Add widgets
In the new dashboard, create the following widgets:
Total schedules count (click to expand)
-
Click
+ Widgetand select Number Chart. -
Title:
Total schedules -
Select
Count entitiesChart type and choose PagerDuty Schedule as the Blueprint. -
Select
countfor the Function. -
Select
customas the Unit and inputschedulesas the Custom unit. -
Click
Save.
Schedules created today (click to expand)
-
Click
+ Widgetand select Number Chart. -
Title:
Schedules created today. -
Select
Count entitiesChart type and choose PagerDuty Schedule as the Blueprint. -
Select
countfor the Function. -
Add this JSON to the Initial filters editor to filter schedules created today:
[{"combinator": "and","rules": [{"property": "$createdAt","operator": "between","value": {"preset": "today"}}]}] -
Select
customas the Unit and inputschedulesas the Custom unit. -
Click
Save.
Users by role (click to expand)
-
Click
+ Widgetand select Pie chart. -
Title:
Users by role. -
Choose the PagerDuty User blueprint.
-
Under
Breakdown by property, select the Role property. -
Click
Save.
Total users count (click to expand)
-
Click
+ Widgetand select Number Chart. -
Title:
Total users(add theUsericon). -
Select
Count entitiesChart type and choose PagerDuty User as the Blueprint. -
Select
countfor the Function. -
Select
customas the Unit and inputusersas the Custom unit. -
Click
Save.
All schedules table (click to expand)
-
Click
+ Widgetand select Table. -
Title the widget All Schedules.
-
Choose the PagerDuty Schedule blueprint.
-
Click
Saveto add the widget to the dashboard.
All users table (click to expand)
-
Click
+ Widgetand select Table. -
Title the widget All Users.
-
Choose the PagerDuty User blueprint.
-
Click
Saveto add the widget to the dashboard. -
Click on the
...button in the top right corner of the table and select Customize table. -
In the top right corner of the table, click on
Manage Propertiesand add the following properties:- Email: User's email address.
- Role: User's role in PagerDuty.
- Time Zone: User's timezone.
- Created At: When the user account was created.
-
Click on the save icon in the top right corner of the widget to save the customized table.
On-call actions (click to expand)
-
Click
+ Widgetand select Action card. -
Select the View current on-call user, Change on-call user, and Delete schedule override workflows as the Actions.
-
Click
Save.
Related guides
- Interact with PagerDuty incidents: Create, trigger, reassign, and resolve PagerDuty incidents.
- PagerDuty integration: Complete setup guide for the PagerDuty integration.