Manage MCP server registry with workflows
This guide demonstrates how to build a centralized MCP (Model Context Protocol) server registry using Port, enabling your organization to govern, discover, and share approved MCP servers across development teams.

Common use cases
- Discovery: Enable developers to find approved MCP servers available for their team.
- Governed requests: Let developers propose new servers through a reviewed request flow instead of ad hoc installs.
- Approval workflow: Give platform teams a single place to approve or reject requests with a reason.
- Visibility: Track connected servers, exposed tools, and pending requests in one dashboard.
- AI-assisted guidance: Answer discovery and connection questions grounded in live catalog data.
Prerequisites
This guide assumes you have:
- A Port account and have completed the onboarding process.
- An admin role in Port, required to configure MCP connectors under Data sources.
Set up the data model
Port already includes a built-in _mcp_server system blueprint that represents external MCP servers connected under Data sources. You do not need to recreate it.
We will add a mcp_server_request blueprint to capture requests for new servers and track their approval status separately from the connected servers themselves.
Create the MCP server request blueprint
-
Go to the builder page of your portal.
-
Click on
+ Blueprint. -
Click on the
{...} Edit JSONbutton. -
Copy and paste the following JSON configuration:
MCP server request blueprint (Click to expand)
{"identifier": "mcp_server_request","title": "MCP Server Request","icon": "AI","schema": {"properties": {"status": {"title": "Status","type": "string","enum": ["requested", "under-review", "approved", "rejected"],"enumColors": {"requested": "yellow","under-review": "blue","approved": "green","rejected": "red"},"description": "Current status of the MCP server request"},"url": {"title": "URL","type": "string","format": "url","description": "The remote MCP server endpoint"},"description": {"title": "Description","type": "string","description": "What this MCP server does"},"requested_use_case": {"title": "Requested use case","type": "string","description": "How the requester intends to use this MCP server"},"rejection_reason": {"title": "Rejection reason","type": "string","description": "Reason the request was rejected, if applicable"}},"required": []},"mirrorProperties": {},"calculationProperties": {},"aggregationProperties": {},"relations": {"requested_by": {"title": "Requested By","target": "_user","required": false,"many": false}}} -
Click
Saveto save the blueprint.
Build the request workflow
This workflow lets developers propose a new MCP server. It uses a self-service trigger to collect the server details and an upsert entity node to create the request entity with a requested status.
Build the workflow
-
Go to the Workflows page of your portal.
-
Click on the + Workflow button in the top-right corner.
-
In the Name field, enter
Request new MCP server, then click Confirm. -
On the editor page, click the see workflow JSON button (the code icon) to open the JSON editor.
-
Copy and paste the workflow JSON below to replace the example workflow:
Request new MCP server workflow JSON (Click to expand)
{"identifier": "request_new_mcp_server","title": "Request new MCP server","icon": "AI","description": "Can't find your favourite MCP in your organization? Request a new MCP server","allowAnyoneToViewRuns": true,"nodes": [{"identifier": "trigger","title": "Request new MCP server","icon": "AI","description": "Collect the details of the MCP server to request","config": {"type": "SELF_SERVE_TRIGGER","userInputs": {"properties": {"server_name": {"type": "string","title": "Server name"},"url": {"type": "string","title": "URL","format": "url"},"description": {"type": "string","title": "Description"},"requesting_team": {"title": "Requesting team","icon": "DefaultProperty","type": "array","items": {"type": "string","format": "entity","blueprint": "_team"}},"intended_use_case": {"type": "string","title": "Intended use case"}},"required": ["server_name","url","intended_use_case"],"order": ["server_name","url","description","requesting_team","intended_use_case"]},"published": true},"variables": {}},{"identifier": "create_request","title": "Create MCP server request","icon": "AI","description": "Create the request entity with a requested status","config": {"type": "UPSERT_ENTITY","blueprintIdentifier": "mcp_server_request","mapping": {"identifier": "{{ .outputs.trigger.server_name | gsub(\"[^\\\\p{L}0-9@_.+:\\\\/=-]\"; \"-\") }}","title": "{{ .outputs.trigger.server_name }}","team": "{{ .outputs.trigger.requesting_team | map(.identifier) }}","properties": {"status": "requested","url": "{{ .outputs.trigger.url }}","requested_use_case": "{{ .outputs.trigger.intended_use_case }}","description": "{{ .outputs.trigger.description }}"},"relations": {"requested_by": "{{ .workflowRun.trigger.by.email }}"}}},"variables": {}}],"connections": [{"description": null,"sourceIdentifier": "trigger","targetIdentifier": "create_request"}]} -
Click Save to save the workflow.
Build the review workflow
This workflow lets a platform engineer approve or reject a pending request. It appears in the bolt menu on mcp_server_request entities with status = requested, matching the DAY-2 review action from the demo. When launched from an entity page, Port pre-fills the selected request automatically.
Build the workflow
-
Go to the Workflows page of your portal.
-
Click on the + Workflow button in the top-right corner.
-
In the Name field, enter
Review MCP request, then click Confirm. -
On the editor page, click the see workflow JSON button (the code icon) to open the JSON editor.
-
Copy and paste the workflow JSON below to replace the example workflow:
Review MCP request workflow JSON (Click to expand)
{"identifier": "review_mcp_server_request","title": "Review MCP request","icon": "AI","description": "Review the requested MCP server","allowAnyoneToViewRuns": true,"nodes": [{"identifier": "trigger","title": "Review MCP request","icon": "AI","description": "Approve or reject a pending MCP server request","config": {"type": "SELF_SERVE_TRIGGER","contexts": [{"on": "ENTITY","userInput": "mcp_request"}],"userInputs": {"properties": {"mcp_request": {"type": "string","title": "MCP server request","format": "entity","blueprint": "mcp_server_request","dataset": {"combinator": "and","rules": [{"property": "status","operator": "=","value": "requested"}]}},"decision": {"type": "string","title": "Decision","enum": ["Approve", "Reject"],"icon": "DefaultProperty","enumColors": {"Approve": "green","Reject": "red"}},"rejection_reason": {"type": "string","title": "Rejection reason","visible": {"jqQuery": ".form.decision == \"Reject\""}}},"required": ["mcp_request","decision"],"order": ["title_section","decision","rejection_reason"],"titles": {"title_section": {"title": "Approve to create the requested MCP server and mark as ready, or reject."}}},"published": true},"variables": {}},{"identifier": "update_request","title": "Update request status","icon": "AI","description": "Set the request status to approved or rejected","config": {"type": "UPSERT_ENTITY","blueprintIdentifier": "mcp_server_request","mapping": {"identifier": "{{ .outputs.trigger.mcp_request }}","properties": {"status": "{{if (.outputs.trigger.decision == (\"Approve\")) then \"approved\" else \"rejected\" end}}","rejection_reason": "{{if (.outputs.trigger.decision == (\"Reject\")) then .outputs.trigger.rejection_reason else null end}}"}}},"variables": {}}],"connections": [{"description": null,"sourceIdentifier": "trigger","targetIdentifier": "update_request"}]} -
Click Save to save the workflow.
Approve and connect an MCP server
Approving a request marks it as ready for the platform team to onboard. To make the server usable, an admin connects it as an MCP connector so Port can discover and expose its tools.
-
Go to the data sources page of your portal.
-
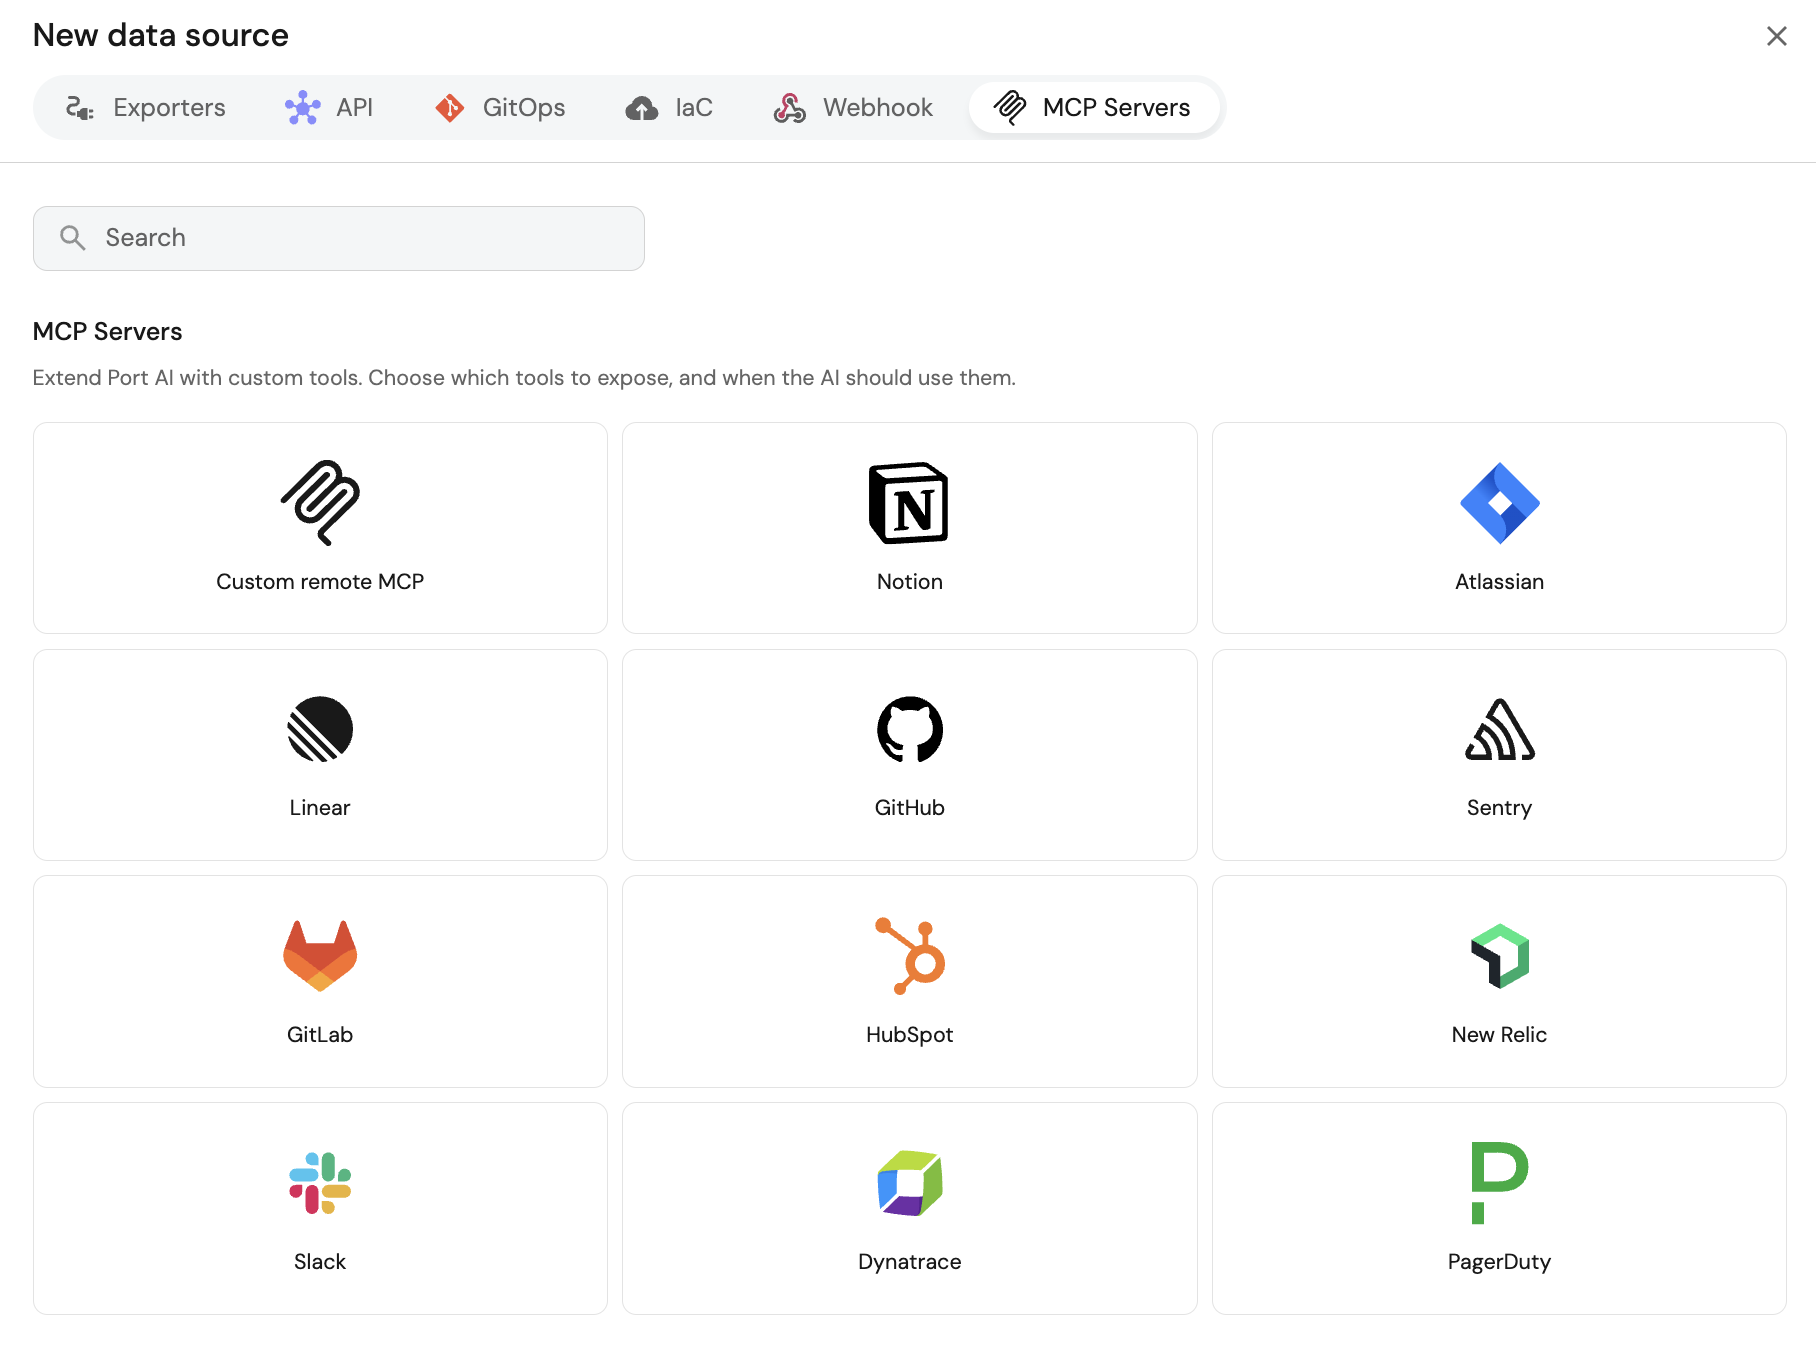
Click on + Data source in the top-right corner, then select the MCP Servers tab.
-
Choose a matching server from the list, or select Custom remote MCP, and fill in the Name and URL from the request.
-
Click Connect and complete the authentication flow if required.
-
Under Allowed Tools, use
+ Add Toolto select which discovered tools to expose to your organization. -
Click Publish to make the connector available.
Once published, the server appears as a _mcp_server entity with exposed = true and its allowed_tools populated. Developers can then authenticate and use it from any Port AI interface.
Visualize the registry with a dashboard
Create a dashboard to give platform teams and developers a single view of connected servers, pending requests, and their statuses.
Create the dashboard
-
Navigate to your software catalog.
-
Click on the
+button in the left sidebar. -
Select New dashboard.
-
Name the dashboard
MCP Dashboardand add a description such asGain visibility and insights into your MCP servers. -
Select an icon (for example
Apps), then clickCreate.
Add widgets
Add the following widgets to your dashboard.
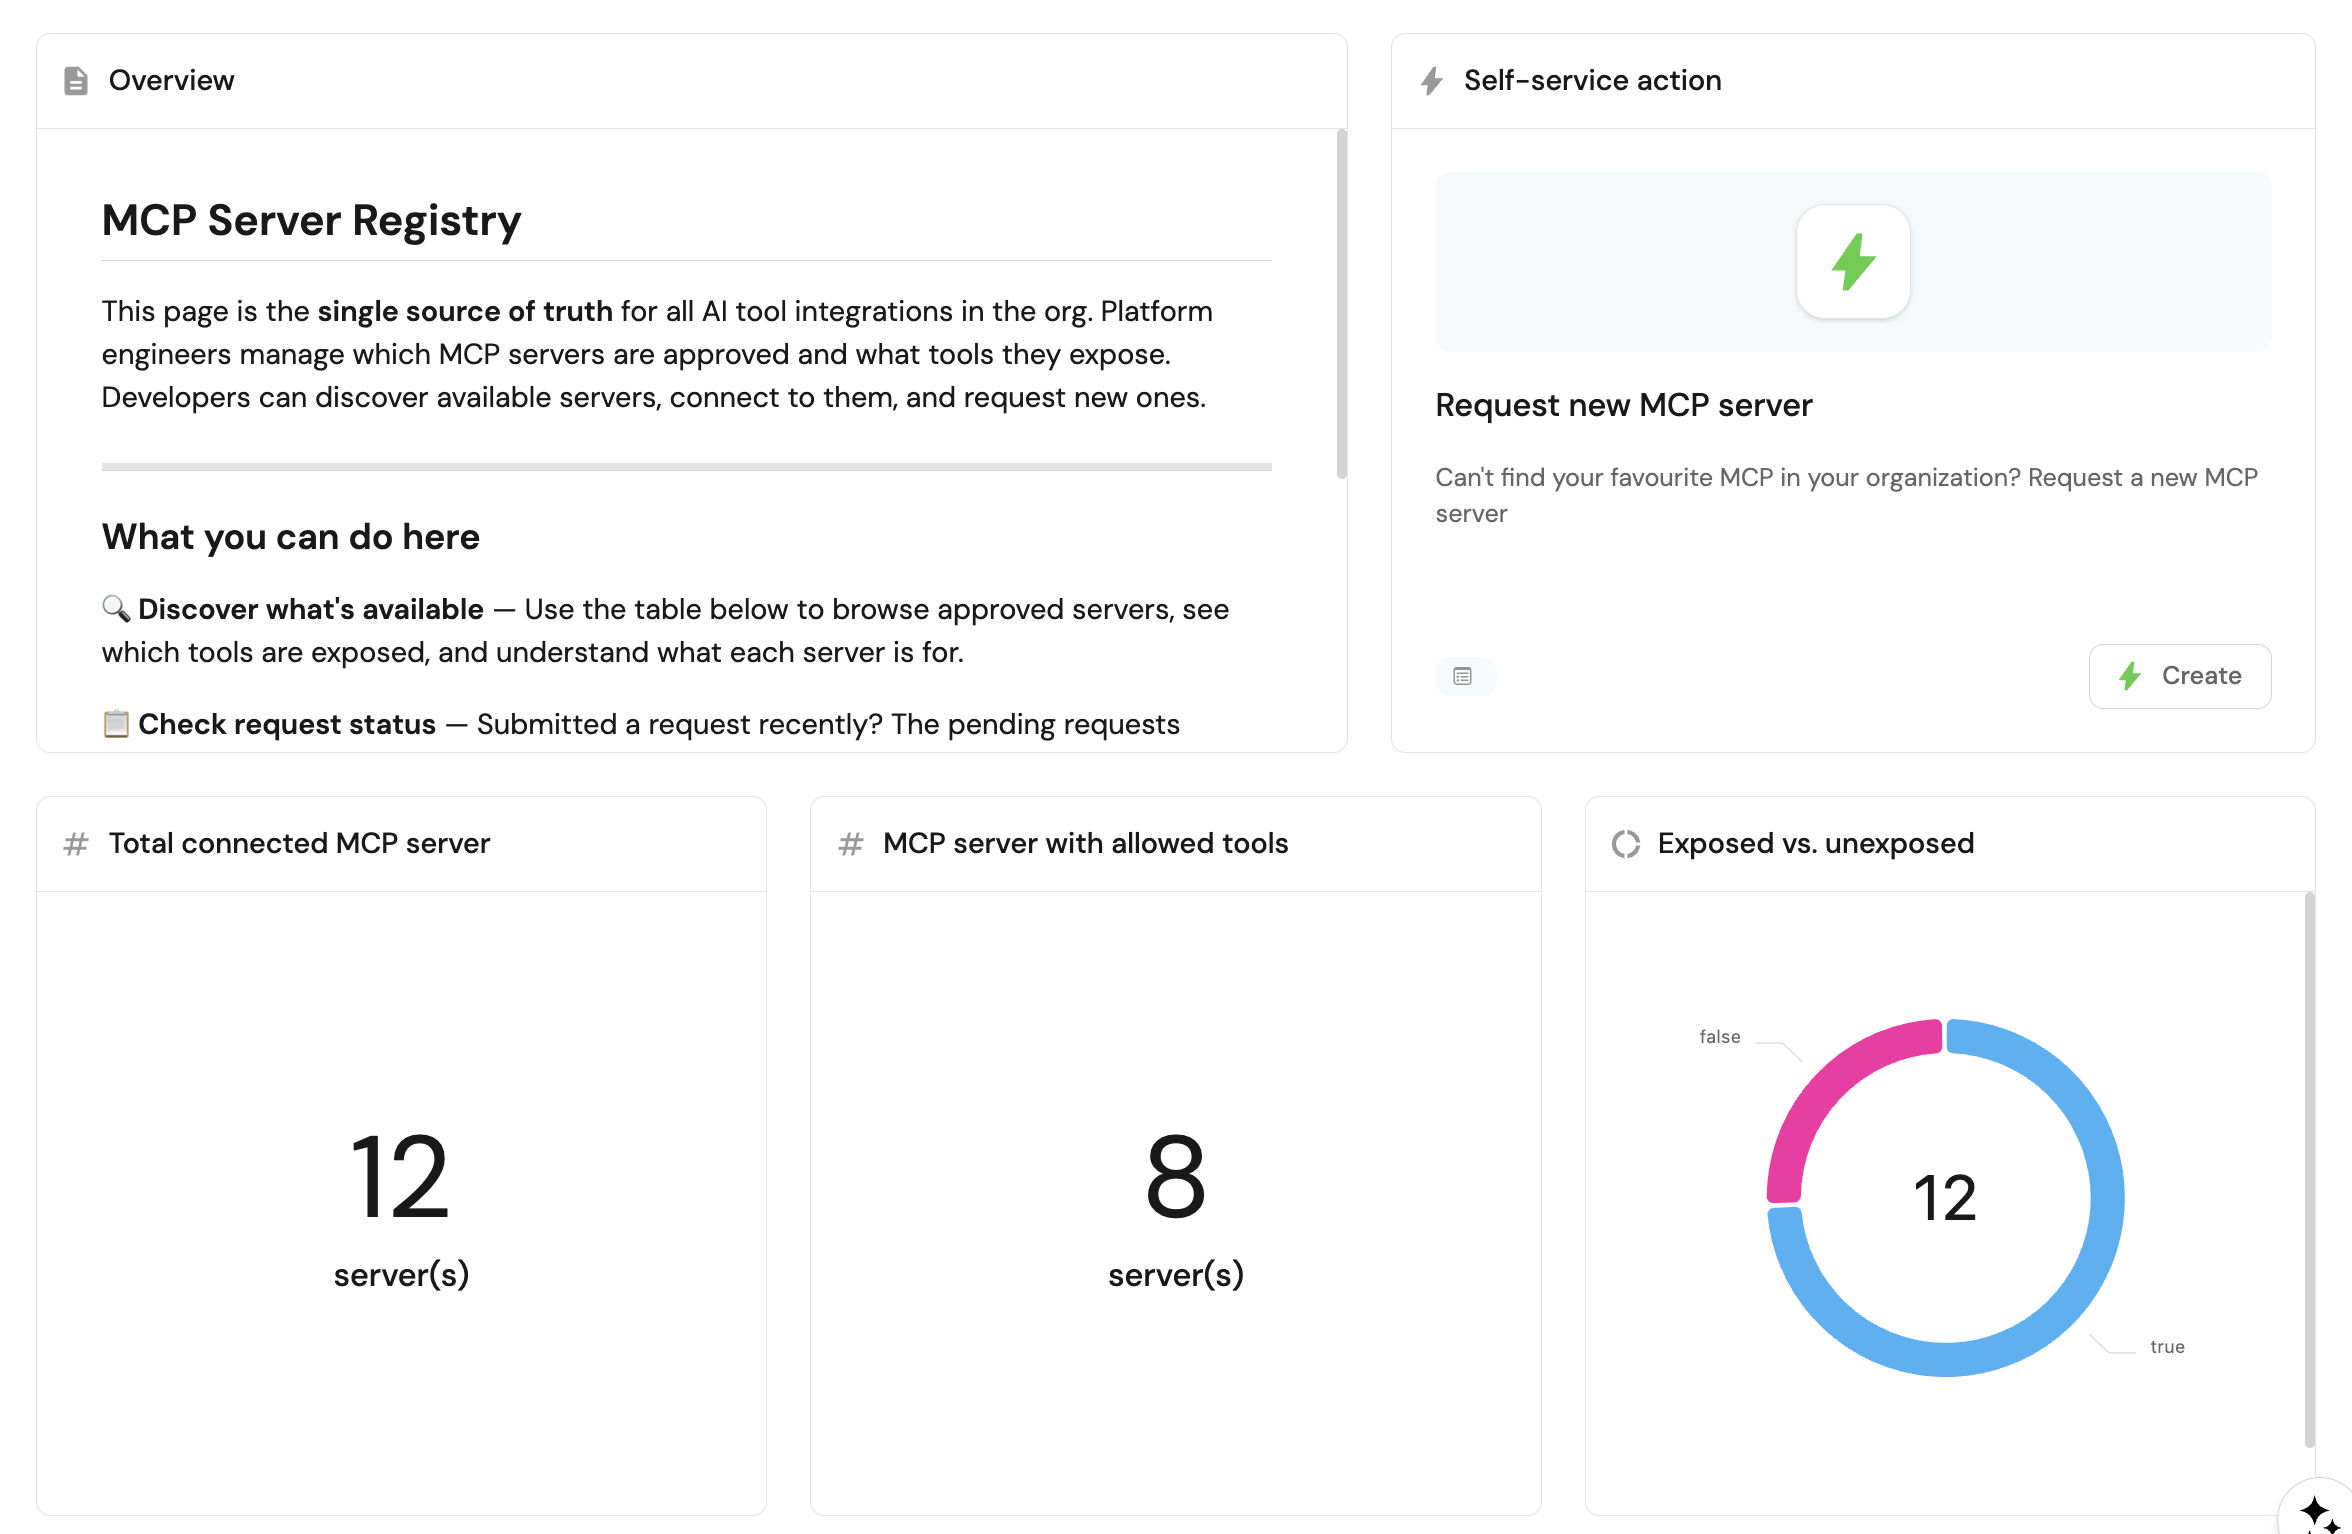
Overview (markdown)
-
Click + Widget and select Markdown.
-
Title:
Overview. -
Paste the following content:
## MCP Server RegistryThis page is the **single source of truth** for all AI tool integrations in the org. Platform engineers manage which MCP servers are approved and what tools they expose. Developers can discover available servers, connect to them, and request new ones.---### What you can do here🔍 **Discover what's available** - Use the table below to browse approved servers, see which tools are exposed, and understand what each server is for.📋 **Check request status** - Submitted a request recently? The pending requests counter and table below show where it is in the approval process.➕ **Request a new server** - Don't see the tool you need? Use the **Request new MCP server** workflow to submit it for platform review. Requests are reviewed within 3 business days.---> **Governed by your organization's MCP policy.** All MCP tool integrations must go through this registry. Connecting unapproved servers directly in your IDE or CI/CD pipelines is a policy violation. -
Click
Save.
Total connected MCP servers (number chart)
-
Click + Widget and select Number Chart.
-
Title:
Total connected MCP servers. -
Select the
Count entitieschart type and choose the MCP Server (_mcp_server) blueprint. -
Set a custom unit such as
server(s). -
Click
Save.
MCP servers with allowed tools (number chart)
-
Click + Widget and select Number Chart.
-
Title:
MCP servers with allowed tools. -
Select the
Count entitieschart type and choose the MCP Server (_mcp_server) blueprint. -
Add this filter to count only exposed servers that have tools:
{"combinator": "and","rules": [{"property": "exposed","operator": "=","value": true},{"property": "allowed_tools","operator": "isNotEmpty"}]} -
Click
Save.
Exposed vs. unexposed (pie chart)
-
Click + Widget and select Pie chart.
-
Title:
Exposed vs. unexposed. -
Choose the MCP Server (
_mcp_server) blueprint. -
Select
exposedas the Breakdown by property. -
Click
Save.
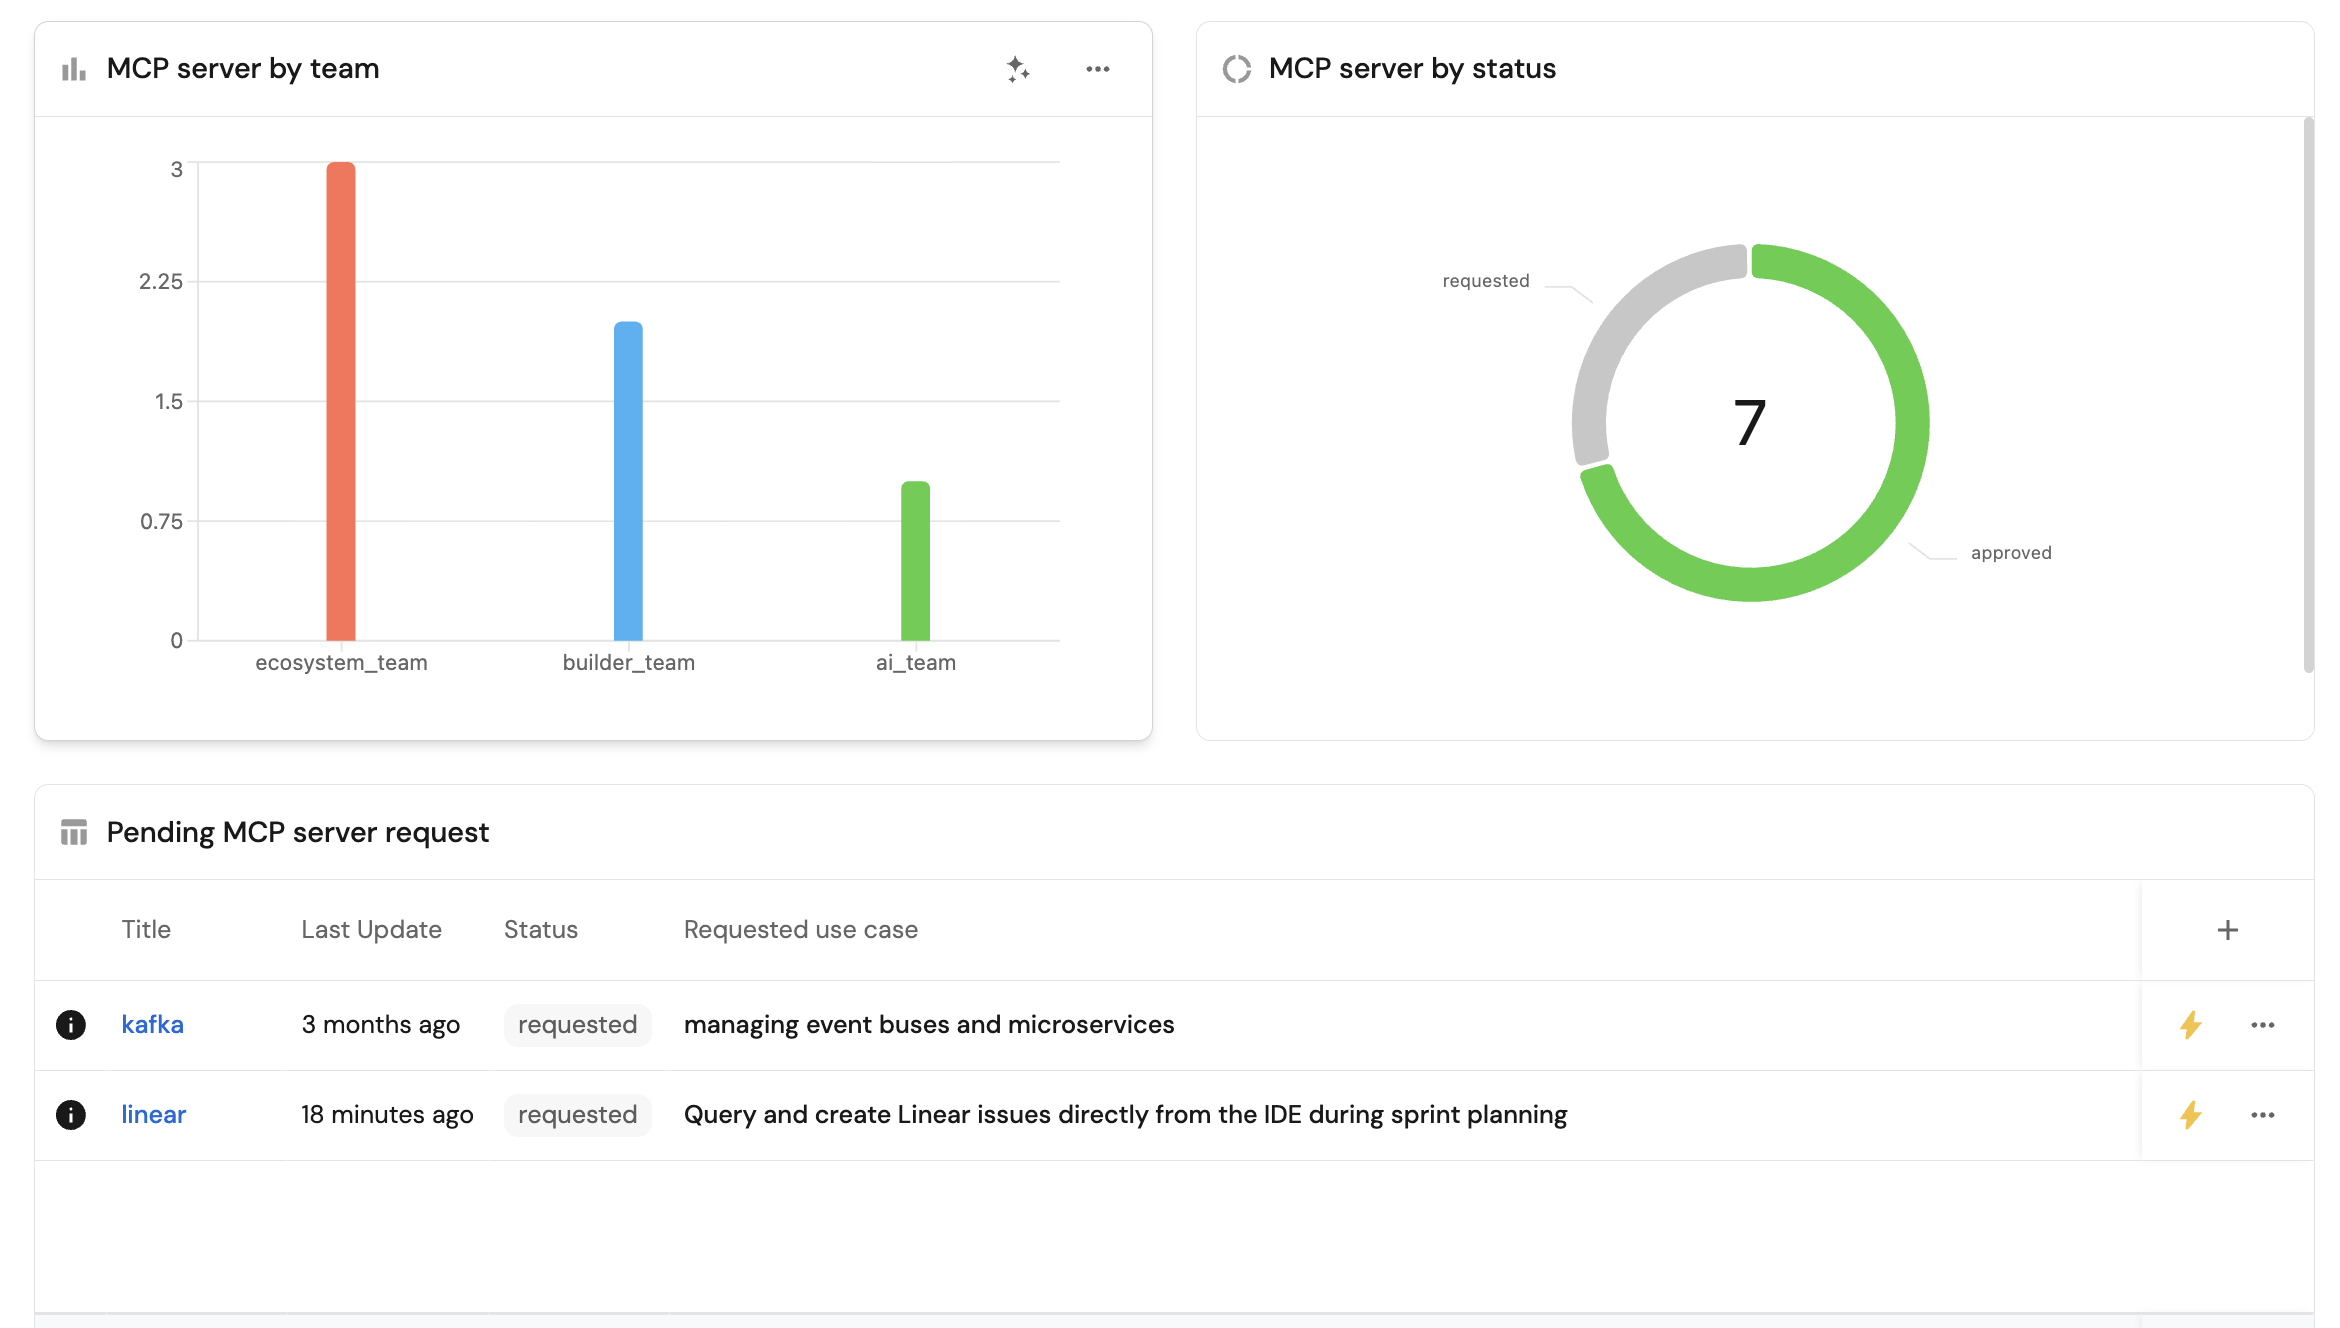
MCP servers by status (pie chart)
-
Click + Widget and select Pie chart.
-
Title:
MCP servers by status. -
Choose the MCP Server Request (
mcp_server_request) blueprint. -
Select
statusas the Breakdown by property. -
Click
Save.
MCP servers by team (bar chart)
-
Click + Widget and select Bar chart.
-
Title:
MCP servers by team. -
Choose the MCP Server (
_mcp_server) blueprint. -
Select
$teamas the Breakdown by property. -
Click
Save.
Pending MCP server requests (table)
-
Click + Widget and select Table.
-
Title:
Pending MCP server requests. -
Choose the MCP Server Request (
mcp_server_request) blueprint. -
Add this filter to show requests still in progress:
{"combinator": "and","rules": [{"property": "status","operator": "in","value": ["requested", "under-review", "rejected"]}]} -
Click
Save.
Approved MCP servers (table)
-
Click + Widget and select Table.
-
Title:
Approved MCP servers. -
Choose the MCP Server (
_mcp_server) blueprint. -
Show columns such as
description,allowed_tools, andexposed. -
Click
Save.
Request new MCP server (action card)
-
Click + Widget and select Action card.
-
Title:
Self-service action. -
Add the Request new MCP server workflow so developers can submit requests directly from the dashboard.
-
Click
Save.
Arrange widgets to match your team's workflow: overview and action card at the top, summary number charts and pie charts in the middle, and the pending and approved tables at the bottom.
Set up the MCP registry assistant
Create an AI skill that helps developers discover approved servers, understand how to connect to them, check request status, and submit new requests, all grounded in live catalog data.
Create the skill blueprint
If you have not already created the skill blueprint, create it now by following this guide.
Create the mcp-registry-assistant skill
-
Go to the Skills catalog page in your portal.
-
Click on
+ Skill, then click on the{...} Edit JSONbutton. -
Copy and paste the following JSON configuration, then click
Register:MCP registry assistant skill (Click to expand)
{"identifier": "mcp-registry-assistant","title": "mcp-registry-assistant","icon": "Learn","properties": {"description": "Help users discover approved MCP servers, understand how to connect to them, check request status, and submit new server requests. Use when users ask about MCP servers or the MCP registry.","instructions": "---\nname: mcp-registry-assistant\ndescription: Help users discover approved MCP servers, understand how to connect to them, check request status, and submit new server requests. Use when users ask about MCP servers or the MCP registry.\n---\n\n# MCP Registry Assistant\n\nUse this skill when users need help with MCP server discovery and governance:\n\n- Finding which MCP servers are approved and available\n- Understanding how to connect to a specific server\n- Checking the status of a pending request\n- Understanding what tools a server exposes and when to use them\n- Submitting or following up on a new server request\n\n## Step 1: Understand the User's Goal\n\nIdentify which type of help the user needs:\n\n1. **Discover available servers** - Show approved MCP servers and what they do\n2. **Connection instructions** - Walk them through connecting to a specific server\n3. **Check request status** - Look up a pending or recent request\n4. **Request a new server** - Guide them through the request process\n\n## Step 2: Gather Context\n\nQuery the MCP server catalog to get current data:\n\n- Use `list_entities` on the `_mcp_server` blueprint to fetch all entities\n- Filter by `exposed = true` for approved/active servers\n\n## Step 3: Discovering Available Servers\n\nWhen a user asks which servers are available or approved:\n\n1. Query `_mcp_server` entities where `exposed = true` and `allowed_tools` is not empty\n2. For each server, return:\n - **Name** and **description**\n - **URL**\n - **Allowed tools** list with a brief explanation of what each tool does\n - **Owning team**\n3. Group servers by use case if there are more than 3 (e.g., Documentation, Code, Project Management, Observability)\n4. Suggest relevant servers based on what the user is trying to do if they gave context\n\n## Step 4: Connection Instructions\n\nWhen a user asks how to connect to a specific server:\n\n1. Fetch the server entity from `_mcp_server` to confirm it exists and is exposed\n2. Provide step-by-step connection instructions:\n - Go to app.getport.io\n - Click your avatar in the top-right corner\n - Select **MCP Servers**\n - Open the **MCP External** tab\n - Find the server by name and click **Connect**\n - Complete the OAuth or authentication flow\n3. Mention which tools will be available after connecting\n4. Provide 2-3 example prompts they can try immediately after connecting\n\n## Step 5: Checking Request Status\n\nWhen a user asks about a pending request:\n\n1. Search `mcp_server_request` blueprint entities where `status` is one of: `requested`, `under_review`, `approved`, `rejected`\n2. If the user gives a server name, filter by title\n3. Return the current status, who requested it, and when\n4. If status is `rejected`, include the `rejection_reason` property if populated\n5. If status is `requested` or `under_review`, remind them that platform review takes up to 3 business days and they can follow up with their platform team\n\n## Step 6: Requesting a New Server\n\nWhen a user wants to request a server that does not exist yet:\n\n1. First check `_mcp_server` or `mcp_server_request` to confirm the server is not already approved or pending. If it is, point them to it\n2. Direct them to the self-service workflow: app.port.io → Self-service → **Request new MCP server**\n3. Tell them what to fill in:\n - **Server name** - the tool or platform name\n - **URL** - the remote MCP server endpoint (must be a publicly reachable HTTPS URL)\n - **Description** - what the tool does\n - **Requesting team** - their team in Port\n - **Intended use case** - specific examples of how they'll use it\n4. Set expectations: requests are reviewed within 3 business days, and they'll be notified on approval or rejection\n\n## Step 7: Provide the Response\n\n- Always ground answers in live catalog data - do not guess which servers are approved\n- If a server exists in the catalog with `exposed = false`, do not present it as available to users\n- Keep responses concise: lead with the answer, follow with detail\n- When listing servers, use a structured format (name, purpose, example prompts)\n- If the user's question is ambiguous, ask one clarifying question before querying\n\n## Tools Reference\n\n| Tool | Purpose |\n| --- | --- |\n| `list_entities` | Query `_mcp_server` entities with filters |\n| `search_port_knowledge_sources` | Look up Port documentation on MCP connectors |\n\n## Important Notes\n\n- Only servers with `exposed = true` in the `_mcp_server` blueprint are available for developer use\n- MCP server requests with `status = requested` or `under_review` are not yet usable - do not instruct users to connect to them\n- Authentication type varies per server (OAuth, API key, none) - always check the server entity before giving auth instructions\n- If a user reports a connection error, suggest they re-authenticate via Avatar → MCP Servers and contact their platform team if the issue persists\n- Never expose internal URLs or credentials from server entities in your response"},"relations": {}}
The assistant uses the list_entities tool to read the _mcp_server and mcp_server_request blueprints, so its answers always reflect the current state of your registry. Learn more about skills and how Port AI loads them.
Let's test it
Run through the full flow to verify your MCP registry setup.
Part 1: Explore the dashboard
-
Go to your MCP Dashboard in Port.
-
Review the widgets:
- Total connected MCP servers.
- MCP servers with allowed tools (exposed servers that have tools configured).
- Exposed vs. unexposed breakdown.
- MCP servers by team.
- Pending and approved server tables.
-
Open the Port AI chat and ask:
"Using skills, which MCP servers are approved and available for me to use?"
-
Follow up with:
"How do I connect to the GitHub MCP server?"
Confirm the
mcp-registry-assistantskill responds with live data from the_mcp_servercatalog.
Part 2: Request a new MCP server
-
On the dashboard, click the Request new MCP server action card, or go to the self-service page and open Request new MCP server.
-
Fill in the form with this sample request:
Field Value Server name linearURL https://mcp.linear.app/mcpDescription Project management and issue trackingRequesting team Your team (for example Ecosystem Team)Intended use case Query and create Linear issues directly from the IDE during sprint planning -
Submit the request.
-
Go to the MCP Server Request catalog page and confirm a new linear entity was created with
status = requested. -
On the dashboard, confirm the pending requests count increased by one.
Part 3: Approve the request
-
Open the linear entity in the catalog.
-
From the entity's bolt menu, run Review MCP request and select Approve.
-
Confirm the entity
statusupdates toapproved. -
Follow the steps in Approve and connect an MCP server to add linear as an MCP connector under Data sources.
What to check at the end
- The
linearentity inmcp_server_requesthasstatus = approved. - The
linearserver appears in the_mcp_servercatalog withexposed = trueandallowed_toolspopulated after you connect it under Data sources. - The dashboard pending count reflects the correct state.