Manage and visualize your LaunchDarkly feature flags
Send this guide to your coding agent.
Prerequisite: Install Port MCP
Open plan mode. Implement this Port guide in my org via MCP:

https://docs.port.io/guides/all/manage-and-visualize-your-launchdarkly-feature-flags/

Goal: get the guide's core flow working end-to-end in my org; adapting it to fit my existing setup takes priority over matching the guide 1:1.

Plan:
1. Confirm MCP is connected, in the right org, with sufficient permissions.
2. Diff the guide's data model (blueprints, properties, relations, actions, agents, automations, integrations, secrets) against mine.
3. Propose adaptations for gaps, reusing existing blueprints/relations over guide-named duplicates.
4. Flag what needs a UI click, credential, or secret from me, testing MCP capability empirically before ruling anything out.
5. Stop on any blocker and give me options. Approving this plan authorizes the writes it lists; pause only for writes beyond what's listed.

Build:
- Extend blueprint schema additively when upserting; don't remove or overwrite existing properties, and treat type conflicts as a blocker, not an auto-fix.
- List any mock data in the plan, minimal and labeled mock; once approved, seed it without re-asking, and tell me what you seeded.
- For anything the guide writes downstream (e.g. a webhook target), use a real entity, not a mock.
- For pages/widgets, use the real page identifier from the app URL, not a guessed slug.
- When you hit a UI step confirmed (not assumed) unsupported via MCP, pause, give exact clicks, then resume via MCP.
- Validate and give links after each meaningful step (only a tool-returned URL, no guessed paths); don't proceed if the last run wasn't a success.

Done:
- Confirm the guide's expected output exists and runs in Port.
- Summarize adaptations, seeded data, what was mocked or skipped, remaining UI steps, and how to verify.
This guide demonstrates how to bring your LaunchDarkly feature flag management experience into Port. You will learn how to:
- Ingest LaunchDarkly data into Port's context lake using Port's LaunchDarkly integration.
- Set up self-service actions to manage feature flags (create, toggle, and archive).
- Build dashboards in Port to monitor and take action on your feature flag resources.
Common use cases
- Monitor the status and usage of all feature flags across projects from a single dashboard.
- Empower development teams to create and manage feature flags without direct LaunchDarkly access.
- Automate feature flag lifecycle management through self-service actions.
- Track temporary flags to ensure cleanup and technical debt reduction.
Prerequisites
This guide assumes the following:
- You have a Port account and have completed the onboarding process.
- Access to your LaunchDarkly organization with permissions to manage feature flags.
- LaunchDarkly API access token with appropriate permissions.
- Optional - Install Port's LaunchDarkly integration.
Set up data model
If you haven't installed the LaunchDarkly integration, you'll need to create blueprints for LaunchDarkly projects, environments, and feature flags. However, we highly recommend you install the LaunchDarkly integration to have these automatically set up for you.
Create the LaunchDarkly project blueprint
-
Go to your Builder page.
-
Click on
+ Blueprint. -
Click on the
{...}button in the top right corner, and choose "Edit JSON". -
Add this JSON schema:
LaunchDarkly project blueprint (click to expand)
{"identifier": "launchDarklyProject","description": "This blueprint represents a project in LaunchDarkly.","title": "LaunchDarkly Project","icon": "Launchdarkly","schema": {"properties": {"tags": {"type": "array","title": "Tags","items": {"type": "string"},"description": "Tags associated with the project for organizational purposes."}},"required": []},"mirrorProperties": {},"calculationProperties": {},"aggregationProperties": {},"relations": {}} -
Click "Save" to create the blueprint.
Create the LaunchDarkly feature flag blueprint
-
Go to your Builder page.
-
Click on
+ Blueprint. -
Click on the
{...}button in the top right corner, and choose "Edit JSON". -
Add this JSON schema:
LaunchDarkly feature flag blueprint (click to expand)
{"identifier": "launchDarklyFeatureFlag","description": "This blueprint represents a feature flag in LaunchDarkly.","title": "LaunchDarkly Feature Flag","icon": "Launchdarkly","schema": {"properties": {"kind": {"type": "string","title": "Flag Kind","description": "The type of the feature flag (e.g., boolean)."},"description": {"type": "string","title": "Description","description": "A description of what the flag controls."},"creationDate": {"type": "string","format": "date-time","title": "Creation Date","description": "The date and time when the flag was created."},"clientSideAvailability": {"type": "object","title": "Client-Side Availability","description": "Availability of the flag for client-side applications."},"temporary": {"type": "boolean","title": "Temporary Flag","description": "Indicates if the flag is temporary."},"tags": {"type": "array","title": "Tags","items": {"type": "string"},"description": "Tags associated with the feature flag."},"maintainer": {"type": "string","title": "Maintainer","description": "Email address of the maintainer of the flag."},"customProperties": {"type": "object","title": "Custom Properties","description": "Custom properties associated with the flag."},"archived": {"type": "boolean","title": "Archived","description": "Indicates if the flag is archived."},"deprecated": {"type": "boolean","title": "Deprecated","description": "Indicates if the flag is deprecated."},"variations": {"type": "array","title": "Variations","description": "An array of possible variations for the flag"}},"required": []},"mirrorProperties": {},"calculationProperties": {},"aggregationProperties": {},"relations": {"project": {"title": "Project","target": "launchDarklyProject","required": true,"many": false}}} -
Click "Save" to create the blueprint.
Create the LaunchDarkly environment blueprint
-
Go to your Builder page.
-
Click on
+ Blueprint. -
Click on the
{...}button in the top right corner, and choose "Edit JSON". -
Add this JSON schema:
LaunchDarkly environment blueprint (click to expand)
{"identifier": "launchDarklyEnvironment","description": "This blueprint represents an environment in LaunchDarkly","title": "LaunchDarkly Environment","icon": "Launchdarkly","schema": {"properties": {"defaultTtl": {"type": "number","title": "Default TTL","description": "The default time-to-live (in minutes) for feature flag settings in this environment."},"secureMode": {"type": "boolean","title": "Secure Mode","description": "Indicates whether Secure Mode is enabled for the environment, enhancing security by verifying user tokens."},"defaultTrackEvents": {"type": "boolean","title": "Default Track Events","description": "Indicates whether event tracking is enabled by default for all flags in this environment."},"requireComments": {"type": "boolean","title": "Require Comments","description": "Indicates whether comments are required for changes made in this environment."},"confirmChanges": {"type": "boolean","title": "Confirm Changes","description": "Indicates whether changes need to be confirmed before being applied in this environment."},"tags": {"type": "array","title": "Tags","description": "A list of tags associated with the environment for organizational purposes."},"critical": {"type": "boolean","title": "Critical Environment","description": "Indicates whether this environment is considered critical, which may affect change management and notifications."}},"required": []},"mirrorProperties": {},"calculationProperties": {},"aggregationProperties": {},"relations": {"project": {"title": "Project","target": "launchDarklyProject","required": true,"many": false}}} -
Click "Save" to create the blueprint.
Set up self-service actions
Now let us create self-service actions to manage your LaunchDarkly feature flags directly from Port using synced webhooks. You will implement workflows to:
- Create a new feature flag.
- Toggle a feature flag in an environment.
- Archive a feature flag.
To implement these use-cases, follow the steps below:
Add Port secrets
If you have already installed Port's LaunchDarkly integration, these secrets should already exist in Port. To view your existing secrets:
- In your Port application, click on your profile picture
 .
. - Choose Credentials, then click on the
Secretstab.
To add these secrets to Port:
- In your Port application, click on your profile picture .
- Click on Credentials.
- Click on the
Secretstab. - Click on
+ Secretand add the following secrets:LAUNCHDARKLY_ACCESS_TOKEN: Your LaunchDarkly API access token
Make sure your LaunchDarkly API token has the following permissions:
- Writer role or Admin role.
- Access to the projects where you want to create/manage flags.
- The token should be a Personal API Access Token or Service Token with
createFlag,updateFlag, anddeleteFlagpermissions.
Create a new feature flag
-
Go to the Self-service page in Port.
-
Click on the
+ New Actionbutton. -
Click on the
{...} Edit JSONbutton. -
Copy and paste the following JSON configuration into the editor.
Create feature flag action (Click to expand)
{"identifier": "create_launchdarkly_feature_flag","title": "Create Feature Flag","icon": "Launchdarkly","description": "Create a new feature flag in LaunchDarkly","trigger": {"type": "self-service","operation": "CREATE","userInputs": {"properties": {"project": {"title": "Project","description": "LaunchDarkly project to create the flag in","type": "string","blueprint": "launchDarklyProject","format": "entity"},"flag_key": {"title": "Flag Key","description": "Unique key for the feature flag","type": "string"},"flag_name": {"title": "Flag Name","description": "Human-readable name for the feature flag","type": "string"},"flag_description": {"title": "Description","description": "Description of what this flag controls","type": "string"},"temporary": {"title": "Temporary Flag","description": "Whether this is a temporary flag","type": "boolean","default": false},"tags": {"title": "Tags","description": "Comma-separated list of tags","type": "string"}},"required": ["project","flag_key","flag_name"],"order": ["project","flag_key","flag_name","flag_description","temporary","tags"]},"blueprintIdentifier": "launchDarklyFeatureFlag"},"invocationMethod": {"type": "WEBHOOK","url": "https://app.launchdarkly.com/api/v2/flags/{{.inputs.project.identifier}}","agent": false,"synchronized": true,"method": "POST","headers": {"Authorization": "{{.secrets.LAUNCHDARKLY_ACCESS_TOKEN}}","Content-Type": "application/json"},"body": {"key": "{{.inputs.flag_key}}","name": "{{.inputs.flag_name}}","description": "{{.inputs.flag_description}}","temporary": "{{.inputs.temporary}}","tags": "{{.inputs.tags | split(\",\") | map(. | trim)}}"}},"requiredApproval": false} -
Click
Save.
Now you should see the Create Feature Flag action in the self-service page. 🎉
Toggle a feature flag
-
Go to the Self-service page in Port.
-
Click on the
+ New Actionbutton. -
Click on the
{...} Edit JSONbutton. -
Copy and paste the following JSON configuration into the editor.
Toggle feature flag action (Click to expand)
{"identifier": "toggle_launchdarkly_feature_flag","title": "Toggle Feature Flag","icon": "Launchdarkly","description": "Toggle a feature flag on or off in a specific environment","trigger": {"type": "self-service","operation": "DAY-2","userInputs": {"properties": {"environment": {"title": "Environment","description": "Environment to toggle the flag in","type": "string","blueprint": "launchDarklyEnvironment","format": "entity","dataset": {"combinator": "and","rules": [{"operator": "relatedTo","blueprint": "launchDarklyProject","value": {"jqQuery": ".entity.relations.project"}}]}},"enabled": {"title": "Enable Flag","description": "Whether to enable or disable the flag","type": "boolean"}},"required": ["environment"],"order": ["environment","enabled"]},"blueprintIdentifier": "launchDarklyFeatureFlag"},"invocationMethod": {"type": "WEBHOOK","url": "https://app.launchdarkly.com/api/v2/flags/{{.entity.relations.project}}/{{.entity.identifier | sub(\"-[^-]+$\"; \"\")}}","agent": false,"synchronized": true,"method": "PATCH","headers": {"Authorization": "{{.secrets.LAUNCHDARKLY_ACCESS_TOKEN}}","Content-Type": "application/json"},"body": [{"op": "replace","path": "/environments/{{.inputs.environment.identifier | sub(\"-[^-]+$\"; \"\")}}/on","value": "{{.inputs.enabled}}"}]},"requiredApproval": false} -
Click
Save.
Now you should see the Toggle Feature Flag action in the self-service page. 🎉
Archive a feature flag
-
Go to the Self-service page in Port.
-
Click on the
+ New Actionbutton. -
Click on the
{...} Edit JSONbutton. -
Copy and paste the following JSON configuration into the editor.
Archive feature flag action (Click to expand)
{"identifier": "archive_launchdarkly_feature_flag","title": "Archive Feature Flag","icon": "Launchdarkly","description": "Archive a feature flag in LaunchDarkly","trigger": {"type": "self-service","operation": "DELETE","userInputs": {"properties": {},"required": [],"order": []},"blueprintIdentifier": "launchDarklyFeatureFlag"},"invocationMethod": {"type": "WEBHOOK","url": "https://app.launchdarkly.com/api/v2/flags/{{.entity.relations.project}}/{{.entity.identifier | sub(\"-[^-]+$\"; \"\")}}","agent": false,"synchronized": true,"method": "PATCH","headers": {"Authorization": "{{.secrets.LAUNCHDARKLY_ACCESS_TOKEN}}","Content-Type": "application/json"},"body": {"patch": [{"op": "replace","path": "/archived","value": true}]}},"requiredApproval": true} -
Click
Save.
Now you should see the Archive Feature Flag action in the self-service page. 🎉
Create automations to update entities
To keep your catalog updated with the latest flag information, create an automation to update the feature flag entities in Port after each action completes successfully.
You do not need to create an automation if you have installed the LaunchDarkly Port integration, the entities will be updated automatically.
Automation for create flag action
-
Head to the automation page.
-
Click on the
+ Automationbutton. -
Copy and paste the following JSON configuration:
Create feature flag automation (click to expand)
{"identifier": "launchDarklyFeatureFlag_sync_created_flag","title": "Sync Created Feature Flag","description": "Update Port with created feature flag data","trigger": {"type": "automation","event": {"type": "RUN_UPDATED","actionIdentifier": "create_launchdarkly_feature_flag"},"condition": {"type": "JQ","expressions": [".diff.after.status == \"SUCCESS\""],"combinator": "and"}},"invocationMethod": {"type": "UPSERT_ENTITY","blueprintIdentifier": "launchDarklyFeatureFlag","mapping": {"identifier": "{{.event.diff.after.response.key}}-{{.event.diff.after.properties.project.identifier}}","title": "{{.event.diff.after.response.name}}","properties": {"kind": "{{.event.diff.after.response.kind}}","description": "{{.event.diff.after.response.description}}","creationDate": "{{(.event.diff.after.response.creationDate / 1000) | strftime(\"%Y-%m-%dT%H:%M:%SZ\")}}","clientSideAvailability": "{{.event.diff.after.response.clientSideAvailability}}","temporary": "{{.event.diff.after.response.temporary}}","tags": "{{.event.diff.after.response.tags}}","maintainer": "{{.event.diff.after.response.maintainer}}","customProperties": "{{.event.diff.after.response.customProperties}}","archived": "{{.event.diff.after.response.archived}}","deprecated": "{{.event.diff.after.response.deprecated}}","variations": "{{.event.diff.after.response.variations}}"},"relations": {"project": "{{.event.diff.after.properties.project.identifier}}"}}},"publish": true} -
Click "Save" to create the automation.
Let's test it!
-
Head to the self-service page in Port
-
Test creating a feature flag:
- Click on
Create Feature Flag. - Fill in the required information:
- Project: Your LaunchDarkly project.
- Flag Key: A unique identifier (e.g., "new-checkout-flow")
- Flag Name: A human-readable name (e.g., "New Checkout Flow")
- Description: What the flag controls.
- Set temporary flag if needed.
- Add relevant tags.
- Click
Execute.
- Click on
-
Test toggling a feature flag:
- Click on
Toggle Feature Flag. - Select an existing feature flag.
- Choose the environment (production, staging, etc.)
- Toggle the enabled input on or off.
- Click
Execute.
- Click on
-
Test archiving a feature flag:
- Click on
Archive Feature Flag. - Select an existing feature flag.
- Click
Execute.
- Click on
Visualize metrics
With your feature flags synced and actions configured, we can create a dedicated dashboard in Port to monitor and manage LaunchDarkly feature flags using customizable widgets. In addition, you can trigger flag management actions directly from the dashboard.
Create a dashboard
-
Navigate to your context lake.
-
Click on the
+button in the left sidebar. -
Select New dashboard.
-
Name the dashboard LaunchDarkly Feature Flags.
-
Input
Monitor and manage LaunchDarkly feature flagsunder Description. -
Select the
Launchdarklyicon. -
Click
Create.
We now have a blank dashboard where we can start adding widgets to visualize insights from our LaunchDarkly feature flags.
Add widgets
In the new dashboard, create the following widgets:
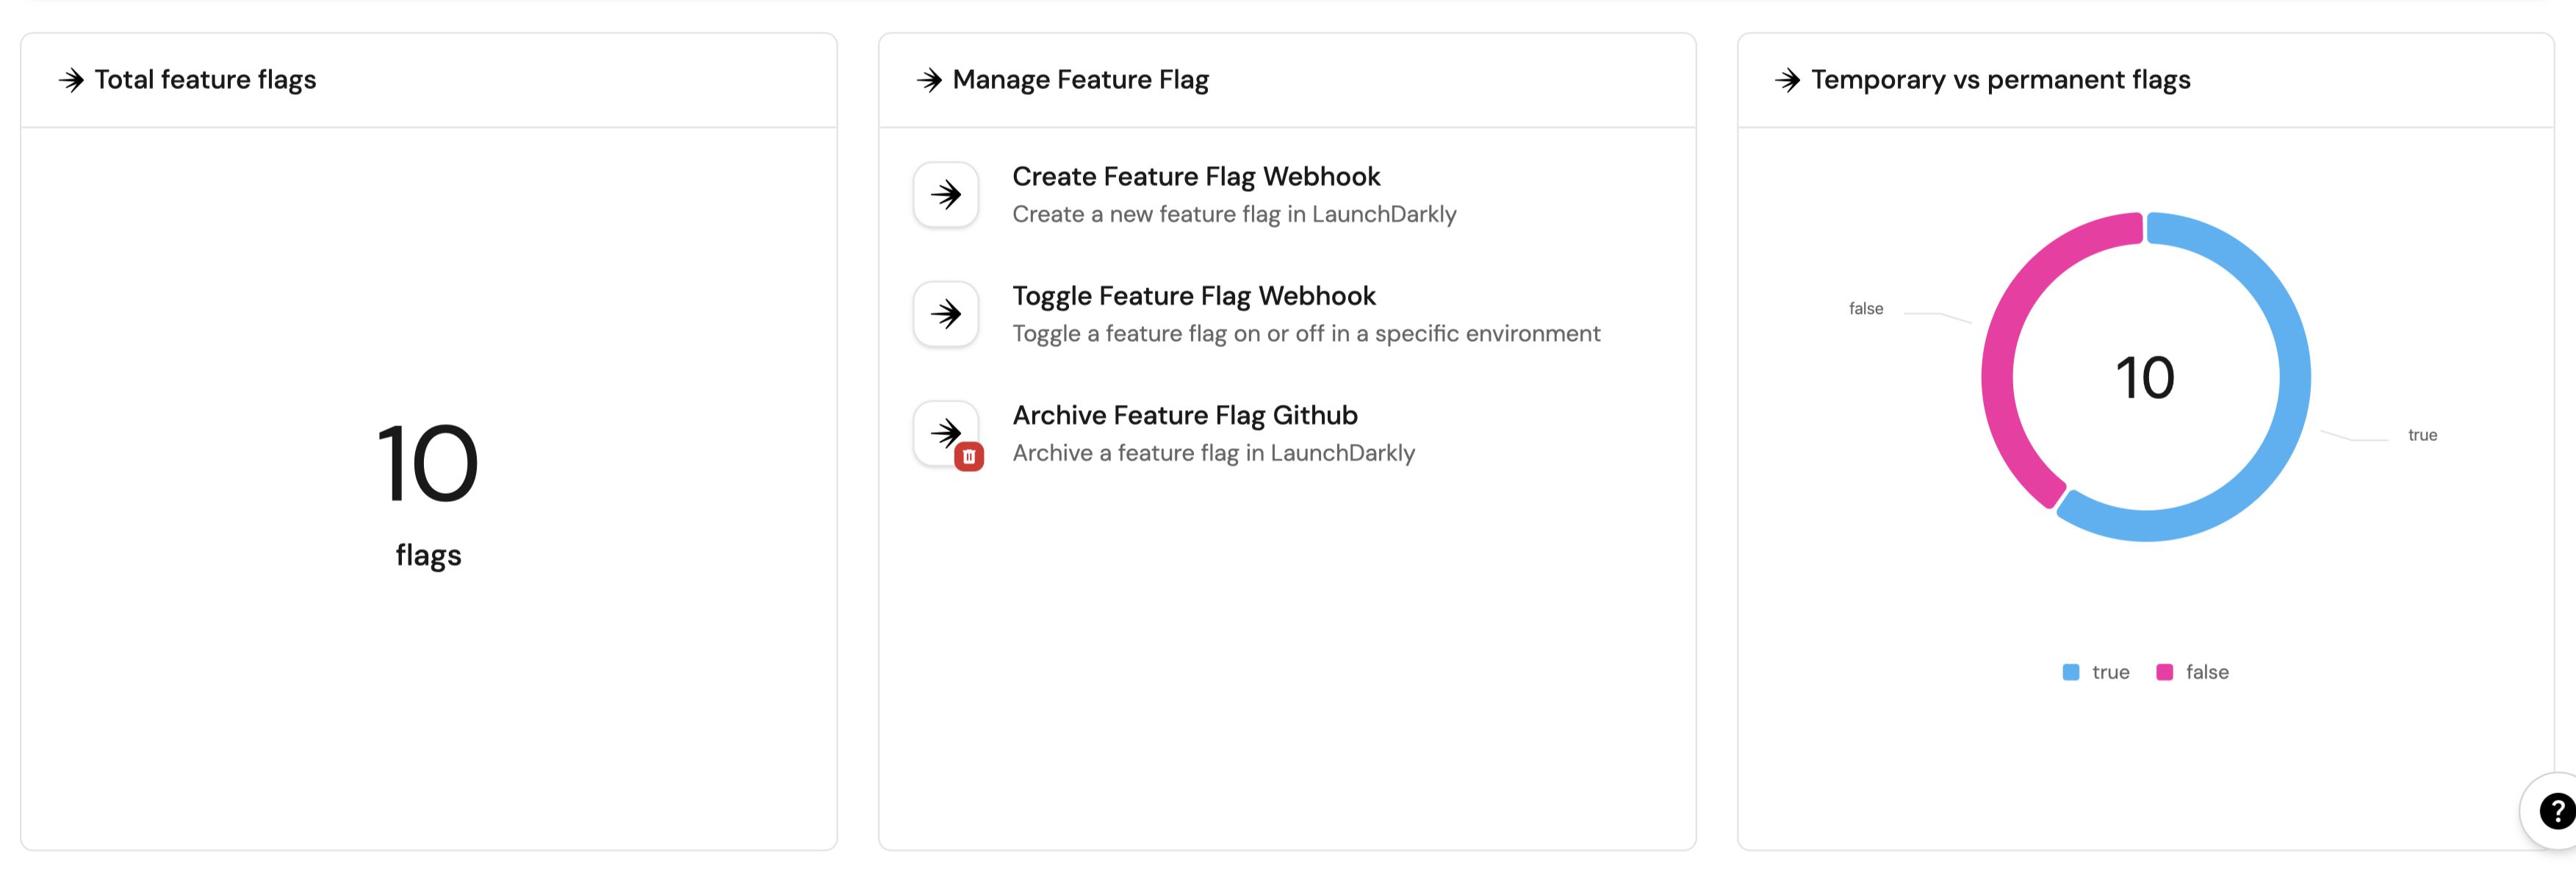
Total feature flags (click to expand)
-
Click
+ Widgetand select Number Chart. -
Title:
Total feature flags(add theLaunchdarklyicon). -
Select
Count entitiesChart type and choose LaunchDarkly Feature Flag as the Blueprint. -
Select
countfor the Function. -
Select
customas the Unit and inputflagsas the Custom unit. -
Click
Save.
Create feature flag action (click to expand)
-
Click
+ Widgetand select Action card. -
Choose the Create Feature Flag, Toggle Feature Flag, and Archive Feature Flag actions we created in this guide.
-
Title:
Manage Feature Flags(add theLaunchdarklyicon). -
Click
Save.
Feature flags table (click to expand)
-
Click
+ Widgetand select Table. -
Title the widget All Feature Flags.
-
Choose the LaunchDarkly Feature Flag blueprint.
-
Click
Saveto add the widget to the dashboard. -
Click on the
...button in the top right corner of the table and select Customize table. -
In the top right corner of the table, click on
Manage Propertiesand add the following properties:- Title: The name of each feature flag.
- Description: What the flag controls.
- Temporary Flag: Whether the flag is temporary.
- Archived: Whether the flag is archived.
- Tags: Tags associated with the flag.
- Project: The related LaunchDarkly project.
-
Click on the save icon in the top right corner of the widget to save the customized table.
Temporary vs permanent flags (click to expand)
-
Click
+ Widgetand select Pie chart. -
Title:
Temporary vs permanent flags(add theLaunchdarklyicon). -
Choose the LaunchDarkly Feature Flag blueprint.
-
Under
Breakdown by property, select Temporary Flag property. -
Click
Save.
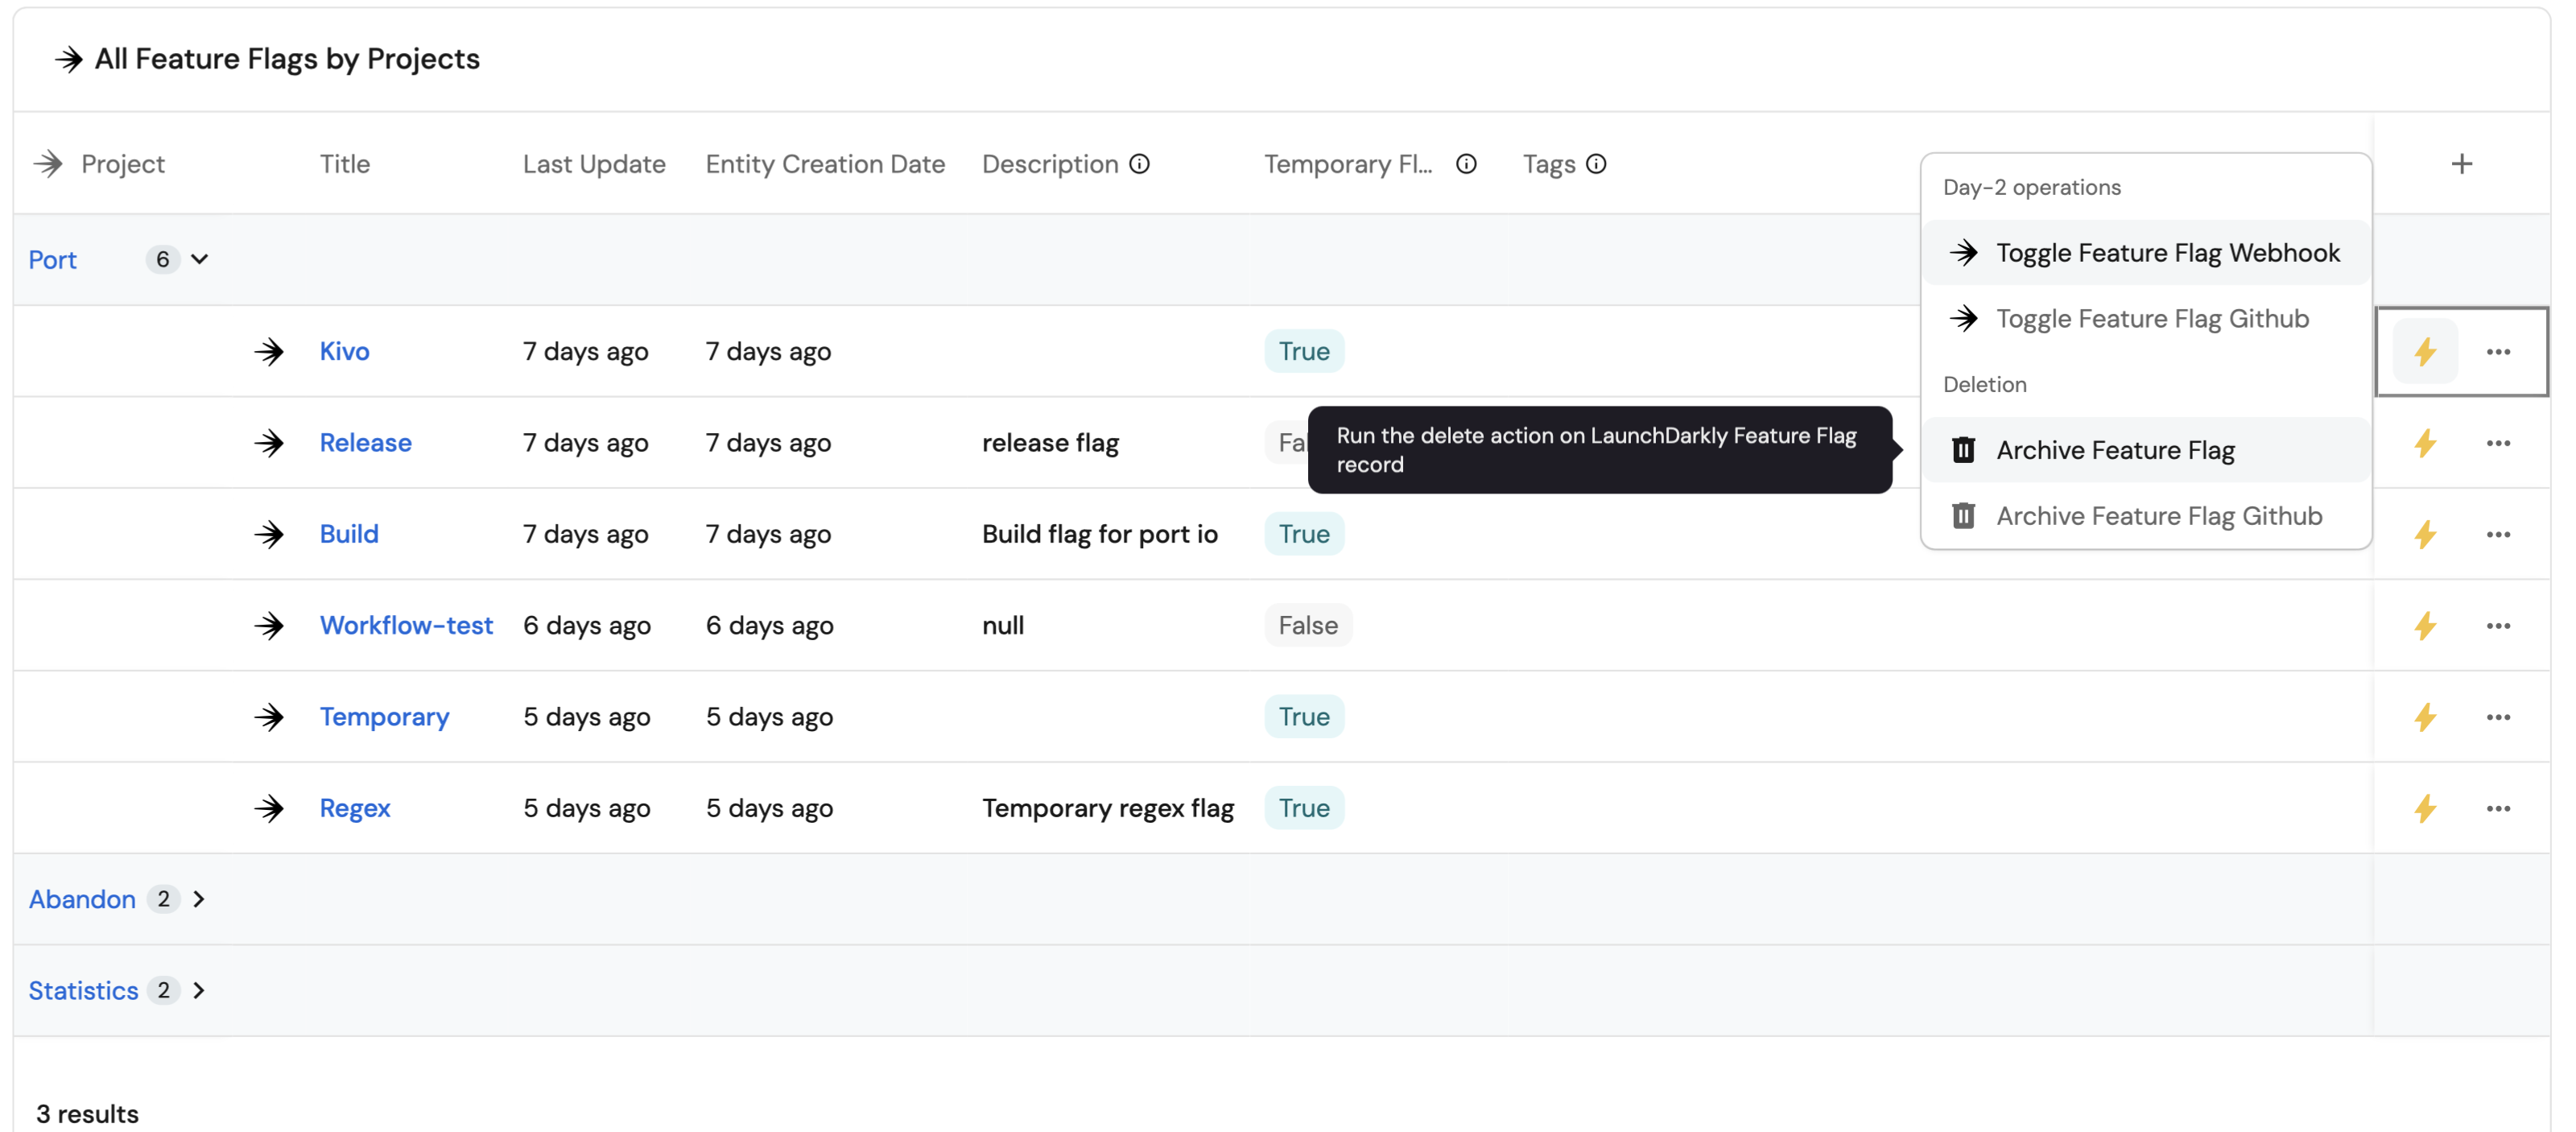
Feature flags table (click to expand)
-
Click
+ Widgetand select Table. -
Title the widget All Feature Flags by Project.
-
Choose the LaunchDarkly Feature Flag blueprint.
-
Click
Saveto add the widget to the dashboard. -
Click on the
...button in the top right corner of the table and select Customize table. -
In the top right corner of the table, click on
Manage Propertiesand add the following properties:- Title: The name of each feature flag.
- Description: What the flag controls.
- Temporary Flag: Whether the flag is temporary.
- Archived: Whether the flag is archived.
- Tags: Tags associated with the flag.
- Project: The related LaunchDarkly project.
-
Under the
Group bysection, select Project property. -
Click on the save icon in the top right corner of the widget to save the customized table.