Manage and visualize your Jira issues
This guide demonstrates how to bring your Jira issue management experience into Port.
In this guide, we will:
- Ingest Jira project and issue data into Port's context lake using Port's Jira integration.
- Set up self-service actions to create issues, add service-specific labels, change status, change assignee, and add comments.
- Build dashboards in Port to monitor and act on issues.
Common use cases
- Monitor the status and health of all Jira issues from a centralized dashboard.
- Empower teams to manage tickets and perform day-2 operations via self-service actions.
- Create Jira issues from repository or service pages and label them with catalog context.
- Track high-priority bugs and their resolution progress.
Prerequisites
This guide assumes the following:
- You have a Port account and have completed the onboarding process.
- Port's Jira integration is installed in your account.
- The Jira integration has created the
jiraIssue,jiraProject, andjiraUserblueprints in Port. - For the automatic label workflow, Port's GitHub Ocean integration is installed and repository entities are synced into Port.
Set up self-service actions
We will create self-service actions in Port to directly interact with the Jira REST API. These actions let users:
-
Create a new issue.
-
Create an issue with an automatic repository label.
-
Change an issue's status.
-
Change an issue's assignee.
-
Add comments to an issue.
Each action will be configured via JSON and triggered using synced webhooks secured with secrets. To implement these use-cases, follow the steps below:
Add Port secrets
To add a secret to Port:
-
Open the Credentials modal.
-
Click on the
Secretstab. -
Click on
+ Secretand add the following secret:-
JIRA_AUTH- Base64 encoded string of your Jira credentials. Generate this by running:echo -n "your-email@domain.com:your-api-token" | base64Replace
your-email@domain.comwith your Jira email andyour-api-tokenwith your Jira API token.One time generationThe base64 encoded string only needs to be generated once and will work for all webhook calls until you change your API token.
-
Create a new issue
-
Go to the Self-service page in Port.
-
Click on the
+ New Actionbutton. -
Click on the
{...} Edit JSONbutton. -
Copy and paste the following JSON configuration into the editor.
Create Jira issue action (click to expand)
Configure your Jira environmentReplace
<JIRA_ORGANIZATION_URL>in the webhook URL with your Jira organization URL (e.g.,example.atlassian.net).{"identifier": "create_jira_issue","title": "Create Jira Issue","icon": "Jira","description": "Create a new Jira issue in the specified project","trigger": {"type": "self-service","operation": "CREATE","userInputs": {"properties": {"title": {"type": "string","title": "Title"},"description": {"type": "string","title": "Description"},"project": {"type": "string","title": "Project","blueprint": "jiraProject","format": "entity"},"issue_type": {"type": "string","title": "Issue Type","default": "Task","enum": ["Task","Story","Bug","Epic"],"enumColors": {"Task": "blue","Story": "green","Bug": "red","Epic": "purple"}}},"required": ["title","description","project","issue_type"],"order": ["title","description","project","issue_type"]}},"invocationMethod": {"type": "WEBHOOK","url": "https://<JIRA_ORGANIZATION_URL>/rest/api/3/issue","agent": false,"synchronized": true,"method": "POST","headers": {"Authorization": "Basic {{.secrets.JIRA_AUTH}}","Content-Type": "application/json"},"body": {"fields": {"project": {"key": "{{.inputs.project.identifier}}"},"summary": "{{.inputs.title}}","description": {"version": 1,"type": "doc","content": [{"type": "paragraph","content": [{"type": "text","text": "{{.inputs.description}}"}]},{"type": "paragraph","content": [{"type": "text","text": "Reported by: {{.trigger.by.user.email}}"}]}]},"issuetype": {"name": "{{.inputs.issue_type}}"},"labels": ["port-ssa"]}}},"requiredApproval": false} -
Click Save to create the action.
Create an issue with an automatic repository label
Use this action when you want to create a Jira issue from a repository entity and add a label that links the issue back to that repository in Port. The label format is port-<repository-identifier>.
- Synced webhook
- GitHub workflow
The synced webhook path creates the Jira issue from Port, then uses an automation to add the repository label after Jira returns the created issue ID.
Set up self-service action
Follow the steps below to create a self-service action that opens the Jira issue.
-
Go to the Self-service page in Port.
-
Click on the
+ New Actionbutton. -
Click on the
{...} Edit JSONbutton. -
Copy and paste the following JSON configuration into the editor:
Create Jira issue with repository label action (click to expand)
Configure your Jira environmentReplace
<JIRA_ORGANIZATION_URL>in the webhook URL with your Jira organization URL (e.g.,example.atlassian.net).{"identifier": "service_create_jira_issue_webhook","title": "Open Jira issue with automatic label","icon": "Jira","description": "Create a Jira issue and label it with the source repository","trigger": {"type": "self-service","operation": "DAY-2","userInputs": {"properties": {"title": {"title": "Title","description": "Title of the Jira issue","icon": "Jira","type": "string"},"type": {"title": "Type","description": "Issue type","icon": "Jira","type": "string","default": "Task","enum": ["Task","Story","Bug","Epic"],"enumColors": {"Task": "blue","Story": "green","Bug": "red","Epic": "pink"}},"project": {"title": "Project","description": "The Jira project where the issue will be created","icon": "Jira","type": "string","blueprint": "jiraProject","format": "entity"}},"required": ["title","type","project"],"order": ["title","type","project"]},"blueprintIdentifier": "githubRepository"},"invocationMethod": {"type": "WEBHOOK","url": "https://<JIRA_ORGANIZATION_URL>/rest/api/3/issue","agent": false,"synchronized": true,"method": "POST","headers": {"Authorization": "Basic {{.secrets.JIRA_AUTH}}","Content-Type": "application/json"},"body": {"fields": {"project": {"key": "{{.inputs.project.identifier}}"},"summary": "{{.inputs.title}}","issuetype": {"name": "{{.inputs.type}}"}}}},"requiredApproval": false} -
Click Save to create the action.
Create automation
The automation below runs after the action succeeds and adds the port-<repository-identifier> label to the new Jira issue.
-
Go to the Automations page in Port.
-
Click on the
+ Automationbutton. -
Copy and paste the following JSON configuration into the editor.
Update Jira issue labels automation (click to expand)
Configure your Jira environmentReplace
<JIRA_ORGANIZATION_URL>in the webhook URL with your Jira organization URL (e.g.,example.atlassian.net).{"identifier": "jiraIssue_add_service_label","title": "Add repository label to Jira issue","description": "Add a repository-specific label to the newly created Jira issue","trigger": {"type": "automation","event": {"type": "RUN_UPDATED","actionIdentifier": "service_create_jira_issue_webhook"},"condition": {"type": "JQ","expressions": [".diff.after.status == \"SUCCESS\""],"combinator": "and"}},"invocationMethod": {"type": "WEBHOOK","url": "https://<JIRA_ORGANIZATION_URL>/rest/api/3/issue/{{.event.diff.after.response.id}}/","agent": false,"synchronized": true,"method": "PUT","headers": {"Authorization": "Basic {{.secrets.JIRA_AUTH}}","Content-Type": "application/json"},"body": {"fields": {"labels": ["port-{{.event.diff.after.entity.identifier}}"]}}},"publish": true} -
Click Save to create the automation.
The GitHub workflow path creates the Jira issue in GitHub Actions and writes the repository label during issue creation.
Add GitHub secrets
In your GitHub repository, go to Settings > Secrets and add the following secrets:
JIRA_API_TOKEN- A Jira API token with permissions to create issues.JIRA_BASE_URL- The URL of your Jira organization. For example,https://your-organization.atlassian.net.JIRA_USER_EMAIL- The email of the Jira user that owns the Jira API token.PORT_CLIENT_ID- Your Port client ID. See find your Port credentials.PORT_CLIENT_SECRET- Your Port client secret. See find your Port credentials.
Create the GitHub workflow
Create .github/workflows/open-jira-issue-with-automatic-label.yml in the .github/workflows folder of your repository.
We recommend creating a dedicated repository for the workflows that are used by Port actions.
Open Jira issue with automatic label workflow (click to expand)
name: Open Jira issue with automatic label
on:
  workflow_dispatch:
    inputs:
      title:
        required: true
        type: string
      type:
        required: true
        type: string
      project:
        required: true
        type: string
      port_context:
        required: true
        type: string

jobs:
  create-jira-issue:
    runs-on: ubuntu-latest
    steps:
      - name: Login
        uses: atlassian/gajira-login@v3
        env:
          JIRA_BASE_URL: ${{ secrets.JIRA_BASE_URL }}
          JIRA_USER_EMAIL: ${{ secrets.JIRA_USER_EMAIL }}
          JIRA_API_TOKEN: ${{ secrets.JIRA_API_TOKEN }}

      - name: Report issue creation start
        uses: port-labs/port-github-action@v1
        with:
          clientId: ${{ secrets.PORT_CLIENT_ID }}
          clientSecret: ${{ secrets.PORT_CLIENT_SECRET }}
          operation: PATCH_RUN
          runId: ${{ fromJson(inputs.port_context).run_id }}
          logMessage: Creating a new Jira issue with an automatic label.

      - name: Create Jira issue
        id: create
        uses: atlassian/gajira-create@v3
        with:
          project: ${{ inputs.project }}
          issuetype: ${{ inputs.type }}
          summary: ${{ inputs.title }}
          fields: |
            ${{ fromJson(inputs.port_context).entity != null
              && format('{{ "labels": ["port-{0}"] }}', fromJson(inputs.port_context).entity)
              || '{}'
            }}

      - name: Report issue creation success
        uses: port-labs/port-github-action@v1
        with:
          clientId: ${{ secrets.PORT_CLIENT_ID }}
          clientSecret: ${{ secrets.PORT_CLIENT_SECRET }}
          operation: PATCH_RUN
          link: ${{ secrets.JIRA_BASE_URL }}/browse/${{ steps.create.outputs.issue }}
          runId: ${{ fromJson(inputs.port_context).run_id }}
          logMessage: |
            Jira issue created.
            The issue ID is: ${{ steps.create.outputs.issue }}
Set up Jira issue with automatic label self-service action
Follow the steps below to create a self-service action that triggers the GitHub workflow.
-
Go to the Self-service page in Port.
-
Click on the
+ New Actionbutton. -
Click on the
{...} Edit JSONbutton. -
Copy and paste the following JSON configuration into the editor:
Open Jira issue with automatic label action (click to expand)
Modification RequiredMake sure to replace
<GITHUB_ORG>and<GITHUB_REPO>with your GitHub organization and repository names respectively.Replace the variables<GITHUB_ORG>- Your GitHub organization or user name.<GITHUB_REPO>- Your GitHub repository name.<YOUR_GITHUB_OCEAN_INTEGRATION_ID>- Your GitHub Ocean integration installation ID.
{"identifier": "service_open_jira_issue_with_automatic_label","title": "Open Jira issue with automatic label","icon": "Jira","description": "Create a Jira issue with a label that links it to the source repository","trigger": {"type": "self-service","operation": "DAY-2","userInputs": {"properties": {"title": {"title": "Title","description": "Title of the Jira issue","icon": "Jira","type": "string"},"type": {"title": "Type","description": "Issue type","icon": "Jira","type": "string","default": "Task","enum": ["Task","Story","Bug","Epic"],"enumColors": {"Task": "blue","Story": "green","Bug": "red","Epic": "pink"}},"project": {"title": "Project","description": "The Jira project where the issue will be created","icon": "Jira","type": "string","blueprint": "jiraProject","format": "entity"}},"required": ["title","type","project"],"order": ["title","type","project"]},"blueprintIdentifier": "githubRepository"},"invocationMethod": {"type": "INTEGRATION_ACTION","installationId": "<YOUR_GITHUB_OCEAN_INTEGRATION_ID>","integrationActionType": "dispatch_workflow","integrationActionExecutionProperties": {"org": "<GITHUB_ORG>","repo": "<GITHUB_REPO>","workflow": "open-jira-issue-with-automatic-label.yml","workflowInputs": {"title": "{{.inputs.\"title\"}}","type": "{{.inputs.\"type\"}}","project": "{{.inputs.\"project\" | if type == \"array\" then map(.identifier) else .identifier end}}","port_context": {"entity": "{{.entity.identifier}}","run_id": "{{.run.id}}"}},"reportWorkflowStatus": true}},"requiredApproval": false} -
Click Save to create the action.
Change issue status
-
Go to the Self-service page in Port.
-
Click on the
+ New Actionbutton. -
Click on the
{...} Edit JSONbutton. -
Copy and paste the following JSON configuration into the editor.
Change Jira issue status action (click to expand)
Configure your Jira environmentReplace
<JIRA_ORGANIZATION_URL>in the webhook URL with your Jira organization URL (e.g.,example.atlassian.net).{"identifier": "change_jira_issue_status","title": "Change Issue Status","icon": "Jira","description": "Update a Jira ticket's status using a synced webhook","trigger": {"type": "self-service","operation": "DAY-2","userInputs": {"properties": {"status": {"icon": "DefaultProperty","title": "Status","type": "string","description": "Select the status to transition the issue to","enum": ["To Do","In Progress","Done","Code Review","Product Review","Waiting For Prod"],"enumColors": {"To Do": "lightGray","In Progress": "bronze","Done": "green","Code Review": "darkGray","Product Review": "purple","Waiting For Prod": "orange"}}},"required": ["status"],"order": ["status"]},"blueprintIdentifier": "jiraIssue"},"invocationMethod": {"type": "WEBHOOK","url": "https://<JIRA_ORGANIZATION_URL>/rest/api/3/issue/{{.entity.identifier}}/transitions","agent": false,"synchronized": true,"method": "POST","headers": {"Authorization": "Basic {{.secrets.JIRA_AUTH}}","Content-Type": "application/json"},"body": {"transition": {"{{ if .inputs.status == 'To Do' then 'id' else 'none' end }}": 11,"{{ if .inputs.status == 'In Progress' then 'id' else 'none' end }}": 21,"{{ if .inputs.status == 'Done' then 'id' else 'none' end }}": 31,"{{ if .inputs.status == 'Code Review' then 'id' else 'none' end }}": 41,"{{ if .inputs.status == 'Product Review' then 'id' else 'none' end }}": 51,"{{ if .inputs.status == 'Waiting For Prod' then 'id' else 'none' end }}": 61}}},"requiredApproval": false} -
Click Save to create the action.
Replace <JIRA_ORGANIZATION_URL> in the webhook URL with your Jira organization URL (e.g., example.atlassian.net).
Make sure the status names are mapped to your Jira workflow's transition IDs. You can find the available transition IDs by running:
curl -X GET "https://example.atlassian.net/rest/api/3/issue/{issueKey}/transitions" \
  -H "Authorization: Basic $JIRA_AUTH" \
  -H "Content-Type: application/json"
The response contains an array of transitions, each with an id and a name you can use in the action configuration.
Change issue assignee
-
Go to the Self-service page in Port.
-
Click on the
+ New Actionbutton. -
Click on the
{...} Edit JSONbutton. -
Copy and paste the following JSON configuration into the editor.
Change Jira issue assignee action (click to expand)
Configure your Jira environmentReplace
<JIRA_ORGANIZATION_URL>in the webhook URL with your Jira organization URL (e.g.,example.atlassian.net).{"identifier": "jiraIssue_change_assignee_webhook","title": "Change Jira Issue Assignee","icon": "Jira","description": "Update a Jira issue's assignee using a synced webhook","trigger": {"type": "self-service","operation": "DAY-2","userInputs": {"properties": {"jira_user": {"type": "string","title": "Jira user","description": "Select the Jira user to assign the issue to","blueprint": "jiraUser","format": "entity"}},"required": ["jira_user"],"order": ["jira_user"]},"blueprintIdentifier": "jiraIssue"},"invocationMethod": {"type": "WEBHOOK","url": "https://<JIRA_ORGANIZATION_URL>/rest/api/3/issue/{{.entity.identifier}}/assignee","agent": false,"synchronized": true,"method": "PUT","headers": {"Authorization": "Basic {{.secrets.JIRA_AUTH}}","Content-Type": "application/json"},"body": {"accountId": "{{.inputs.jira_user.identifier}}"}},"requiredApproval": false} -
Click Save to create the action.
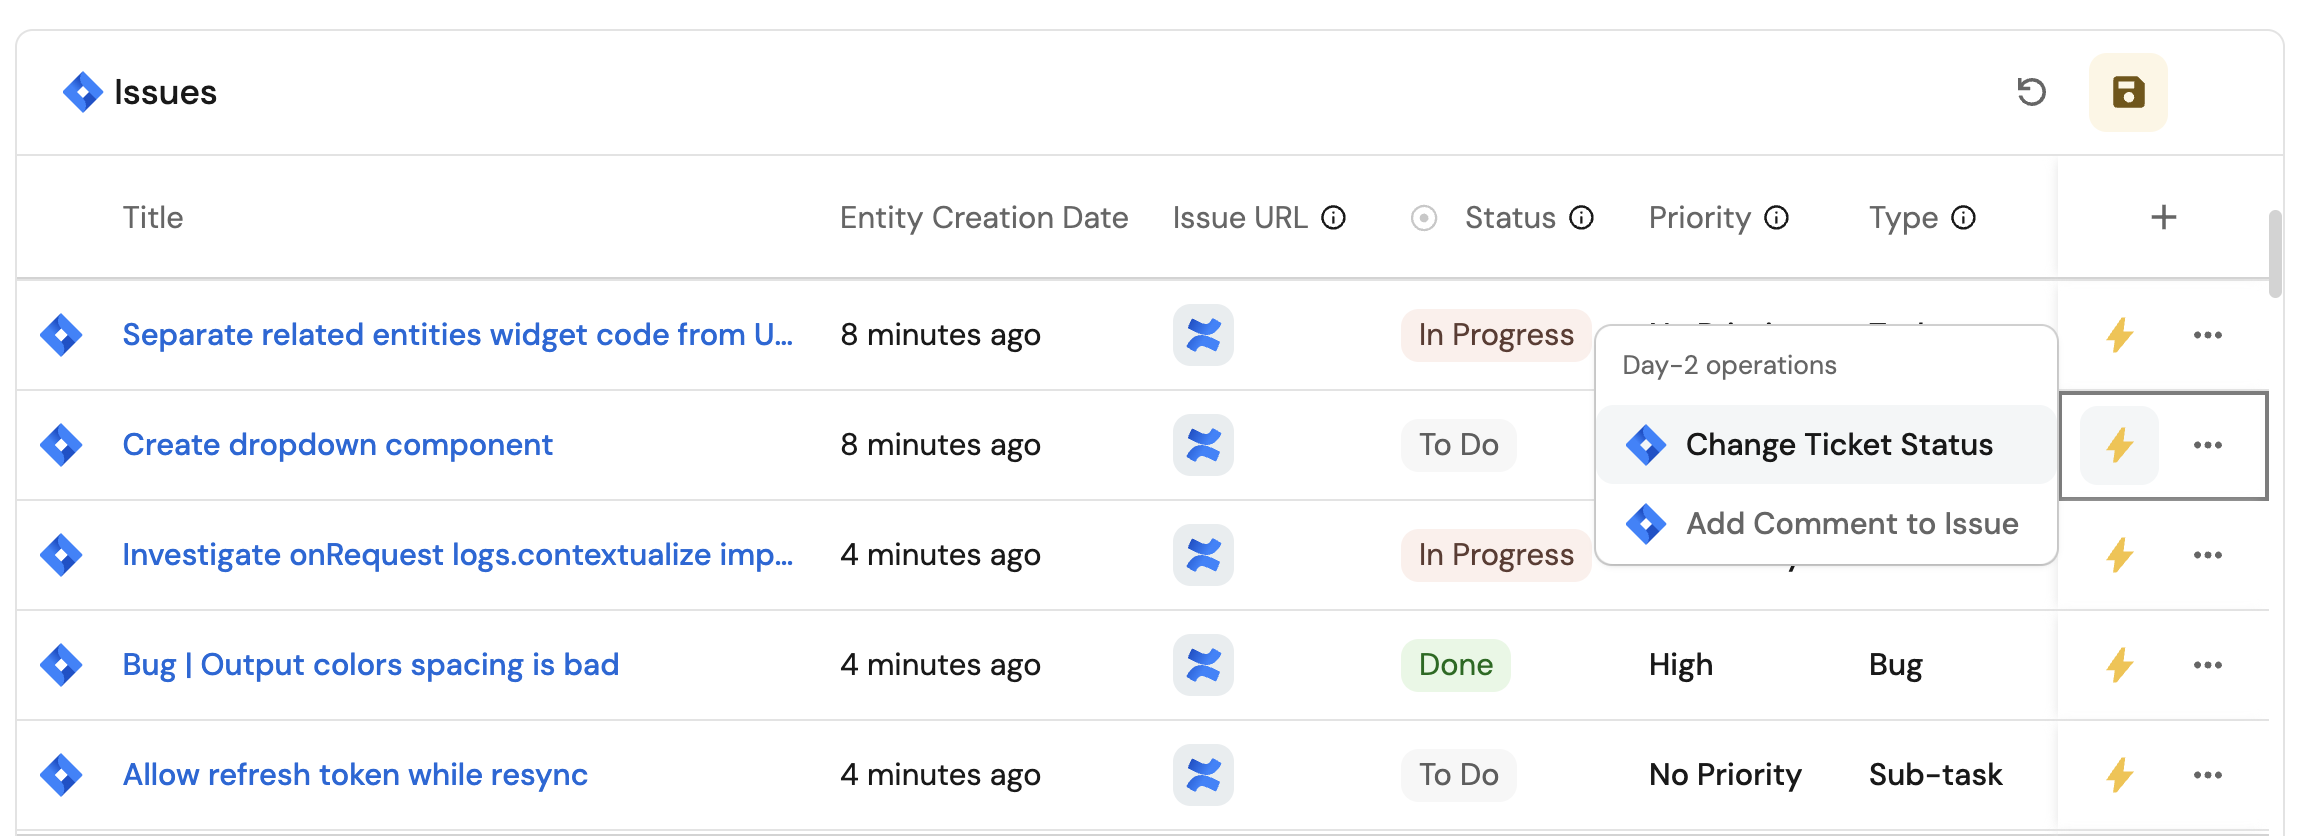
Now you should see the Change Jira issue assignee action in the self-service page.
Change issue status and assignee with a GitHub workflow
Use this optional path when you want to manage the status and assignee updates in GitHub Actions instead of calling Jira directly from Port.
Add GitHub secrets
In your GitHub repository, go to Settings > Secrets and add the following secrets:
JIRA_API_TOKEN- A Jira API token with permissions to manage issues.JIRA_BASE_URL- The URL of your Jira organization. For example,https://your-organization.atlassian.net.JIRA_USER_EMAIL- The email of the Jira user that owns the Jira API token.PORT_CLIENT_ID- Your Port client ID. See find your Port credentials.PORT_CLIENT_SECRET- Your Port client secret. See find your Port credentials.
Create the GitHub workflow
Create .github/workflows/change-jira-ticket-status-and-assignee.yml in the .github/workflows folder of your repository.
We recommend creating a dedicated repository for the workflows that are used by Port actions.
Change Jira issue status and assignee workflow (click to expand)
name: Change Jira issue status and assignee
on:
  workflow_dispatch:
    inputs:
      status:
        type: string
        required: false
      assignee:
        type: string
        required: false
      port_context:
        required: true
        type: string

jobs:
  change-jira-issue-status-and-assignee:
    runs-on: ubuntu-latest
    outputs:
      selected_user_id: ${{ steps.user_list_from_search.outputs.selected_user_id }}
      selected_user_name: ${{ steps.user_list_from_search.outputs.selected_user_name }}

    steps:
      - name: Login
        uses: atlassian/gajira-login@v3
        env:
          JIRA_BASE_URL: ${{ secrets.JIRA_BASE_URL }}
          JIRA_USER_EMAIL: ${{ secrets.JIRA_USER_EMAIL }}
          JIRA_API_TOKEN: ${{ secrets.JIRA_API_TOKEN }}

      - name: Report status update start
        id: inform_ticket_start
        if: ${{ inputs.status }}
        uses: port-labs/port-github-action@v1
        with:
          clientId: ${{ secrets.PORT_CLIENT_ID }}
          clientSecret: ${{ secrets.PORT_CLIENT_SECRET }}
          operation: PATCH_RUN
          runId: ${{ fromJson(inputs.port_context).run_id }}
          logMessage: Changing the Jira issue status.

      - name: Report skipped status update
        id: inform_skip_ticket_status
        if: steps.inform_ticket_start.outcome == 'skipped'
        uses: port-labs/port-github-action@v1
        with:
          clientId: ${{ secrets.PORT_CLIENT_ID }}
          clientSecret: ${{ secrets.PORT_CLIENT_SECRET }}
          operation: PATCH_RUN
          runId: ${{ fromJson(inputs.port_context).run_id }}
          logMessage: Status field is blank, skipping status change.

      - name: Transition issue
        id: transition_issue_status
        if: steps.inform_ticket_start.outcome == 'success'
        uses: atlassian/gajira-transition@v3
        with:
          issue: ${{ fromJson(inputs.port_context).entity }}
          transition: ${{ inputs.status }}

      - name: Report status update success
        if: steps.transition_issue_status.outcome == 'success'
        uses: port-labs/port-github-action@v1
        with:
          clientId: ${{ secrets.PORT_CLIENT_ID }}
          clientSecret: ${{ secrets.PORT_CLIENT_SECRET }}
          operation: PATCH_RUN
          link: ${{ secrets.JIRA_BASE_URL }}/browse/${{ fromJson(inputs.port_context).entity }}
          runId: ${{ fromJson(inputs.port_context).run_id }}
          logMessage: Jira issue status changed to ${{ inputs.status }}.

      - name: Report assignee update start
        id: inform_assignee_start
        if: ${{ inputs.assignee }}
        uses: port-labs/port-github-action@v1
        with:
          clientId: ${{ secrets.PORT_CLIENT_ID }}
          clientSecret: ${{ secrets.PORT_CLIENT_SECRET }}
          operation: PATCH_RUN
          runId: ${{ fromJson(inputs.port_context).run_id }}
          logMessage: Assigning the Jira issue to a user.

      - name: Report skipped assignee update
        id: inform_skip_assignee
        if: steps.inform_assignee_start.outcome == 'skipped'
        uses: port-labs/port-github-action@v1
        with:
          clientId: ${{ secrets.PORT_CLIENT_ID }}
          clientSecret: ${{ secrets.PORT_CLIENT_SECRET }}
          operation: PATCH_RUN
          runId: ${{ fromJson(inputs.port_context).run_id }}
          logMessage: Assignee field is blank, skipping assignment.

      - name: Report user search
        if: steps.inform_skip_assignee.outcome == 'skipped'
        uses: port-labs/port-github-action@v1
        with:
          clientId: ${{ secrets.PORT_CLIENT_ID }}
          clientSecret: ${{ secrets.PORT_CLIENT_SECRET }}
          operation: PATCH_RUN
          runId: ${{ fromJson(inputs.port_context).run_id }}
          logMessage: Searching for the Jira user.

      - name: Search for assignee
        id: search_for_assignee
        if: steps.inform_skip_assignee.outcome == 'skipped'
        uses: fjogeleit/http-request-action@v1
        with:
          url: "${{ secrets.JIRA_BASE_URL }}/rest/api/3/user/search?query=${{ inputs.assignee }}"
          method: "GET"
          username: ${{ secrets.JIRA_USER_EMAIL }}
          password: ${{ secrets.JIRA_API_TOKEN }}
          customHeaders: '{"Content-Type": "application/json"}'

      - name: Install jq
        if: steps.search_for_assignee.outcome == 'success'
        run: sudo apt-get install jq

      - name: Retrieve user from search
        id: user_list_from_search
        if: steps.search_for_assignee.outcome == 'success'
        run: |
          selected_user_id=$(echo '${{ steps.search_for_assignee.outputs.response }}' | jq -r 'if length > 0 then .[0].accountId else "empty" end')
          selected_user_name=$(echo '${{ steps.search_for_assignee.outputs.response }}' | jq -r 'if length > 0 then .[0].displayName else "empty" end')
          echo "selected_user_id=${selected_user_id}" >> $GITHUB_OUTPUT
          echo "selected_user_name=${selected_user_name}" >> $GITHUB_OUTPUT

      - name: Report user found
        if: steps.user_list_from_search.outputs.selected_user_id != 'empty'
        uses: port-labs/port-github-action@v1
        with:
          clientId: ${{ secrets.PORT_CLIENT_ID }}
          clientSecret: ${{ secrets.PORT_CLIENT_SECRET }}
          operation: PATCH_RUN
          runId: ${{ fromJson(inputs.port_context).run_id }}
          logMessage: Assigning the issue to ${{ steps.user_list_from_search.outputs.selected_user_name }}.

      - name: Report user not found
        if: steps.user_list_from_search.outputs.selected_user_id == 'empty'
        uses: port-labs/port-github-action@v1
        with:
          clientId: ${{ secrets.PORT_CLIENT_ID }}
          clientSecret: ${{ secrets.PORT_CLIENT_SECRET }}
          operation: PATCH_RUN
          runId: ${{ fromJson(inputs.port_context).run_id }}
          logMessage: User not found, skipping assignment.

      - name: Assign issue to selected user
        id: assign_ticket
        if: steps.user_list_from_search.outputs.selected_user_id != 'empty'
        uses: fjogeleit/http-request-action@v1
        with:
          url: "${{ secrets.JIRA_BASE_URL }}/rest/api/3/issue/${{ fromJson(inputs.port_context).entity }}/assignee"
          method: "PUT"
          username: ${{ secrets.JIRA_USER_EMAIL }}
          password: ${{ secrets.JIRA_API_TOKEN }}
          customHeaders: '{"Content-Type": "application/json"}'
          data: '{"accountId": "${{ steps.user_list_from_search.outputs.selected_user_id }}"}'

      - name: Report assignment success
        if: steps.assign_ticket.outcome == 'success'
        uses: port-labs/port-github-action@v1
        with:
          clientId: ${{ secrets.PORT_CLIENT_ID }}
          clientSecret: ${{ secrets.PORT_CLIENT_SECRET }}
          operation: PATCH_RUN
          link: ${{ secrets.JIRA_BASE_URL }}/browse/${{ fromJson(inputs.port_context).entity }}
          runId: ${{ fromJson(inputs.port_context).run_id }}
          logMessage: Jira issue assigned to ${{ steps.user_list_from_search.outputs.selected_user_name }}.
Set up Jira issue status and assignee self-service action
Follow the steps below to create a self-service action that triggers the GitHub workflow.
-
Go to the Self-service page in Port.
-
Click on the
+ New Actionbutton. -
Click on the
{...} Edit JSONbutton. -
Copy and paste the following JSON configuration into the editor:
Change Jira issue status and assignee action (click to expand)
Modification RequiredMake sure to replace
<GITHUB_ORG>and<GITHUB_REPO>with your GitHub organization and repository names respectively.Replace the variables<GITHUB_ORG>- Your GitHub organization or user name.<GITHUB_REPO>- Your GitHub repository name.<YOUR_GITHUB_OCEAN_INTEGRATION_ID>- Your GitHub Ocean integration installation ID.
{"identifier": "jiraIssue_change_jira_issue_status_and_assignee","title": "Change Jira issue status and assignee","icon": "Jira","description": "Transition a Jira issue to another status and update its assignee","trigger": {"type": "self-service","operation": "DAY-2","userInputs": {"properties": {"status": {"icon": "DefaultProperty","title": "Status","type": "string","description": "Select the status to transition the issue to","enum": ["To Do","In Progress","Done","Code Review","Product Review","Waiting For Prod"],"enumColors": {"To Do": "lightGray","In Progress": "bronze","Done": "green","Code Review": "darkGray","Product Review": "purple","Waiting For Prod": "orange"}},"assignee": {"type": "string","title": "Assignee","icon": "User","format": "user"}},"required": ["status","assignee"],"order": ["status","assignee"]},"blueprintIdentifier": "jiraIssue"},"invocationMethod": {"type": "INTEGRATION_ACTION","installationId": "<YOUR_GITHUB_OCEAN_INTEGRATION_ID>","integrationActionType": "dispatch_workflow","integrationActionExecutionProperties": {"org": "<GITHUB_ORG>","repo": "<GITHUB_REPO>","workflow": "change-jira-ticket-status-and-assignee.yml","workflowInputs": {"status": "{{.inputs.\"status\"}}","assignee": "{{.inputs.\"assignee\"}}","port_context": {"entity": "{{.entity.identifier}}","run_id": "{{.run.id}}"}},"reportWorkflowStatus": true}},"requiredApproval": false} -
Click Save to create the action.
Add comment to issue
-
Go to the Self-service page in Port.
-
Click on the
+ New Actionbutton. -
Click on the
{...} Edit JSONbutton. -
Copy and paste the following JSON configuration into the editor.
Add Jira issue comment action (click to expand)
Configure your Jira environmentReplace
<JIRA_ORGANIZATION_URL>in the webhook URL with your Jira organization URL (e.g.,example.atlassian.net).{"identifier": "addCommentOnJiraIssue","title": "Add Comment to Issue","icon": "Jira","description": "Add a comment to a Jira issue using a synced webhook","trigger": {"type": "self-service","operation": "DAY-2","userInputs": {"properties": {"comment": {"icon": "DefaultProperty","title": "Comment","type": "string","description": "Enter the comment to add to the Jira issue"}},"required": ["comment"],"order": ["comment"]},"blueprintIdentifier": "jiraIssue"},"invocationMethod": {"type": "WEBHOOK","url": "https://<JIRA_ORGANIZATION_URL>/rest/api/3/issue/{{.entity.identifier}}/comment","agent": false,"synchronized": true,"method": "POST","headers": {"Authorization": "Basic {{.secrets.JIRA_AUTH}}","Content-Type": "application/json"},"body": {"body": {"type": "doc","version": 1,"content": [{"type": "paragraph","content": [{"type": "text","text": "{{.inputs.comment}}"}]}]}}},"requiredApproval": false} -
Click Save to create the action.
Now you should see the Add Comment to Issue action in the self-service page. 🎉
Let's test it!
-
Go to the Self-service page in Port.
-
Select the action you want to test:
- Create Jira Issue to create a standalone Jira issue.
- Open Jira issue with automatic label to create a Jira issue from a repository entity.
- Change Issue Status to transition an existing Jira issue.
- Change Jira issue assignee to assign an existing Jira issue to a Jira user.
- Add Comment to Issue to add a comment to an existing Jira issue.
-
Fill in the action inputs.
-
Click Execute.
-
Check your Jira project to verify the result:
- New issues should appear in the selected Jira project.
- Repository-labeled issues should include a label in the
port-<repository-identifier>format. - Updated issues should show the selected status, assignee, or comment.
Visualize metrics
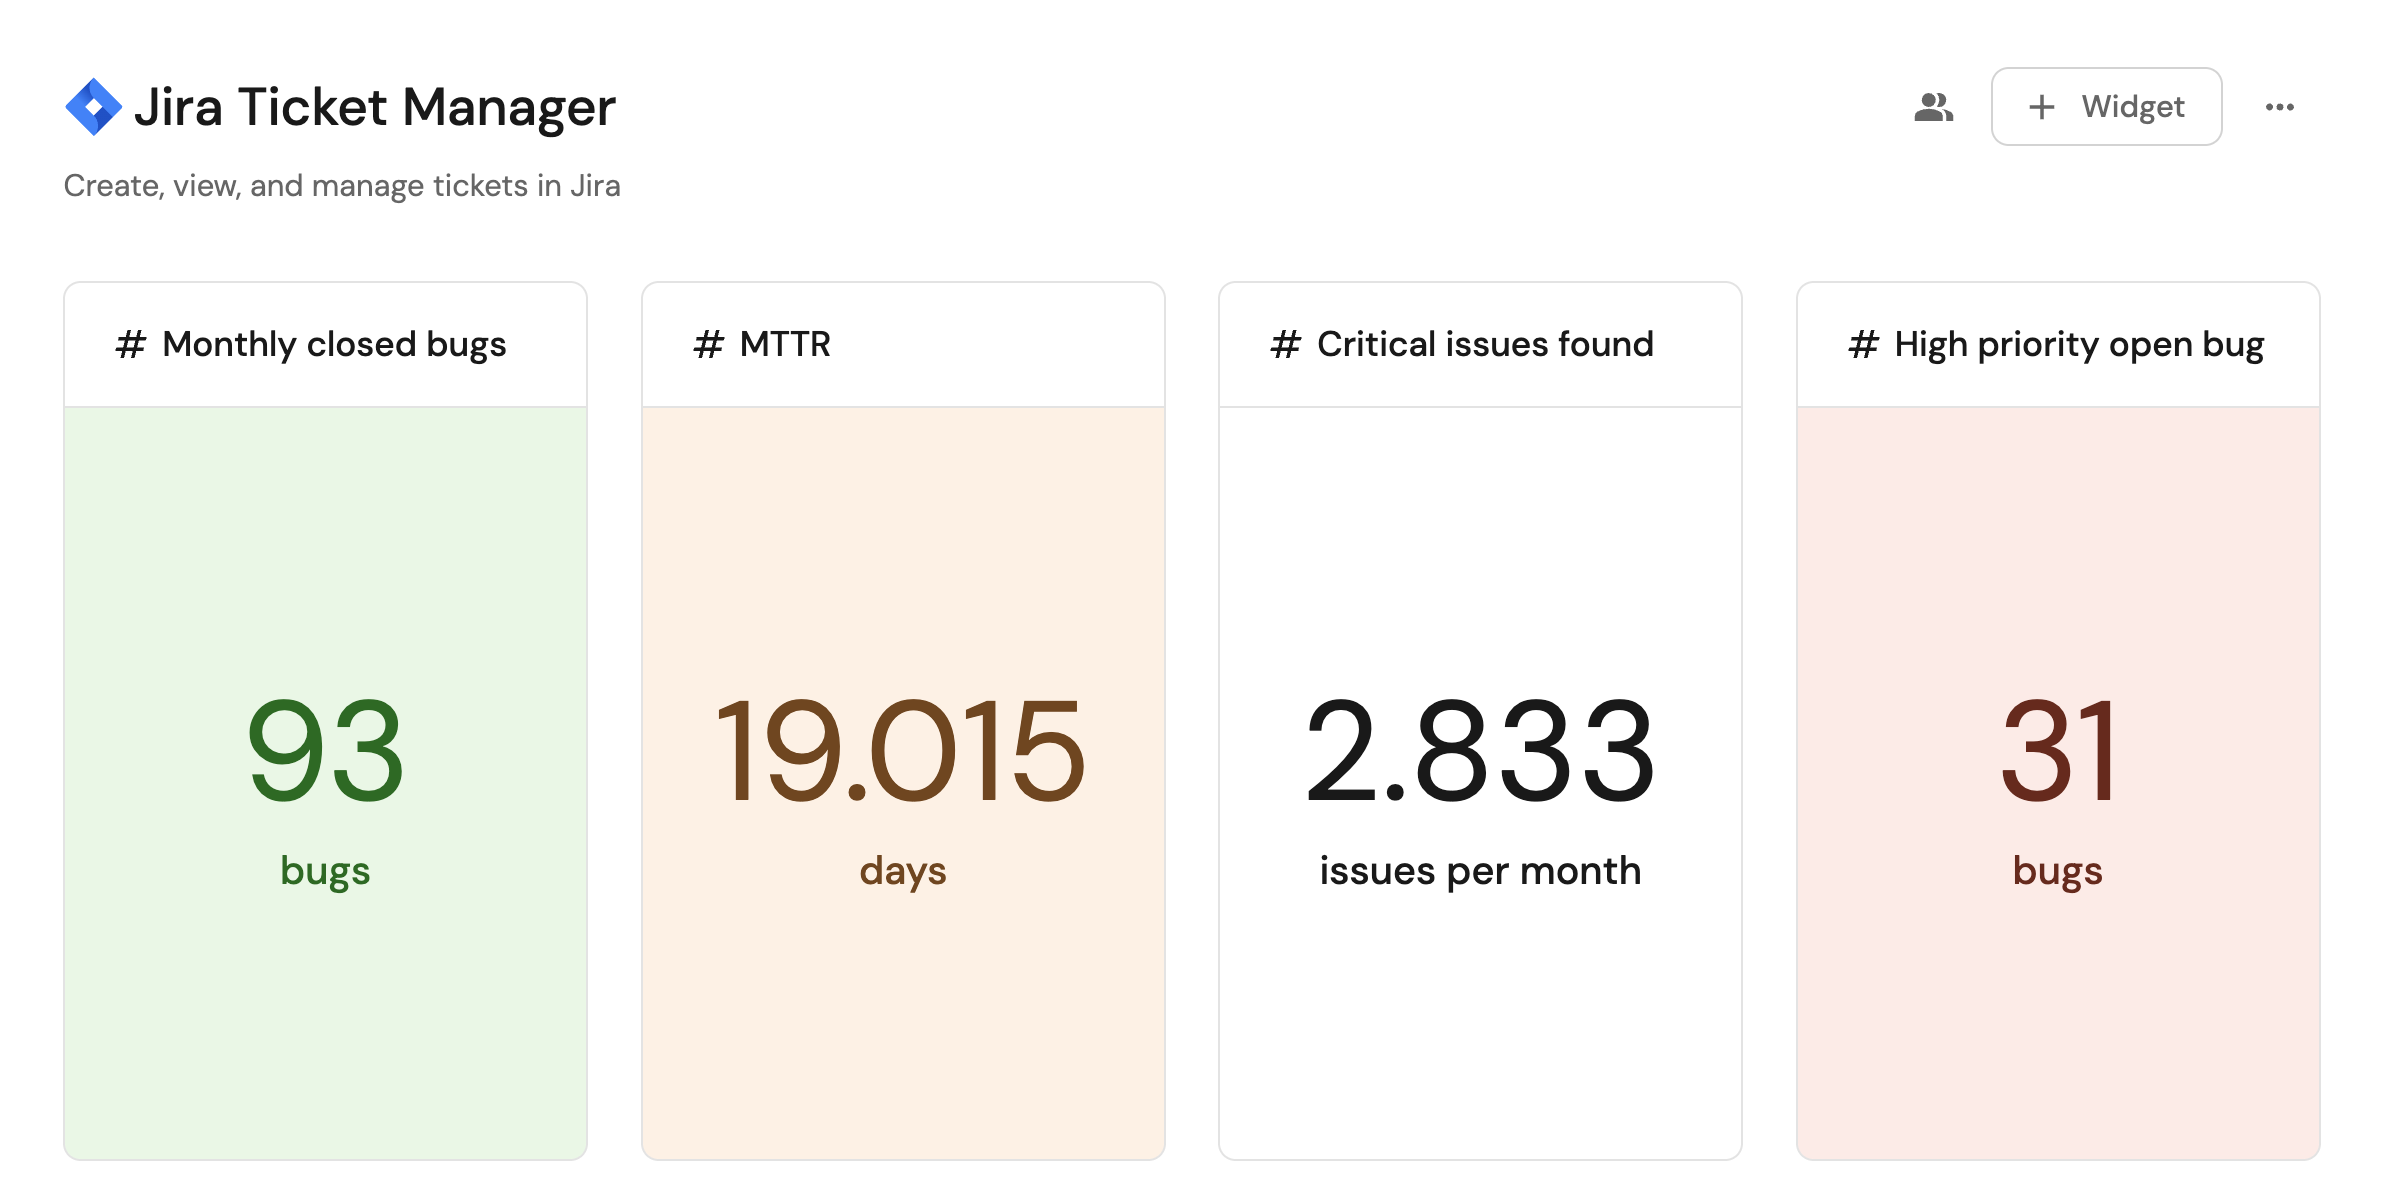
With issues ingested and actions configured, the next step is building a dashboard to monitor Jira data directly in Port. We can visualize key metrics using the following widgets: ticket status distribution, delivery timelines, and high-priority bug tracking. These customizable widgets provide insights into your Jira issues, helping you manage and prioritize effectively.
Create a dashboard
- Navigate to your context lake.
- Click on the
+button in the left sidebar. - Select New dashboard.
- Name the dashboard Jira Issue Management.
- Input
Create, view and manage your Jira issuesunder Description. - Select the
Jiraicon. - Click Create.
We now have a blank dashboard where we can start adding widgets to visualize insights from our Jira issues.
Add widgets
In the new dashboard, create the following widgets:
Average monthly closed bugs (click to expand)
- Click
+ Widgetand select Number Chart. - Title:
Monthly closed bugs(add theJiraicon). - Select
Count entitiesChart type and choose Jira Issue as the Blueprint. - Select
averagefor the Function and choosemonthunder Average of. - Select
resolutionDatefor the Measure time by. - Add this JSON to the Initial filters editor to filter closed bugs in the current month:
[{"combinator":"and","rules":[{"property":"issueType","operator":"=","value": "Bug"},{"property":"status","operator":"=","value": "Done"}]}]
- Select
customas the Unit and inputbugsas the Custom unit. - Click Save.
Mean time to resolve (MTTR) in days (click to expand)
- Click
+ Widgetand select Number Chart. - Title:
Mean time to resolve (MTTR)(add theJiraicon). - Select
Aggregate by propertyChart type and choose Jira Issue as the Blueprint. - Select
Handling Duration (Days)for the Property and choosemedianfor the Function. - Select
customas the Unit and inputdaysas the Custom unit. - Click Save.
Total critical issues found per month (click to expand)
- Click
+ Widgetand select Number Chart. - Title:
Critical issues found per month(add theJiraicon). - Select
Count entitiesChart type and choose Jira Issue as the Blueprint. - Select
averagefor the Function and choosemonthunder Average of. - Select
createdfor the Measure time by. - Add this JSON to the Initial filters editor to filter critical issues created this month:
[{"combinator":"and","rules":[{"property":"priority","operator":"in","value": ["High", "Now (Urgent)"]},{"property":"issueType","operator":"=","value": "Bug"}]}]
- Select
customas the Unit and inputissuesas the Custom unit. - Click Save.
High open priority bugs (click to expand)
- Click
+ Widgetand select Number Chart. - Title:
High open priority bugs(add theJiraicon). - Select
Count entitiesChart type and choose Jira Issue as the Blueprint. - Select
countfor the Function. - Add this JSON to the Initial filters editor to filter high priority open bugs:
[{"combinator":"and","rules":[{"property":"issueType","operator":"=","value": "Bug"},{"property":"priority","operator":"in","value": ["Now (Urgent)", "High"]},{"property":"status","operator":"!=","value": "Done"}]}]
- Select
customas the Unit and inputbugsas the Custom unit. - Click Save.
Create Jira issue action (click to expand)
- Click
+ Widgetand select Action card. - Choose the Create Jira Issue action we created in this guide.
- Click Save.
Critical ongoing bugs in the past week (click to expand)
- Click
+ Widgetand select Table. - Title the widget Critical ongoing bugs.
- Choose the Jira Issue blueprint.
- Add this JSON to the Initial filters editor to show only high/critical issues in progress or code review:
{"combinator": "and","rules": [{"property": "status","operator": "in","value": ["In Progress","Code Review"]},{"property": "issueType","operator": "=","value": "Bug"},{"property": "created","operator": "between","value": {"preset": "lastWeek"}},{"operator": "=","value": "jiraIssue","property": "$blueprint"}]}
- Click Save to add the widget to the dashboard.
- Click on the
...button in the top right corner of the table and select Customize table. - In the top right corner of the table, click on
Manage Propertiesand add the following properties:- Status: The current status of the issue.
- Assignee: The assignee of the issue.
- Priority: The issue priority.
- Created: The date the issue was created.
- Project: The related Jira project.
- Click on the save icon in the top right corner of the widget to save the customized table.
Issue types distribution (click to expand)
- Click
+ Widgetand select Pie chart. - Title:
Issue types distribution(add theJiraicon). - Choose the Jira Issue blueprint.
- Under
Breakdown by property, select the Type property. - Add this JSON to the Initial filters editor to show only issues created in the past 3 months:
[{"combinator":"and","rules":[{"property":"created","operator":"between","value": {"preset":"last3Months"}}]}]
- Click Save.