Ingest Slack data into Port
This guide demonstrates how to ingest Slack channels, users, and channel membership data into Port using Airbyte or Fivetran, S3, and a webhook integration.
For most use cases, prefer Port's native Slack integration, which ingests Slack data directly without an external ETL pipeline. Use this guide when you need a custom ETL flow through S3.
Common use cases
- Ingest Slack channels and users through an existing Airbyte or Fivetran pipeline.
- Map Slack users to Port user accounts by email.
- Track Slack channel memberships in your context lake.
Because this guide uses Port's S3 integration, review the following limitation before continuing:
S3 integrations lack some of the features (such as reconciliation) found in Ocean or other Port integration solutions.
As a result, if a record ingested during the initial sync is later deleted in the data source, there’s no automatic mechanism to remove it from Port. The record simply won’t appear in future syncs, but it will remain in Port indefinitely.
If the data includes a flag for deleted records (e.g., is_deleted: "true"), you can configure a webhook delete operation in your webhook’s mapping configuration to remove these records from Port automatically.
Prerequisites
- Ensure you have a Port account and have completed the onboarding process.
- This feature is part of Port's limited-access offering. To obtain the required S3 bucket, contact our team directly via chat, Slack, or the support site, and we will create and manage the bucket on your behalf.
- Access to a Slack account with privileges to approve the Slack app installation for your ingestion provider.
Choose the ingestion provider you want to use:
- Airbyte
- Fivetran
- Access to an available Airbyte app. You can use Airbyte Cloud or a self-hosted Airbyte deployment. For reference, follow Airbyte's quick start guide.
Very short Quickstart Guide for macOS (click to expand)
-
Download and Install Docker Desktop
-
Install abctl:
curl -LsfS https://get.airbyte.com | bash -
- Install Airbyte locally:
abctl local install
The application will be available by default in http://localhost:8000/
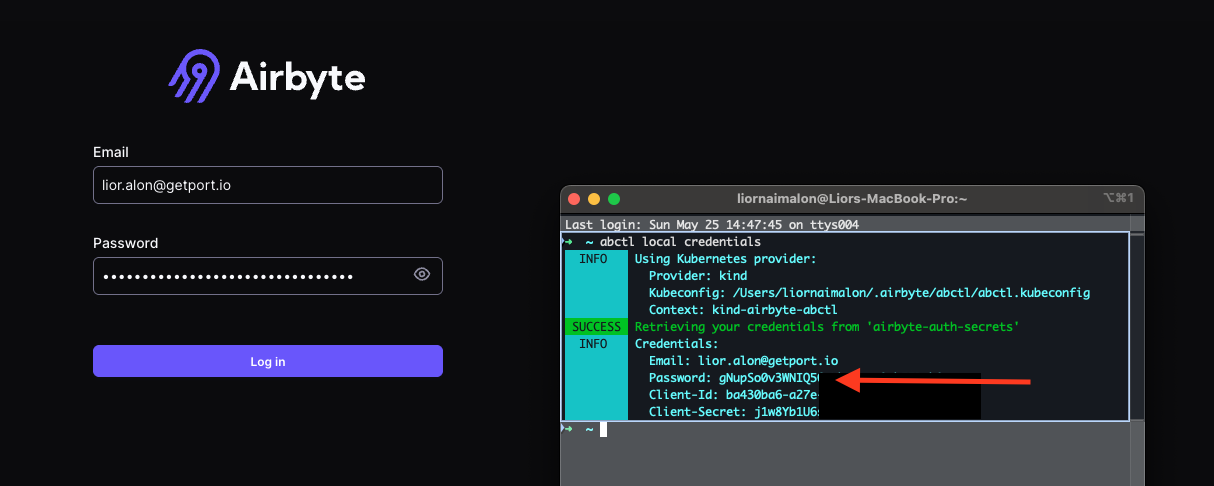
You can find your password by typing in a terminal (see screenshot):
abctl local credentials
- Set up a Slack Airbyte exporter app by following Airbyte's Slack connector guide.
If you want to include email data, add the user.email:read permission to the Slack app in addition to the permissions listed in Airbyte's guide.
- Access to an available Fivetran account. You can complete this guide during the Fivetran free trial period.
- Access to a Slack account with privileges to approve the Fivetran Slack app installation.
To configure your Fivetran ARN role, provide Port with the External ID that Fivetran generates while you configure the S3 destination.
You can start creating the destination, copy the External ID value, click Save for later, and resume the destination setup after Port provides the remaining S3 details.
If you set up multiple Fivetran destinations with different S3 prefix paths, provide each External ID to your Port representative so they can add it to the IAM role.
Set up data model
Create the Slack channel membership, Slack channel, and Slack user blueprints.
-
Go to the Data model page in Port.
-
Click + Blueprint.
-
Click Edit JSON.
-
Copy and paste the following JSON configuration into the editor:
Slack channel membership blueprint (click to expand)
{"identifier": "slack_channel_membership","description": "Slack Channel Membership","title": "Slack Channel Membership","icon": "Slack","schema": {"properties": {"member_id": {"type": "string","description": "ID of the user who is a member of the channel."},"channel_id": {"type": "string","description": "ID of the channel the user belongs to."}},"required": ["member_id","channel_id"]},"mirrorProperties": {},"calculationProperties": {},"aggregationProperties": {},"relations": {}} -
Click Save to create the blueprint.
Repeat the same process for the Slack channel blueprint.
-
Go to the Data model page in Port.
-
Click + Blueprint.
-
Click Edit JSON.
-
Copy and paste the JSON configuration for your ingestion provider into the editor:
- Airbyte
- Fivetran
Slack channel blueprint for Airbyte (click to expand)
{"identifier": "slack_channel","description": "Slack Channel","title": "Slack Channel","icon": "Slack","schema": {"properties": {"is_private": {"type": "boolean","description": "Indicates if the channel is private."},"context_team_id": {"type": "string","description": "ID of the team the channel belongs to."},"is_channel": {"type": "boolean","description": "Indicates if this is a channel (true) or a direct message (false)."},"is_shared": {"type": "boolean","description": "Indicates if the channel is shared across teams."},"previous_names": {"type": "array","description": "List of previous names of the channel."},"creator": {"type": "string","description": "ID of the user who created the channel."},"createdAt": {"type": "number","description": "Timestamp of when the channel was created."},"is_ext_shared": {"type": "boolean","description": "Indicates if the channel is externally shared."},"is_group": {"type": "boolean","description": "Indicates if this is a group DM."},"is_archived": {"type": "boolean","description": "Indicates if the channel is archived."},"shared_team_ids": {"type": "array","description": "List of teams the channel is shared with."},"is_org_shared": {"type": "boolean","description": "Indicates if the channel is shared across the entire organization."},"num_members": {"type": "number","title": "num_members"},"purpose": {"type": "string","description": "Information about the channel's purpose."},"topic": {"type": "string","description": "Information about the channel's topic."}},"required": []},"mirrorProperties": {"member_id": {"title": "member_id","path": "users.member_id"}},"calculationProperties": {},"aggregationProperties": {},"relations": {"users": {"title": "Users","target": "slack_channel_membership","required": false,"many": true}}}Slack channel blueprint for Fivetran (click to expand)
{"identifier": "slack_channel","description": "Slack Channel","title": "Slack Channel","icon": "Slack","schema": {"properties": {"is_private": {"type": "boolean","description": "Indicates if the channel is private."},"context_team_id": {"type": "string","description": "ID of the team the channel belongs to."},"is_channel": {"type": "boolean","description": "Indicates if this is a channel (true) or a direct message (false)."},"is_shared": {"type": "boolean","description": "Indicates if the channel is shared across teams."},"previous_names": {"type": "array","description": "List of previous names of the channel."},"creator": {"type": "string","description": "ID of the user who created the channel."},"createdAt": {"type": "string","description": "Timestamp of when the channel was created."},"is_ext_shared": {"type": "boolean","description": "Indicates if the channel is externally shared."},"is_group": {"type": "boolean","description": "Indicates if this is a group DM."},"is_archived": {"type": "boolean","description": "Indicates if the channel is archived."},"shared_team_ids": {"type": "array","description": "List of teams the channel is shared with."},"is_org_shared": {"type": "boolean","description": "Indicates if the channel is shared across the entire organization."},"num_members": {"type": "number","title": "num_members"},"purpose": {"type": "string","description": "Information about the channel's purpose."},"topic": {"type": "string","description": "Information about the channel's topic."}},"required": []},"mirrorProperties": {"member_id": {"title": "member_id","path": "users.member_id"}},"calculationProperties": {},"aggregationProperties": {},"relations": {"users": {"title": "Users","target": "slack_channel_membership","required": false,"many": true}}} -
Click Save to create the blueprint.
Repeat the same process for the Slack user blueprint.
-
Go to the Data model page in Port.
-
Click + Blueprint.
-
Click Edit JSON.
-
Copy and paste the following JSON configuration into the editor:
Slack user blueprint (click to expand)
{"identifier": "slack_user","description": "Slack User","title": "Slack User","icon": "Slack","schema": {"properties": {"tz": {"type": "string","description": "The user's time zone."},"is_restricted": {"type": "boolean","description": "Indicates if the user is restricted."},"is_primary_owner": {"type": "boolean","description": "Indicates if the user is the primary owner."},"real_name": {"type": "string","description": "The user's real name."},"team_id": {"type": "string","description": "The user's team ID."},"is_admin": {"type": "boolean","description": "Indicates if the user is an admin."},"is_app_user": {"type": "boolean","description": "Indicates if the user is an app user."},"deleted": {"type": "boolean","description": "Indicates if the user is deleted."},"is_bot": {"type": "boolean","description": "Indicates if the user is a bot."},"email": {"type": "string","title": "email"}},"required": []},"mirrorProperties": {"channel_id": {"title": "channel_id","path": "membership.channel_id"}},"calculationProperties": {},"aggregationProperties": {},"relations": {"user": {"title": "User","target": "_user","required": false,"many": false},"membership": {"title": "membership","target": "slack_channel_membership","required": false,"many": true}}} -
Click Save to create the blueprint.
Configure webhook mapping
Set up the webhook integration mapping that reads Slack objects from your S3 bucket and creates matching Port entities.
Create Webhook Integration
Create a webhook integration to ingest the data into Port:
-
Go to the Connectors page of your portal.
-
Click on "+ Connector".
-
In the top selection bar, click on Webhook, then select
Custom Integration. -
Enter a name for your Integration (for example: "Hibob Integration"), enter a description (optional), then click on
Next. -
Copy the Webhook URL that was generated and include set up the airbyte connection (see Below).
-
Scroll down to the section titled "Map the data from the external system into Port" and paste the following mapping:
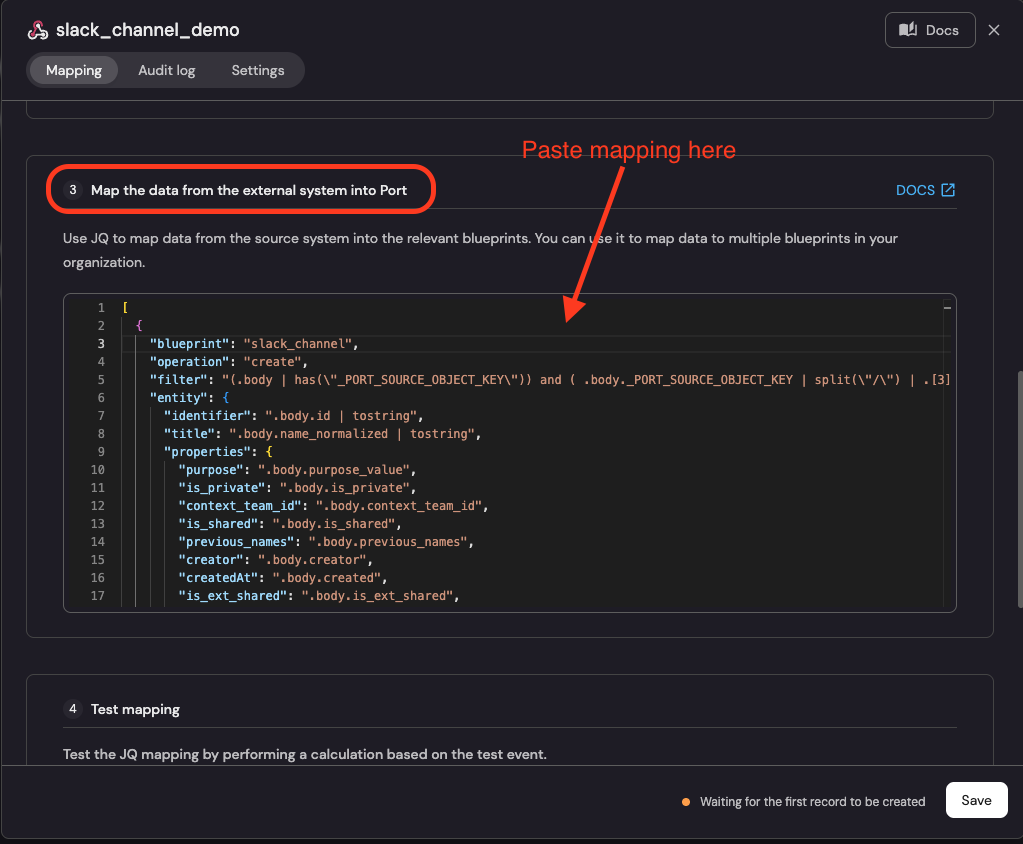
Copy the mapping for your ingestion provider into the webhook integration:
- Airbyte
- Fivetran
Airbyte writes Slack data under the channels, users, and channel_members object paths. Use this mapping for the Airbyte sync:Slack webhook mapping for Airbyte (click to expand)
Fivetran writes Slack data under the channel, users, and channel_member object paths. Use this mapping for the Fivetran sync:Slack webhook mapping for Fivetran (click to expand)
Set up ingestion pipeline
Choose the provider you want to use to export Slack data into the S3 bucket.
- Airbyte
- Fivetran
Set up S3 destination
If you have not already set up an S3 destination for Port's S3 integration, follow these steps:
- UI
- Terraform
-
Login to your Airbyte application (cloud or self-hosted).
-
In the left-side pane, click on
Destinations. -
Click on
+ New Destination. -
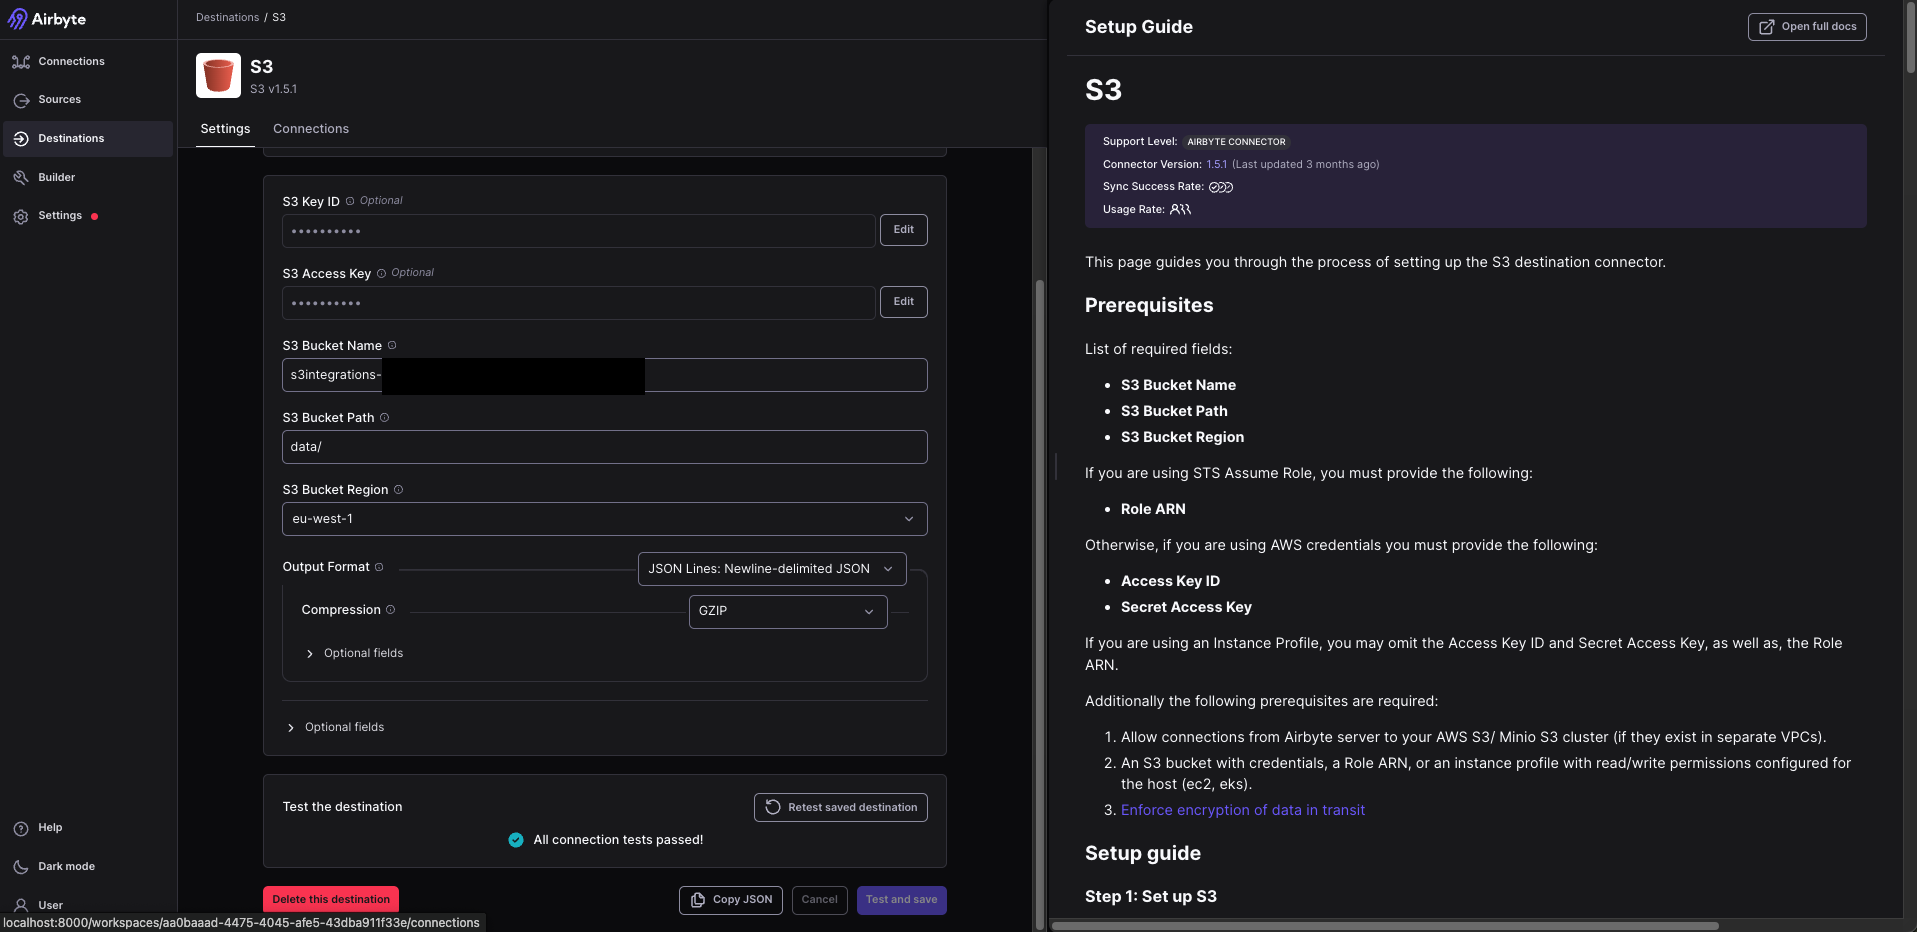
Input the S3 Credentials provided to you by Port:
- Under S3 Key ID enter your S3 Access Key ID.
- Under S3 Access Key enter your S3 Access Key Secret.
- Under S3 Bucket Name enter the bucket name (example: "org-xxx").
- Under S3 Bucket Path enter "data/".
- Under S3 Bucket Region enter the appropriate region.
- For output format, choose "JSON Lines: Newline-delimited JSON".
- For compression, choose "GZIP".
- Under Optional Fields, enter the following in S3 Path Format:
${NAMESPACE}/${STREAM_NAME}/year=${YEAR}/month=${MONTH}/${DAY}_${EPOCH}_
-
Click
Test and saveand wait for Airbyte to confirm the Destination is set up correctly.
terraform {
  required_providers {
    airbyte = {
      source = "airbytehq/airbyte"
      version = "0.6.5"
    }
  }
}

provider "airbyte" {
  username = "<AIRBYTE_USERNAME>"
  password = "<AIRBYTE_PASSWORD>"
  server_url = "<AIRBYTE_API_URL>"
}

resource "airbyte_destination_s3" "port-s3-destination" {
  configuration = {
    access_key_id     = "<S3_ACCESS_KEY>"
    secret_access_key = "<S3_SECRET_KEY>"
    s3_bucket_region  = "<S3_REGION>"
    s3_bucket_name    = "<S3_BUCKET>"
    s3_bucket_path    = "data/"
    format = {
      json_lines_newline_delimited_json = {
        compression = { gzip = {} }
        format_type = "JSONL"
      }
    }
    s3_path_format    = `$${NAMESPACE}/$${STREAM_NAME}/year=$${YEAR}/month=$${MONTH}/$${DAY}_$${EPOCH}_`
    destination_type = "s3"
  }
  name          = "port-s3-destination"
  workspace_id  = var.workspace_id
}

variable "workspace_id" {
  default     = "<AIRBYTE_WORKSPACE_ID>"
}
Set up Slack connection
-
Follow Airbyte's Slack connector guide to set up the Slack source.
Private channelsAirbyte does not read information from private channels by default. To include private channels, enable Include private channels and manually add the Slack export app to each private channel you want to sync.
For more information, see set up data source.
-
After the source is set up, create a + New Connection.
-
For Source, choose the Slack source you created.
-
For Destination, choose the S3 destination you created.
-
In the Select Streams step, select only
channel_members,channels, andusers. -
In the Configuration step, under Destination Namespace, choose Custom Format and enter the webhook URL you copied when setting up the webhook. For example, enter
wSLvwtI1LFwQzXXX. -
Click Finish & Sync to apply the connection and start the sync.
If you entered different values than the ones specified in this guide, inform Port so we can help ensure the integration runs smoothly.
Test the flow
After the Airbyte sync finishes, go to your Port context lake and confirm that Slack channels, users, and channel memberships were created.
Set up S3 destination
When you use Fivetran with Port's S3 integration, create an S3 Data Lake destination for each data source you want to integrate.
-
Log in to your Fivetran account and go to Destinations.
-
Click Add Destination.
-
Locate S3 Data Lake under Fivetran Managed Data Lake Service, and click Set up.
-
Give the destination a name, and click Add.
-
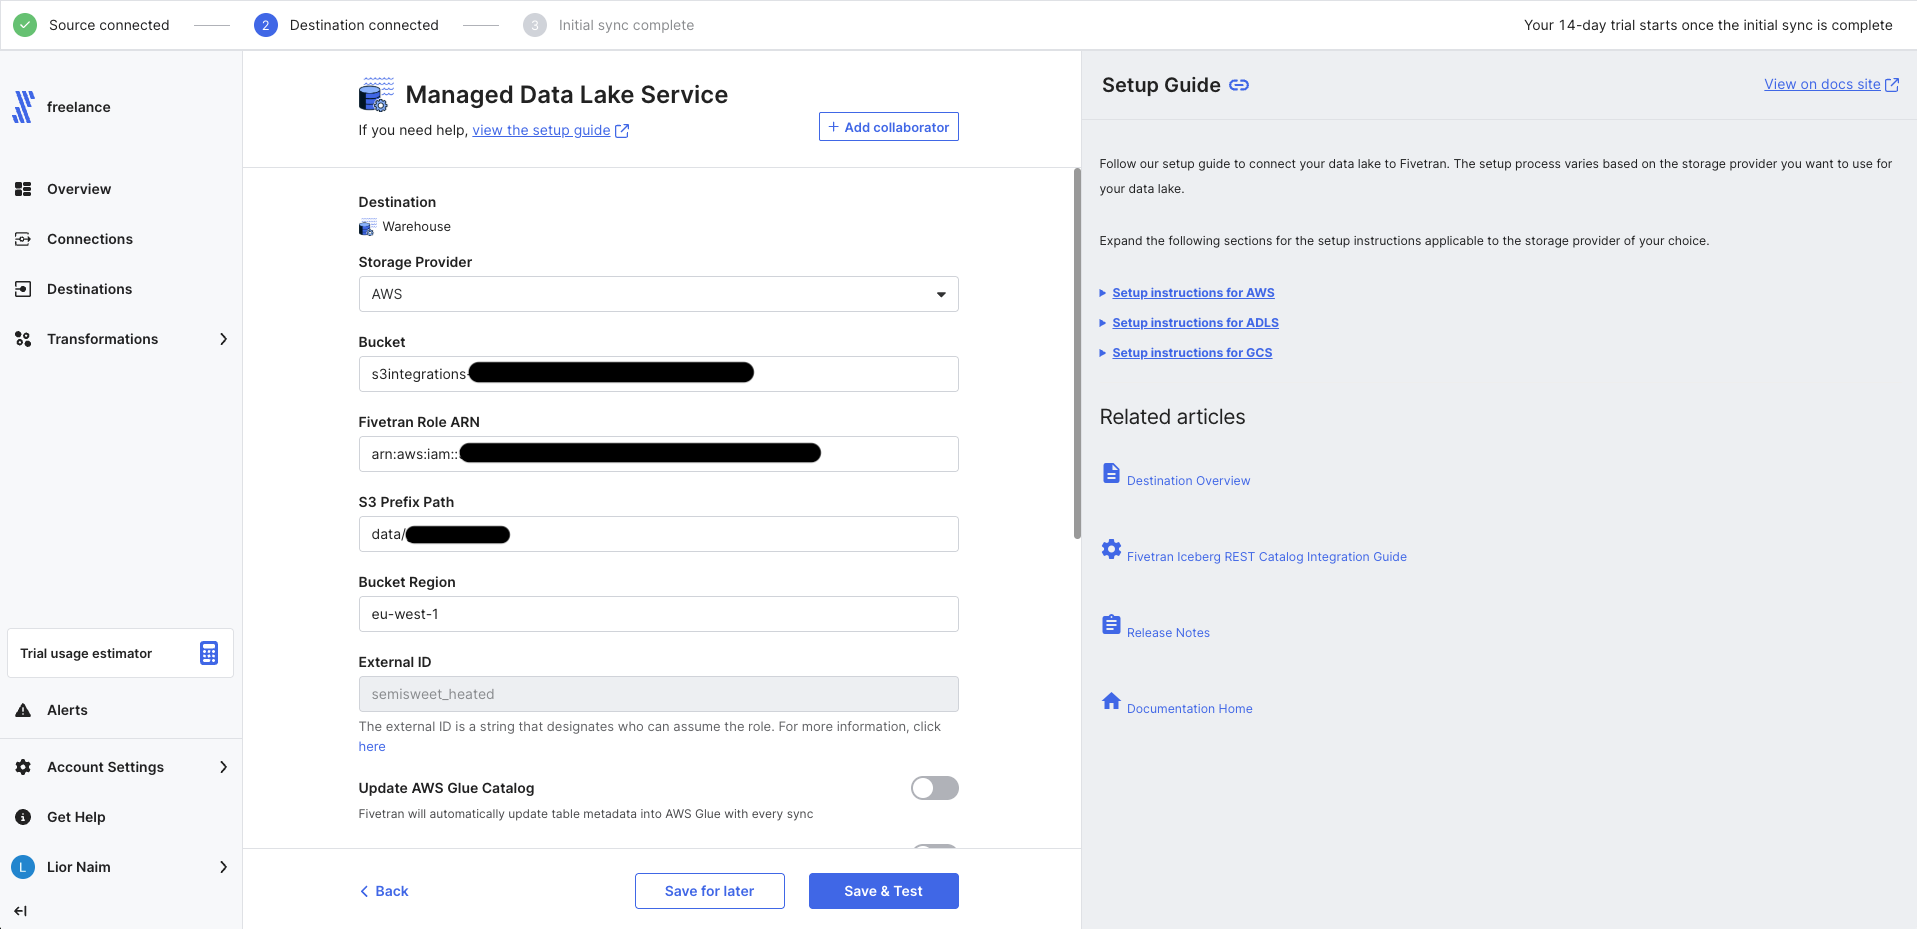
Enter the S3 credentials provided by Port:
- Under Storage Provider, select AWS.
- Under Bucket, enter the bucket name. For example, enter
org-xxx. - Under Fivetran Role ARN, enter your IAM role ARN.
- Under S3 Bucket Path, enter
data/<WEBHOOK_URL>using the webhook URL you copied when setting up the webhook. For example, enterdata/wSLvwtI1LFwQzXXX. - Under S3 Bucket Region, enter the appropriate region.
- Keep Update AWS Glue Catalog toggled off. Data catalog updates are not supported.
- Keep Update Databricks Unity Catalog toggled off. Data catalog updates are not supported.
-
Click Save & Test and wait for Fivetran to confirm the destination is set up correctly.
Set up Slack connection
-
Follow Fivetran's Slack connector setup guide to set up the Slack source.
Private channelsFivetran does not read information from private channels by default. To include private channels, enable Include private channels and manually add the Slack export app to each private channel you want to sync.
-
For Destination, choose the S3 destination you created in the previous step.
-
In the Schema tab, select only
channel,users, andchannel_member. -
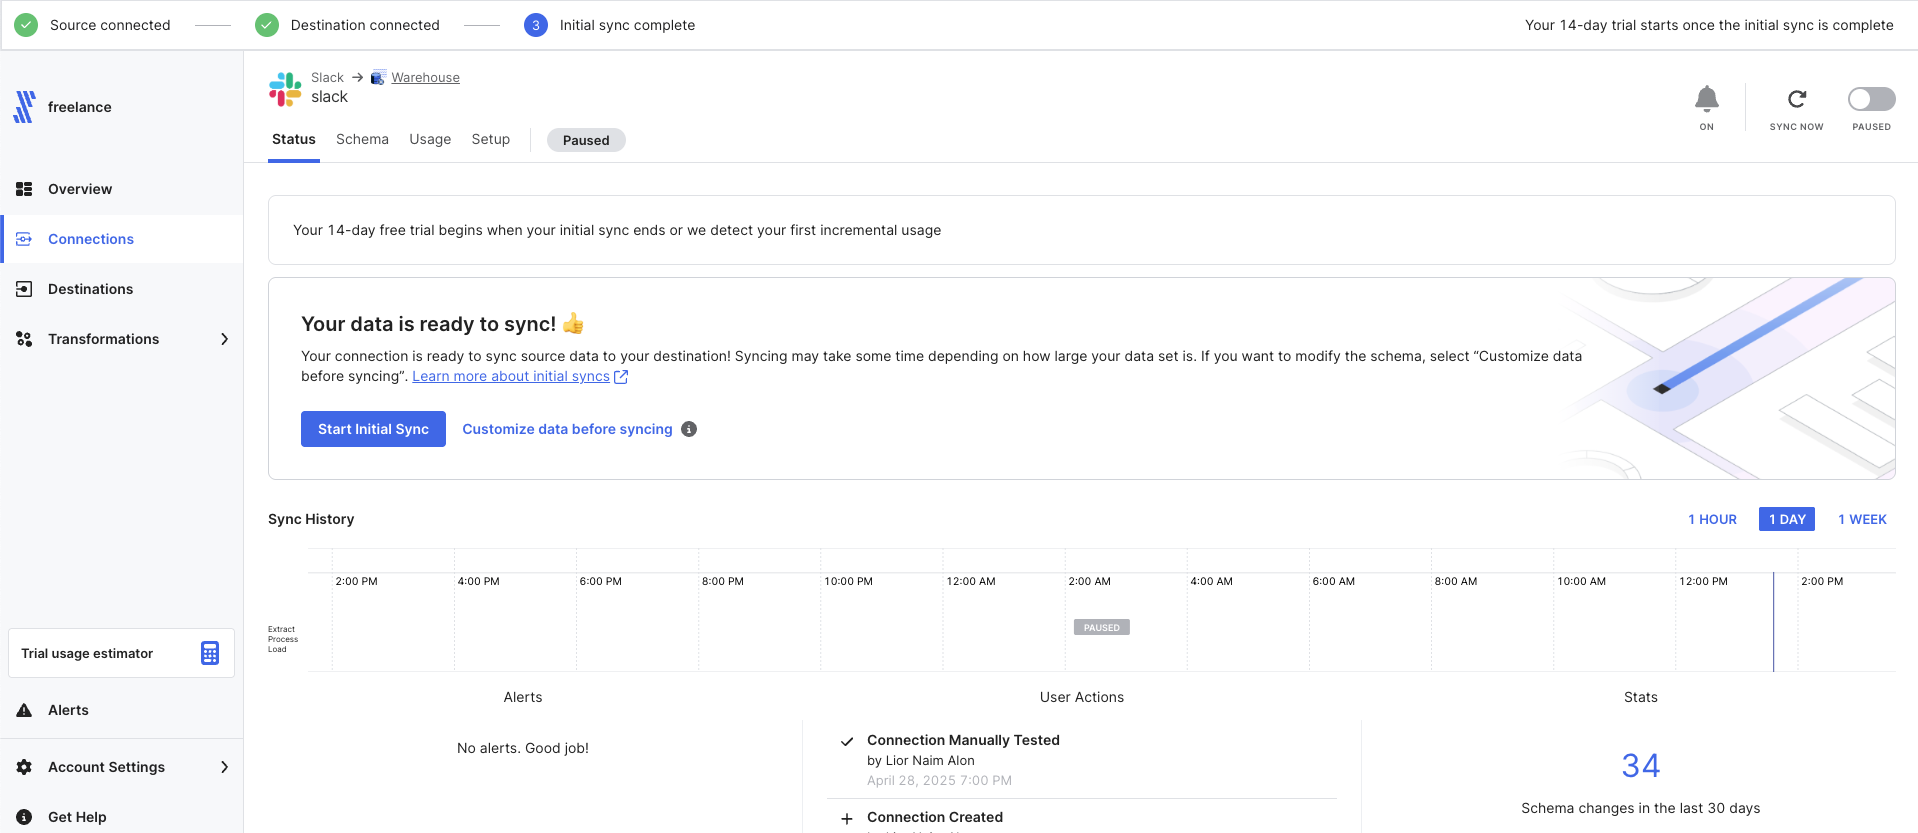
Click Start Initial Sync to apply the connection and start the sync.
If you entered different values than the ones specified in this guide, inform Port so we can help ensure the integration runs smoothly.
Test the flow
After the Fivetran sync finishes, go to your Port context lake and confirm that Slack channels, users, and channel memberships were created.