Ingest repository files into your context lake
Send this guide to your coding agent.
Prerequisite: Install Port MCP
Open plan mode. Implement this Port guide in my org via MCP:

https://docs.port.io/guides/all/ingest-repository-files-into-your-context-lake

Goal: get the guide's core flow working end-to-end in my org; adapting it to fit my existing setup takes priority over matching the guide 1:1.

Plan:
1. Confirm MCP is connected, in the right org, with sufficient permissions.
2. Diff the guide's data model (blueprints, properties, relations, actions, agents, automations, integrations, secrets) against mine.
3. Propose adaptations for gaps, reusing existing blueprints/relations over guide-named duplicates.
4. Flag what needs a UI click, credential, or secret from me, testing MCP capability empirically before ruling anything out.
5. Stop on any blocker and give me options. Approving this plan authorizes the writes it lists; pause only for writes beyond what's listed.

Build:
- Extend blueprint schema additively when upserting; don't remove or overwrite existing properties, and treat type conflicts as a blocker, not an auto-fix.
- List any mock data in the plan, minimal and labeled mock; once approved, seed it without re-asking, and tell me what you seeded.
- For anything the guide writes downstream (e.g. a webhook target), use a real entity, not a mock.
- For pages/widgets, use the real page identifier from the app URL, not a guessed slug.
- When you hit a UI step confirmed (not assumed) unsupported via MCP, pause, give exact clicks, then resume via MCP.
- Validate and give links after each meaningful step (only a tool-returned URL, no guessed paths); don't proceed if the last run wasn't a success.

Done:
- Confirm the guide's expected output exists and runs in Port.
- Summarize adaptations, seeded data, what was mocked or skipped, remaining UI steps, and how to verify.
This guide demonstrates how to parse structured files from your repositories and ingest their contents into Port. You can use the same file ingestion pattern for package dependencies, API paths, software bills of materials (SBOMs), SARIF issues, Trivy vulnerabilities, and Checkmarx KICS results.
Each example defines the data model and mapping required for its file format. Choose only the examples that match the files and entities you want to track.
Common use cases
- Relate dependencies from
package.jsonfiles to the services that use them. - Catalog API operations from OpenAPI specifications.
- Track components and vulnerabilities from CycloneDX SBOM files.
- Relate SARIF security findings to affected services.
- Ingest Trivy and Checkmarx KICS scan results from repository files.
Prerequisites
This guide assumes the following:
- You have a Port account and have completed the onboarding process.
- You have installed and configured the GitHub integration.
- Your repositories contain at least one of the supported files described in this guide.
- The
serviceandrepositoryblueprints exist when an example relates ingested entities to them.
The SARIF pattern can also use the GitLab integration. The mappings in this guide use GitHub's file selector fields, so adjust the selector and repository expressions when you use GitLab.
Understand the file ingestion pattern
Port's Git integrations use the file kind to locate repository files. The mapping then parses the file's contents and creates one entity for each selected item.
Every file mapping has the same main parts:
selector.filesfinds files by path and scopes the repositories to scan.port.itemsToParseconverts the file contents into the items you want to ingest.port.entity.mappingsmaps each item to an entity identifier, title, blueprint, properties, and relations.
File ingestion pattern (Click to expand)
resources:
  - kind: file
    selector:
      query: 'true'
      files:
        - path: '**/<FILE_NAME>'
          organization: my-org
          repos:
            - name: MyRepo
              branch: main
    port:
      itemsToParse: .content.<ARRAY_TO_PARSE>
      entity:
        mappings:
          identifier: .item.<UNIQUE_FIELD>
          title: .item.<DISPLAY_FIELD>
          blueprint: '"<BLUEPRINT_IDENTIFIER>"'
          properties: {}
          relations: {}
For GitHub Ocean, use .content to read file contents. The integration also exposes repository context through .repository and .__repository, depending on the target relation.
Configure GitHub file ingestion
Choose whether to manage the shared integration mapping in Port or in a port-app-config.yml file in GitHub.
- Using Port's UI
- Using GitHub
-
Go to the Data sources page of your portal.
-
Select your GitHub integration.
-
Add the mapping from your chosen example to the YAML editor.
-
Click Save & Resync to apply the mapping.
This method applies the configuration to every repository that the GitHub app can access.
-
Go to the Data sources page of your portal.
-
Select your GitHub integration.
-
Enable Manage this integration using the port-app-config.yml file.
-
Add the mapping from your chosen example to one of these locations:
- For a global configuration, create a
.github-privaterepository and addport-app-config.ymlto its default branch. - For a repository-specific configuration, add
port-app-config.ymlto the repository's.githubdirectory.
- For a global configuration, create a
-
Commit the file to apply the configuration.
A repository-specific file overrides the global configuration for that repository.
Configuration saved in Port's UI overrides port-app-config.yml files in GitHub.
Apply the pattern to your repository files
Select a file type to view its complete data model and mapping. The two package.json options represent different models: Dependencies creates shared dependency entities and relates services to them, while Packages creates package entities that point back to services.
- Dependencies
- Packages
- OpenAPI
- SBOM
- SARIF
- Trivy
- Checkmarx KICS
Relate package dependencies to services
Use this pattern to parse the dependencies object in each package.json file, create shared dependency entities, and relate each service to the dependencies it uses.
Create the dependency blueprint
-
Go to the Builder page.
-
Click + Blueprint.
-
Click Edit JSON.
-
Copy and paste the following JSON configuration into the editor:
Dependency blueprint (Click to expand)
{"identifier": "dependency","title": "Dependency","icon": "Package","schema": {"properties": {"package_name": {"icon": "DefaultProperty","type": "string","title": "Package name"},"semver_requirement": {"type": "string","title": "Semver requirement"},"type": {"type": "string","title": "Type","enum": ["Production","Development"]},"url": {"type": "string","title": "URL","format": "url"}},"required": ["package_name","semver_requirement"]},"mirrorProperties": {},"calculationProperties": {},"aggregationProperties": {},"relations": {}} -
Click Save to create the blueprint.
Ingest dependencies from package.json
-
Go to the Data sources page of your portal.
-
Select your GitHub integration.
-
Add the following YAML block to the editor:
Dependency file mapping (Click to expand)
- kind: fileselector:query: 'true'files:- path: '**/package.json'organization: my-orgrepos:- name: MyRepobranch: mainport:itemsToParse: .content.dependencies | to_entriesentity:mappings:identifier: >-.item.key + "_" + (.item.value | gsub("\\^"; "caret_") |gsub("~"; "tilde_") | gsub(">="; "gte_") | gsub("<="; "lte_") |gsub(">"; "gt_") | gsub("<"; "lt_") | gsub("@"; "at_") |gsub("\\*"; "star") | gsub(" "; "_"))title: .item.key + "@" + .item.valueblueprint: '"dependency"'properties:package_name: .item.keysemver_requirement: .item.value -
Click Save & Resync to ingest the dependencies.
The mapping converts each entry in dependencies into an entity. Its identifier replaces characters that Port cannot use in entity identifiers while preserving the package name and semantic version requirement.
Relate dependencies to each service
-
Go to the Builder page.
-
Select the Service blueprint.
-
Click Edit JSON.
-
Add the following relation to the blueprint's
relationsobject:"dependencies": {"title": "Dependencies","target": "dependency","required": false,"many": true} -
Click Save.
Choose how the file mapping will populate the new relation:
- Direct mapping
- Search query
Use this mapping when the dependency identifiers can be constructed directly from each package.json entry.Direct dependency relation mapping (Click to expand)
Use a search query when you know a dependency property but not its entity identifier. This example matches the first package in dependencies and devDependencies; adjust the rules for your organization.Dependency search relation mapping (Click to expand)
After choosing a relation mapping, update your GitHub data source:
-
Go to the Data sources page of your portal.
-
Select your GitHub integration.
-
Add the selected relation mapping to the YAML editor.
-
Click Save & Resync to apply the mapping.
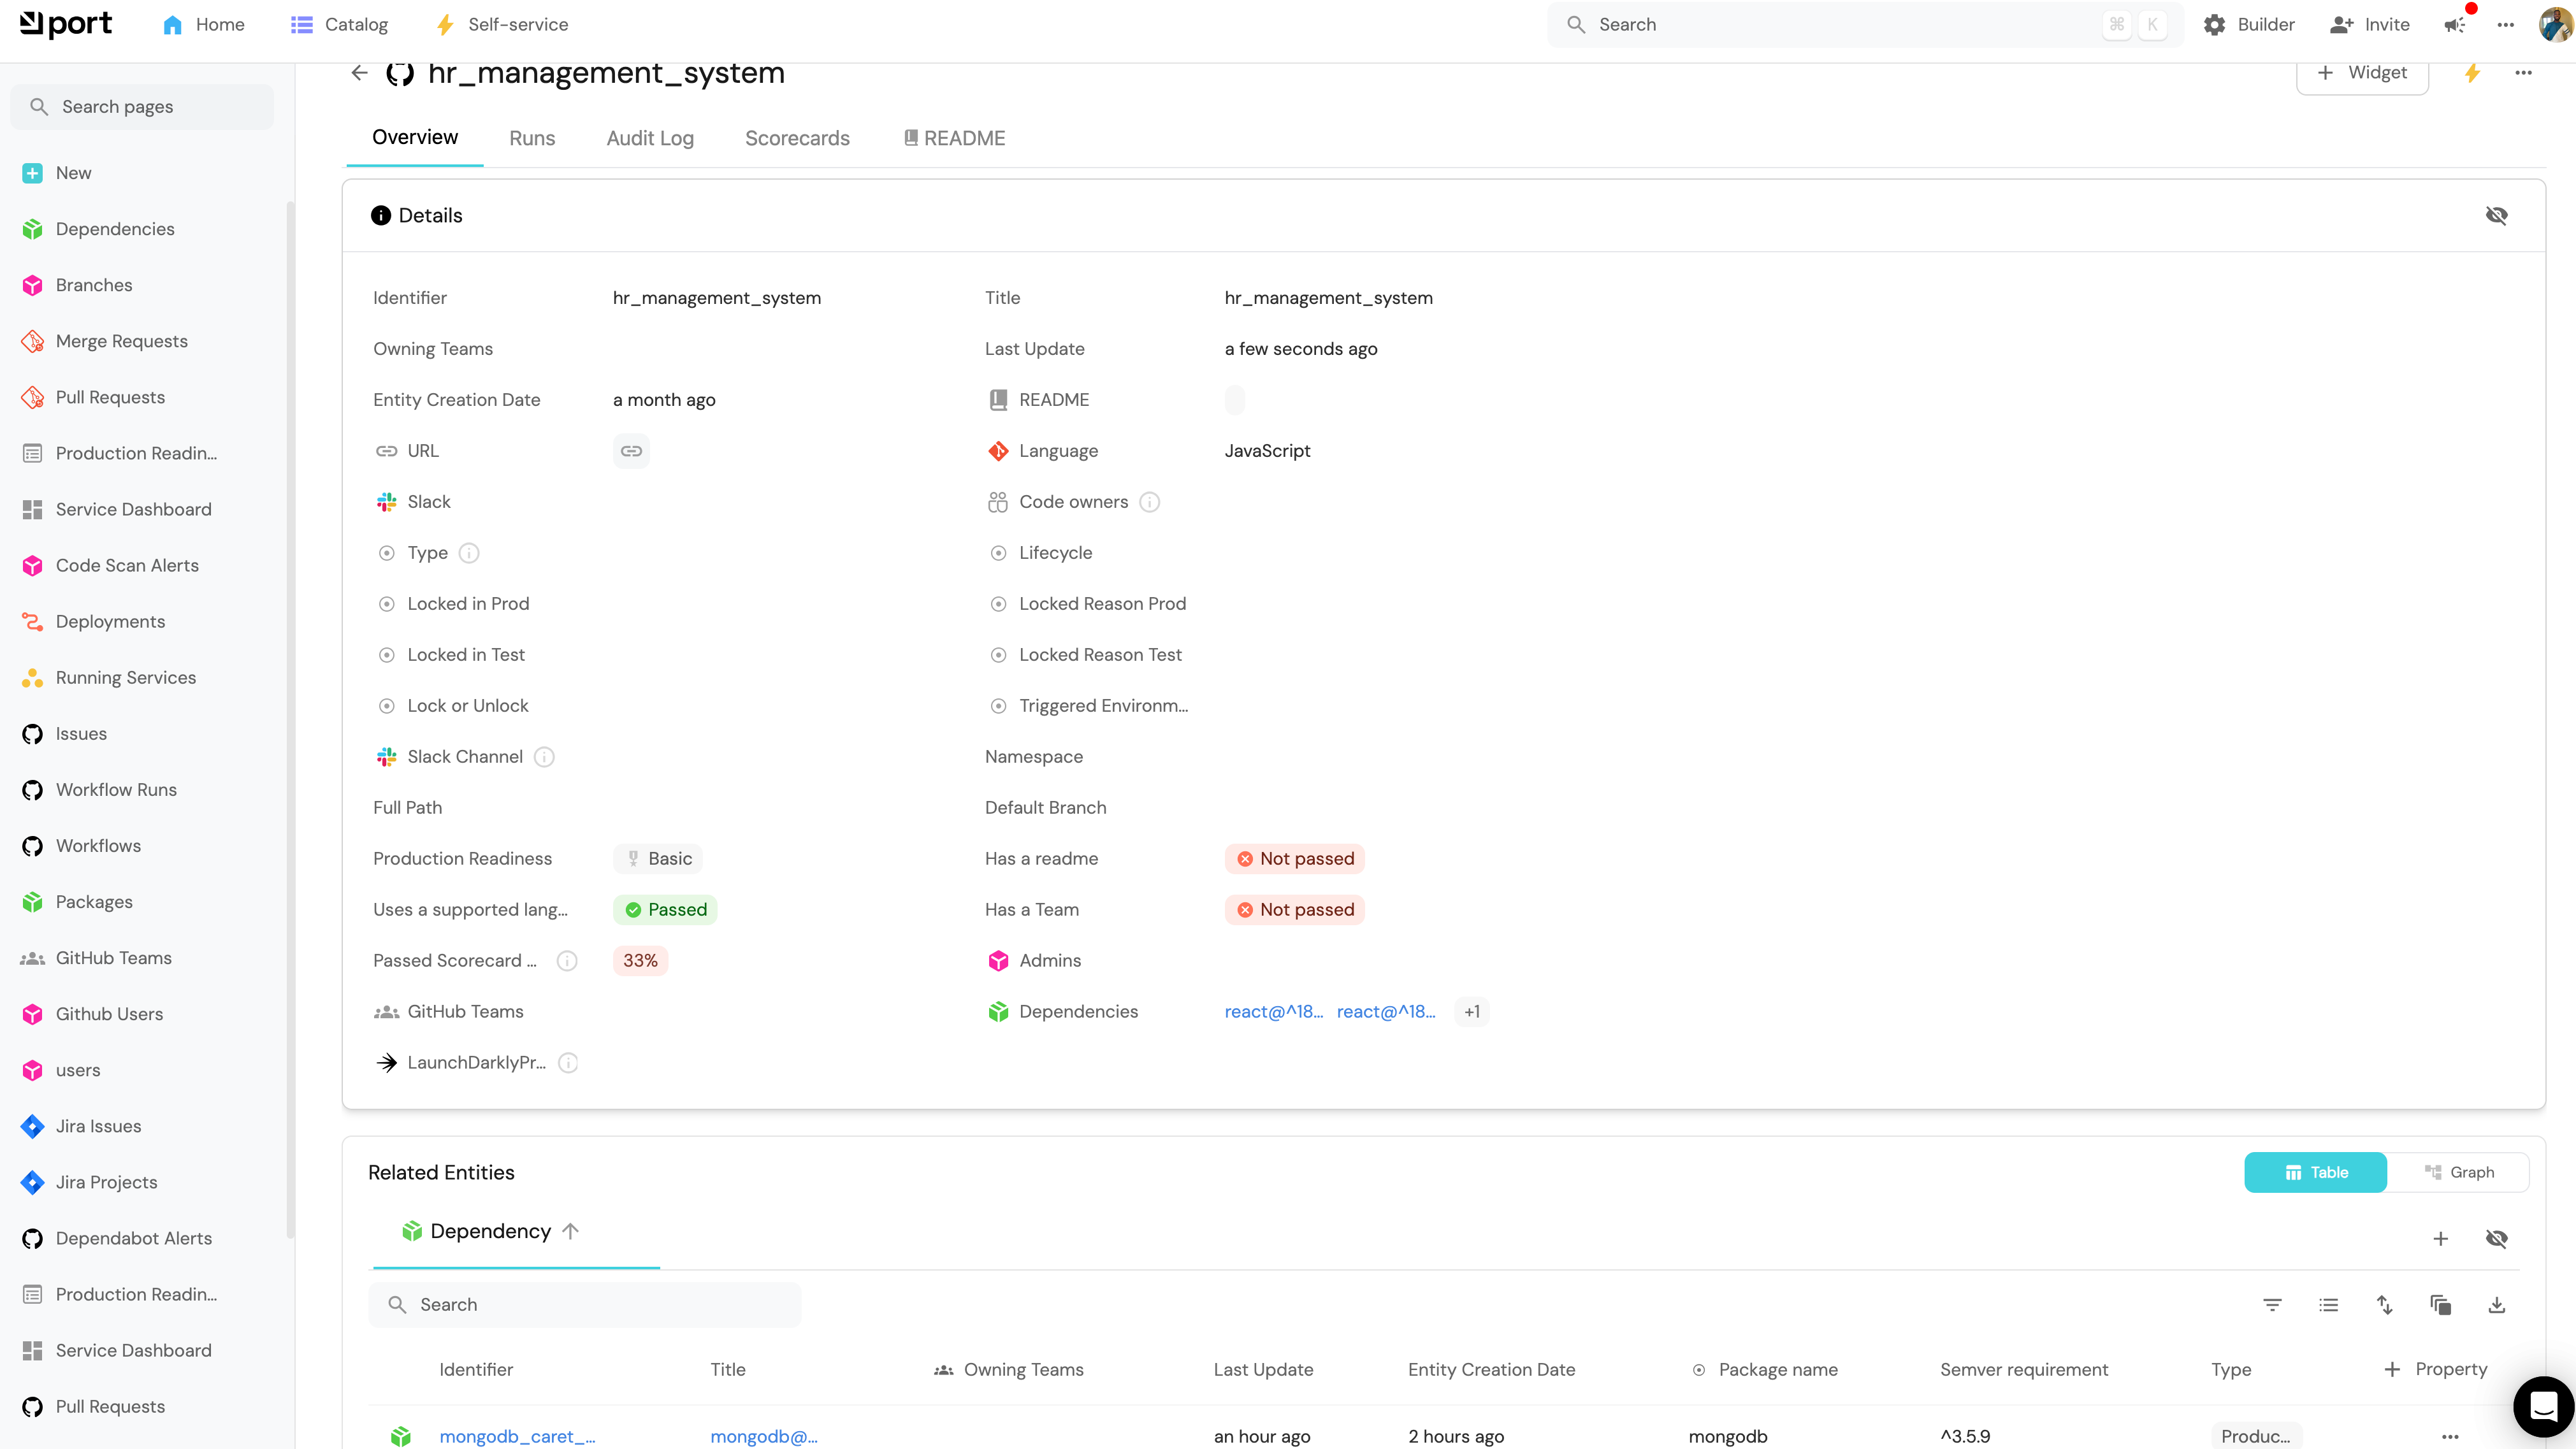
If you manage the integration through GitHub, add the mapping to the configured port-app-config.yml file and commit the change instead. The service entity page will then show its package dependencies.
Create package entities for JavaScript dependencies
Use this alternative package.json model when you want each package entity to hold a relation back to one or more services. If your catalog already has a service blueprint, keep it and create only the package blueprint.
Create the service and package blueprints
-
Go to the Builder page.
-
Click + Blueprint.
-
Click Edit JSON.
-
Create the required blueprints with these JSON configurations:
Service blueprint (Click to expand)
{"identifier": "service","title": "Service","icon": "Service","schema": {"properties": {"description": {"title": "Description","type": "string"}},"required": []},"mirrorProperties": {},"calculationProperties": {},"relations": {}}Package blueprint (Click to expand)
{"identifier": "package","description": "This blueprint represents a software package file in our catalog","title": "Package","icon": "Package","schema": {"properties": {"version": {"type": "string","title": "Dependency Version"}},"required": []},"mirrorProperties": {},"calculationProperties": {},"relations": {"service": {"title": "Service","target": "service","required": false,"many": true}}} -
Click Save after creating each blueprint.
Map JavaScript packages
Follow these steps to update your GitHub data source. If you manage the integration through GitHub, add the same mapping to the configured port-app-config.yml file instead.
-
Go to the Data sources page of your portal.
-
Select your GitHub integration.
-
Add the following YAML block to the editor:
JavaScript package mapping (Click to expand)
resources:- kind: fileselector:query: 'true'files:- path: '**/package.json'organization: my-orgrepos:- name: MyRepobranch: mainport:itemsToParse: .content.dependencies | to_entriesentity:mappings:identifier: >-.item.key + "_" + if (.item.value | startswith("^")) then.item.value[1:] else .item.value endtitle: .item.key + "@" + .item.valueblueprint: '"package"'properties:package: .item.keyversion: .item.valuerelations: {} -
Click Save & Resync to ingest the packages.
To link packages to their source repository, add a repository relation to the package blueprint and map it from .repository.name or .__repository.name.
For a pipeline-based alternative, see the package.json webhook example.
Catalog API paths from an OpenAPI specification
Use this pattern to parse each operation in an openapi.json or OpenAPI YAML file and create an apiPath entity related to its repository.
Create the API path blueprint
-
Go to the Builder page.
-
Click + Blueprint.
-
Click Edit JSON.
-
Copy and paste the following JSON configuration into the editor:
API path blueprint (Click to expand)
{"identifier": "apiPath","description": "This blueprint represents an OpenAPI path in our software catalog","title": "API Paths","icon": "Swagger","schema": {"properties": {"method": {"type": "string","title": "Method","default": "get","enum": ["get", "post", "delete", "put", "patch"],"enumColors": {"get": "yellow","post": "green","delete": "red","put": "purple","patch": "purple"}},"serverUrl": {"type": "string","title": "Server URL","format": "url"},"path": {"title": "Path","type": "string"},"parameters": {"items": {"type": "object"},"title": "Parameters","type": "array"},"requestBody": {"title": "Request Body","type": "object"},"responses": {"title": "Responses","type": "object"},"description": {"title": "Description","type": "string"},"version": {"title": "Version","type": "string"},"summary": {"title": "Summary","type": "string"},"tags": {"title": "Tags","type": "array","items": {"type": "string"}}},"required": []},"mirrorProperties": {},"calculationProperties": {},"relations": {"repository": {"title": "Repository","target": "repository","required": false,"many": false}}} -
Click Save to create the blueprint.
Map API operations
Follow these steps to update your GitHub data source. If you manage the integration through GitHub, add the same mapping to the configured port-app-config.yml file instead.
-
Go to the Data sources page of your portal.
-
Select your GitHub integration.
-
Add the following YAML block to the editor:
OpenAPI path mapping (Click to expand)
resources:- kind: fileselector:query: 'true'files:- path: '**/openapi.json' # Or .yaml.organization: my-orgrepos:- name: MyRepobranch: mainport:itemsToParse: >-.content | [[. as $root | .paths | to_entries[] as $entries |{version: $root.info.version, servers: $root.servers, title:$root.info.title, path: $entries.key, methods: ($entries.value |to_entries[] as $inner | {method: ($inner.key), rest: $inner.value,path: $entries.key})}][] | {id: (.title + "-" + .path +.methods.method), path, method: .methods.method, summary:.methods.rest.summary, description: .methods.rest.description,parameters: .methods.rest.parameters, requestBody:.methods.rest.requestBody, responses: .methods.rest.responses, tags:.methods.rest.tags, project: .title, version, serverUrl:.servers[0].url}]entity:mappings:identifier: '.item.id | sub("[^A-Za-z0-9@_.:/=-]"; "-"; "g")'title: .item.method + .item.pathblueprint: '"apiPath"'properties:method: .item.methodserverUrl: .item.serverUrlpath: .item.pathparameters: .item.parametersrequestBody: .item.requestBodyresponses: .item.responsesdescription: .item.descriptionversion: .item.versionsummary: .item.summarytags: .item.tagsrelations:repository: .__repository -
Click Save & Resync to ingest the API operations.
The mapping creates one entity for every HTTP operation and preserves its method, path, schema details, version, tags, and repository relation.
Catalog CycloneDX SBOM components and vulnerabilities
Use this pattern to create sbomComponent and sbomVulnerability entities from a CycloneDX SBOM. JSON files can use GitHub file ingestion directly, while XML files require a webhook and a script that converts the XML into the webhook payload.
These examples use the CycloneDX 1.5 schema. Adjust the mappings if your SBOM generator produces a different structure.
Create the SBOM blueprints
-
Go to the Builder page.
-
Click + Blueprint.
-
Click Edit JSON.
-
Create the component and vulnerability blueprints with these configurations:
SBOM component blueprint (Click to expand)
{"identifier": "sbomComponent","description": "This blueprint represents an SBOM component in our software catalog","title": "SBOM Component","icon": "Package","schema": {"properties": {"name": {"title": "Name","type": "string"},"version": {"title": "Version","type": "string"},"package_url": {"title": "Package URL","type": "string"},"external_references": {"title": "External References","type": "array"},"licenses": {"title": "Licenses","type": "array"},"type": {"title": "Type","type": "string","default": "library","enum": ["application","framework","library","container","platform","operating-system","device","device-driver","firmware","file","data","machine-learning-model"]},"software_product": {"title": "Software Product","type": "string"}},"required": []},"mirrorProperties": {},"calculationProperties": {},"relations": {}}SBOM vulnerability blueprint (Click to expand)
{"identifier": "sbomVulnerability","description": "This blueprint represents an SBOM vulnerability in our software catalog","title": "SBOM Vulnerability","icon": "Package","schema": {"properties": {"description": {"title": "Description","type": "string"},"reference": {"title": "BOM Reference","type": "string"},"recommendation": {"title": "Recommendation","type": "string"},"ratings": {"title": "Ratings","type": "array"},"source": {"title": "Source","type": "string"},"published": {"title": "Published On","type": "string","format": "date-time"},"state": {"title": "State","type": "string","default": "exploitable","enum": ["resolved","resolved_with_pedigree","exploitable","in_triage","false_positive","not_affected"],"enumColors": {"resolved": "green","resolved_with_pedigree": "lightGray","exploitable": "red","in_triage": "yellow","false_positive": "purple","not_affected": "green"}}},"required": []},"mirrorProperties": {},"calculationProperties": {},"relations": {"components": {"title": "Components","target": "sbomComponent","required": false,"many": true}}} -
Click Save after creating each blueprint.
Choose the SBOM format
- JSON
- XML
Follow these steps to update your GitHub data source. If you manage the integration through GitHub, add the same mapping to the configured port-app-config.yml file instead.
-
Go to the Data sources page of your portal.
-
Select your GitHub integration.
-
Add the following YAML block to parse components and vulnerabilities from
sbom.json:SBOM JSON mapping (Click to expand)
resources:- kind: fileselector:query: 'true'files:- path: '**/sbom.json'organization: my-orgrepos:- name: MyRepobranch: mainport:itemsToParse: .content.componentsentity:mappings:identifier: .item.bom-reftitle: .item.nameblueprint: '"sbomComponent"'properties:version: .item.versionpackage_url: .item.purltype: .item.typeexternal_references: .item.external_referenceslicenses: .item.licensessoftware_product: .content.metadata.component.name + "-" + .content.metadata.component.versionrelations:repository: .repository.full_name- kind: fileselector:query: 'true'files:- path: '**/sbom.json'organization: my-orgrepos:- name: MyRepobranch: mainport:itemsToParse: .content.vulnerabilitiesentity:mappings:identifier: .item.idtitle: .item.idblueprint: '"sbomVulnerability"'properties:description: .item.descriptionreference: .item.referencerecommendation: .item.recommendationratings: .item.ratingssource: .item.sourcepublished: .item.publishedstate: .item.staterelations:repository: .repository.full_name -
Click Save & Resync to ingest the SBOM entities.
The component and vulnerability blueprints must include the repository relations referenced by this mapping. GitHub Ocean exposes the source repository through .repository, which represents the integration's .__repository context.
Port's repository file mapper parses JSON and YAML content. To ingest a CycloneDX XML file, configure a webhook and run a Python script in your pipeline to convert the XML into a JSON payload.
Create the SBOM webhook
Create a webhook integration with the following configuration:SBOM webhook configuration (Click to expand)
Save the webhook URL as WEBHOOK_URL in your pipeline environment.
Convert and send the XML file
Create the following Python script in your repository. Set PATH_TO_SBOM_XML_FILE to the SBOM file's path before running the script in your pipeline.CycloneDX XML ingestion script (Click to expand)
Relate SARIF security issues to services
Use this pattern to parse Static Analysis Results Interchange Format (SARIF) files, create a security_issue entity for each result, and relate each issue to the service represented by its repository.
Create the security issue blueprint
-
Go to the Builder page.
-
Click + Blueprint.
-
Click Edit JSON.
-
Copy and paste the following JSON configuration into the editor:
Security issue blueprint (Click to expand)
{"identifier": "security_issue","description": "A security issue parsed from SARIF format","title": "Security Issue","icon": "Alert","schema": {"properties": {"rule_name": {"type": "string","title": "Rule Name"},"rule_desc": {"type": "string","title": "Rule Description"},"location": {"type": "string","title": "Location"},"message": {"type": "string","title": "Message"},"title": {"type": "string","title": "Title"},"ai_summary": {"type": "string","title": "ai_summary","format": "markdown"}},"required": []},"mirrorProperties": {},"calculationProperties": {},"aggregationProperties": {},"relations": {"issue_service": {"title": "issue service","description": "The service this issue was found in","target": "service","required": false,"many": false}}} -
Click Save to create the blueprint.
Map security issues from SARIF files
-
Go to the Data sources page of your portal.
-
Select your GitHub or GitLab integration.
-
Add the following YAML block to the editor:
SARIF security issue mapping (Click to expand)
- kind: fileselector:query: 'true'files:- path: '**/*.sarif'organization: my-orgrepos:- name: my-repobranch: mainport:itemsToParse: |.content.runs[0] as $content |$content.tool.driver.rules as $rules |[ $content.results[] ] |map(. as $result |{ruleId: .ruleId,error: .message.text,loc: .locations[0].physicalLocation.artifactLocation.uri,ruleName: ($rules[] | select(.id == $result.ruleId) | .name),ruleDesc: ($rules[] | select(.id == $result.ruleId) | .shortDescription.text)})entity:mappings:identifier: .repository.name + "_" + .item.ruleIdtitle: .item.errorblueprint: '"security_issue"'properties:rule_name: .item.ruleNamerule_desc: .item.ruleDesclocation: .item.locmessage: .item.errorrelations:issue_service: .repository.name -
Click Save & Resync to ingest the issues.
The mapping performs the following operations:
- Finds every
.sariffile in the selected repositories. - Reads the rules and results from the first SARIF run.
- Creates a unique issue identifier from the repository name and rule ID.
- Maps the rule name, description, location, and result message.
- Relates the issue to the service whose identifier matches the repository name.
Test with an example SARIF file
The extracted security issues appear in Port with their rule names, descriptions, locations, messages, and service relations.
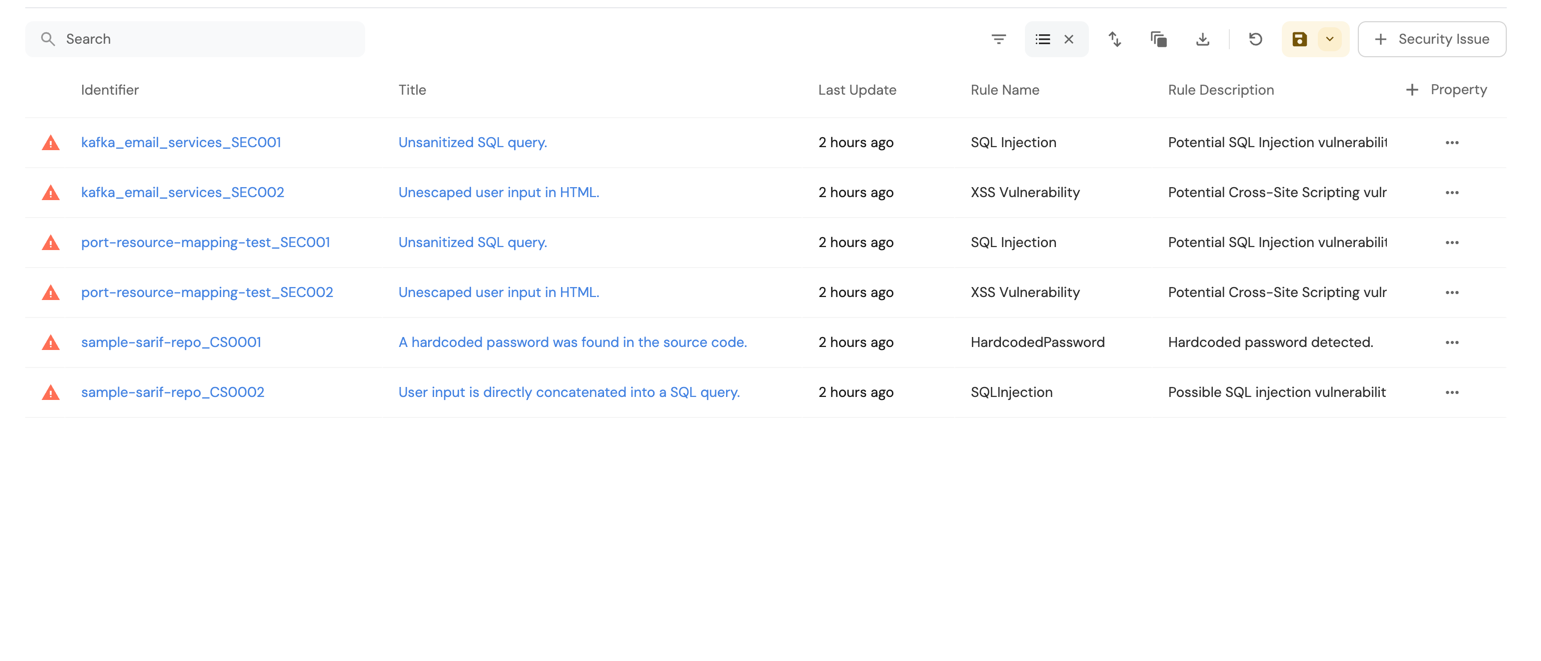
Use this example file to test the mapping:Example SARIF file (Click to expand)
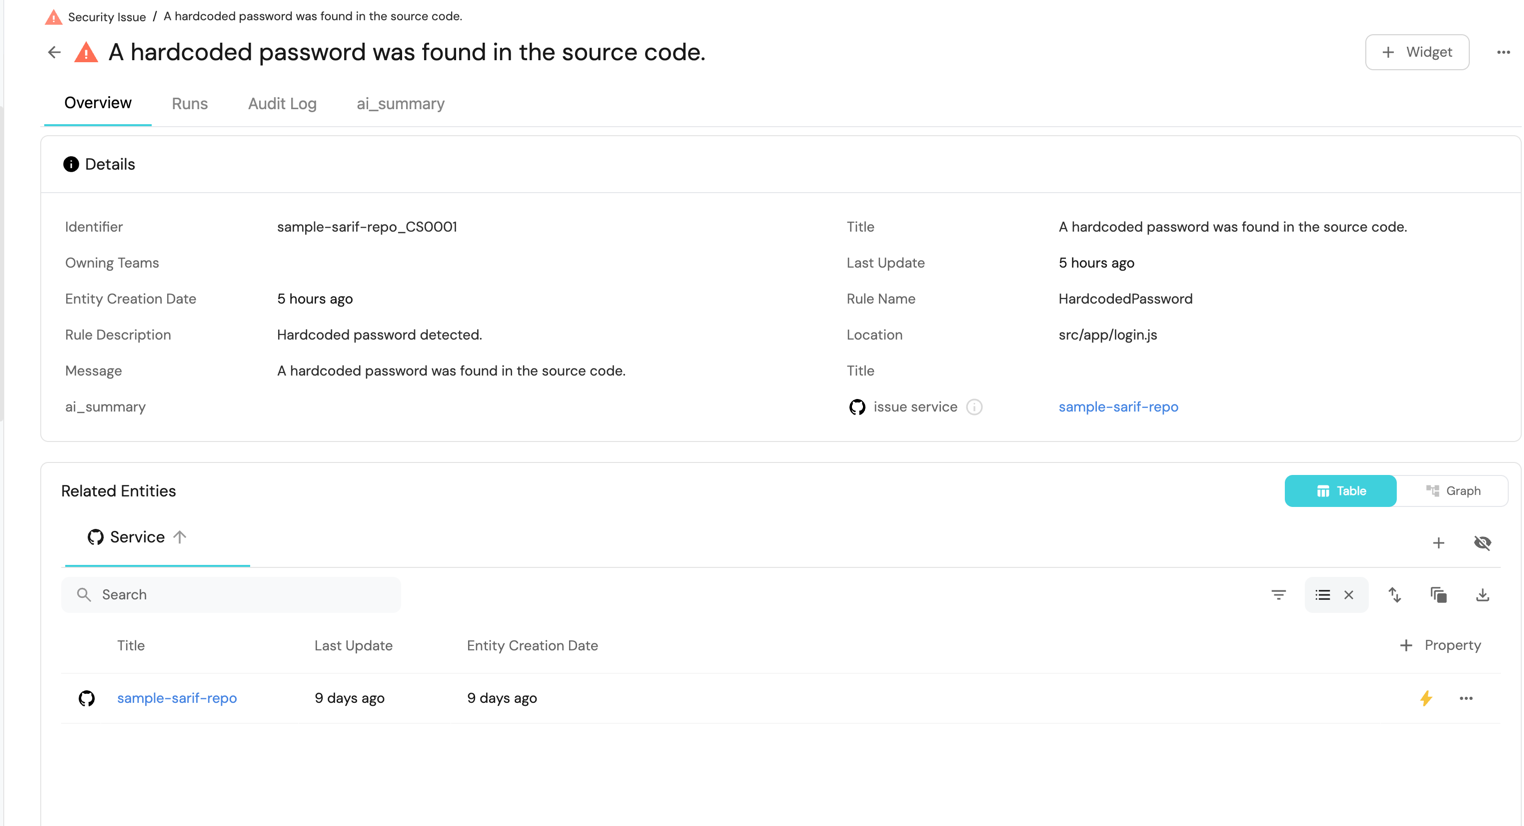
SARIF is a standard format for static analysis results. You can extend this mapping with additional fields, or model the locations array as relations to specific components.
Ingest Trivy vulnerabilities
Use this pattern to parse a Trivy JSON result file and create a trivyVulnerability entity for each vulnerability. The mapping preserves package, version, severity, target, description, and data source details.
For continuous Kubernetes scanning, use the Trivy Kubernetes exporter. Use this repository file pattern when your pipeline stores Trivy results in GitHub.
Create the Trivy vulnerability blueprint
-
Go to the Builder page.
-
Click + Blueprint.
-
Click Edit JSON.
-
Copy and paste the following JSON configuration into the editor:
Trivy vulnerability blueprint (Click to expand)
{"identifier": "trivyVulnerability","description": "This blueprint represents a Trivy vulnerability in our software catalog","title": "Trivy Vulnerability","icon": "Trivy","schema": {"properties": {"version": {"title": "Version","type": "string"},"package_name": {"title": "Package Name","type": "string"},"url": {"title": "Primary URL","type": "string","format": "url"},"description": {"title": "Description","type": "string"},"target": {"title": "Target","type": "string"},"severity": {"title": "Severity","type": "string","default": "HIGH","enum": ["HIGH", "MEDIUM", "LOW", "CRITICAL", "UNKNOWN"],"enumColors": {"HIGH": "red","MEDIUM": "yellow","LOW": "green","CRITICAL": "red","UNKNOWN": "purple"}},"data_source": {"title": "Data Source","type": "object"}},"required": []},"mirrorProperties": {},"calculationProperties": {},"relations": {}} -
Click Save to create the blueprint.
Map Trivy result files
Follow these steps to update your GitHub data source. If you manage the integration through GitHub, add the same mapping to the configured port-app-config.yml file instead.
-
Go to the Data sources page of your portal.
-
Select your GitHub integration.
-
Add the following YAML block to the editor:
Trivy result mapping (Click to expand)
- kind: fileselector:query: 'true'files:- path: '**/result.json'organization: my-orgrepos:- name: MyRepobranch: mainport:itemsToParse: '[.content[] | select(.Vulnerabilities != null) as $input | .Vulnerabilities[] | {VulnerabilityID, PkgName, InstalledVersion, FixedVersion, Title, Description, Severity, References, PrimaryURL, DataSource, Target: $input.Target}]'entity:mappings:identifier: .item.VulnerabilityIDtitle: .item.Titleblueprint: '"trivyVulnerability"'properties:version: .item.InstalledVersionpackage_name: .item.PkgNameprimaryUrl: .item.PrimaryURLdescription: .item.Descriptiontarget: .item.Targetseverity: .item.Severitydata_source: .item.DataSourcerelations:repository: .repository.name -
Click Save & Resync to ingest the vulnerabilities.
To link vulnerabilities to their source repositories, add a repository relation to the trivyVulnerability blueprint. The mapping populates that relation from .repository.name.
Ingest Checkmarx KICS scan results
Use this pattern to parse the queries array in a Checkmarx KICS JSON result file. Each query becomes a checkmarxScan entity with its severity, platform, cloud provider, affected files, and source repository.
Create the Checkmarx KICS blueprint
-
Go to the Builder page.
-
Click + Blueprint.
-
Click Edit JSON.
-
Copy and paste the following JSON configuration into the editor:
Checkmarx KICS blueprint (Click to expand)
{"identifier": "checkmarxScan","description": "This blueprint represents a Checkmarx KICS scan in our software catalog","title": "Checkmarx Scans","icon": "checkmarx","schema": {"properties": {"severity": {"title": "Severity","type": "string","enum": ["LOW", "MEDIUM", "HIGH", "INFO"],"enumColors": {"LOW": "green","MEDIUM": "yellow","HIGH": "red","INFO": "yellow"}},"url": {"type": "string","title": "Scan URL","format": "url"},"platform": {"title": "Platform","type": "string"},"files": {"items": {"type": "object"},"title": "Files","type": "array"},"cloud_provider": {"title": "Cloud Provider","type": "string"},"description": {"title": "Description","type": "string"},"category": {"title": "Category","type": "string"}},"required": []},"mirrorProperties": {},"calculationProperties": {},"relations": {}} -
Click Save to create the blueprint.
Map Checkmarx KICS result files
Follow these steps to update your GitHub data source. If you manage the integration through GitHub, add the same mapping to the configured port-app-config.yml file instead.
-
Go to the Data sources page of your portal.
-
Select your GitHub integration.
-
Add the following YAML block to the editor:
Checkmarx KICS result mapping (Click to expand)
resources:- kind: fileselector:query: 'true'files:- path: '**/results.json'organization: my-orgrepos:- name: MyRepobranch: mainport:itemsToParse: >-[.url as $url | .content.queries[] | {$url, query_id,query_name, severity, platform, files, cloud_provider, description,category}]entity:mappings:identifier: .item.query_idtitle: .item.query_nameblueprint: '"checkmarxScan"'properties:category: .item.categorycloud_provider: .item.cloud_providerdescription: .item.descriptionfiles: .item.filesseverity: .item.severityplatform: .item.platformurl: .item.urlrelations:repository: .__repository -
Click Save & Resync to ingest the scan results.
GitHub Ocean exposes file contents through .content, the file URL through .url, and the source repository through .__repository.
Let's test it!
After you save a mapping, verify that Port can find the files and create the expected entities:
-
Commit a supported file to a repository and branch included by the mapping's
filesselector. -
Go to the Data sources page and select your Git integration.
-
Click Resync.
-
Review the integration logs for selector or JQ parsing errors.
-
Open the relevant blueprint in the software catalog and verify the ingested properties and relations.
If no entities appear, confirm that the file path matches the glob, the integration can access the repository, and itemsToParse returns an array.