Ingest Okta data into Port via Airbyte, S3 and webhook
This guide will demonstrate how to ingest Okta data into Port using Airbyte, S3 and a webhook integration.
S3 integrations lack some of the features (such as reconciliation) found in Ocean or other Port integration solutions.
As a result, if a record ingested during the initial sync is later deleted in the data source, there’s no automatic mechanism to remove it from Port. The record simply won’t appear in future syncs, but it will remain in Port indefinitely.
If the data includes a flag for deleted records (e.g., is_deleted: "true"), you can configure a webhook delete operation in your webhook’s mapping configuration to remove these records from Port automatically.
Prerequisites
-
Ensure you have a Port account and have completed the onboarding process.
-
This feature is part of Port's limited-access offering. To obtain the required S3 bucket, please contact our team directly via chat, Slack, or thesupport site, and we will create and manage the bucket on your behalf.
-
Access to an available Airbyte app (can be cloud or self-hosted) - for reference, follow the quick start guide.
Very short Quickstart Guide for macOS
-
Download and Install Docker Desktop
-
Install abctl:
curl -LsfS https://get.airbyte.com | bash -
- Install Airbyte locally:
abctl local install
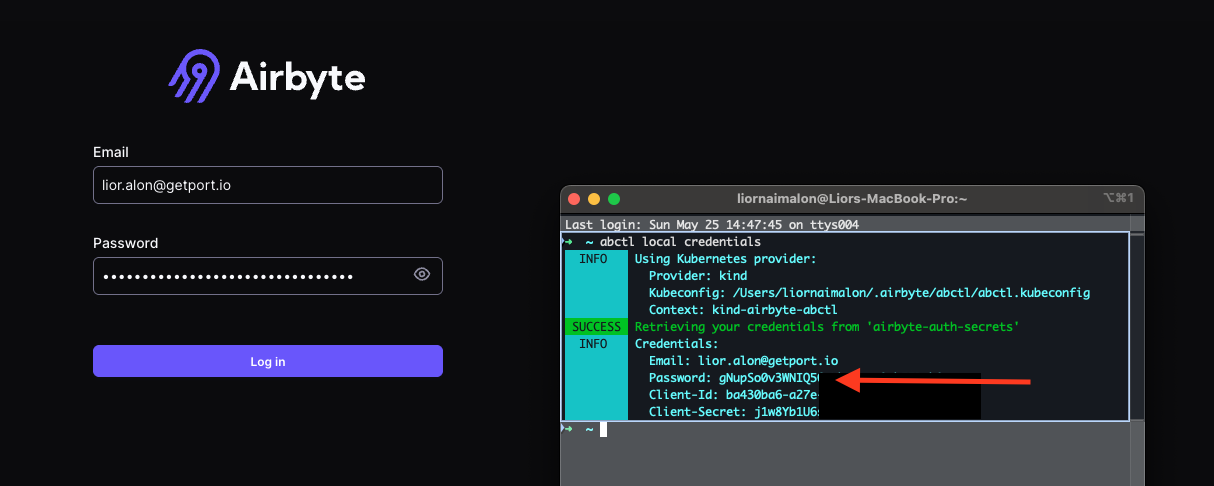
The application will be available by default in http://localhost:8000/
You can find your password by typing in a terminal (see screenshot):
abctl local credentials
- An Okta Personal API Token used to retrieve data.
Data model setup
Add Blueprints
Add the Okta Permission blueprint:
-
Go to the Builder page of your portal.
-
Click on "+ Blueprint".
-
Click on the
{...}button in the top right corner, and choose "Edit JSON". -
Paste the following JSON schema into the editor:
Okta Permission (Click to expand)
{
  "identifier": "okta_permission",
  "description": "Represents an Okta permission.",
  "title": "Okta Permission",
  "icon": "Okta",
  "schema": {
    "properties": {
      "created": {
        "type": "string",
        "format": "date-time",
        "description": "Creation timestamp of the permission."
      },
      "conditions": {
        "type": "object",
        "description": "Conditions associated with the permission (can be null)."
      },
      "links": {
        "type": "object",
        "description": "Links related to the permission."
      }
    },
    "required": [
      "created"
    ]
  },
  "mirrorProperties": {},
  "calculationProperties": {},
  "aggregationProperties": {},
  "relations": {}
}
Add the Okta Role blueprint in the same way:
Okta Role (Click to expand)
{
  "identifier": "okta_role",
  "description": "Represents an Okta role.",
  "title": "Okta Role",
  "icon": "Okta",
  "schema": {
    "properties": {
      "description": {
        "type": "string",
        "description": "Description of the role."
      },
      "created": {
        "type": "string",
        "format": "date-time",
        "description": "Creation timestamp of the role."
      },
      "links": {
        "type": "object",
        "description": "Links related to the role."
      }
    },
    "required": [
      "created"
    ]
  },
  "mirrorProperties": {},
  "calculationProperties": {},
  "aggregationProperties": {},
  "relations": {
    "permissions": {
      "title": "Permissions",
      "target": "okta_permission",
      "required": false,
      "many": true
    }
  }
}
Add the Okta Role Assignment blueprint in the same way:
Okta Role Assignment (Click to expand)
{
  "identifier": "okta_role_assignment",
  "description": "Represents an assignment of a role to a user in Okta.",
  "title": "Okta Role Assignment",
  "icon": "Okta",
  "schema": {
    "properties": {
      "type": {
        "type": "string",
        "description": "Type of role (e.g., SUPER_ADMIN)."
      },
      "status": {
        "type": "string",
        "description": "Status of the role assignment (e.g., ACTIVE)."
      },
      "created": {
        "type": "string",
        "format": "date-time",
        "description": "Creation timestamp of the role assignment."
      },
      "assignmentType": {
        "type": "string",
        "description": "Type of assignment (e.g., USER)."
      },
      "links": {
        "type": "object",
        "description": "Links related to the role assignment."
      },
      "userId": {
        "type": "string",
        "description": "ID of the assigned user."
      }
    },
    "required": [
      "type",
      "status",
      "created",
      "assignmentType",
      "userId"
    ]
  },
  "mirrorProperties": {},
  "calculationProperties": {},
  "aggregationProperties": {},
  "relations": {}
}
Add the Okta User blueprint in the same way:
Okta User (Click to expand)
{
  "identifier": "okta_user",
  "description": "Represents an Okta user.",
  "title": "Okta User",
  "icon": "Okta",
  "schema": {
    "properties": {
      "status": {
        "type": "string",
        "description": "Status of the user (e.g., ACTIVE)."
      },
      "created": {
        "type": "string",
        "format": "date-time",
        "description": "Creation timestamp of the user."
      },
      "activated": {
        "type": "string",
        "format": "date-time",
        "description": "Activation timestamp of the user."
      },
      "statusChanged": {
        "type": "string",
        "format": "date-time",
        "description": "Timestamp when the user's status last changed."
      },
      "lastLogin": {
        "type": "string",
        "format": "date-time",
        "description": "Timestamp of the user's last login."
      },
      "passwordChanged": {
        "type": "string",
        "format": "date-time",
        "description": "Timestamp when the user's password was last changed."
      },
      "type": {
        "type": "object",
        "description": "Type information for the user.",
        "properties": {
          "id": {
            "type": "string",
            "description": "ID of the user type."
          }
        }
      },
      "profile": {
        "type": "object",
        "description": "User profile information."
      },
      "links": {
        "type": "object",
        "description": "Links related to the user."
      }
    },
    "required": [
      "status",
      "created",
      "activated",
      "statusChanged",
      "type",
      "profile"
    ]
  },
  "mirrorProperties": {},
  "calculationProperties": {},
  "aggregationProperties": {},
  "relations": {
    "role_assignments": {
      "title": "Role Assignments",
      "target": "okta_role_assignment",
      "required": false,
      "many": true
    }
  }
}
Create Webhook Integration
Create a webhook integration to ingest the data into Port:
-
Go to the Data sources page of your portal.
-
Click on "+ Data source".
-
In the top selection bar, click on Webhook, then select
Custom Integration. -
Enter a name for your Integration (for example: "Hibob Integration"), enter a description (optional), then click on
Next. -
Copy the Webhook URL that was generated and include set up the airbyte connection (see Below).
-
Scroll down to the section titled "Map the data from the external system into Port" and paste the following mapping:
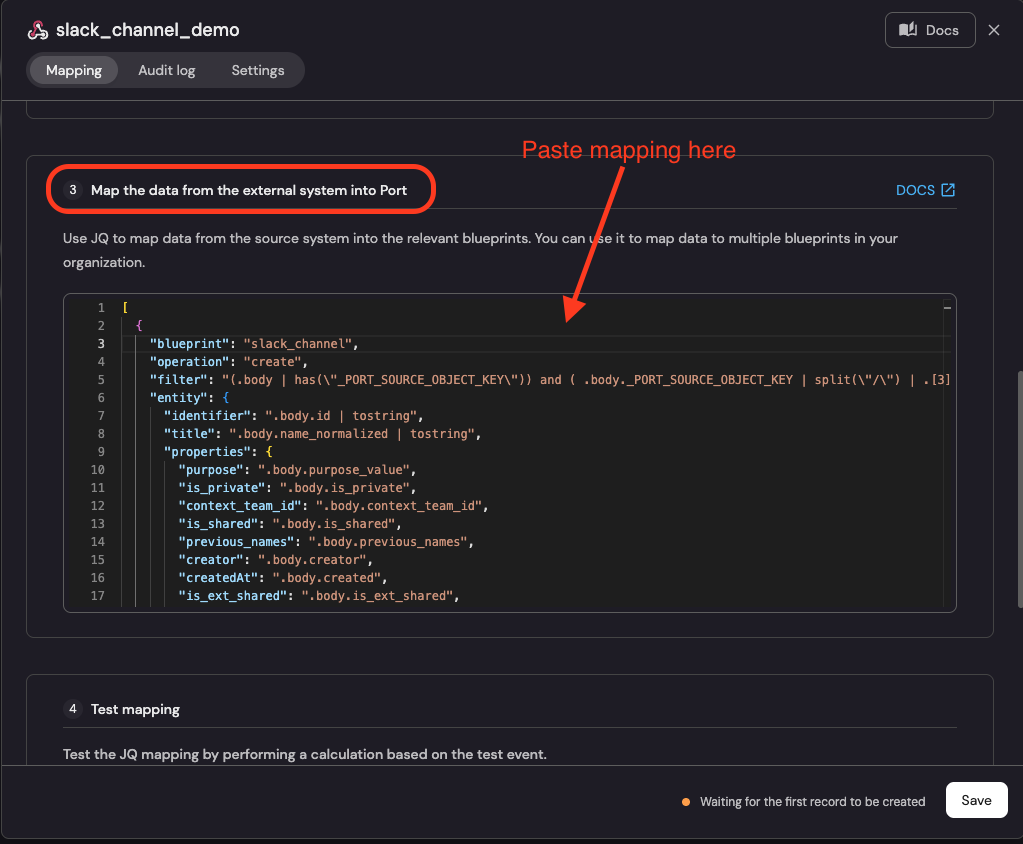
Okta Webhook Mapping (Click to expand)
[
  {
    "blueprint": "okta_role",
    "operation": "create",
    "filter": "(.body | has(\"_PORT_SOURCE_OBJECT_KEY\")) and (.body._PORT_SOURCE_OBJECT_KEY | split(\"/\") | .[2] | IN(\"custom_roles\"))",
    "entity": {
      "identifier": ".body.id",
      "title": ".body.label",
      "properties": {
        "description": ".body.description",
        "created": ".body.created",
        "links": ".body._links"
      }
    }
  },
  {
    "blueprint": "okta_permission",
    "operation": "create",
    "filter": "(.body | has(\"_PORT_SOURCE_OBJECT_KEY\")) and (.body._PORT_SOURCE_OBJECT_KEY | split(\"/\") | .[2] | IN(\"permissions\"))",
    "entity": {
      "identifier": ".body._links.self.href",
      "title": ".body.label",
      "properties": {
        "created": ".body.created",
        "conditions": ".body.conditions",
        "links": ".body._links"
      }
    }
  },
  {
    "blueprint": "okta_role_assignment",
    "operation": "create",
    "filter": "(.body | has(\"_PORT_SOURCE_OBJECT_KEY\")) and (.body._PORT_SOURCE_OBJECT_KEY | split(\"/\") | .[2] | IN(\"user_role_assignments\"))",
    "entity": {
      "identifier": ".body.id",
      "title": ".body.label",
      "properties": {
        "type": ".body.type",
        "status": ".body.status",
        "created": ".body.created",
        "assignmentType": ".body.assignmentType",
        "links": ".body._links",
        "userId": ".body.userId"
      }
    }
  },
  {
    "blueprint": "okta_user",
    "operation": "create",
    "filter": "(.body | has(\"_PORT_SOURCE_OBJECT_KEY\")) and (.body._PORT_SOURCE_OBJECT_KEY | split(\"/\") | .[2] | IN(\"users\"))",
    "entity": {
      "identifier": ".body.id",
      "title": ".body.profile.login",
      "properties": {
        "status": ".body.status",
        "created": ".body.created",
        "activated": ".body.activated",
        "statusChanged": ".body.statusChanged",
        "lastLogin": ".body.lastLogin",
        "passwordChanged": ".body.passwordChanged",
        "type": ".body.type",
        "profile": ".body.profile",
        "links": ".body._links"
      }
    }
  }
]
Airbyte Setup
Set up S3 Destination
If you haven't already set up S3 Destination for Port S3, follow these steps:
- UI
- Terraform
-
Login to your Airbyte application (cloud or self-hosted).
-
In the left-side pane, click on
Destinations. -
Click on
+ New Destination. -
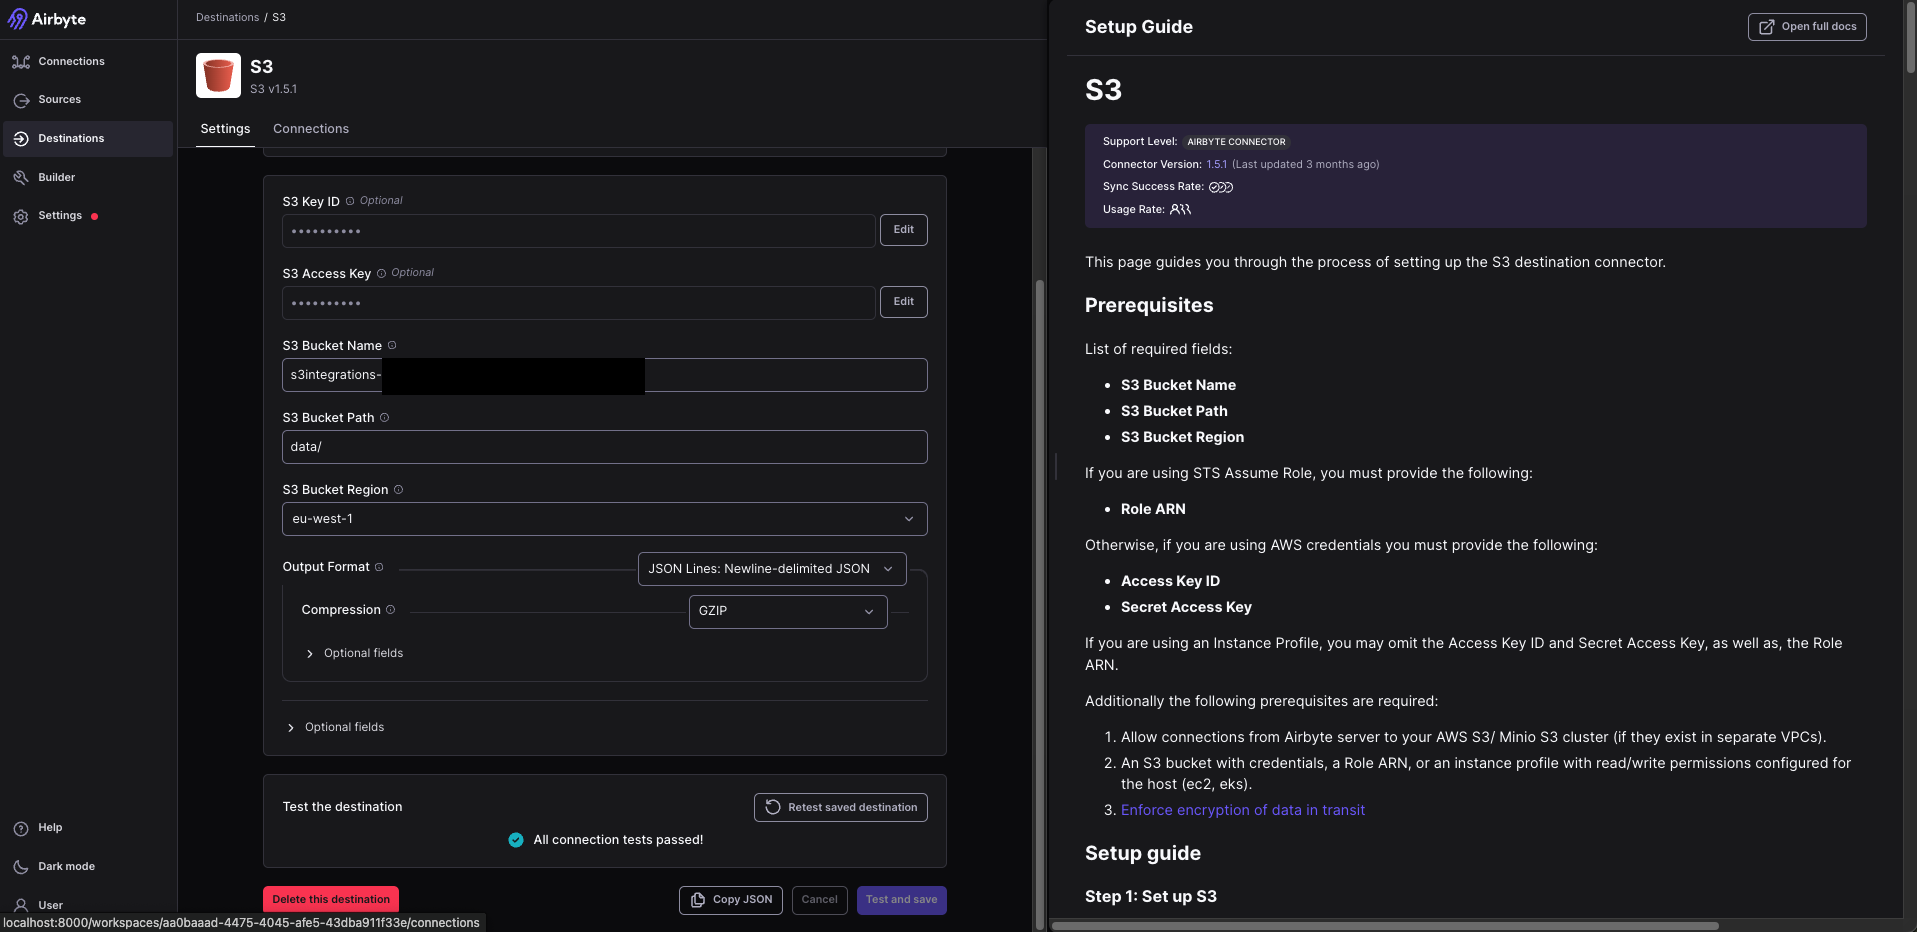
Input the S3 Credentials provided to you by Port:
- Under S3 Key ID enter your S3 Access Key ID.
- Under S3 Access Key enter your S3 Access Key Secret.
- Under S3 Bucket Name enter the bucket name (example: "org-xxx").
- Under S3 Bucket Path enter "data/".
- Under S3 Bucket Region enter the appropriate region.
- For output format, choose "JSON Lines: Newline-delimited JSON".
- For compression, choose "GZIP".
- Under Optional Fields, enter the following in S3 Path Format:
${NAMESPACE}/${STREAM_NAME}/year=${YEAR}/month=${MONTH}/${DAY}_${EPOCH}_
-
Click
Test and saveand wait for Airbyte to confirm the Destination is set up correctly.
terraform {
  required_providers {
    airbyte = {
      source = "airbytehq/airbyte"
      version = "0.6.5"
    }
  }
}

provider "airbyte" {
  username = "<AIRBYTE_USERNAME>"
  password = "<AIRBYTE_PASSWORD>"
  server_url = "<AIRBYTE_API_URL>"
}

resource "airbyte_destination_s3" "port-s3-destination" {
  configuration = {
    access_key_id     = "<S3_ACCESS_KEY>"
    secret_access_key = "<S3_SECRET_KEY>"
    s3_bucket_region  = "<S3_REGION>"
    s3_bucket_name    = "<S3_BUCKET>"
    s3_bucket_path    = "data/"
    format = {
      json_lines_newline_delimited_json = {
        compression = { gzip = {} }
        format_type = "JSONL"
      }
    }
    s3_path_format    = `$${NAMESPACE}/$${STREAM_NAME}/year=$${YEAR}/month=$${MONTH}/$${DAY}_$${EPOCH}_`
    destination_type = "s3"
  }
  name          = "port-s3-destination"
  workspace_id  = var.workspace_id
}

variable "workspace_id" {
  default     = "<AIRBYTE_WORKSPACE_ID>"
}
Set up Okta Connection
-
Follow Airbyte's guide to set up Okta connector. More information on setting source connectors
-
After the Source is set up, proceed to create a "+ New Connection".
-
For Source, choose the Okta source you have set up.
-
For Destination, choose the S3 Destination you have set up.
-
In the Select Streams step, make sure only "custom_roles", "permissions", "user_role_assignments" and "users" are marked for synchronization.
-
In the Configuration step, under "Destination Namespace", choose "Custom Format" and enter the Webhook URL you have copied when setting up the webhook", for example: "wSLvwtI1LFwQzXXX".
-
Click on Finish & Sync to apply and start the Integration process!
If for any reason you have entered different values than the ones specified in this guide, inform us so we can assist to ensure the integration will run smoothly.