Ingest cloud resources using APM integrations
Send this guide to your coding agent.
Prerequisite: Install Port MCP
Open plan mode. Implement this Port guide in my org via MCP:

https://docs.port.io/guides/all/ingest-cloud-resources-using-apm-integrations

Goal: get the guide's core flow working end-to-end in my org; adapting it to fit my existing setup takes priority over matching the guide 1:1.

Plan:
1. Confirm MCP is connected, in the right org, with sufficient permissions.
2. Diff the guide's data model (blueprints, properties, relations, actions, agents, automations, integrations, secrets) against mine.
3. Propose adaptations for gaps, reusing existing blueprints/relations over guide-named duplicates.
4. Flag what needs a UI click, credential, or secret from me, testing MCP capability empirically before ruling anything out.
5. Stop on any blocker and give me options. Approving this plan authorizes the writes it lists; pause only for writes beyond what's listed.

Build:
- Extend blueprint schema additively when upserting; don't remove or overwrite existing properties, and treat type conflicts as a blocker, not an auto-fix.
- List any mock data in the plan, minimal and labeled mock; once approved, seed it without re-asking, and tell me what you seeded.
- For anything the guide writes downstream (e.g. a webhook target), use a real entity, not a mock.
- For pages/widgets, use the real page identifier from the app URL, not a guessed slug.
- When you hit a UI step confirmed (not assumed) unsupported via MCP, pause, give exact clicks, then resume via MCP.
- Validate and give links after each meaningful step (only a tool-returned URL, no guessed paths); don't proceed if the last run wasn't a success.

Done:
- Confirm the guide's expected output exists and runs in Port.
- Summarize adaptations, seeded data, what was mocked or skipped, remaining UI steps, and how to verify.
This guide demonstrates how to ingest cloud resources monitored by Datadog, Dynatrace, or New Relic into Port.
Select your application performance monitoring (APM) provider once, and the provider tabs will stay synchronized throughout the guide.
Common use cases
- Map cloud resources monitored by Datadog, Dynatrace, or New Relic into Port.
- Centralize cloud resource metadata from AWS, Azure, and GCP in your software catalog.
- Track provider-specific health, identity, type, tag, and infrastructure data.
- Assign team ownership to Dynatrace resources using labels, tags, or search queries.
Prerequisites
- You have a Port account and have completed the onboarding process.
Complete the prerequisites for your selected provider:
- Datadog
- Dynatrace
- New Relic
- You have installed and set up Port's Datadog integration.
- You have configured the AWS, Azure, or GCP integration in Datadog.
- You have installed and set up Port's Dynatrace integration.
- You have cloud provider entities configured in Dynatrace. See the Dynatrace deployment documentation.
- You have installed and set up Port's New Relic integration.
- You have cloud provider entities configured in New Relic. See the New Relic infrastructure documentation.
Set up data model
Create the cloud resource blueprint for your selected provider.
- Datadog
- Dynatrace
- New Relic
Create the Datadog cloud resource blueprint
The blueprint captures host availability, platform, agent, source, and tag data from Datadog.
-
Go to the Builder page.
-
Click + Blueprint.
-
Click Edit JSON.
-
Copy and paste the following JSON configuration into the editor:
Datadog cloud resource blueprint (Click to expand)
{"identifier": "datadogCloudResource","description": "This blueprint represents a cloud resource in Datadog","title": "Datadog Cloud Resource","icon": "Datadog","schema": {"properties": {"up": {"type": "boolean","title": "Is Running?","description": "Is the host up?"},"host_name": {"type": "string","title": "Host Name","description": "the name of the host"},"description": {"type": "string","title": "Description","description": "the host description"},"platform": {"type": "string","title": "Platform","description": "the host platform"},"machine": {"type": "string","title": "Machine","description": "The CPU architecture of the host machine (e.g., amd64, x86, x64, arm, arm64)."},"cpu_cores": {"type": "number","title": "CPU Cores","description": "the host CPU cores"},"agent_version": {"type": "string","title": "Datadog Agent Version","description": "the Datadog agent version installed on the host"},"is_muted": {"type": "boolean","title": "Is Host Muted?","description": "Indicates whether alerts for that specific host are temporarily suppressed."},"sources": {"title": "Sources","type": "array","description": "Source or cloud provider associated with your host."},"tags": {"title": "Tags","type": "object","description": "Tags associated with the host."}},"required": []},"mirrorProperties": {},"calculationProperties": {},"relations": {}} -
Click Save to create the blueprint.
Create the Dynatrace cloud resource blueprint
The blueprint captures discovery timestamps, entity type, tags, and management zones. Its optional owned_by relation supports the ownership configuration later in this guide.
-
Go to the Builder page.
-
Click + Blueprint.
-
Click Edit JSON.
-
Copy and paste the following JSON configuration into the editor:
Cloud resource blueprint (Click to expand)
{"identifier": "dynatraceEntityCloudResource","description": "This blueprint represents a cloud resource monitored by Dynatrace.","title": "Dynatrace Cloud Resource","icon": "Dynatrace","schema": {"properties": {"firstSeen": {"type": "string","title": "First seen","description": "The timestamp at which the entity was first seen, in UTC milliseconds.","format": "date-time"},"lastSeen": {"type": "string","title": "Last seen","description": "The timestamp at which the entity was last seen, in UTC milliseconds.","format": "date-time"},"type": {"type": "string","title": "Type","description": "The type of the entity."},"tags": {"type": "array","title": "Tags","description": "A list of tags on the entity.","items": {"type": "string"}},"managementZone": {"type": "string","title": "Management zone","description": "The first Dynatrace management zone associated with the entity."}},"required": []},"mirrorProperties": {},"calculationProperties": {},"aggregationProperties": {},"relations": {"owned_by": {"title": "Owned by","target": "dynatraceTeam","required": false,"many": true}}} -
Click Save to create the blueprint.
Create the New Relic cloud resource blueprint
The blueprint captures New Relic account, entity, infrastructure integration, reporting, link, and tag data.
-
Go to the Builder page.
-
Click + Blueprint.
-
Click Edit JSON.
-
Copy and paste the following JSON configuration into the editor:
New Relic cloud resource blueprint (Click to expand)
{"identifier": "newRelicEntityCloudResource","description": "This blueprint represents a New Relic cloud resource entity.","title": "New Relic Cloud Resource","icon": "NewRelic","schema": {"properties": {"accountId": {"type": "string","title": "Account ID","description": "The New Relic account ID associated with the entity."},"domain": {"type": "string","title": "Domain","description": "The domain of the entity (e.g., INFRA, APM)."},"type": {"type": "string","title": "Entity Type","description": "The type of the entity."},"infrastructureIntegrationType": {"type": "string","title": "Infrastructure Integration Type","description": "The cloud provider integration type."},"tags": {"type": "object","title": "Tags","description": "Tags associated with the entity."},"reporting": {"type": "boolean","title": "Reporting","description": "Indicates if the entity is reporting data."},"link": {"type": "string","title": "Entity Link","description": "A link to the entity in New Relic.","format": "url"}},"required": []},"relations": {},"mirrorProperties": {},"calculationProperties": {},"aggregationProperties": {}} -
Click Save to create the blueprint.
Configure the mapping
Update your integration mapping to select cloud resources and create entities from them.
- Datadog
- Dynatrace
- New Relic
Update the Datadog integration mapping
The Datadog integration exposes monitored hosts through the host kind. This mapping selects hosts whose sources include AWS, Azure, GCP, or Google Compute Engine (gce).
-
Go to the Data sources page of your portal.
-
Select your Datadog integration.
-
Add the following YAML block into the editor:
Datadog cloud resource mapping (Click to expand)
deleteDependentEntities: truecreateMissingRelatedEntities: trueresources:- kind: hostselector:query: >-[.sources[] | . as $source | ["azure", "gcp", "gce", "aws"] |contains([$source])] | any(.)port:entity:mappings:blueprint: '"datadogCloudResource"'identifier: .id | tostringtitle: .aws_name // .host_nameproperties:up: .uphost_name: .host_nameplatform: .meta.platformis_muted: .is_mutedmachine: .meta.machinedescription: .descriptionsources: .sourcescpu_cores: .meta.cpuCoresagent_version: .meta.agent_versiontags: .tags_by_source -
Click Save & Resync to apply the mapping.
Update the Dynatrace integration mapping
The Dynatrace integration exposes monitored resources through the entity kind. Dynatrace organizes entities by type, so this mapping limits ingestion to cloud resource entity types.
-
Go to the Data sources page of your portal.
-
Select your Dynatrace integration.
-
Add the following YAML block into the editor:
Dynatrace cloud resource mapping (Click to expand)
deleteDependentEntities: truecreateMissingRelatedEntities: trueenableMergeEntity: trueresources:- kind: entityselector:query: 'true'entityTypes:- cloud:gcp:k8s_cluster- cloud:gcp:pubsub_subscription- cloud:gcp:pubsub_topic- cloud:gcp:gcs_bucket- cloud:gcp:gae_app- cloud:aws:acmprivateca- cloud:aws:api_gateway- cloud:aws:app_runner- cloud:aws:appstream- cloud:aws:appsync- cloud:azure:apimanagement:service- cloud:azure:app:containerapps- cloud:azure:app:managedenvironments- cloud:azure:appconfiguration:configurationstores- cloud:azure:appplatform:spring# See the cloud entity types section for more entity types.entityFields: firstSeenTms,lastSeenTms,tags,properties,managementZones,fromRelationships,toRelationshipsport:entity:mappings:identifier: .displayName | gsub(" "; "-")title: .displayNameblueprint: '"dynatraceEntityCloudResource"'properties:firstSeen: .firstSeenTms / 1000 | todatelastSeen: .lastSeenTms / 1000 | todatetype: .typetags: .tags[].stringRepresentationmanagementZone: .managementZones[0].name -
Click Save & Resync to apply the mapping.
Update the New Relic integration mapping
The New Relic integration exposes monitored resources through the entity kind. This mapping selects entities by their infrastructure integration type.
-
Go to the Data sources page of your portal.
-
Select your New Relic integration.
-
Add the following YAML block into the editor:
New Relic cloud resource mapping (Click to expand)
deleteDependentEntities: truecreateMissingRelatedEntities: trueresources:- kind: entityselector:query: 'true'entityQueryFilter:type IN (# Add the infrastructure integration types you want to ingest.'AWSEC2INSTANCE','AWSS3BUCKET','AWSRDSDBINSTANCE','AWSLAMBDAFUNCTION','AWSELBLOADBALANCER','AZUREVIRTUALMACHINE','AZURESQLDATABASE','GCPCOMPUTEINSTANCE','GCPSTORAGEBUCKET','GCPSQLDATABASEINSTANCE')entityExtraPropertiesQuery: |... on InfrastructureHostEntityOutline {infrastructureIntegrationType# Include additional properties if needed.}port:entity:mappings:blueprint: '"newRelicEntityCloudResource"'identifier: .guidtitle: .nameproperties:accountId: .accountIddomain: .domaintype: .entityTypeinfrastructureIntegrationType: .typereporting: .reportinglink: .permalinktags: .tags -
Click Save & Resync to apply the mapping.
Assign Dynatrace team ownership
Dynatrace supports multiple methods for assigning team ownership, including Kubernetes labels and annotations, host metadata, environment variables, tags, and management zones.
The examples below are complete mapping blocks. If you want to assign ownership, replace the base mapping from the previous section with the mapping that matches your preferred method.
If you want to apply the same ownership pattern to Port's default Dynatrace entity blueprint, replace "dynatraceEntityCloudResource" with "dynatraceEntity" in the relevant mapping.
If the default Dynatrace entity blueprint does not already have an owned_by relation, add it before applying an ownership mapping:
Team relation for the default Dynatrace entity blueprint (Click to expand)
"relations": {
  "owned_by": {
    "title": "Owned by",
    "target": "dynatraceTeam",
    "required": false,
    "many": true
  }
}
Choose one of the following YAML blocks:
- Kubernetes labels
- Tags
- Search query
This mapping reads team ownership from Kubernetes label keys such as dt.owner or owner.Ownership mapping using Kubernetes labels and annotations (Click to expand)
In this example, the dt.owner and owner keys from Kubernetes resource labels define ownership. Use the keys configured in your Dynatrace environment. For more details, see the Dynatrace ownership documentation.
This mapping reads team ownership from Dynatrace tags such as dt.owner or owner.Ownership mapping using tags (Click to expand)
In this example, the dt.owner and owner keys from tags define ownership. Use the keys configured in your Dynatrace environment. For more details, see the Dynatrace ownership documentation.
Use this mapping when the team identifier is not stored directly on the entity, but you can match the team by a known property such as management zone name or a Kubernetes label.Ownership mapping using search query (Click to expand)
After choosing a mapping:
-
Go to the Data sources page of your portal.
-
Select your Dynatrace integration.
-
Replace the existing cloud resource mapping with the YAML block you chose.
-
Click Save & Resync to apply the mapping.
Let's test it!
- Datadog
- Dynatrace
- New Relic
Test the flow
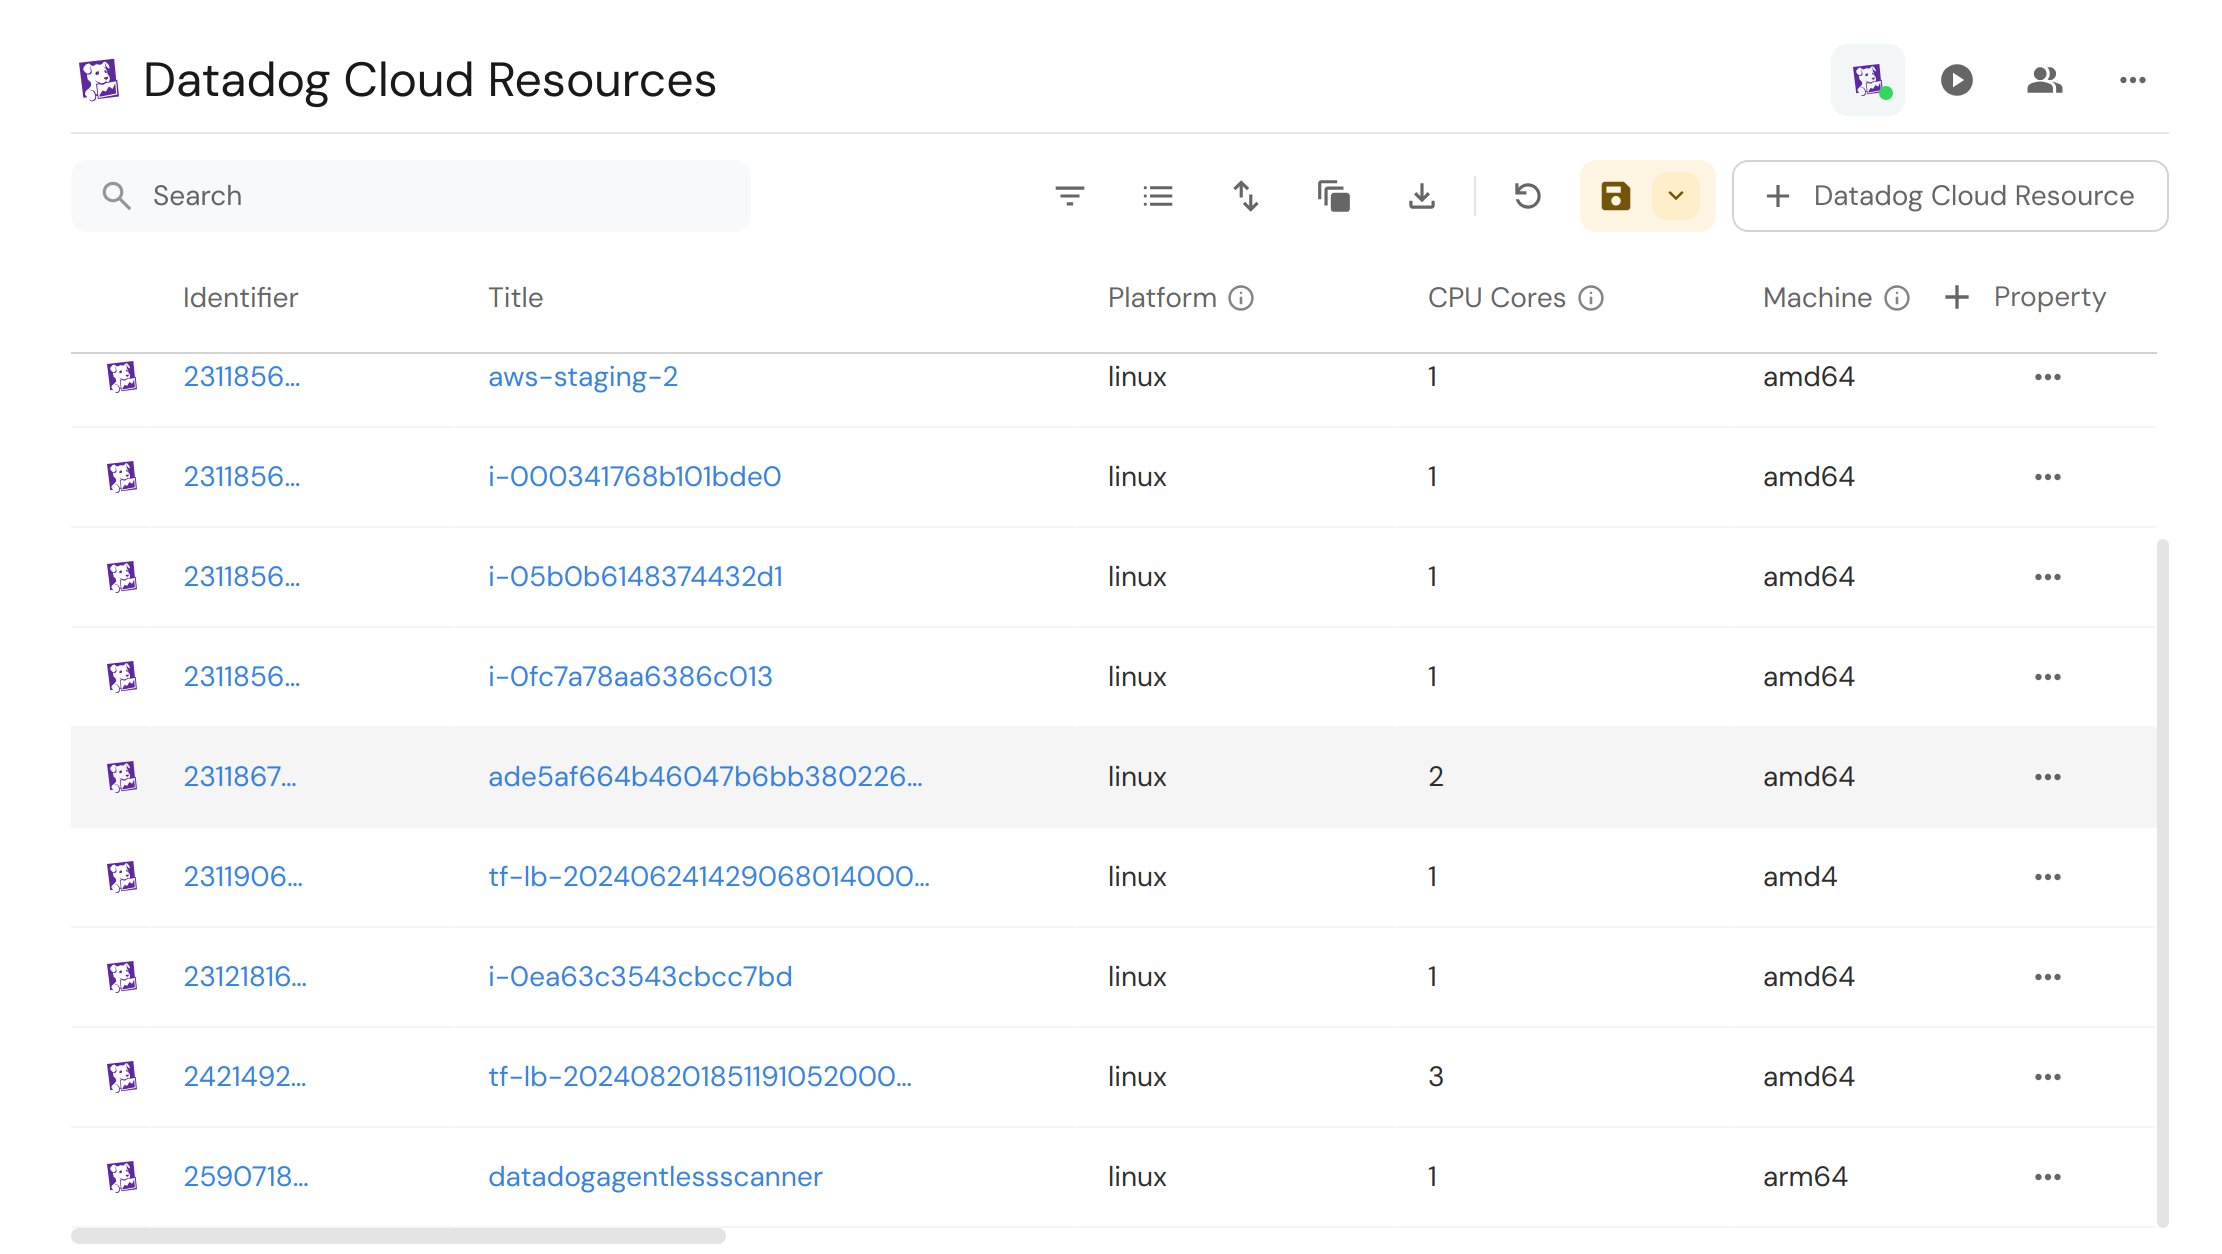
After the sync finishes, open the Datadog Cloud Resource blueprint in your software catalog.
Confirm that Datadog hosts associated with AWS, Azure, or GCP were created:
Test the flow
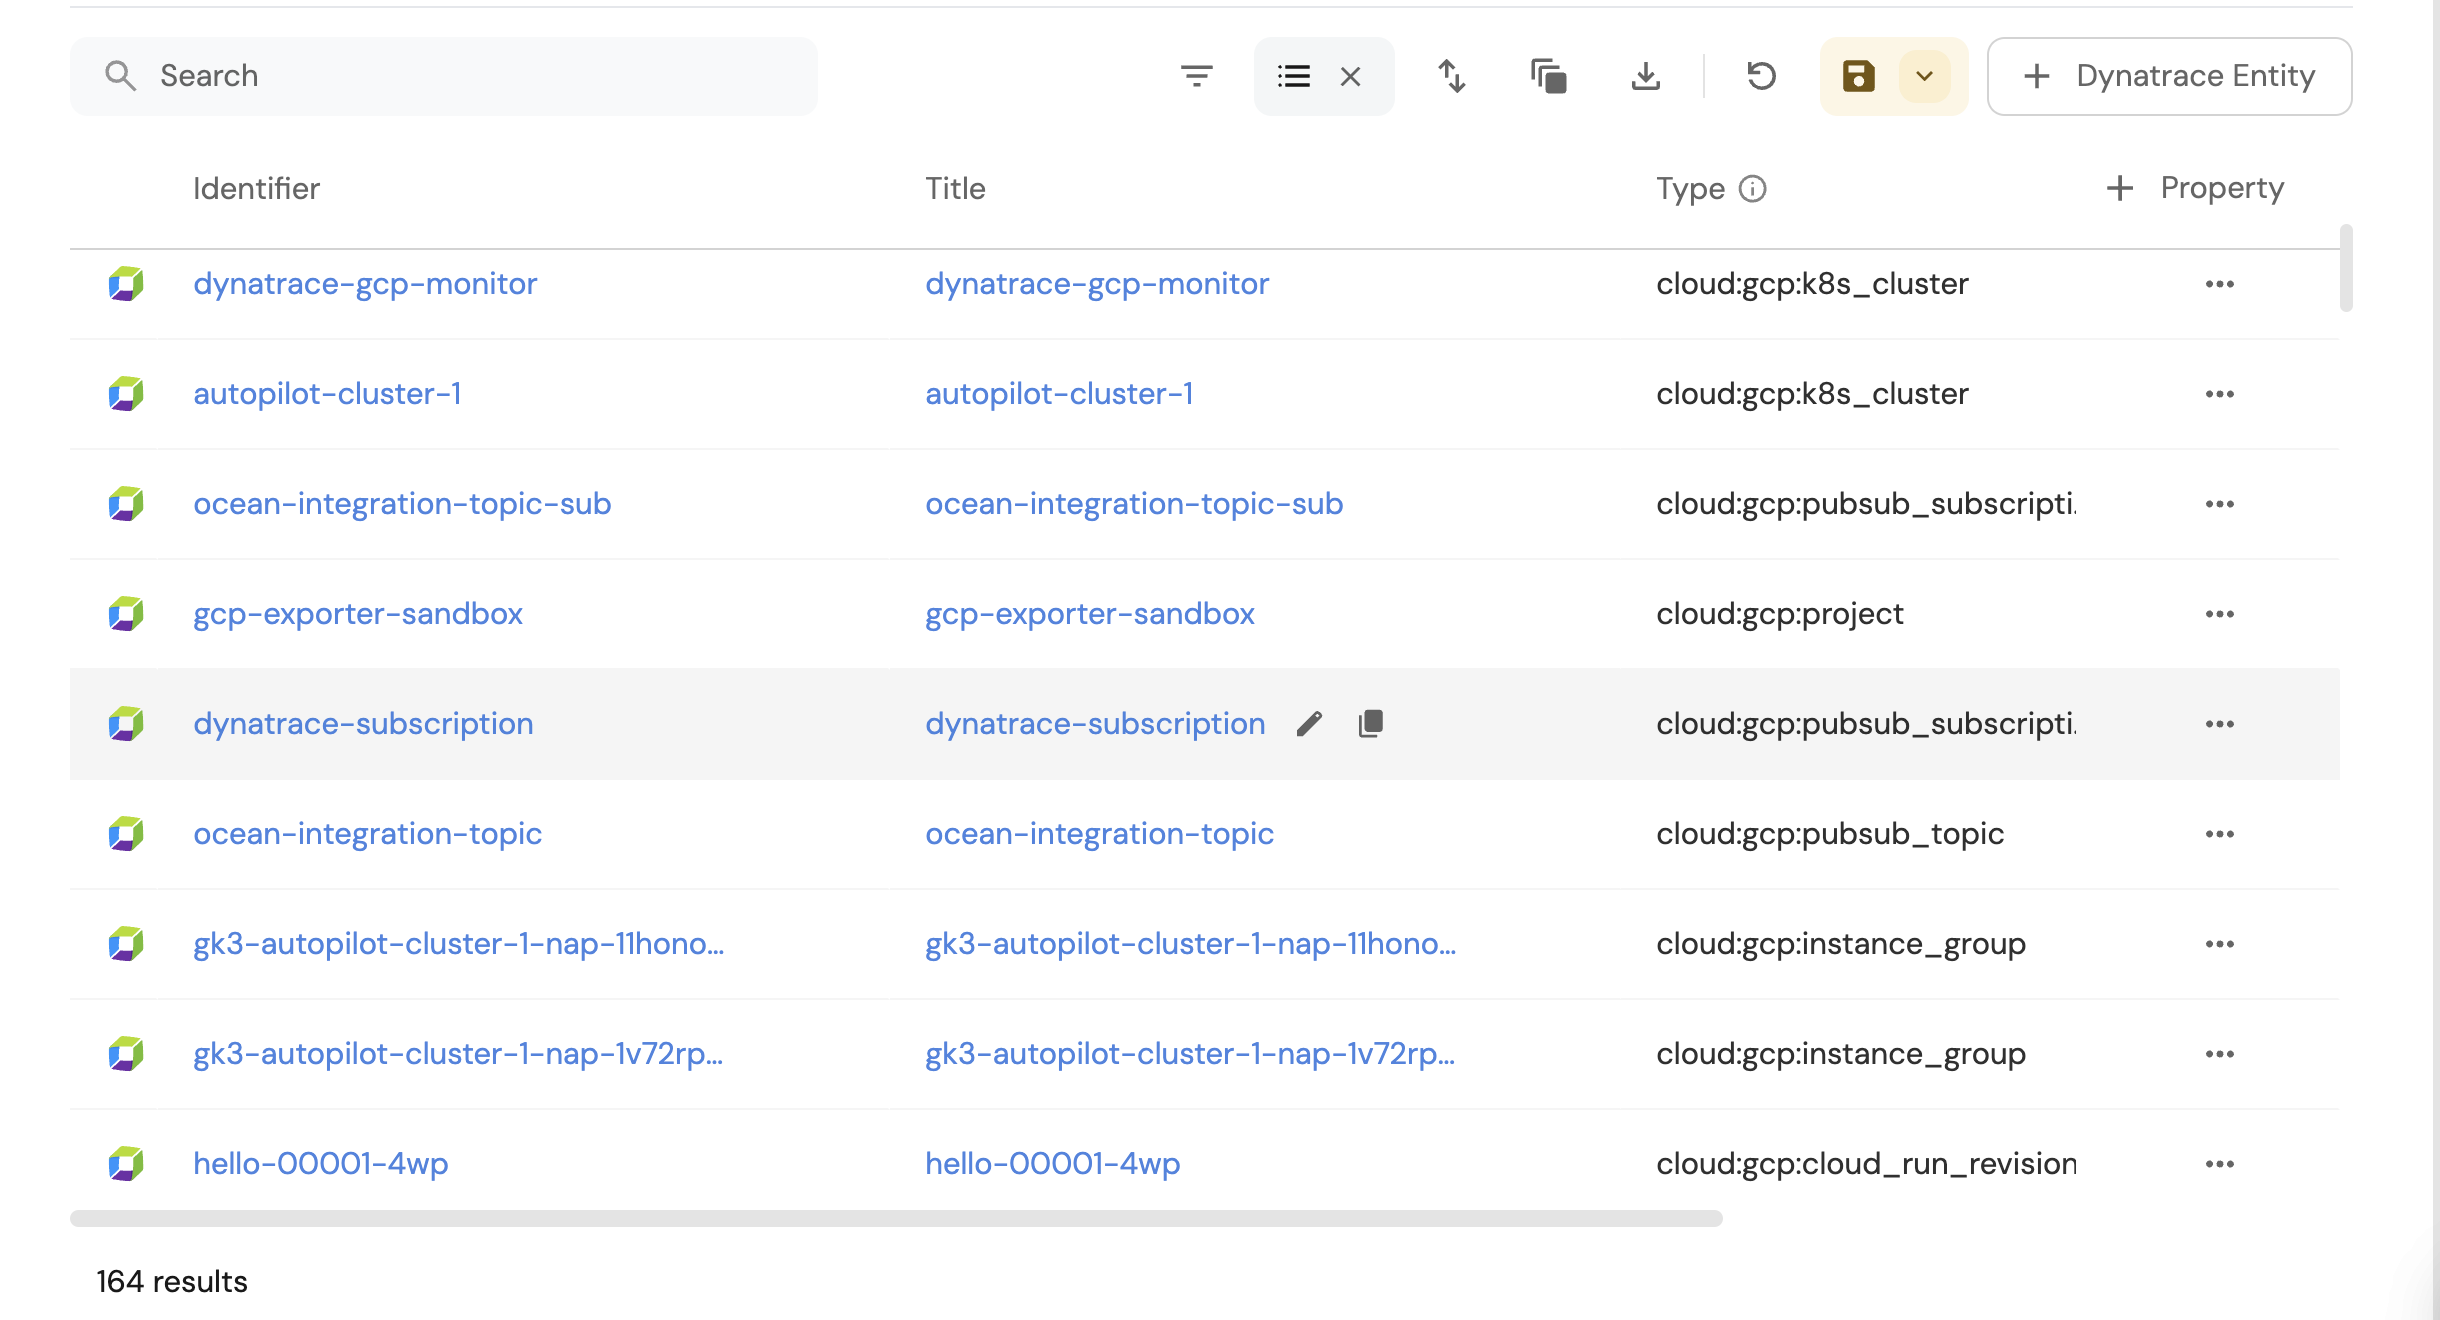
After the sync finishes, go to your Port software catalog and open the Dynatrace Cloud Resource blueprint.
Confirm that cloud resources from Dynatrace were created:
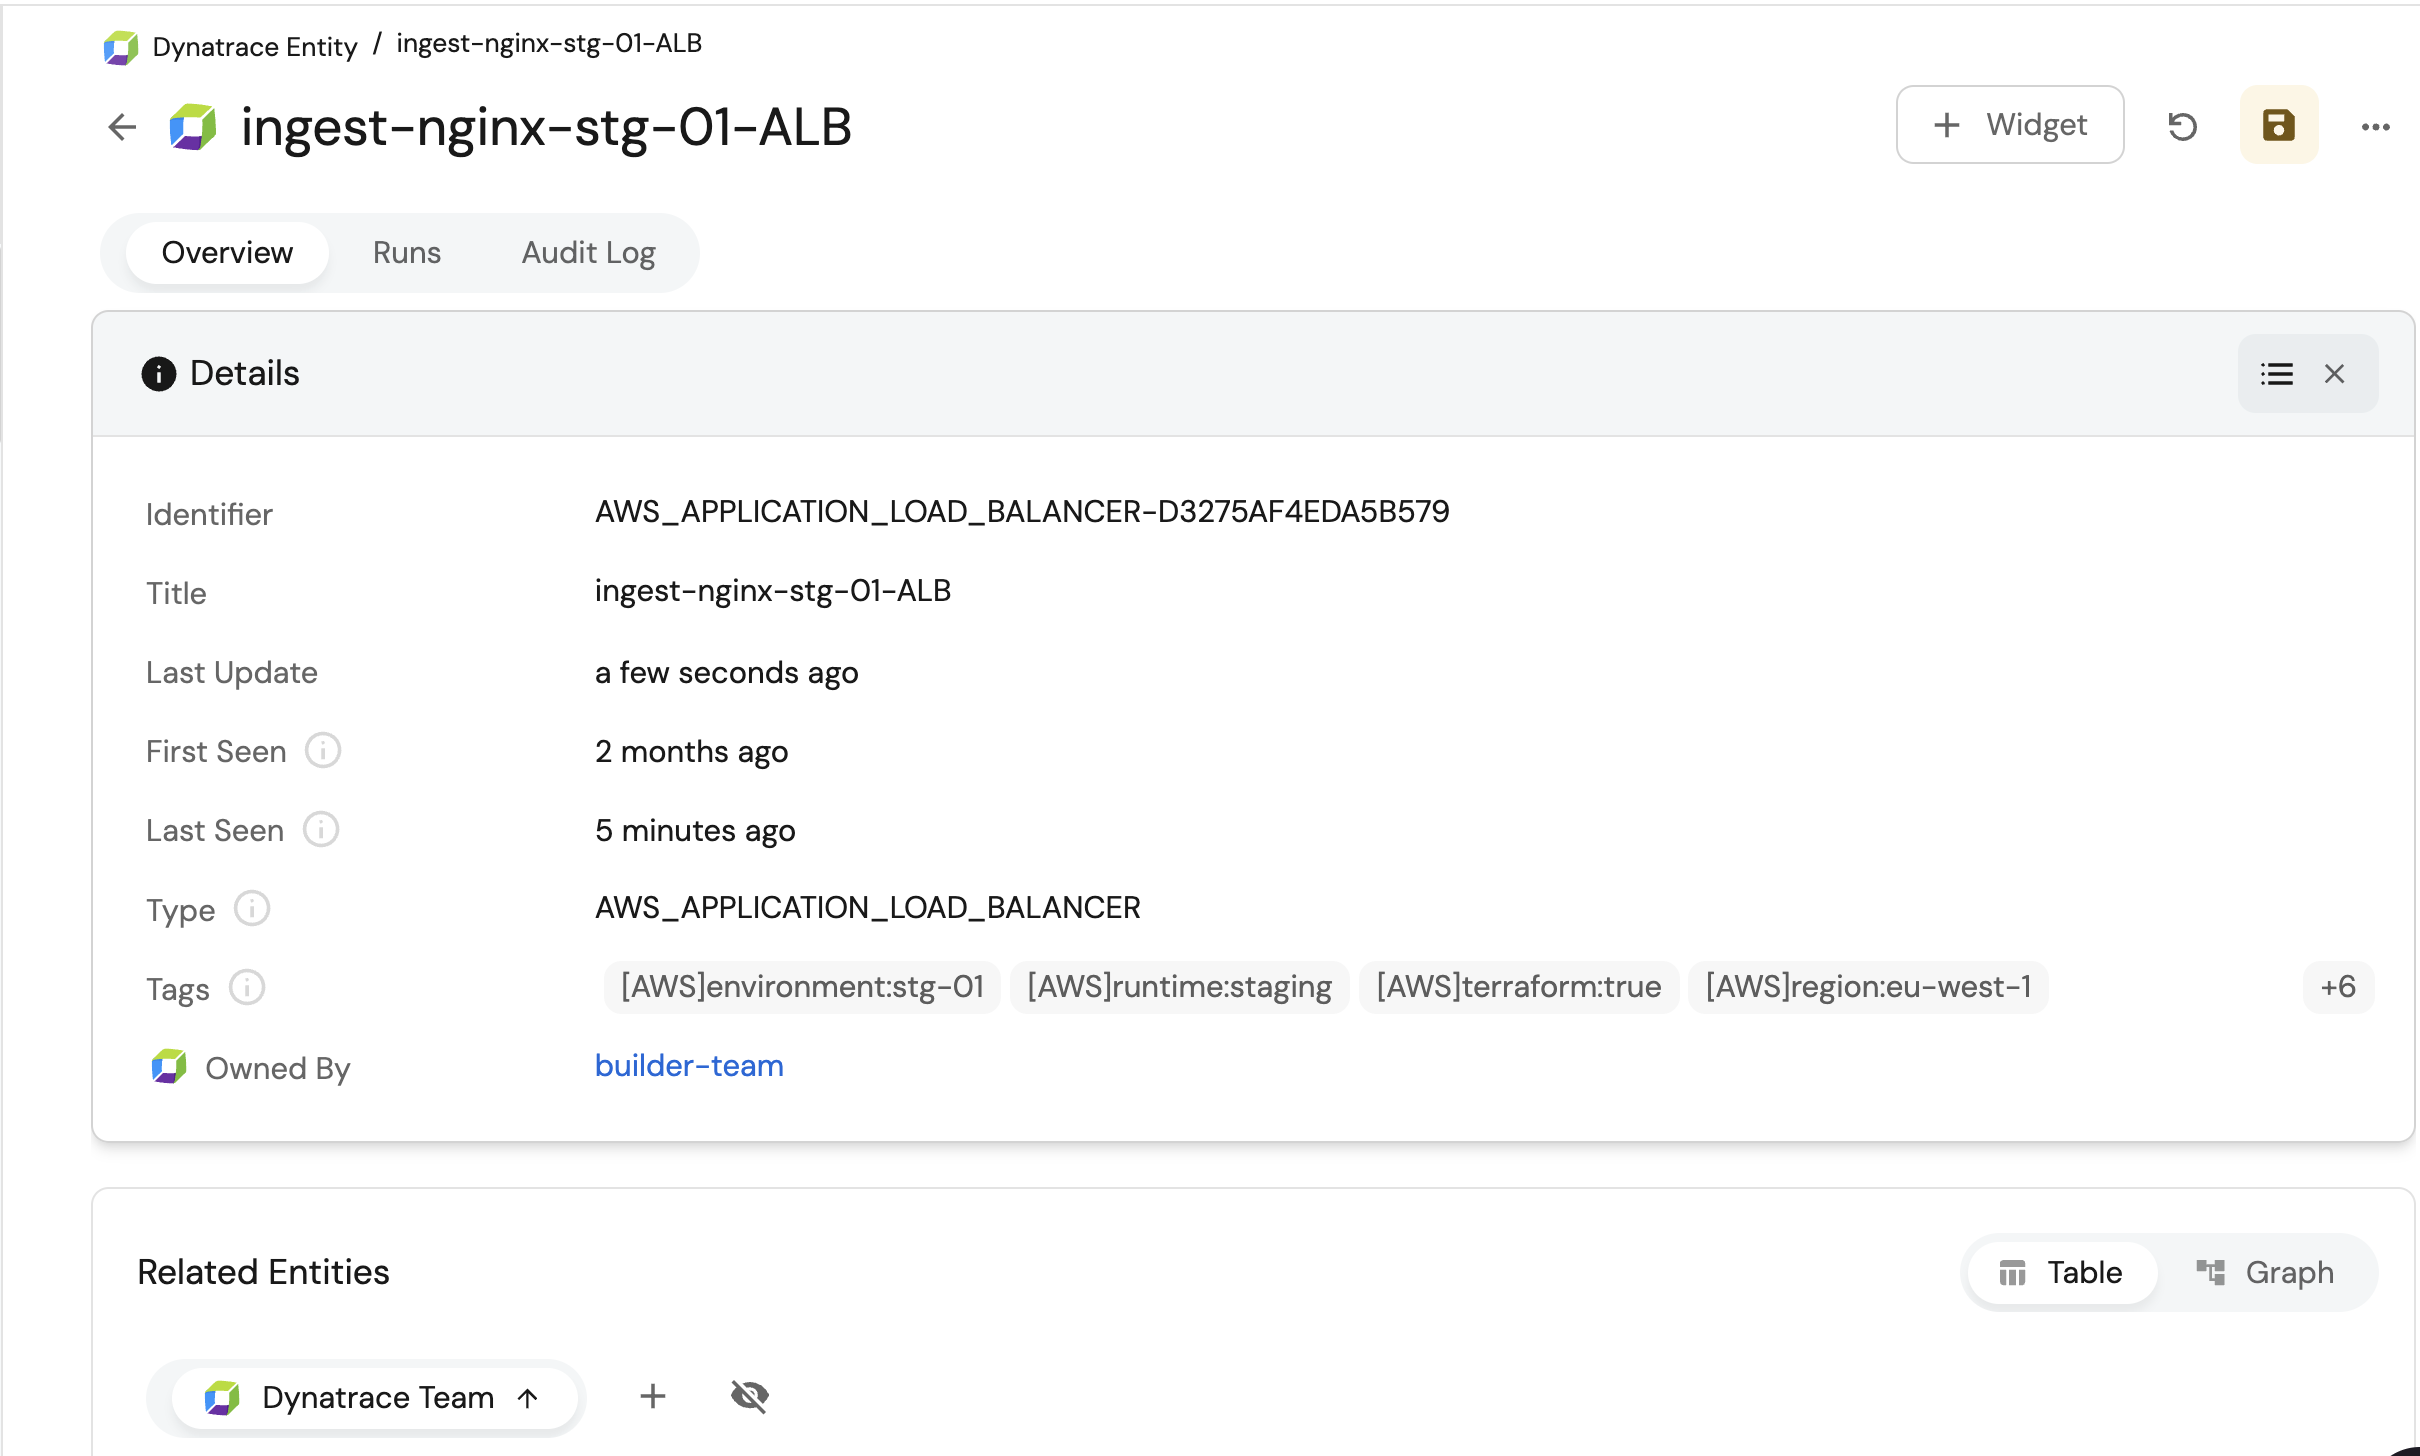
If you configured ownership mapping, open a resource entity and confirm that the Owned by relation points to the expected Dynatrace team:
Test the flow
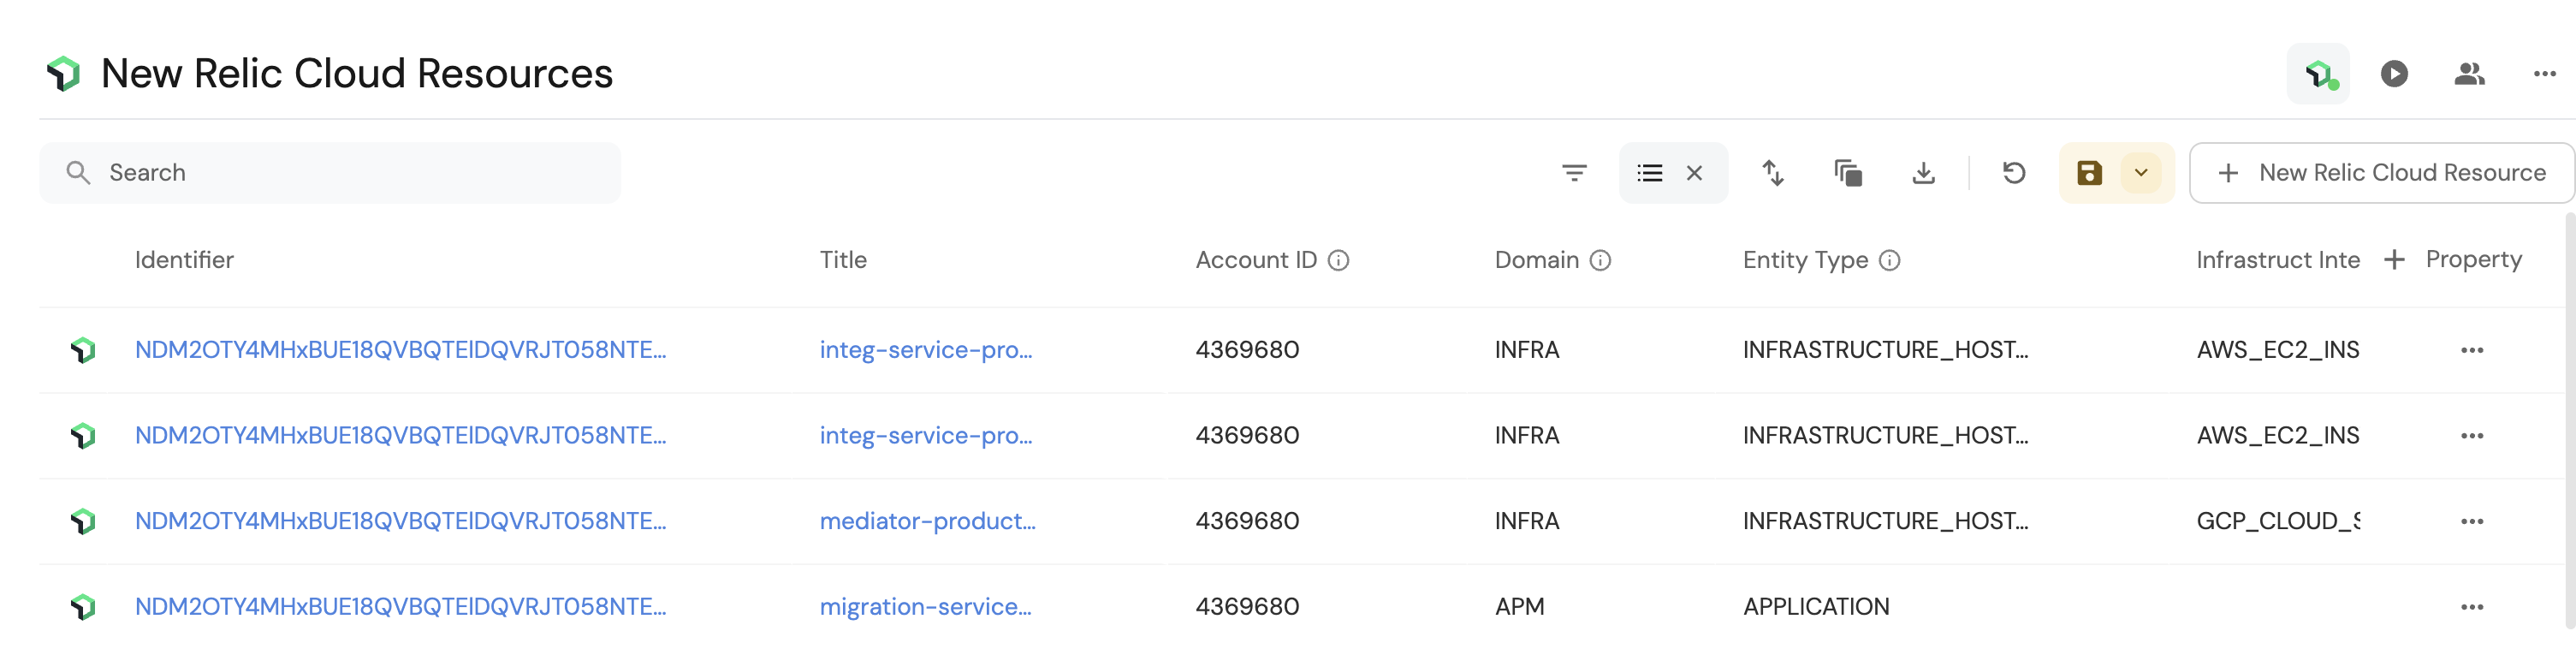
After the sync finishes, open the New Relic Cloud Resource blueprint in your software catalog.
Confirm that the selected New Relic infrastructure entities were created:
Review provider entity types
- Datadog
- Dynatrace
- New Relic
Review Datadog source values
The Datadog mapping selects hosts whose sources property contains one of these cloud provider values:
aws.azure.gcp.gce.
Add or remove values in the mapping selector to match the sources configured in your Datadog environment.
Review Dynatrace cloud entity types
The entityTypes selector in the mapping above contains common cloud resource entity types in Dynatrace. You can get the full list of entity types by making a GET request to https://<YOUR_DYNATRACE_ENVIRONMENT_ID>.live.dynatrace.com/api/v2/entityTypes.Dynatrace cloud resource entity types (Click to expand)
cloud:aws:acmprivateca.cloud:aws:api_gateway.cloud:aws:app_runner.cloud:aws:appstream.cloud:aws:appsync.cloud:aws:athena.cloud:aws:aurora.cloud:aws:autoscaling.cloud:aws:billing.cloud:aws:cassandra.cloud:aws:chatbot.cloud:aws:cloud_front.cloud:aws:cloudhsm.cloud:aws:cloudsearch.cloud:aws:codebuild.cloud:aws:cognito.cloud:aws:connect.cloud:aws:datasync.cloud:aws:dax.cloud:aws:dms.cloud:aws:documentdb.cloud:aws:dxcon.cloud:aws:dynamodb.cloud:aws:ebs.cloud:aws:ec2_spot.cloud:aws:ec2api.cloud:aws:ecs.cloud:aws:ecs:cluster.cloud:aws:efs.cloud:aws:eks:cluster.cloud:aws:elasticache.cloud:aws:elasticbeanstalk.cloud:aws:elasticinference.cloud:aws:elastictranscoder.cloud:aws:emr.cloud:aws:es.cloud:aws:events.cloud:aws:fsx.cloud:aws:gamelift.cloud:aws:glue.cloud:aws:inspector.cloud:aws:iot.cloud:aws:iot_things_graph.cloud:aws:iotanalytics.cloud:aws:kafka.cloud:aws:kinesis:data_analytics.cloud:aws:kinesis:data_firehose.cloud:aws:kinesis:data_stream.cloud:aws:kinesis:video_stream.cloud:aws:lambda.cloud:aws:lex.cloud:aws:logs.cloud:aws:media_tailor.cloud:aws:mediaconnect.cloud:aws:mediaconvert.cloud:aws:mediapackagelive.cloud:aws:mediapackagevod.cloud:aws:mq.cloud:aws:nat_gateway.cloud:aws:neptune.cloud:aws:opsworks.cloud:aws:polly.cloud:aws:qldb.cloud:aws:rds.cloud:aws:redshift.cloud:aws:rekognition.cloud:aws:robomaker.cloud:aws:route53.cloud:aws:route53resolver.cloud:aws:s3.cloud:aws:sage_maker:batch_transform_job.cloud:aws:sage_maker:endpoint.cloud:aws:sage_maker:endpoint_instance.cloud:aws:sage_maker:ground_truth.cloud:aws:sage_maker:processing_job.cloud:aws:sage_maker:training_job.cloud:aws:servicecatalog.cloud:aws:ses.cloud:aws:sns.cloud:aws:sqs.cloud:aws:ssm-runcommand.cloud:aws:states.cloud:aws:storagegateway.cloud:aws:swf.cloud:aws:textract.cloud:aws:transfer.cloud:aws:transitgateway.cloud:aws:translate.cloud:aws:trustedadvisor.cloud:aws:usage.cloud:aws:vpn.cloud:aws:waf.cloud:aws:wafv2.cloud:aws:workmail.cloud:aws:workspaces.cloud:azure:apimanagement:service.cloud:azure:app:containerapps.cloud:azure:app:managedenvironments.cloud:azure:appconfiguration:configurationstores.cloud:azure:appplatform:spring.cloud:azure:automation:automationaccounts.cloud:azure:batch:account.cloud:azure:blockchain:blockchainmembers.cloud:azure:cache:redis.cloud:azure:cdn:cdnwebapplicationfirewallpolicies.cloud:azure:cdn:profiles.cloud:azure:classic_storage_account.cloud:azure:classic_storage_account:blob.cloud:azure:classic_storage_account:file.cloud:azure:classic_storage_account:queue.cloud:azure:classic_storage_account:table.cloud:azure:classic_virtual_machine.cloud:azure:cognitiveservices:allinone.cloud:azure:cognitiveservices:anomalydetector.cloud:azure:cognitiveservices:bingautosuggest.cloud:azure:cognitiveservices:bingcustomsearch.cloud:azure:cognitiveservices:bingentitysearch.cloud:azure:cognitiveservices:bingsearch.cloud:azure:cognitiveservices:bingspellcheck.cloud:azure:cognitiveservices:computervision.cloud:azure:cognitiveservices:contentmoderator.cloud:azure:cognitiveservices:customvisionprediction.cloud:azure:cognitiveservices:customvisiontraining.cloud:azure:cognitiveservices:face.cloud:azure:cognitiveservices:immersivereader.cloud:azure:cognitiveservices:inkrecognizer.cloud:azure:cognitiveservices:luis.cloud:azure:cognitiveservices:luisauthoring.cloud:azure:cognitiveservices:openai.cloud:azure:cognitiveservices:personalizer.cloud:azure:cognitiveservices:qnamaker.cloud:azure:cognitiveservices:speech.cloud:azure:cognitiveservices:textanalytics.cloud:azure:cognitiveservices:translator.cloud:azure:containerinstance:containergroup.cloud:azure:containerregistry:registries.cloud:azure:containerservice:managedcluster.cloud:azure:datafactory:v1.cloud:azure:datafactory:v2.cloud:azure:datalakeanalytics:accounts.cloud:azure:datalakestore:accounts.cloud:azure:datashare:accounts.cloud:azure:devices:iothubs.cloud:azure:devices:provisioningservices.cloud:azure:documentdb:databaseaccounts:global.cloud:azure:documentdb:databaseaccounts:mongo.cloud:azure:eventgrid:domains.cloud:azure:eventgrid:systemtopics.cloud:azure:eventgrid:topics.cloud:azure:eventhub:clusters.cloud:azure:frontdoor.cloud:azure:hdinsight:cluster.cloud:azure:hybridcompute:machines.cloud:azure:insights:components.cloud:azure:iotcentral:iotapps.cloud:azure:keyvault:vaults.cloud:azure:kusto:clusters.cloud:azure:logic:integrationserviceenvironments.cloud:azure:logic:workflows.cloud:azure:machinelearningservices:workspaces.cloud:azure:maps:accounts.cloud:azure:mariadb:server.cloud:azure:media:mediaservices.cloud:azure:media:mediaservices:streamingendpoints.cloud:azure:mysql:flexibleservers.cloud:azure:mysql:server.cloud:azure:netapp:netappaccounts:capacitypools.cloud:azure:netapp:netappaccounts:capacitypools:volumes.cloud:azure:network:applicationgateways.cloud:azure:network:azurefirewalls.cloud:azure:network:dnszones.cloud:azure:network:expressroutecircuits.cloud:azure:network:loadbalancers:basic.cloud:azure:network:loadbalancers:gateway.cloud:azure:network:loadbalancers:standard.cloud:azure:network:networkinterfaces.cloud:azure:network:networkwatchers:connectionmonitors.cloud:azure:network:networkwatchers:connectionmonitors:preview.cloud:azure:network:privatednszones.cloud:azure:network:publicipaddresses.cloud:azure:notificationhubs:namespaces:notificationhubs.cloud:azure:postgresql:flexibleservers.cloud:azure:postgresql:server.cloud:azure:postgresql:serverv2.cloud:azure:powerbidedicated:capacities.cloud:azure:recoveryservices:vaults.cloud:azure:relay:namespaces.cloud:azure:search:searchservices.cloud:azure:servicefabricmesh:applications.cloud:azure:signalrservice:signalr.cloud:azure:sql:managed.cloud:azure:sql:servers.cloud:azure:sql:servers:databases:datawarehouse.cloud:azure:sql:servers:databases:dtu.cloud:azure:sql:servers:databases:hyperscale.cloud:azure:sql:servers:databases:vcore.cloud:azure:sql:servers:elasticpools:dtu.cloud:azure:sql:servers:elasticpools:vcore.cloud:azure:storage:storageaccounts.cloud:azure:storage:storageaccounts:blob.cloud:azure:storage:storageaccounts:file.cloud:azure:storage:storageaccounts:queue.cloud:azure:storage:storageaccounts:table.cloud:azure:storagesync:storagesyncservices.cloud:azure:streamanalytics:streamingjobs.cloud:azure:synapse:workspaces.cloud:azure:synapse:workspaces:bigdatapools.cloud:azure:synapse:workspaces:sqlpools.cloud:azure:timeseriesinsights:environments.cloud:azure:timeseriesinsights:eventsources.cloud:azure:traffic_manager_profile.cloud:azure:virtual_network_gateway.cloud:azure:web:appslots.cloud:azure:web:functionslots.cloud:azure:web:hostingenvironments:v2.cloud:azure:web:serverfarms.cloud:gcp:autoscaler.cloud:gcp:bigquery_biengine_model.cloud:gcp:cloud_function.cloud:gcp:cloud_run_revision.cloud:gcp:cloudsql_database.cloud:gcp:filestore_instance.cloud:gcp:gae_app.cloud:gcp:gce_instance.cloud:gcp:gcs_bucket.cloud:gcp:https_lb.cloud:gcp:instance_group.cloud:gcp:internal_http_lb_rule.cloud:gcp:internal_network_lb_rule.cloud:gcp:k8s_cluster.cloud:gcp:k8s_container.cloud:gcp:k8s_node.cloud:gcp:k8s_pod.cloud:gcp:network_lb_rule.cloud:gcp:project.cloud:gcp:pubsub_snapshot.cloud:gcp:pubsub_subscription.cloud:gcp:pubsub_topic.cloud:gcp:pubsublite_subscription_partition.cloud:gcp:pubsublite_topic_partition.cloud:gcp:tcp_ssl_proxy_rule.cloud:gcp:tpu_worker.S3BUCKET.
Review New Relic infrastructure integration types
The entityQueryFilter in the mapping selects New Relic entities by their infrastructure integration type. Add the values that represent the resources you want to ingest.New Relic infrastructure integration types (Click to expand)
AWSEC2INSTANCE.AWSEBSVOLUME.AWSS3BUCKET.AWSRDSDBINSTANCE.AWSLAMBDAFUNCTION.AWSELBLOADBALANCER.AWSDYNAMODBTABLE.AWSELASTICACHENODE.AWSREDSHIFTCLUSTER.AWSKINESISSTREAM.AWSSNSTOPIC.AWSSQSQUEUE.AWSELASTICBEANSTALK.AWSAUTOSCALINGGROUP.AWSCLOUDFRONTDISTRIBUTION.AWSAPIGATEWAY.AWSECSCLUSTER.AWSEKSCLUSTER.
AZUREVIRTUALMACHINE.AZUREVMSCALESET.AZUREAPPSERVICE.AZUREFUNCTIONAPP.AZURESQLDATABASE.AZURESTORAGEACCOUNT.AZURECOSMOSDB.AZUREREDISCACHE.AZURESERVICEBUSNAMESPACE.AZUREEVENTHUBNAMESPACE.AZURELOADBALANCER.AZUREAPPLICATIONGATEWAY.AZURECONTAINERINSTANCE.AZUREKUBERNETESSERVICE.
GCPCOMPUTEINSTANCE.GCPSTORAGEBUCKET.GCPCLOUDSQLDATABASE.GCPFUNCTION.GCPPUBSUBTOPIC.GCPBIGQUERYDATASET.GCPCLOUDSPANNERINSTANCE.GCPKUBERNETESCLUSTER.GCPCLOUDRUNSERVICE.
APACHEHTTPDSERVER.NGINXSERVER.MYSQLDATABASE.POSTGRESQLDATABASE.REDISINSTANCE.DOCKERCONTAINER.KUBERNETESCLUSTER.