# Summarize Zendesk tickets with AI
When working on support, you often need quick, structured summaries of a ticket for internal handoffs or customer updates.
In this guide, we will set up a prompt in Port so that any AI tool that supports the prompt feature of the MCP protocol can help you summarize Zendesk tickets with all the relevant context.
## Common use cases[](#common-use-cases "Direct link to Common use cases")
* Generate a concise, standardized ticket summary for internal handoffs.
* Produce a customer-facing summary capturing request, resolution, and root cause.
* Create quick recaps for weekly reviews or QA of support interactions.
## Scenario[](#scenario "Direct link to Scenario")
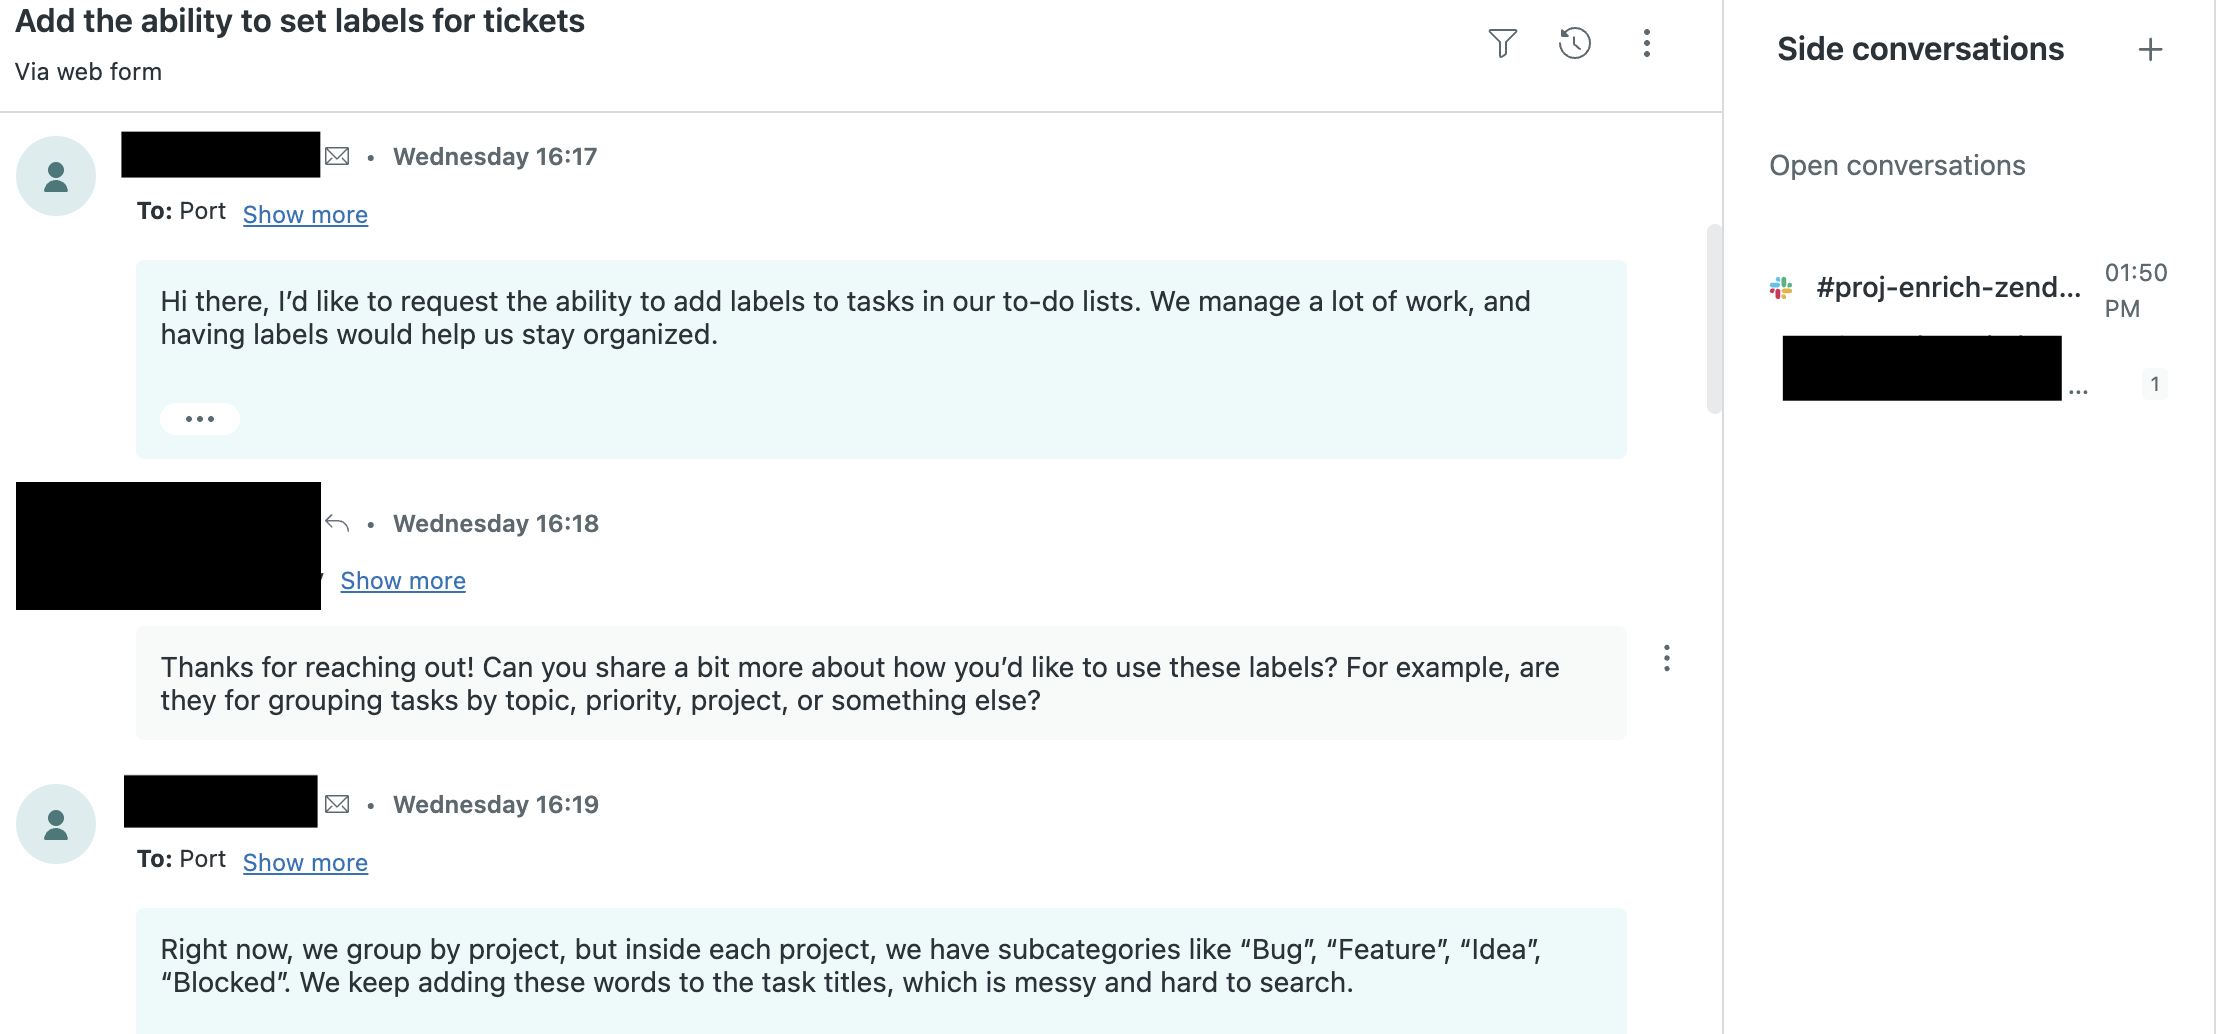
You’re the on-call support engineer. A customer requests the ability to set labels for tickets on Zendesk ticket `4095`. Before hand-off, you need a concise internal summary and a customer-facing version.
Example context snippets the prompt will fetch:
```
Ticket subject: Add the ability to set labels for tickets
Recent comments
- 2025-08-13 13:12: Customer: "I want the ability to set labels for tickets"
- 2025-08-13 13:16: Agent: "Thanks for reaching out! Can you share a bit more about how you’d like to use these labels?"
```
Example output from the prompt:

## Flow overview[](#flow-overview "Direct link to Flow overview")
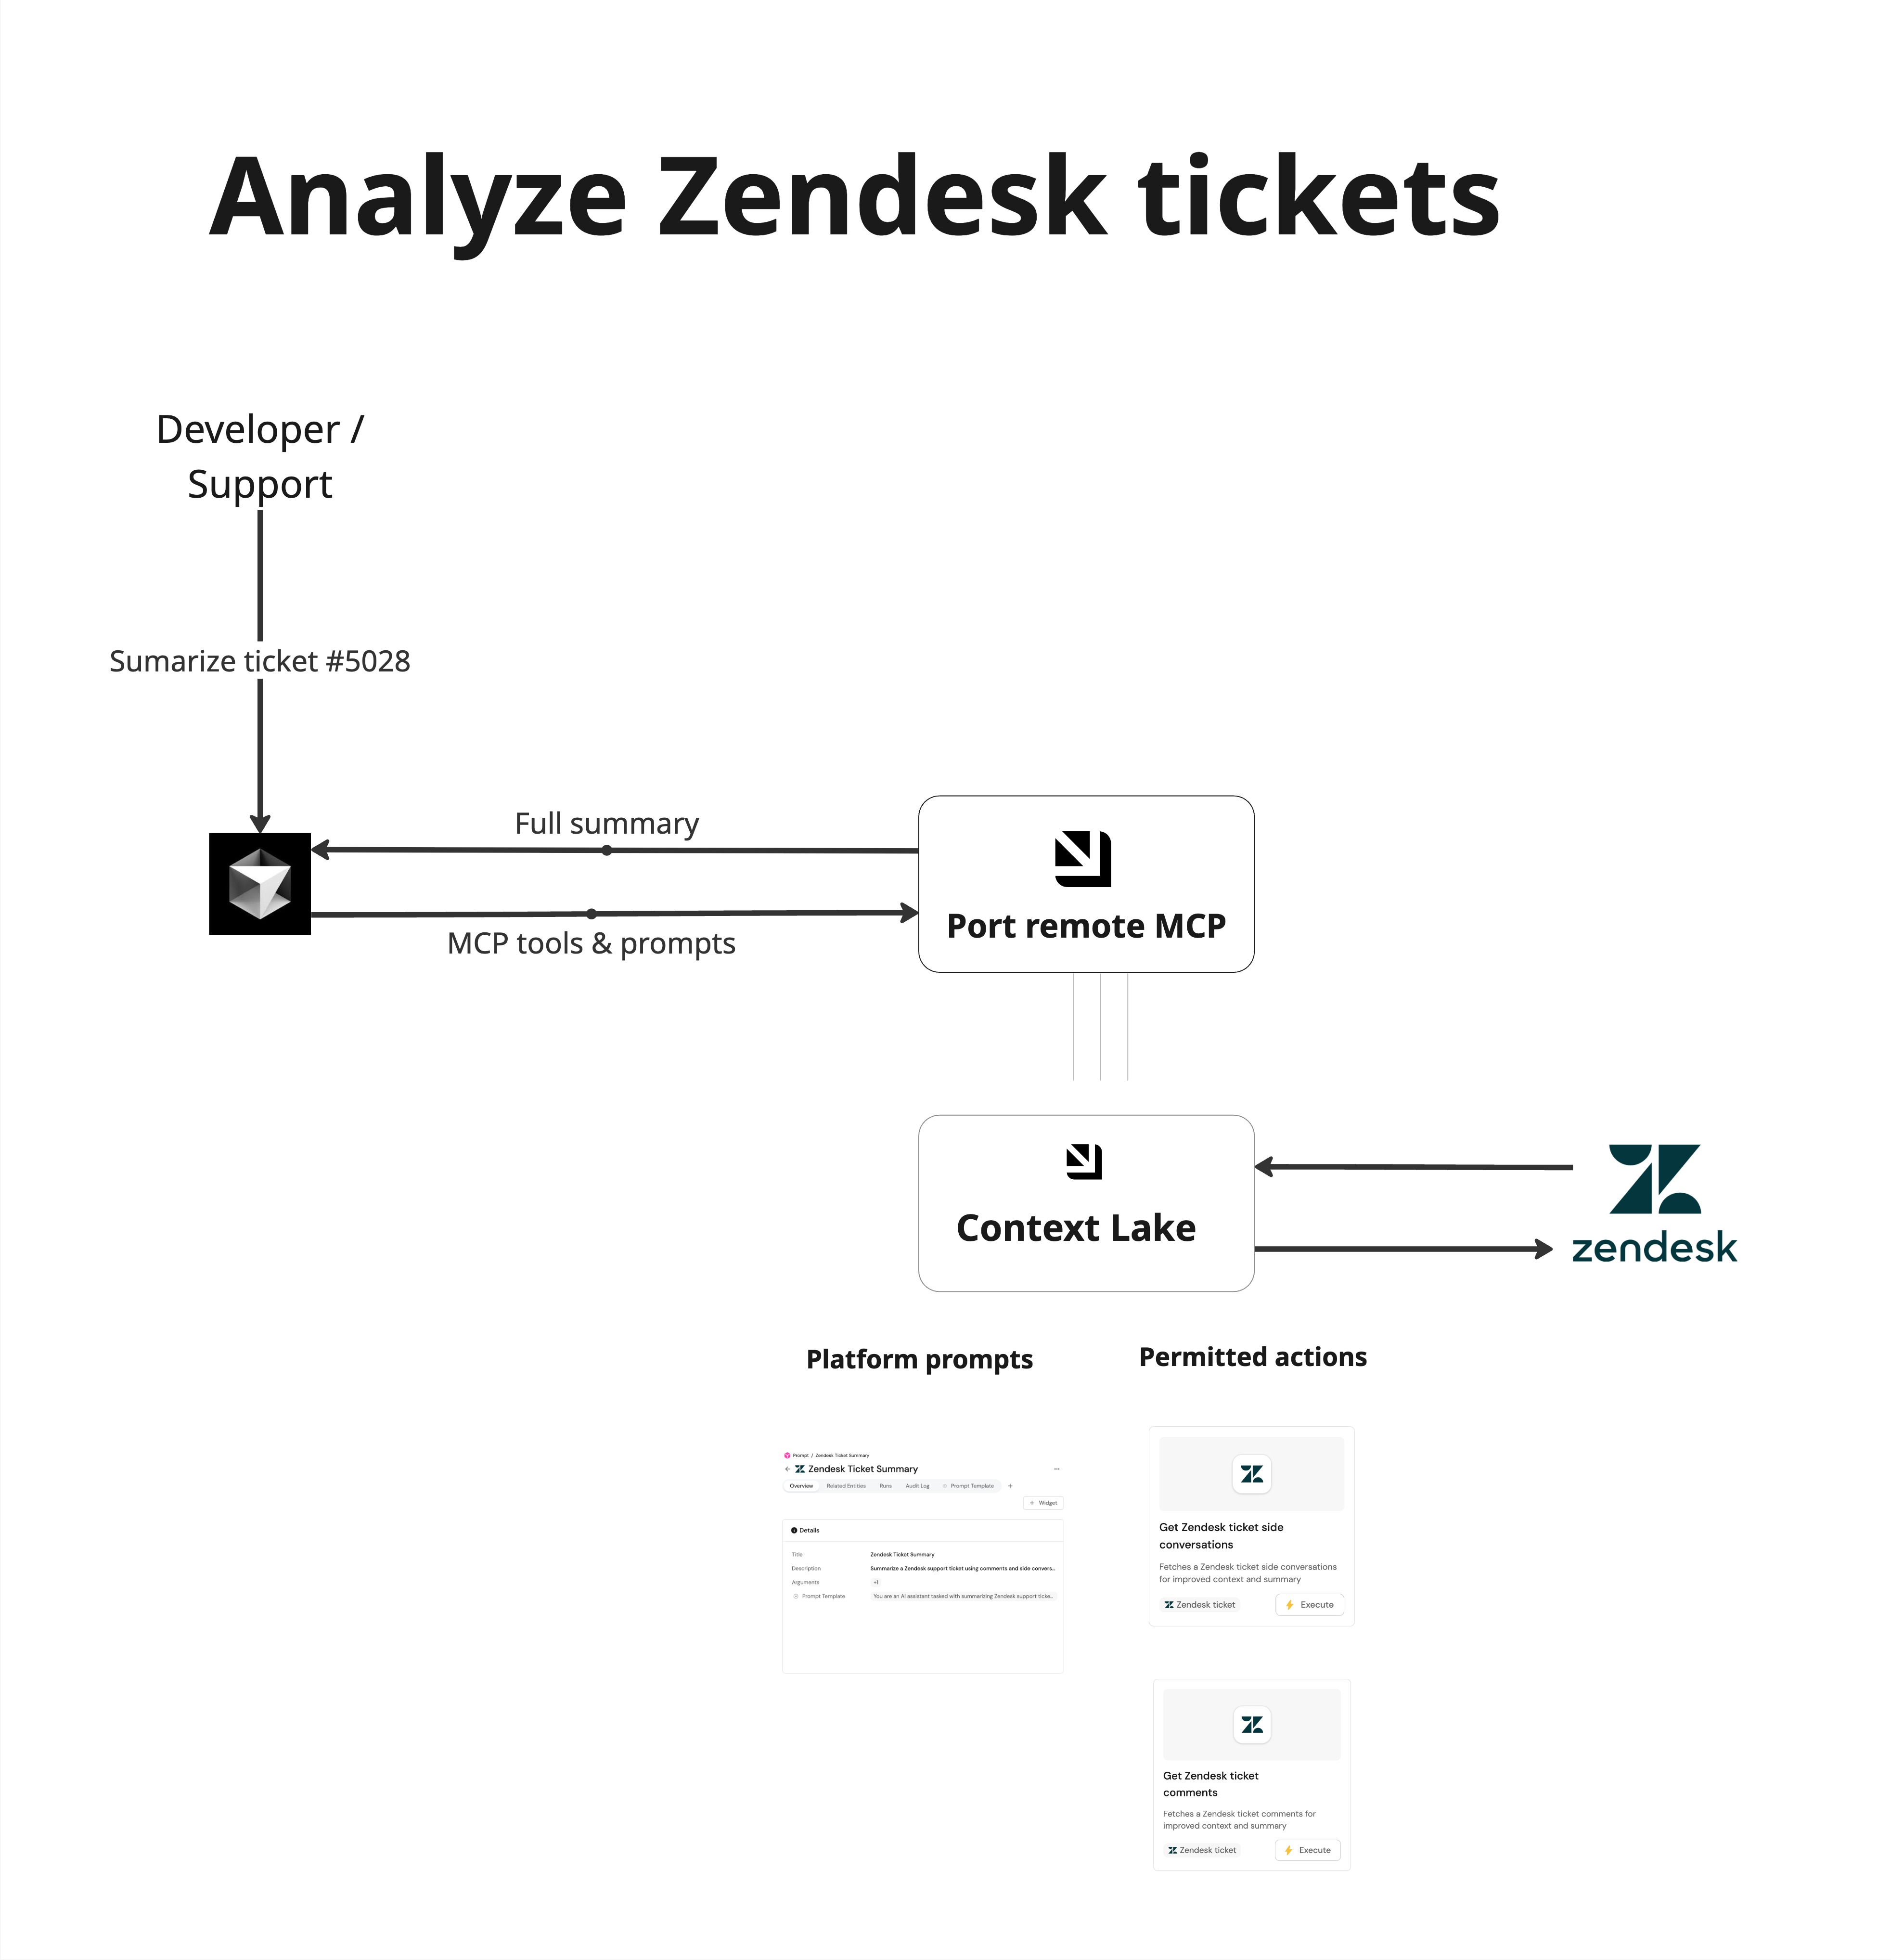
* Developer runs the reusable `zendesk_ticket_summary` prompt with `ticket_id`
* Prompt uses actions to fetch comments and side conversations → returns a structured summary
## Prerequisites[](#prerequisites "Direct link to Prerequisites")
* Port remote MCP installed and connected in your IDE (Cursor, Claude, etc.). Follow the setup guide: [Port MCP Server - Setup](/ai-interfaces/port-mcp-server/overview-and-installation.md#installing-port-mcp)
* A Port account and have completed the [onboarding process](https://docs.port.io/getting-started/overview).
* Custom integration to ingest Zendesk tickets using [Port webhooks](/build-your-software-catalog/custom-integration/webhook/.md).
## Add Secrets[](#add-secrets "Direct link to Add Secrets")
The actions in this guide authenticate to Zendesk using a secret that stores your API token, enabling them to retrieve ticket comments and side-conversation data. You can generate an API token by following Zendesk’s instructions [here](https://developer.zendesk.com/api-reference/introduction/security-and-auth/#api-token).
To add the secret to your portal:
1. Click on your **profile picture** in the top right corner of your Port application.
2. Click on **Credentials**.
3. Click on the `Secrets` tab.
4. Click on `+ Secret` and add the following secrets:
* `ZENDESK_TOKEN` - Your Zendesk API token generated according to the guide.
## Set up self-service actions[](#set-up-self-service-actions "Direct link to Set up self-service actions")
Zendesk tickets consist of two main sources:
1. **Comments** – the primary conversation between the requester and agents (public or internal).
2. **Side conversations** – separate threaded discussions (email, Slack, etc.) opened from the ticket for additional stakeholders.
The self-service actions you’ll create below retrieve both comments and side-conversation messages, ensuring the prompt has the complete context before generating a summary.
#### Get Ticket Comments[](#get-ticket-comments "Direct link to Get Ticket Comments")
This action fetches all comments for the Zendesk ticket identified by the entity identifier.
1. Go to the [self-service](https://app.getport.io/self-serve) page of your portal.
2. Click on `+ New Action`.
3. Click on the `{...} Edit JSON` button.
4. Copy and paste the following JSON configuration:
**Action: Get Ticket Comments (Click to expand)**
Create in Port
```
{
"identifier": "get_ticket_comments",
"title": "get ticket comments",
"trigger": {
"type": "self-service",
"operation": "DAY-2",
"userInputs": {
"properties": {},
"required": [],
"order": []
},
"blueprintIdentifier": "zendesk_ticket"
},
"invocationMethod": {
"type": "WEBHOOK",
"url": "https://.zendesk.com/api/v2/tickets/{{ .entity.identifier }}/comments",
"agent": false,
"synchronized": true,
"method": "GET",
"headers": {
"Content-Type": "application/json",
"Authorization": "Basic {{ .secrets.ZENDESK_TOKEN }}"
},
"body": {}
},
"requiredApproval": false
}
```
5. Click `Save`.
#### Get Ticket Side Conversations[](#get-ticket-side-conversations "Direct link to Get Ticket Side Conversations")
This action lists all side conversations for the Zendesk ticket.
1. Go to the [self-service](https://app.getport.io/self-serve) page of your portal.
2. Click on `+ New Action`.
3. Click on the `{...} Edit JSON` button.
4. Copy and paste the following JSON configuration:
**Action: Get Ticket Side Conversations (Click to expand)**
Create in Port
```
{
"identifier": "get_ticket_side_conversation",
"title": "get ticket side conversations",
"trigger": {
"type": "self-service",
"operation": "DAY-2",
"userInputs": {
"properties": {},
"required": [],
"order": []
},
"blueprintIdentifier": "zendesk_ticket"
},
"invocationMethod": {
"type": "WEBHOOK",
"url": "https://.zendesk.com/api/v2/tickets/{{ .entity.identifier }}/side_conversations",
"agent": false,
"synchronized": true,
"method": "GET",
"headers": {
"Content-Type": "application/json",
"Authorization": "Basic {{ .secrets.ZENDESK_TOKEN }}"
},
"body": {}
},
"requiredApproval": false
}
```
5. Click `Save`.
#### Get Side Conversation Messages[](#get-side-conversation-messages "Direct link to Get Side Conversation Messages")
This action retrieves the messages for a specific side conversation using its URL.
1. Go to the [self-service](https://app.getport.io/self-serve) page of your portal.
2. Click on `+ New Action`.
3. Click on the `{...} Edit JSON` button.
4. Copy and paste the following JSON configuration:
**Action: Get Side Conversation Messages (Click to expand)**
Create in Port
```
{
"identifier": "get_side_conversation_messages",
"title": "get side conversation messages",
"trigger": {
"type": "self-service",
"operation": "DAY-2",
"userInputs": {
"properties": {
"side_conversation_url": {
"type": "string",
"title": "side conversation url",
"format": "url"
}
},
"required": [
"side_conversation_url"
],
"order": [
"side_conversation_url"
]
}
},
"invocationMethod": {
"type": "WEBHOOK",
"url": "{{ .inputs.side_conversation_url }}/events",
"agent": false,
"synchronized": true,
"method": "GET",
"headers": {
"Content-Type": "application/json",
"Authorization": "Basic {{ .secrets.ZENDESK_TOKEN }}"
},
"body": {}
},
"requiredApproval": false
}
```
5. Click `Save`.
Subdomain flexibility
Replace `` with your Zendesk subdomain, for example: `https://acme.zendesk.com/...`.
## Create a reusable prompt[](#create-a-reusable-prompt "Direct link to Create a reusable prompt")
We will now define a prompt entity that your IDE can invoke via [Port MCP](/ai-interfaces/port-mcp-server/prompts.md). Once created, you can run it with the ticket ID, and it will gather context and produce a structured summary.
1. Go to the [Prompts page](https://app.getport.io/prompts) in Port.
2. Click `Create prompt`.
3. Toggle JSON mode.
4. Paste the following JSON and adjust if needed.
**Prompt entity: Zendesk Ticket Summary (Click to expand)**
```
{
"identifier": "zendesk_ticket_summary",
"title": "Zendesk Ticket Summary",
"icon": "AI",
"properties": {
"description": "Summarize a Zendesk support ticket using comments and side conversations",
"arguments": [
{
"name": "ticket_id",
"required": true,
"description": "The Zendesk ticket ID to summarize"
}
],
"template": "You are an AI assistant tasked with summarizing Zendesk support tickets in Port. Use the comments and the side conversations on the ticket to summarize it in the following format:\n\n## Request\nWhat the customer wanted in a short sentence\n\n## Resolution \nWhat was the resolution\n\n## Root Cause\nIn case of a problem/bug, what was the root cause\n\n## Recommendations\nE.g., update docs, improve error messages, etc.\n\nInstructions for data gathering:\n- To get the comments and side conversations, send empty properties and use the entity identifier: {{ticket_id}}\n- To use the side conversations, you first need to get their URLs and then get the messages sent in them\n- No need to send an entity identifier for side conversation messages, only the side conversation URL in the properties\n\nTicket ID to analyze: {{ticket_id}}"
},
"relations": {}
}
```
5. Click `Create`.
### Test the workflow[](#test-the-workflow "Direct link to Test the workflow")
1. In Port, make sure there is a `zendesk_ticket` entity whose `identifier` matches a real Zendesk ticket ID you want to summarize.
2. In your IDE assistant, choose **Port MCP** as the provider as described [here](/ai-interfaces/port-mcp-server/overview-and-installation.md#installing-port-mcp).
3. Run the `zendesk_ticket_summary` prompt with `ticket_id` set to that Zendesk ticket ID.
4. The assistant will automatically execute the self-service actions to fetch comments and side conversations, then return a structured summary.
Internal-only content
Summaries can include sensitive customer or internal details, so treat them as internal documents.
Using Port MCP prompts
For setup and capabilities, see the Port MCP Server prompts documentation: [Port MCP Server - Prompts](/ai-interfaces/port-mcp-server/prompts.md)
## Best practices[](#best-practices "Direct link to Best practices")
* Adjust the prompt to how you’d ideally want to receive a ticket summary—whether that’s a short bullet list or a detailed customer-facing recap.
* Extend the prompt with specific preferences, such as ignoring non-informative system/autoresponder comments or highlighting key fields.
* Use consistent formatting so summaries are scannable across tickets.
* Consider variants: internal vs customer-facing tone; enforce English or match ticket locale.