Enrich tasks with AI-powered context using workflows
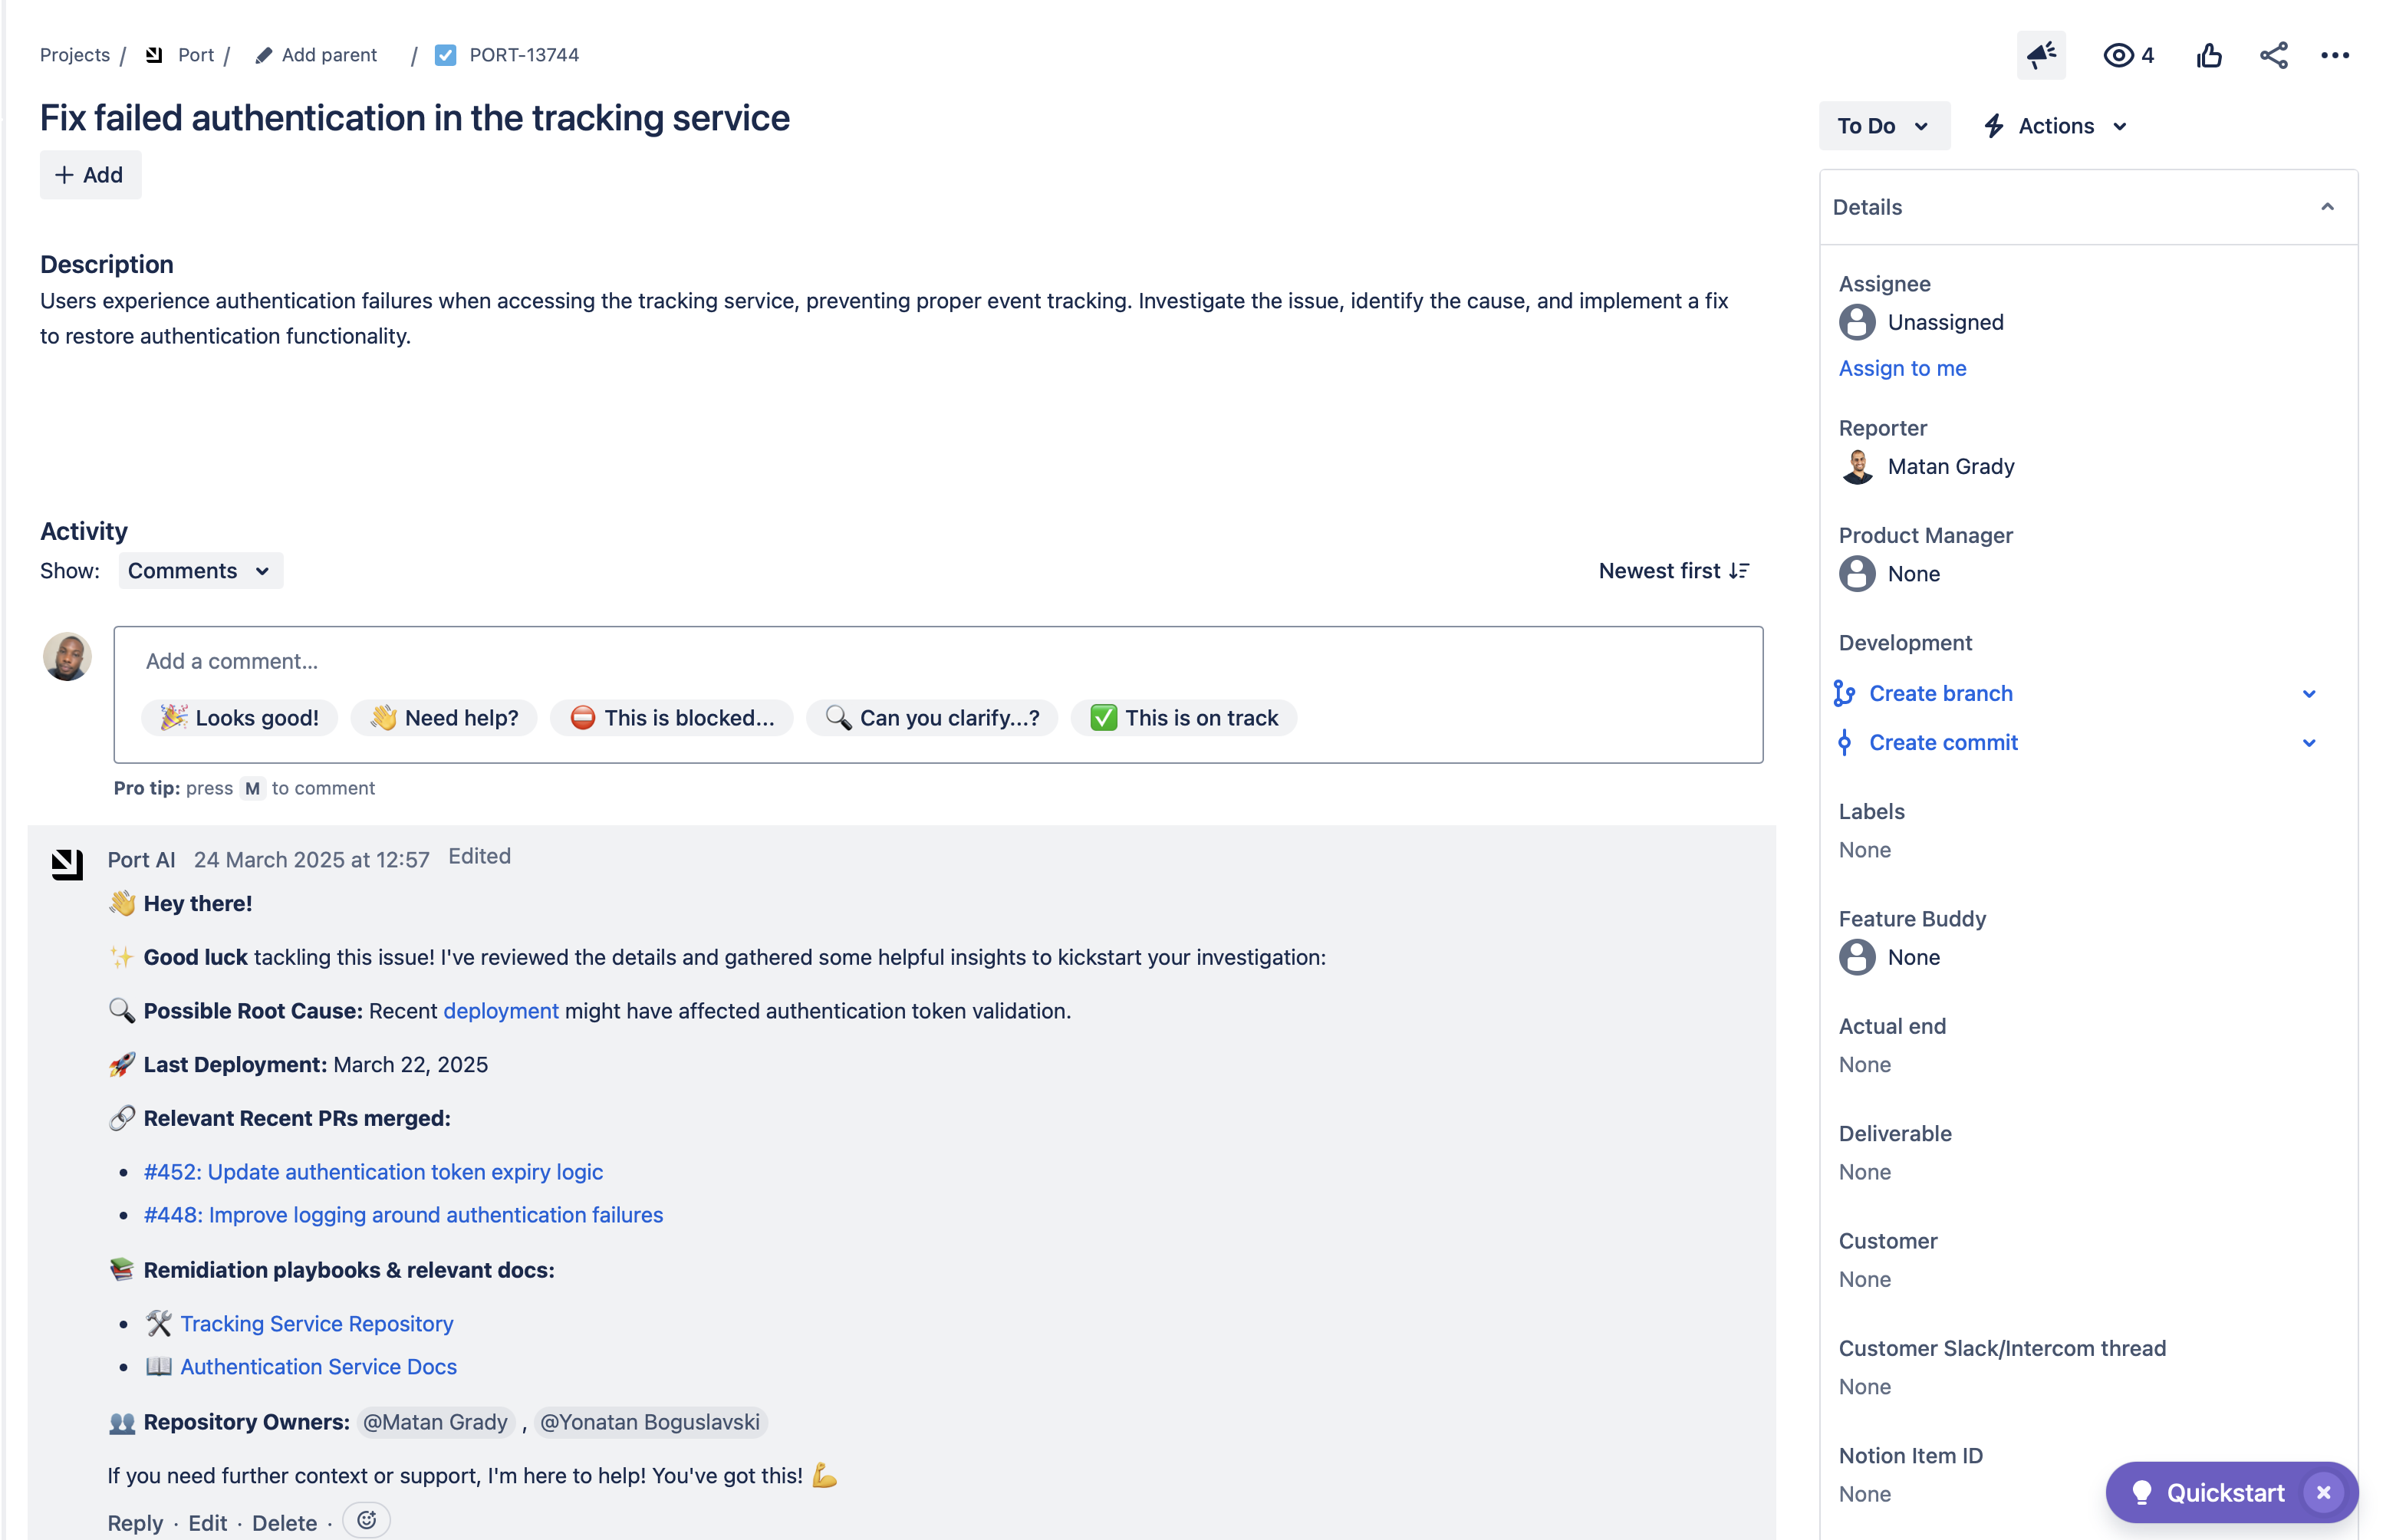
This guide walks you through setting up a "Task Assistant" AI agent and driving it with Port workflows. By the end of this guide, your developers will receive automated, contextual insights when they start working on tasks, including related issues, pull requests, and potential collaborators.
The heart of this guide is a single enrichment workflow that reacts to task changes and comments on the Jira issue with AI-generated context. We also build a separate, optional comment workflow as a convenience for posting a comment to a Jira issue manually. The comment workflow is standalone: it does not use the AI agent and does not depend on the enrichment workflow.
Port workflows are currently in open beta and available to all users. Workflows may undergo changes without prior notice.
Common use cases
- Automatically provide context when developers start working on tasks.
- Identify related issues and pull requests.
- Suggest potential collaborators based on task context.
- Enable easy commenting on Jira issues through Port.
Prerequisites
This guide assumes you have:
- A Port account with access to the workflows beta feature.
- Jira integration configured in your Port instance.
- Port's GitHub Ocean integration configured in your Port instance.
While this guide uses Jira, you can choose tools that best fit your organization's needs. For example, GitHub or ServiceNow.
Set up data model
To create a Task Assistant AI agent in Port, we will configure the agent's capabilities and message format as described in our Build an AI agent guide. The agent uses the data ingested by the Jira and GitHub integrations to answer questions about tasks and their related issues and collaborators.
Create the agent configuration
-
Go to the AI Agents page.
-
Click on
+ AI Agent. -
Fill in the agent form with the following configuration:
- Title:
Clarity AI. - Identifier: turn off
Auto-generateand entertask_assistant_ai_agent. The enrichment workflow invokes the agent by this identifier, so it must match (or update the workflow'sagentIdentifierto your own value). - Description:
Automatically enriches Jira tasks with relevant context when developers start working on them. - Status: set to
Active. - Prompt: click the edit icon and paste the prompt below.
- Execution Mode:
Automatic. - Tools: switch from
Simple UItoAdvanced Regex, then add^(list|search|track|describe)_.*to theToolsfield, so the agent can discover related catalog entities.
Task Assistant AI agent prompt (click to expand)
# TaskCompose a comment for the developer who was just assigned a task. Send a greeting using their first name and explain this is an automatic message. Then share three sections with emojis for helpful context. Return only the comment body, formatted in markdown - the workflow will post it to the Jira issue for you.## Message FormatHey there [First Name], it's Clarity :crystal_ball: - the Port AI agent!I noticed you just started working on a new task: [link to assigned issue].Here's some context to help you get started :blobdance::male-technologist: Devs who might have input:List up to 3 developers (excluding the user), explain briefly why each is relevant. If none, write a meaningful explanation.:jira: Similar Tasks:List up to 3 Jira issues (not assigned to the user), mention the assigned person and why it's relevant. If none, explain why.:github_on_fire: Similar Pull Requests:List up to 3 pull requests in statuses "open" or "merged", mention the creator and why it's relevant. If none, explain why.## Guidelines- Each section can have fewer than 3 items. Always explainMCP Enhanced CapabilitiesThe AI agent uses MCP (Model Context Protocol) enhanced capabilities to automatically discover important and relevant blueprint entities via its tools. The
^(list|search|track|describe)_.*pattern allows the agent to access and analyze related entities in your software catalog, providing richer context for task enrichment. In the workflow, the agent only composes the message. The enrichment workflow posts the agent's response to Jira with a webhook node, so the agent does not need arun_...action tool. - Title:
-
Click on
Createto save the agent.
Set up workflows
With the agent in place, we will build the workflows that drive it:
- An enrichment workflow that reacts to task changes, invokes the agent, and comments on the Jira issue.
- An optional, standalone comment workflow that lets you comment on a Jira issue on demand (a convenience, not part of the AI enrichment).
Build the enrichment workflow
Now that we have created the Task Assistant AI agent, we will build a workflow that triggers automatically whenever a task is assigned or its status changes to "In Progress". The workflow invokes the agent to compose a contextual message, then posts that message as a comment on the Jira issue.
The value {{cloudId}} in the webhook URL is your Jira Cloud ID. Replace it with your own value. If you've recently installed Jira and have a "create a Jira issue" action, you can copy it from there. Otherwise, you can find your Jira Cloud ID by following this guide.
Follow the steps below to build the workflow:
-
Go to the Workflows page of your portal.
-
Click on the
+ Workflowbutton in the top-right corner. -
In the
Create new workflowform, enter a Name, and optionally set an Icon, Category, and Description. You can leave Identifier onAuto-generate. ClickConfirmto open the workflow editor. -
Copy and paste the workflow JSON below into the editor to replace the starter workflow (the pasted JSON sets the final identifier and title):
Send context to task assignee workflow (click to expand)
{"identifier": "send_context_to_task_assignee","title": "Send context to task assignee","icon": "Details","description": "Triggers on Jira task status change to In Progress or assignee, and enriches the task with AI-generated context","nodes": [{"identifier": "trigger","title": "On task assigned or In Progress","config": {"type": "EVENT_TRIGGER","event": {"type": "ENTITY_UPDATED","blueprintIdentifier": "jiraIssue"},"condition": {"type": "JQ","expressions": [".diff.after.relations.assignee != null",".diff.after.properties.status == \"In Progress\"",".diff.before.properties.status == \"To Do\" or .diff.before.relations.assignee != .diff.after.relations.assignee"],"combinator": "and"}}},{"identifier": "generate_context","title": "Generate context with Clarity AI","config": {"type": "AI_AGENT","agentIdentifier": "task_assistant_ai_agent","userPrompt": "User's email: \"{{ .outputs.trigger.diff.after.relations.assignee }}\". Task title: \"{{ .outputs.trigger.diff.after.title }}\". Task identifier: \"{{ .outputs.trigger.diff.after.identifier }}\"."}},{"identifier": "post_comment","title": "Comment on the Jira issue","config": {"type": "WEBHOOK","url": "https://api.atlassian.com/ex/jira/{{cloudId}}/rest/api/3/issue/{{ .outputs.trigger.diff.after.identifier }}/comment","method": "POST","synchronized": true,"headers": {"Authorization": "Bearer {{ .secrets[\"__JIRA_JIRA_ATLASSIAN_USER_TOKEN\"] }}","Content-Type": "application/json"},"body": {"body": {"content": [{"content": [{"text": "{{ .outputs[\"generate_context\"].response }}","type": "text"}],"type": "paragraph"}],"type": "doc","version": 1},"visibility": {"identifier": "Administrators","type": "role","value": "Administrators"}}}}],"connections": [{"sourceIdentifier": "trigger","targetIdentifier": "generate_context"},{"sourceIdentifier": "generate_context","targetIdentifier": "post_comment"}]} -
Click on
Saveto save and activate the workflow.
The workflow uses three nodes:
- An event trigger (
ENTITY_UPDATEDonjiraIssue) with the same conditions as the original automation, so it only runs when a task is picked up. - An AI action node (
AI_AGENT) that invokes the Task Assistant agent to compose the contextual message. - A webhook node that posts the agent's
responseoutput to the Jira issue as a comment.
Optional: trigger enrichment manually
You can also let developers run the enrichment on demand, for example to re-enrich an issue after new context appears. Because a manual run drives the same logic (invoke the agent, then comment), we add it as a second trigger on the same workflow rather than building a separate one.
To do this, we make three changes to the workflow above:
- Add a
SELF_SERVE_TRIGGERnode (manual_trigger) with a singlejira_issueentity input and anENTITYcontext, so it appears in the issue's bolt (⚡) menu. - Resolve the issue identifier from whichever trigger fired, using the
.outputs.triggeralias with a JQ//fallback in the AI prompt and the webhook URL. The agent looks up the issue's title, assignee, and related work from that identifier. - Add a connection from
manual_triggertogenerate_context.
Enrichment workflow with a manual trigger (click to expand)
{
  "identifier": "send_context_to_task_assignee",
  "title": "Send context to task assignee",
  "icon": "Details",
  "description": "Enriches a Jira task with AI-generated context automatically or on demand",
  "nodes": [
    {
      "identifier": "trigger",
      "title": "On task assigned or In Progress",
      "config": {
        "type": "EVENT_TRIGGER",
        "event": {
          "type": "ENTITY_UPDATED",
          "blueprintIdentifier": "jiraIssue"
        },
        "condition": {
          "type": "JQ",
          "expressions": [
            ".diff.after.relations.assignee != null",
            ".diff.after.properties.status == \"In Progress\"",
            ".diff.before.properties.status == \"To Do\" or .diff.before.relations.assignee != .diff.after.relations.assignee"
          ],
          "combinator": "and"
        }
      }
    },
    {
      "identifier": "manual_trigger",
      "title": "Enrich a Jira issue",
      "config": {
        "type": "SELF_SERVE_TRIGGER",
        "contexts": [
          {
            "on": "ENTITY",
            "userInput": "jira_issue"
          }
        ],
        "userInputs": {
          "properties": {
            "jira_issue": {
              "title": "Jira issue",
              "icon": "Jira",
              "type": "string",
              "blueprint": "jiraIssue",
              "format": "entity"
            }
          },
          "required": [
            "jira_issue"
          ]
        }
      }
    },
    {
      "identifier": "generate_context",
      "title": "Generate context with Clarity AI",
      "config": {
        "type": "AI_AGENT",
        "agentIdentifier": "task_assistant_ai_agent",
        "userPrompt": "Enrich the Jira issue with identifier \"{{ .outputs.trigger.diff.after.identifier // .outputs.trigger.jira_issue }}\". Look up its title, assignee, related issues, and pull requests to compose the context comment."
      }
    },
    {
      "identifier": "post_comment",
      "title": "Comment on the Jira issue",
      "config": {
        "type": "WEBHOOK",
        "url": "https://api.atlassian.com/ex/jira/{{cloudId}}/rest/api/3/issue/{{ .outputs.trigger.diff.after.identifier // .outputs.trigger.jira_issue }}/comment",
        "method": "POST",
        "synchronized": true,
        "headers": {
          "Authorization": "Bearer {{ .secrets[\"__JIRA_JIRA_ATLASSIAN_USER_TOKEN\"] }}",
          "Content-Type": "application/json"
        },
        "body": {
          "body": {
            "content": [
              {
                "content": [
                  {
                    "text": "{{ .outputs[\"generate_context\"].response }}",
                    "type": "text"
                  }
                ],
                "type": "paragraph"
              }
            ],
            "type": "doc",
            "version": 1
          },
          "visibility": {
            "identifier": "Administrators",
            "type": "role",
            "value": "Administrators"
          }
        }
      }
    }
  ],
  "connections": [
    {
      "sourceIdentifier": "trigger",
      "targetIdentifier": "generate_context"
    },
    {
      "sourceIdentifier": "manual_trigger",
      "targetIdentifier": "generate_context"
    },
    {
      "sourceIdentifier": "generate_context",
      "targetIdentifier": "post_comment"
    }
  ]
}
To run enrichment only on demand (no automatic runs), keep the manual_trigger node and remove the event trigger node along with its connection to generate_context. Self-service permissions are set per trigger, so you can control who may run it.
Build the comment workflow (optional)
This workflow is a standalone convenience for commenting on a Jira issue manually from Port. It is not part of the AI enrichment flow, and it does not use the Task Assistant agent. Skip this section if you only want automated enrichment.
This self-service workflow lets you comment on an issue directly from Port. You can trigger it manually from a Jira issue's action menu (the bolt ⚡ menu) whenever you want to add a comment, whether or not the enrichment workflow is set up.
Follow the steps below to build the workflow:
-
Go to the Workflows page of your portal.
-
Click on the
+ Workflowbutton in the top-right corner. -
In the
Create new workflowform, enter a Name, and optionally set an Icon, Category, and Description. You can leave Identifier onAuto-generate. ClickConfirmto open the workflow editor. -
Copy and paste the workflow JSON below into the editor to replace the starter workflow (the pasted JSON sets the final identifier and title):
Comment on a Jira issue workflow (click to expand)
{"identifier": "comment_on_jira_issue","title": "Comment on a Jira issue","icon": "Jira","description": "Comments on an existing Jira issue","nodes": [{"identifier": "trigger","title": "Comment on a Jira issue","config": {"type": "SELF_SERVE_TRIGGER","contexts": [{"on": "ENTITY","userInput": "jira_issue"}],"userInputs": {"properties": {"jira_issue": {"title": "Jira issue","icon": "Jira","type": "string","blueprint": "jiraIssue","format": "entity"},"assignee": {"title": "Assignee","icon": "DefaultProperty","type": "string","blueprint": "_user","format": "entity","dataset": {"combinator": "and","rules": [{"property": "jira_user_id","operator": "isNotEmpty"}]}},"comment": {"title": "Comment","icon": "DefaultProperty","type": "string","format": "markdown"}},"required": ["jira_issue","comment"],"order": ["jira_issue","comment","assignee"]}}},{"identifier": "post_comment","title": "Post the comment","config": {"type": "WEBHOOK","url": "https://api.atlassian.com/ex/jira/{{cloudId}}/rest/api/3/issue/{{ .outputs.trigger.jira_issue }}/comment","method": "POST","synchronized": true,"headers": {"Authorization": "Bearer {{ .secrets[\"__JIRA_JIRA_ATLASSIAN_USER_TOKEN\"] }}","Content-Type": "application/json"},"body": {"body": {"content": [{"content": [{"text": "{{ .outputs.trigger.comment }}","type": "text"}],"type": "paragraph"}],"type": "doc","version": 1},"visibility": {"identifier": "Administrators","type": "role","value": "Administrators"}}}}],"connections": [{"sourceIdentifier": "trigger","targetIdentifier": "post_comment"}]} -
Click on
Saveto save and activate the workflow.
The ENTITY context ties the trigger to jiraIssue entities, so it appears in the bolt (⚡) menu on any Jira issue and pre-fills the selected issue. The webhook node then posts your comment to that issue.
Best practices
To get the most out of your Task Assistant agent:
-
Monitor responses: Review the agent's messages to ensure they provide valuable context.
-
Refine the prompt: Adjust the agent's prompt based on your team's needs and feedback.
-
Test thoroughly: Create test issues to verify both the automated enrichment workflow and the manual comment workflow work as expected.
Possible enhancements
You can further enhance the Task Assistant setup by:
- Integration expansion: Add more data sources like Confluence or ServiceNow for broader context.
- Custom triggers: Add more event triggers based on other task events.
- Structured output: Use the AI node's structured output to return separate fields, then branch on them with a condition node.
Related guides
- Enrich tasks with AI-powered context - the actions and automations version of this guide.
- AI-powered work item preparation - a structured companion that enriches work items with ownership suggestions and scorecard readiness signals.
- Improve specifications with Port AI - triage incoming tickets with AI to ensure only well-defined tasks reach your coding agents.
- Auto-assign bugs to owners with AI - automatically route Jira bugs to the right team using catalog ownership data.
- Automatically resolve tickets with coding agents - the downstream step: delegating enriched, well-specified work to Claude Code or Copilot.