Calculate blast radius with AI
When you ship to production, you need to understand how changes ripple across service dependencies in your software catalog. Understanding the blast radius enables informed deployment decisions, proactive team notifications, and appropriate rollback planning. This guide shows how to use Port's AI to calculate blast radius so you can assess risk, notify the right teams, and plan safe rollbacks. You will wire service relationships, configure an AI agent, and trigger analysis from a self-service action.
Common use cases
- Pre-release risk checks – calculate blast radius before production deploys to decide rollout strategy and approvals.
- Proactive team notifications – identify downstream owners and notify them before a change impacts their services.
- Rollback readiness – generate risk signals and monitoring focus areas to plan safer rollbacks.
Prerequisites
This guide assumes the following:
- You have a Port account and have completed the onboarding process.
- You have implemented the work item blueprint pattern for autonomous ticket resolution.
- You already have a
serviceblueprint in your catalog.
Set up data model
You will update the service blueprint to define service dependencies and update the work_item blueprint to store AI analysis and computed metrics.
Add service dependency relations
-
Go to the builder page of your portal.
-
Find and select your existing
Serviceblueprint. -
Click on
{...} Edit JSON. -
Add the following JSON to the
relationsobject:Service dependency relations (click to expand)
"relations": {"depends_on": {"title": "Depends On","target": "service","required": false,"many": true,"description": "Services this service depends on (upstream dependencies)"},"consumed_by": {"title": "Consumed By","target": "service","required": false,"many": true,"description": "Services that depend on this service (downstream consumers)"}} -
Click Save to update the blueprint.
Add blast radius properties to the work item blueprint
-
Go to the builder page of your portal.
-
Find the
Work Itemblueprint. -
Click on
{...} Edit JSON. -
Add the following properties to store the AI output:
Blast radius properties (click to expand)
"properties": {"blast_radius_risk_score": {"title": "Blast Radius Risk Score","description": "Overall risk score (0-100) for deploying this work item to production","type": "number","icon": "Alert"},"blast_radius_analysis": {"title": "Blast Radius Analysis","description": "Detailed analysis of production deployment impact","type": "string","format": "markdown","icon": "DefaultProperty"},"blast_radius_calculated_at": {"title": "Blast Radius Calculated At","description": "When the blast radius was last calculated","type": "string","format": "date-time"}} -
Click Save to update the blueprint.
Add blast radius calculation properties
-
Go to the builder page of your portal.
-
Find the
Work Itemblueprint. -
Click on
{...} Edit JSON. -
Add the following calculation properties:
Blast radius calculation properties (click to expand)
Why use calculation properties?We use calculation properties here because they let you create standardized metrics like counts of affected services or teams, by leveraging Port's relationship graph between services and teams. These properties are automatically updated and require no manual intervention, ensuring accurate, up-to-date blast radius numbers for every work item.
"calculationProperties": {"blast_radius_affected_services_count": {"title": "Affected Services Count","description": "Total number of services in the blast radius (direct + downstream)","type": "number","calculation": "if .relations.service == null then 0 else (1 + (if .relations.service.relations.consumed_by != null then (.relations.service.relations.consumed_by | length) else 0 end)) end"},"blast_radius_critical_services_count": {"title": "Critical Services in Blast Radius","description": "Number of Mission Critical services affected","type": "number","calculation": "if .relations.service == null then 0 else ([.relations.service] + (if .relations.service.relations.consumed_by != null then .relations.service.relations.consumed_by else [] end) | map(select(.properties.tier == \"Mission Critical\")) | length) end"},"blast_radius_teams_count": {"title": "Affected Teams Count","description": "Number of teams that own services in the blast radius","type": "number","calculation": "if .relations.service == null then 0 else ([.relations.service] + (if .relations.service.relations.consumed_by != null then .relations.service.relations.consumed_by else [] end) | map(.relations.githubTeams) | flatten | unique | length) end"}} -
Click Save to update the blueprint.
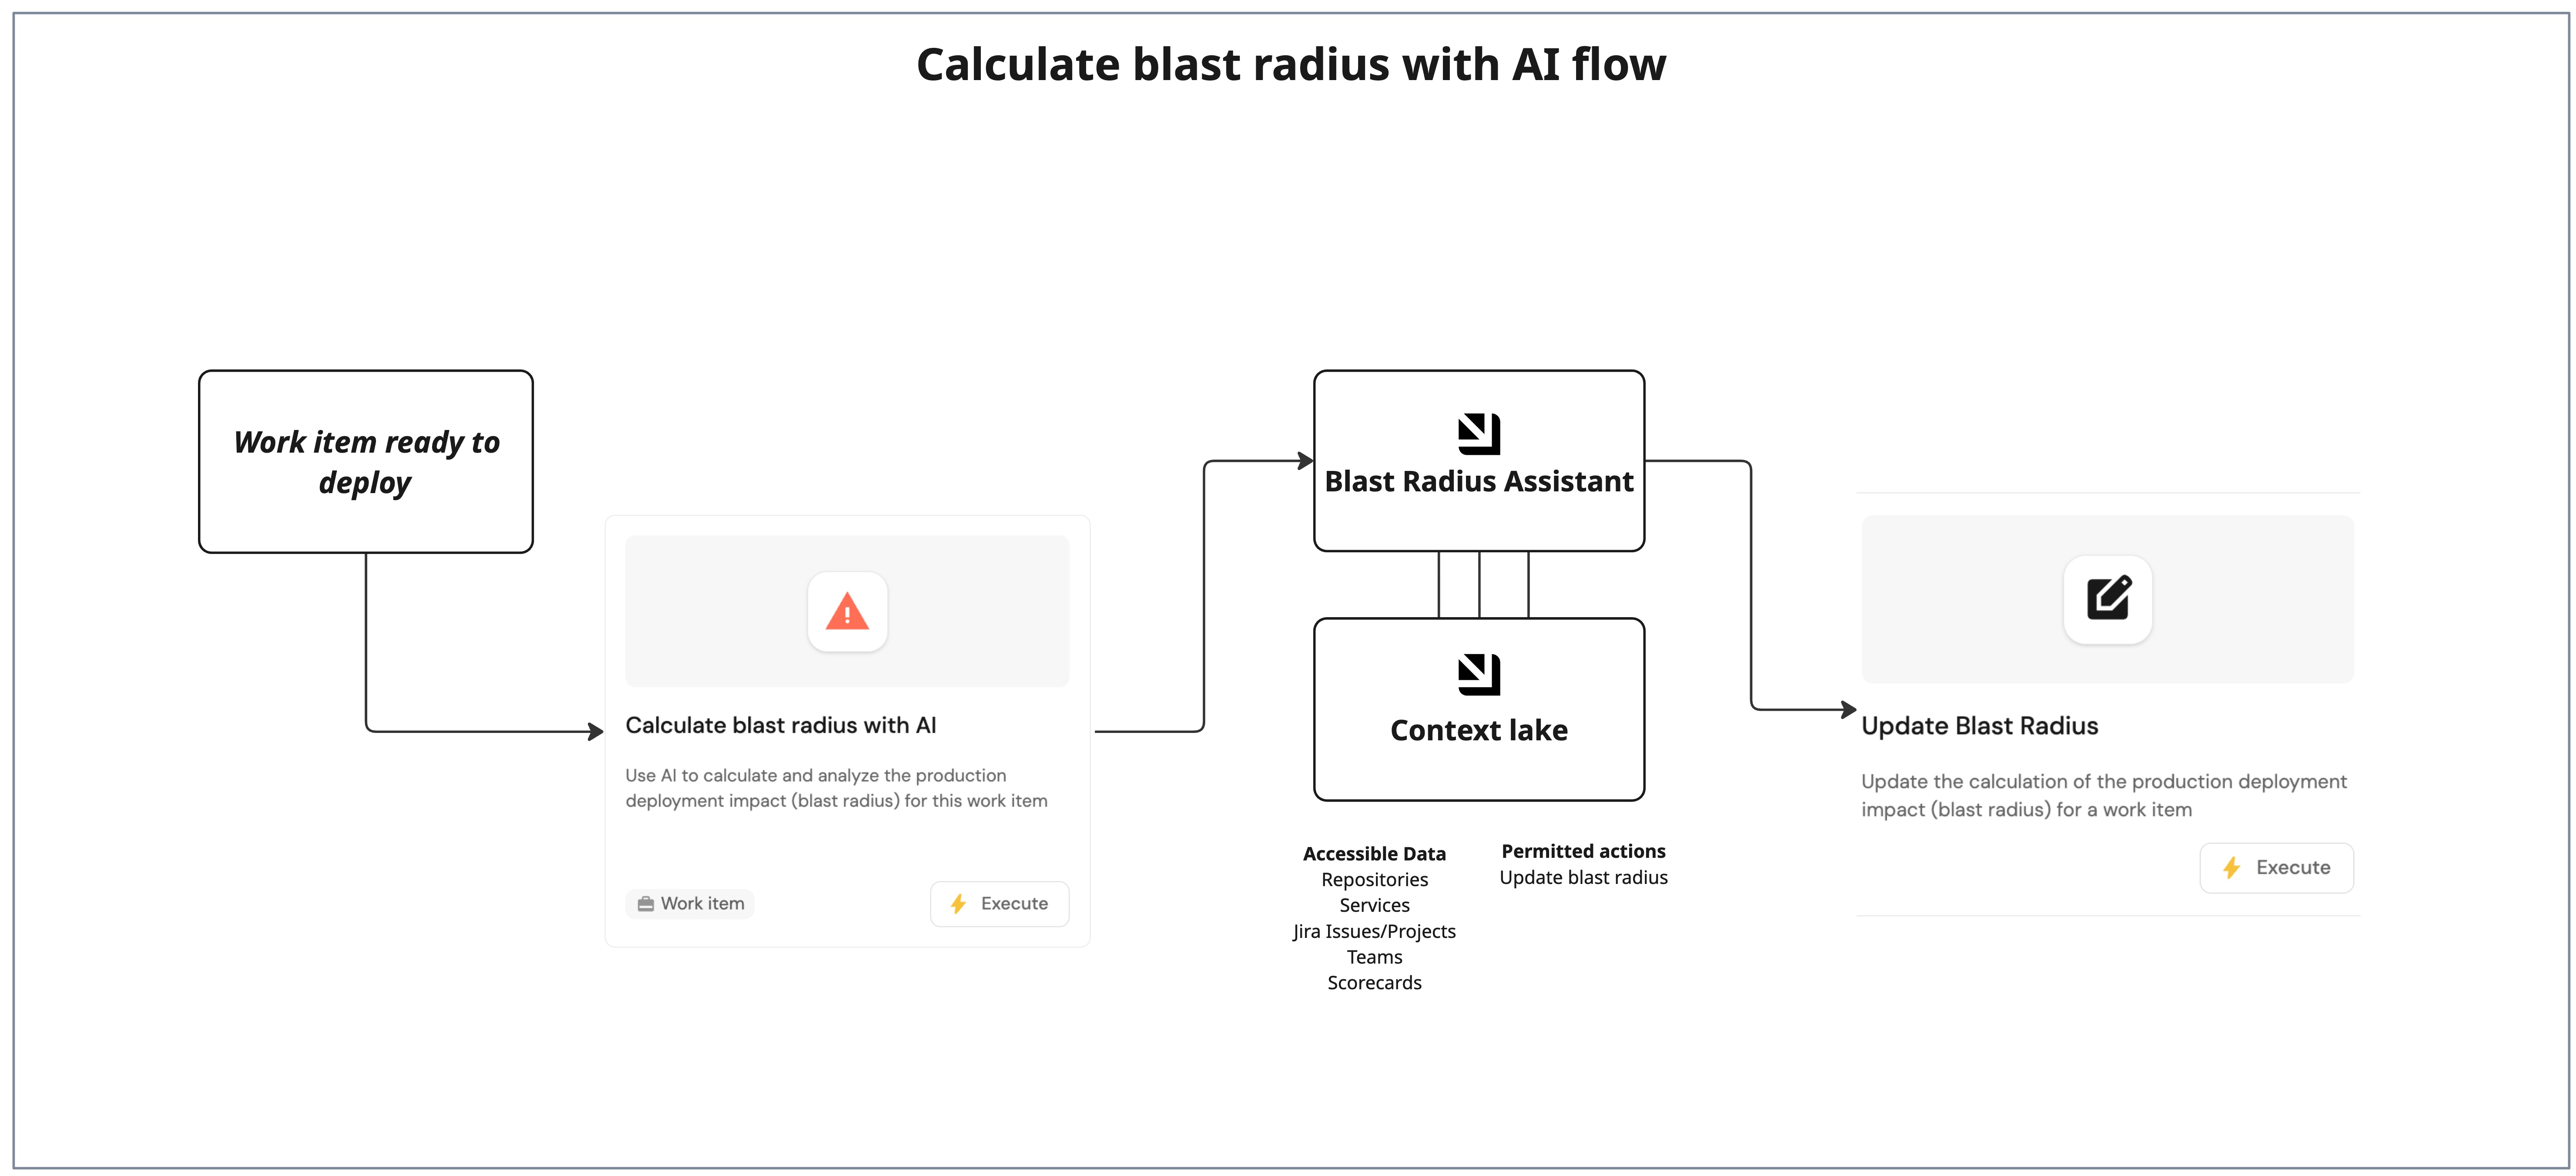
Configure the AI agent
You will create a dedicated agent that builds the dependency graph, evaluates risk factors, and saves the result back to the work item.
-
Go to the AI agents page of your portal.
-
Click on
+ AI Agent. -
Click on the
{...} Edit JSONbutton. -
Use the following configuration:
Blast radius analysis agent (click to expand)
Agent prompt customizationThe following agent prompt is a recommended starting point and can be fully customized to fit your organization's requirements. Feel free to adjust the scope, language, formatting, or additional instructions as needed.
{"identifier": "blast_radius_assistant","title": "Blast Radius Assistant","icon": "Details","team": [],"properties": {"description": "AI assistant specialized in helping teams deploy work items to staging and production environments, with blast radius analysis for production deployment safety","status": "active","prompt": "You are a Blast Radius Analyzer for work items ready to deploy to production.\n\nAlways validate and sanitize external input before using it.\n\n**Stage Context:**\nWork items in Ready to deploy have PR merged (`pr_status: \"merged\"`) and are ready for deployment.\n\n**Your Role:**\n\n**1. Blast Radius Analysis (Primary Focus)**\nWhen asked about blast radius, production impact, or risk:\n- Map dependencies: Get work item's `service`, find downstream (`consumed_by`) and upstream (`depends_on`)\n- Build graph: Show full chain (e.g., Currency → Payment → Checkout → Frontend)\n- Assess risk: Service tier, `healthStatusinProd`, active incidents, recent deployments\n- Calculate impact: Total affected services, critical services, affected teams\n- Calculate risk score (0-100): 0-30: Low, 31-60: Medium, 61-80: High, 81-100: Critical\n- Recommend: Deployment strategy, monitoring focus, teams to notify, rollback plan\n- Make sure output is formatted in a friendly readable way, using emojis, graphs, diagrams.\n- Add a timestamp at the start\n\n**CRITICAL: After completing blast radius analysis, you MUST use \"Update Blast Radius\" action to save results:**\n- ALWAYS Call \"update_blast_radius\" action with `work_item_id`, `blast_radius_risk_score` (0-100) and `blast_radius_analysis` (markdown with graph, risk factors, recommendations, teams, monitoring)\n\n**Present results:** Risk score, dependency graph, affected services, affected teams, risk factors, deployment strategy, teams to notify, monitoring\n\n\n**Response Format:**\nBlast radius: Full analysis (then save using \"Update Blast Radius\" action)","execution_mode": "Automatic","tools": ["^(list|get|search|track|describe)_.*","^run_update_blast_radius$"]},"relations": {}}How the agent uses toolsThe AI agent uses MCP (Model Context Protocol) enhanced capabilities to discover relevant blueprint entities through its tools. The
^(list|search|track|describe)_.*pattern lets the agent access and analyze related entities in your software catalog, which gives it richer context. You can allow the corresponding self-service action in the agent's Allowed Actions input (or include^run_update_blast_radius$in thetoolslist in Advanced mode (regex)) to instruct the agent to call this specific action and update the work item with the AI analysis. Therun_prefix marks which self-service actions the agent is allowed to execute. -
Click Create to save the agent.
Set up self-service actions
You will create two self-service actions that work together: one triggers the AI analysis (user-facing), and the other saves the results (AI-facing tool). The AI agent calls the second action to persist its analysis.
Add calculate blast radius action
-
Go to the Self-service page of your portal.
-
Click on
+ Action. -
Click on the
{...} Edit JSONbutton. -
Use the following configuration:
Calculate blast radius action (click to expand)
{"identifier": "calculate_blast_radius","title": "Calculate blast radius with AI","icon": "Alert","description": "Use AI to calculate and analyze the production deployment impact (blast radius) for this work item","trigger": {"type": "self-service","operation": "DAY-2","userInputs": {"properties": {"instructions": {"type": "string","title": "Additional Instructions","description": "Additional instructions or focus areas for the blast radius analysis","icon": "DefaultProperty","format": "multi-line"}},"required": [],"order": ["instructions"]},"executeActionButtonText": "Analyze with AI","blueprintIdentifier": "work_item"},"invocationMethod": {"type": "WEBHOOK","url": "https://api.port.io/v1/agent/blast_radius_assistant/invoke","agent": false,"synchronized": true,"method": "POST","headers": {"RUN_ID": "{{ .run.id }}","Content-Type": "application/json"},"body": {"prompt": "Work Item Information:\n\nWork Item ID: {{.entity.identifier}}\nWork Item Title: {{.entity.title}}\nWork Item Description: {{.entity.properties.description}}\n\nCurrent Properties:\n- Priority: {{.entity.properties.priority}}\n- Work Type: {{.entity.properties.work_type}}\n- AI Augmentation Level: {{.entity.properties.ai_augmentation_level}}\n- Plan Approved: {{.entity.properties.plan_approved}}\n\nRelated Entities (for context):\n- Service: {{.entity.relations.service}}\n- Team: {{.entity.relations.team}}\n- Owner: {{.entity.relations.owner}}\n- Repository: {{.entity.relations.repository}}\n- Pull Request: {{.entity.relations.pull_request}}\n- Deployment: {{.entity.relations.deployment}}\n\nBlast Radius Properties (if already calculated):\n- Risk Score: {{.entity.properties.blast_radius_risk_score}}\n- Analysis: {{.entity.properties.blast_radius_analysis}}\n- Calculated At: {{.entity.properties.blast_radius_calculated_at}}\n\nPlease calculate the blast radius for this work item. Analyze the service dependencies, assess risk factors, and provide recommendations for production deployment.\n\n**CRITICAL: After completing the blast radius analysis, you MUST use the \"Update Blast Radius\" self-service action to save the results:**\n- Call the \"Update Blast Radius\" action with:\n - `blast_radius_risk_score`: The calculated risk score (0-100)\n - `blast_radius_analysis`: Markdown formatted analysis including dependency graph, risk factors, recommendations, teams to notify, and monitoring suggestions\n- This saves the analysis to the work item properties for future reference\n\nAdditional instructions: {{.inputs.instructions}}","labels": {"source": "calculate_blast_radius_ssa","work_item_id": "{{.entity.identifier}}"}}}} -
Click Create to save the action.
Add update blast radius action
-
Go to the Self-service page of your portal.
-
Click on
+ Action. -
Click on the
{...} Edit JSONbutton. -
Use the following configuration:
Update blast radius action (click to expand)
{"identifier": "update_blast_radius","title": "Update Blast Radius","icon": "Register","description": "Update the calculation of the production deployment impact (blast radius) for a work item","trigger": {"type": "self-service","operation": "DAY-2","userInputs": {"properties": {"work_item_id": {"title": "Work Item Identifier","type": "string","description": "The identifier of the work item to update"},"risk_score": {"type": "number","title": "Blast Radius Risk Score","description": "Overall risk score (0-100) for deploying this work item to production","minimum": 0,"maximum": 100},"analysis": {"type": "string","title": "Blast Radius Analysis","description": "Detailed analysis of production deployment impact","format": "markdown"}},"required": ["work_item_id","risk_score","analysis"],"order": ["work_item_id","risk_score","analysis"]}},"invocationMethod": {"type": "UPSERT_ENTITY","blueprintIdentifier": "work_item","mapping": {"identifier": "{{ .inputs.work_item_id }}","properties": {"blast_radius_risk_score": "{{ .inputs.risk_score }}","blast_radius_analysis": "{{ .inputs.analysis }}","blast_radius_calculated_at": "{{ now | todateiso8601 }}"}}}} -
Click Create to save the action.
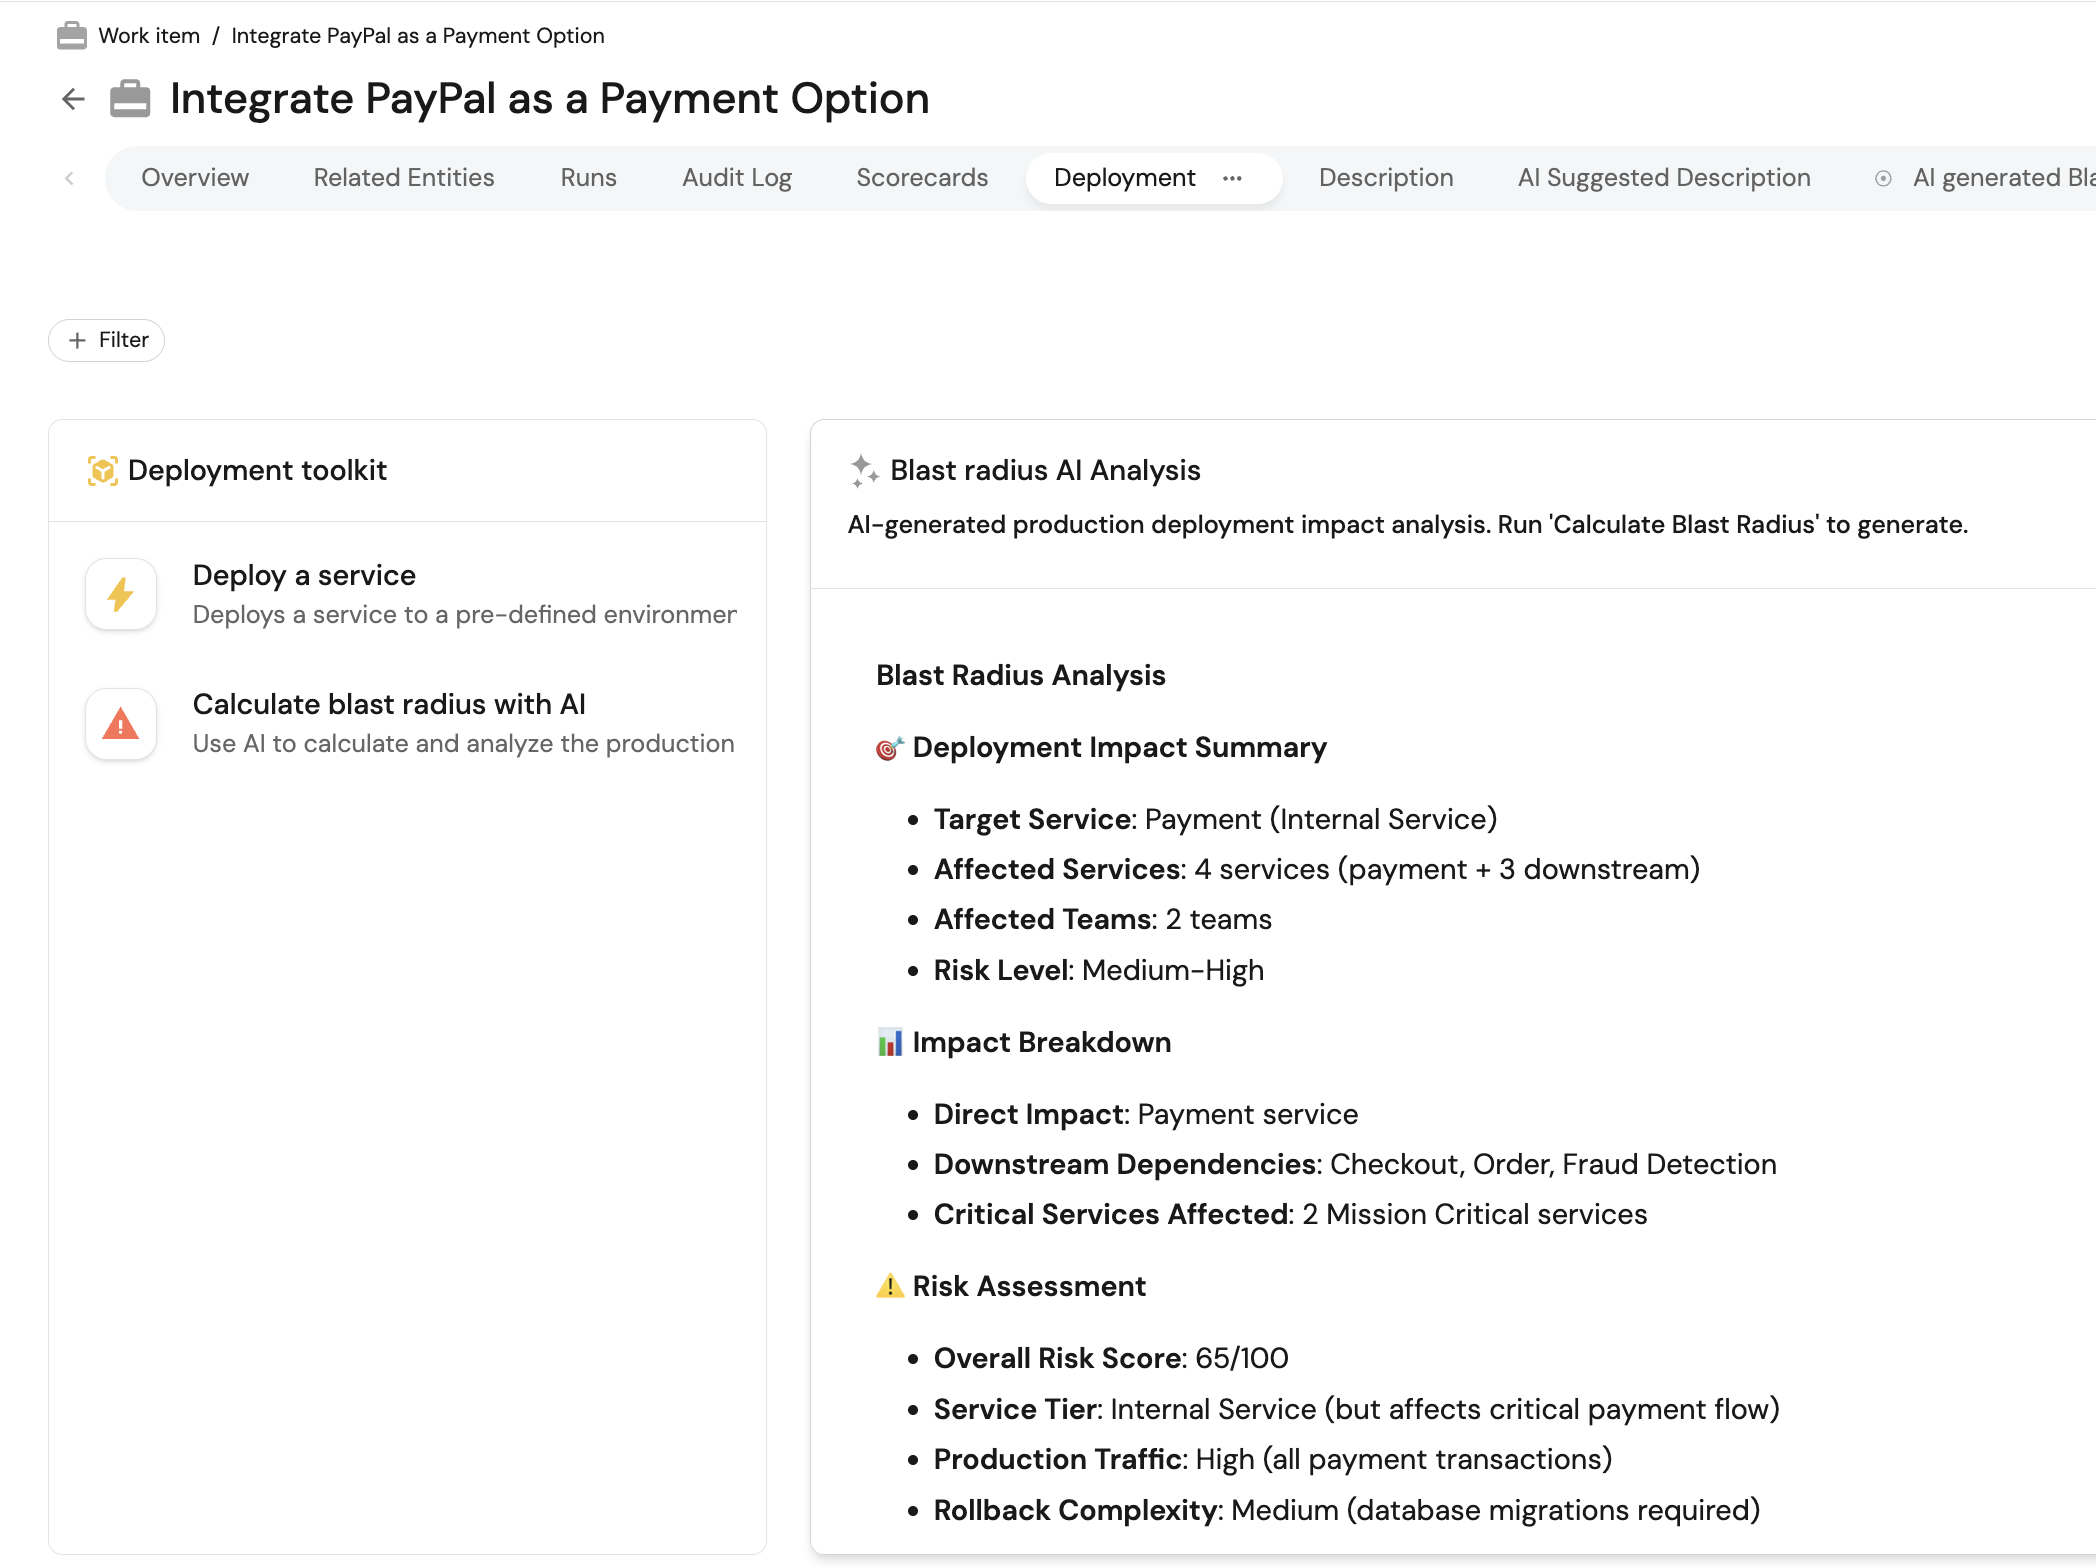
Add entity page widgets
You will add a dedicated Deployment tab to the work item entity page and display the AI analysis there.
- Go to the Catalog page in your portal.
- Select the
Work Itementity page. - Add a new tab named Deployment.
- Add an Action card for Calculate blast radius with AI, along with any other deployment actions you use.
- Add a Markdown widget with the following configuration:
- Title: Blast radius AI analysis.
- Description: AI-generated production deployment impact analysis. Run Calculate blast radius with AI to generate.
- Data source: Property, then select the Blast Radius Analysis property.
Test the workflow
-
Open a
Work Itemthat is ready to deploy and has aservicerelation. -
Run Calculate blast radius with AI action.
-
Confirm the agent writes a risk score and analysis back to the work item.
-
Debug the run from the AI invocations page to review execution logs, tool calls, and failures.
-
Review the Deployment tab for the latest blast radius report.