AI-powered incident management
Send this guide to your coding agent.
Prerequisite: Install Port MCP
Open plan mode. Implement this Port guide in my org via MCP:

https://docs.port.io/guides/all/ai-powered-incident-management

Goal: get the guide's core flow working end-to-end in my org; adapting it to fit my existing setup takes priority over matching the guide 1:1.

Plan:
1. Confirm MCP is connected, in the right org, with sufficient permissions.
2. Diff the guide's data model (blueprints, properties, relations, actions, agents, automations, integrations, secrets) against mine.
3. Propose adaptations for gaps, reusing existing blueprints/relations over guide-named duplicates.
4. Flag what needs a UI click, credential, or secret from me, testing MCP capability empirically before ruling anything out.
5. Stop on any blocker and give me options. Approving this plan authorizes the writes it lists; pause only for writes beyond what's listed.

Build:
- Extend blueprint schema additively when upserting; don't remove or overwrite existing properties, and treat type conflicts as a blocker, not an auto-fix.
- List any mock data in the plan, minimal and labeled mock; once approved, seed it without re-asking, and tell me what you seeded.
- For anything the guide writes downstream (e.g. a webhook target), use a real entity, not a mock.
- For pages/widgets, use the real page identifier from the app URL, not a guessed slug.
- When you hit a UI step confirmed (not assumed) unsupported via MCP, pause, give exact clicks, then resume via MCP.
- Validate and give links after each meaningful step (only a tool-returned URL, no guessed paths); don't proceed if the last run wasn't a success.

Done:
- Confirm the guide's expected output exists and runs in Port.
- Summarize adaptations, seeded data, what was mocked or skipped, remaining UI steps, and how to verify.
This guide demonstrates how to implement an AI-powered incident management lifecycle in Port. You will use Port AI agents, workflows, automations, and self-service actions to triage incidents, coordinate response, generate stakeholder updates, capture RCA context, and create postmortems.
Use the stages independently, or combine them into a complete incident lifecycle. The standalone Incident Manager AI agent guide can be used as the prerequisite agent setup before you add lifecycle-specific actions and automations.
Common use cases
- Assess incident severity, business impact, ownership, and response team recommendations with AI.
- Orchestrate Slack channels, Zoom war rooms, Jira tracking tickets, and team notifications.
- Generate contextual incident updates and send them to Slack.
- Draft RCA and postmortem documents after incidents are resolved.
- Add historical RCA documents as searchable context for incident AI agents.
Prerequisites
This guide assumes the following:
- You have a Port account and have completed the onboarding process.
- You have implemented the incident blueprint pattern for incident lifecycle workflows.
- You have set up the Incident Manager AI agent, or you have an equivalent incident-focused AI agent.
- You have incidents synced into Port from PagerDuty or another incident management tool.
- You have the external tools required for the stages you want to implement, such as Slack, Zoom, Jira, GitHub, or n8n.
Set up the Incident Manager AI agent
Start with the Incident Manager AI agent if you do not already have an incident-focused AI agent. That guide covers the base agent configuration, PagerDuty data access, interaction methods, and example questions.
After the base agent is available, use the lifecycle sections below to add specific triage, orchestration, communication, RCA, and postmortem capabilities.
Triage incidents with AI
Incident triage requires quickly assessing severity, identifying affected services, calculating business impact, and mobilizing response teams. Manual triage is slow, inconsistent, and delays resolution during critical outages. This guide shows how to use Port's AI to triage incidents so on-call engineers and SREs get instant severity assessment, automatic blast radius identification, intelligent team recommendations, and pre-drafted communications, leading to a reduction in MTTR and helping prevent SLA breaches.
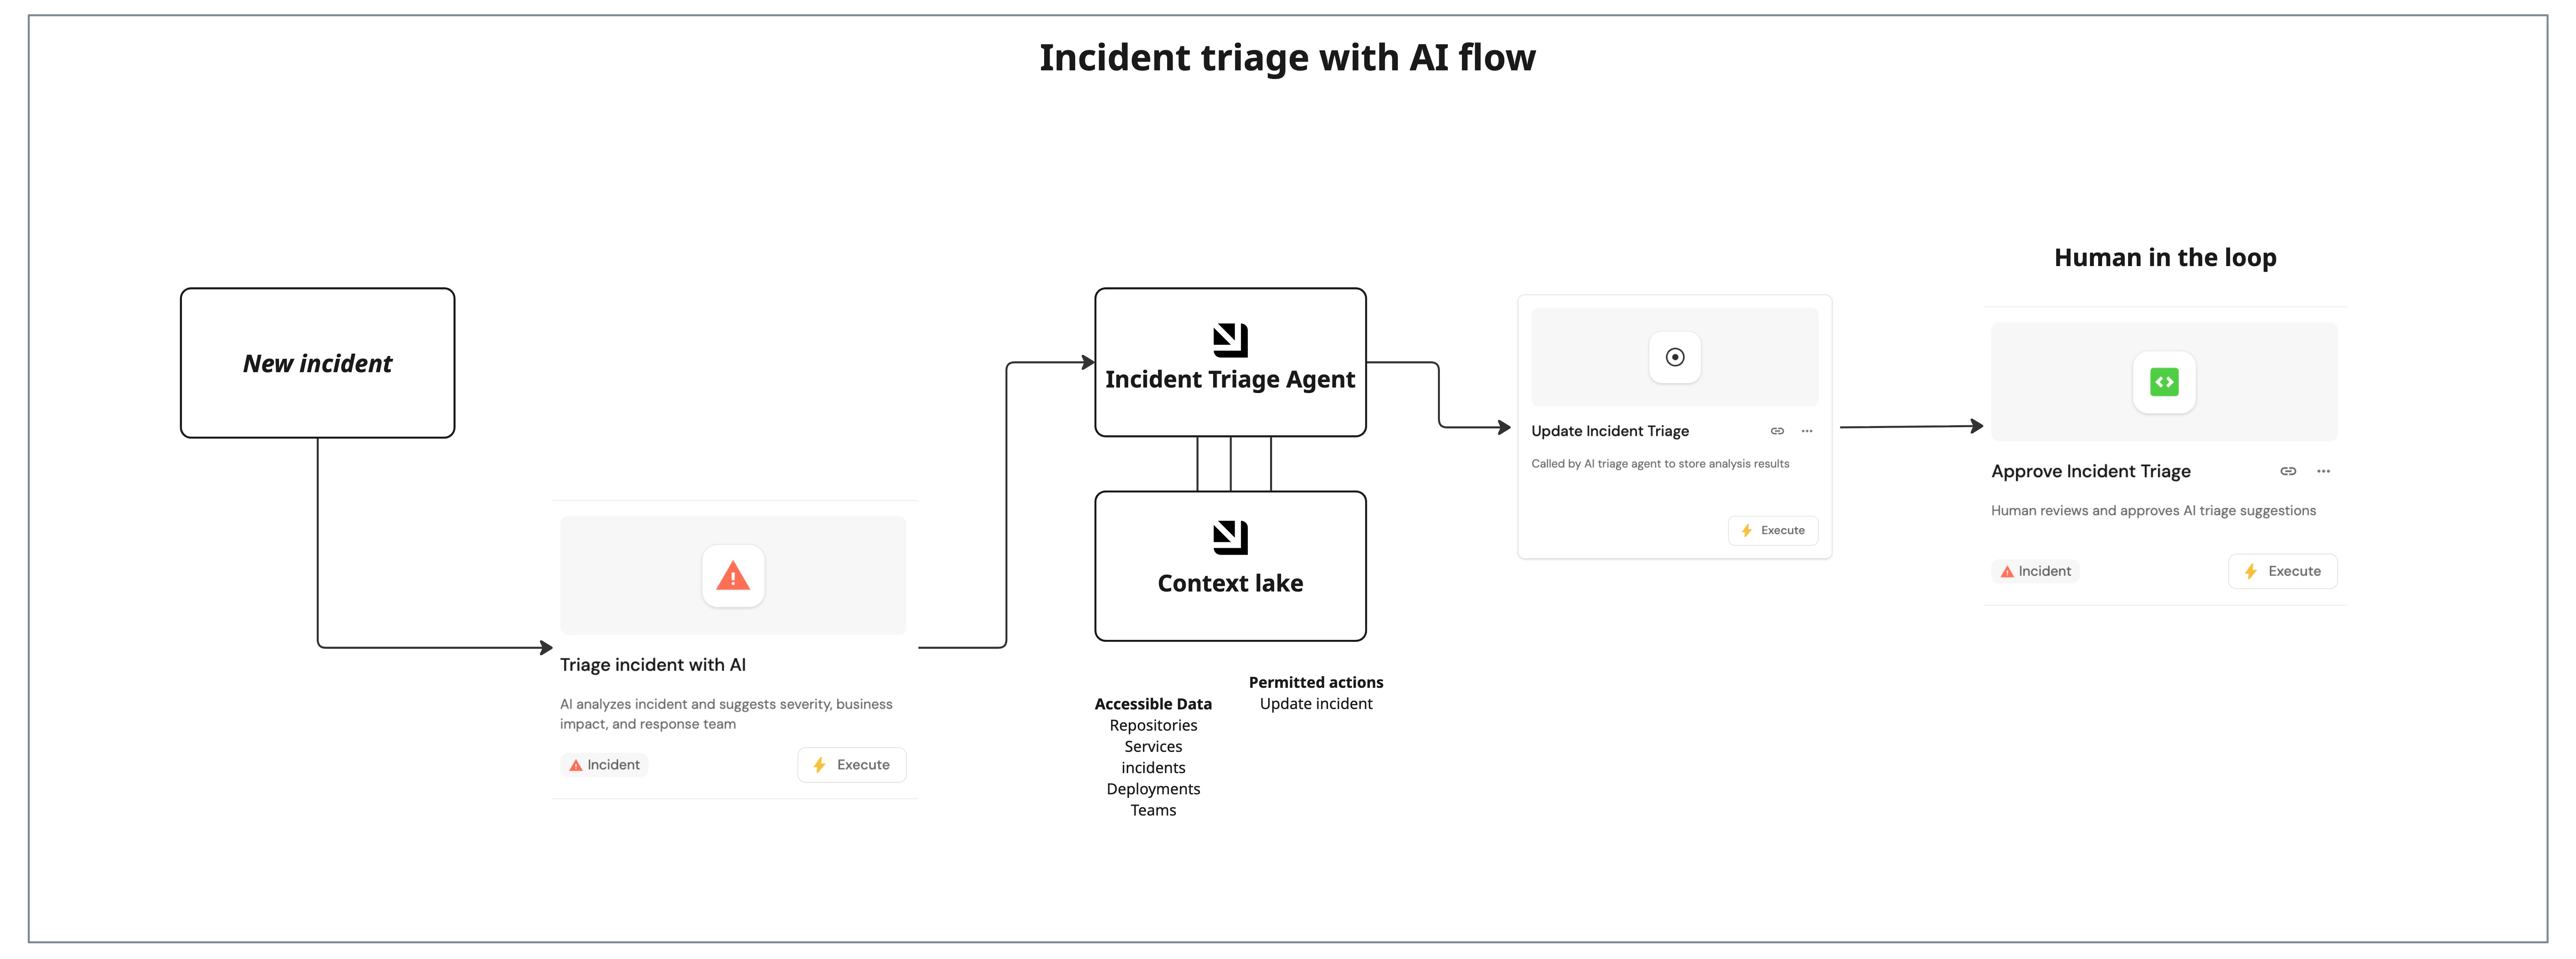
Where AI triage helps
- Instant severity assessment: AI suggests sev1–sev4 based on service tier, error rates, and business impact so you can prioritize correctly.
- Blast radius identification: Automatically identify affected services and dependencies from your software catalog.
- Pre-drafted communications: Get internal stakeholder and status page message drafts so you can notify quickly.
Prepare incident context for AI triage
This guide assumes the following:
- You have a Port account and have completed the onboarding process.
- You have implemented the incident blueprint pattern for incident management workflows.
- You have incidents in your catalog (e.g., from PagerDuty or another alert source) with at least
primary_serviceor alert context.
Use the incident data model for triage
You will use the incident blueprint pattern described in the incident blueprint guide. The blueprint already includes properties for AI-suggested triage (severity, business impact, communications, owner, response team) and timestamps such as triaged_at.
Configure the incident triage AI agent
You will create a triage agent that analyzes incident context, suggests severity and business impact, drafts communications, and recommends owner and response team.
-
Go to the AI agents page of your portal.
-
Click on
+ AI Agent. -
Click on the
{...} Edit JSONbutton. -
Use the following configuration:
Incident triage agent (Click to expand)
Agent prompt customizationThe following agent prompt is a recommended starting point. You can customize it to match your severity definitions, escalation paths, and communication templates.
{"identifier": "incident_triage_agent","title": "Incident Triage Agent","icon": "Details","team": [],"properties": {"description": "AI agent that evaluates incidents and suggests severity, business impact, affected services, and communications","status": "active","prompt": "You are a Triage Agent for incidents in the Alert stage.\n\n**Your Role:**\n1. Analyze incident details from PagerDuty, monitoring systems, and service context\n2. Suggest severity level (sev1-sev4) based on:\n - Service tier and criticality\n - Error rates and affected customers\n - Revenue impact potential\n - Business hours vs off-hours\n3. Identify affected services by checking:\n - Service dependencies\n - Error rate spikes\n - Recent deployments\n4. Calculate business impact:\n - Estimated customer count\n - Revenue impact\n - SLA implications\n5. Draft communications:\n - Internal stakeholder message\n - Customer-facing status page update\n6. Recommend incident owner and response team:\n - Query Port for service ownership relations\n - Check primary_service.on_call user\n - Identify service owner team\n - Consider oncall rotation and expertise\n\n**Response Format:**\nAlways call the `update_incident_triage` action with:\n- `incident_id`: The incident identifier (required)\n- `ai_suggested_severity`: sev1-sev4 (required)\n- `business_impact`: Detailed impact analysis in markdown (required)\n- `internal_comms_message`: Draft for stakeholders (required)\n- `status_page_message`: Draft for customers (optional)\n- `ai_suggested_owner`: User email of recommended incident commander (optional)\n- `ai_suggested_response_team`: Team identifier for response team (optional)\n\n**Finding Owner & Team:**\nUse Port queries to find:\n1. Primary service's on_call user → suggest as owner\n2. Primary service's team relation → suggest as response_team\n3. If no on_call, check service owner or recent incident commanders\n4. For sev1/sev2, escalate to senior engineers or leadership teams\n\nBe specific, data-driven, and focus on speed. Time matters in incidents.","execution_mode": "Automatic","conversation_starters": ["What's the blast radius of this incident? Show me affected services and their dependencies.","Assess the severity and business impact. Who should I page and what should I tell customers?","Connect this alert to recent deployments or changes. Is there a correlation?"],"tools": ["^(list|get|search|track|describe)_.*","run_update_incident_triage"]},"relations": {}} -
Click Create to save the agent.
The AI agent uses MCP (Model Context Protocol) enhanced capabilities to discover relevant blueprint entities through its tools. The ^(list|get|search|track|describe)_.* pattern lets the agent access services, teams, users, and deployments in your catalog. You add run_update_incident_triage so the agent can persist its triage suggestions. The run_ prefix marks which self-service actions the agent is allowed to execute.
Set up triage self-service actions
You will create three self-service actions: one to trigger AI triage (user-facing), one for the agent to save results (AI-facing), and one for humans to approve triage (human-in-the-loop).
Add triage incident with AI action
-
Go to the Self-service page of your portal.
-
Click on the + New Action button.
-
Click on the
{...} Edit JSONbutton. -
Use the following configuration:
Triage incident with AI action (Click to expand)
{"identifier": "ai_triage_incident","title": "Triage incident with AI","icon": "Alert","description": "AI analyzes incident and suggests severity, business impact, and response team","trigger": {"type": "self-service","operation": "DAY-2","userInputs": {"properties": {"additional_context": {"type": "string","title": "Additional Context","description": "Any additional context for the AI to consider","format": "markdown"}},"required": [],"order": ["additional_context"]},"blueprintIdentifier": "incident"},"invocationMethod": {"type": "WEBHOOK","url": "https://api.port.io/v1/agent/incident_triage_agent/invoke","agent": false,"synchronized": true,"method": "POST","headers": {"RUN_ID": "{{ .run.id }}","Content-Type": "application/json"},"body": {"prompt": "Incident Triage Request:\n\nIncident ID: {{.entity.identifier}}\nTitle: {{.entity.title}}\nDescription: {{.entity.properties.description}}\nAlert Source: {{.entity.properties.alert_source}}\nAlerted At: {{.entity.properties.alerted_at}}\nPrimary Service: {{.entity.relations.primary_service}}\nPagerDuty Incident: {{.entity.relations.pagerduty_incident}}\n\nAdditional Context: {{.inputs.additional_context}}\n\nPlease analyze and provide:\n1. Suggested severity (sev1-sev4)\n2. Business impact analysis\n3. Affected services identification\n4. Internal communications draft\n5. Status page message draft\n6. Recommended incident owner and response team","labels": {"source": "ai_triage_incident","incident_id": "{{.entity.identifier}}","stage": "alert"}}},"requiredApproval": false} -
Click Create to save the action.
Add update incident triage action
-
Go to the Self-service page of your portal.
-
Click on the + New Action button.
-
Click on the
{...} Edit JSONbutton. -
Use the following configuration:
Update incident triage action (Click to expand)
{"identifier": "update_incident_triage","title": "Update Incident Triage","icon": "DefaultProperty","description": "Called by AI triage agent to store analysis results","trigger": {"type": "self-service","operation": "DAY-2","userInputs": {"properties": {"incident_id": {"type": "string","title": "Incident ID"},"ai_suggested_severity": {"type": "string","title": "AI Suggested Severity","enum": ["sev1","sev2","sev3","sev4"]},"business_impact": {"type": "string","title": "Business Impact","format": "markdown"},"internal_comms_message": {"type": "string","title": "Internal Communications Message","format": "markdown"},"status_page_message": {"type": "string","title": "Status Page Message","format": "markdown"},"ai_suggested_owner": {"type": "string","title": "AI Suggested Owner","format": "user"},"ai_suggested_response_team": {"type": "string","title": "AI Suggested Response Team","format": "team"}},"required": ["incident_id","ai_suggested_severity","business_impact","internal_comms_message"],"order": ["incident_id","ai_suggested_severity","business_impact","internal_comms_message","status_page_message","ai_suggested_owner","ai_suggested_response_team"]}},"invocationMethod": {"type": "UPSERT_ENTITY","blueprintIdentifier": "incident","mapping": {"identifier": "{{ .inputs.incident_id }}","properties": {"ai_suggested_severity": "{{ .inputs.ai_suggested_severity }}","business_impact": "{{ .inputs.business_impact }}","internal_comms_message": "{{ .inputs.internal_comms_message }}","status_page_message": "{{ .inputs.status_page_message }}","ai_suggested_owner": "{{ .inputs.ai_suggested_owner }}","ai_suggested_response_team": "{{ .inputs.ai_suggested_response_team }}"}}},"requiredApproval": false} -
Click Create to save the action.
Add approve incident triage action
-
Go to the Self-service page of your portal.
-
Click on the + New Action button.
-
Click on the
{...} Edit JSONbutton. -
Use the following configuration:
Approve incident triage action (Click to expand)
{"identifier": "approve_incident_triage","title": "Approve incident triage","icon": "UpArrow","description": "Human reviews and approves AI triage suggestions","trigger": {"type": "self-service","operation": "DAY-2","userInputs": {"properties": {"severity": {"type": "string","title": "Final Severity","default": {"jqQuery": ".entity.properties.ai_suggested_severity"},"enum": ["sev1","sev2","sev3","sev4"]},"owner": {"type": "string","title": "Incident Owner","default": {"jqQuery": ".entity.properties.ai_suggested_owner"},"format": "user"},"response_team": {"type": "string","title": "Response Team","default": {"jqQuery": ".entity.properties.ai_suggested_response_team"},"format": "team"},"override_business_impact": {"type": "string","title": "Override Business Impact (optional)","format": "markdown","default": {"jqQuery": ".entity.properties.business_impact"}},"override_comms": {"type": "string","title": "Override Internal Comms (optional)","format": "markdown","default": {"jqQuery": ".entity.properties.internal_comms_message"}}},"required": ["severity","owner","response_team"],"order": ["severity","owner","response_team","override_business_impact","override_comms"]},"condition": {"type": "SEARCH","rules": [{"operator": "isNotEmpty","property": "ai_suggested_severity"},{"operator": "isEmpty","property": "triaged_at"}],"combinator": "and"},"blueprintIdentifier": "incident"},"invocationMethod": {"type": "UPSERT_ENTITY","blueprintIdentifier": "incident","mapping": {"identifier": "{{ .entity.identifier }}","properties": {"business_impact": "{{ if .inputs.override_business_impact then .inputs.override_business_impact else .entity.properties.business_impact end }}","internal_comms_message": "{{ if .inputs.override_comms then .inputs.override_comms else .entity.properties.internal_comms_message end }}","severity": "{{ .inputs.severity }}","status": "investigating","triaged_at": "{{ now | todateiso8601 }}"},"relations": {"owner": "{{ .inputs.owner }}","response_team": "{{ .inputs.response_team }}"}}},"requiredApproval": false} -
Click Create to save the action.
The three actions implement a human-in-the-loop flow: the AI suggests severity, impact, comms, owner, and team; a human reviews and approves (or overrides) before the incident moves to investigating. This keeps triage consistent while avoiding fully automated escalation.
Add triage widgets to the incident page
Add a Triage & Response tab to the incident entity page so you can run the triage agent, use the self-service actions, and view business impact.
-
Go to the Catalog page in your portal.
-
Select the Incident entity page.
-
Add a new tab named Triage & Response.
-
Add an Action card for Triage incident with AI.
-
Add an Action card for Approve incident triage (and any other triage-related actions you use).
-
Add a Markdown widget with the following configuration:
- Title: Business impact.
- Description: AI-suggested business impact analysis. Run Triage incident with AI to generate.
- Data source: Property, then select the Business Impact property.
Optionally add Markdown widgets for Internal Comms Message and Status Page Message so reviewers can see and edit the drafts before approving.
Test AI triage
-
Open an Incident in the Alert stage (no
triaged_atyet). -
Run Triage incident with AI.
-
Confirm the agent writes
ai_suggested_severity,business_impact,internal_comms_message, and optionallystatus_page_message,ai_suggested_owner, andai_suggested_response_teamto the incident. -
Open the Triage & Response tab and review the business impact and suggested owner/team.
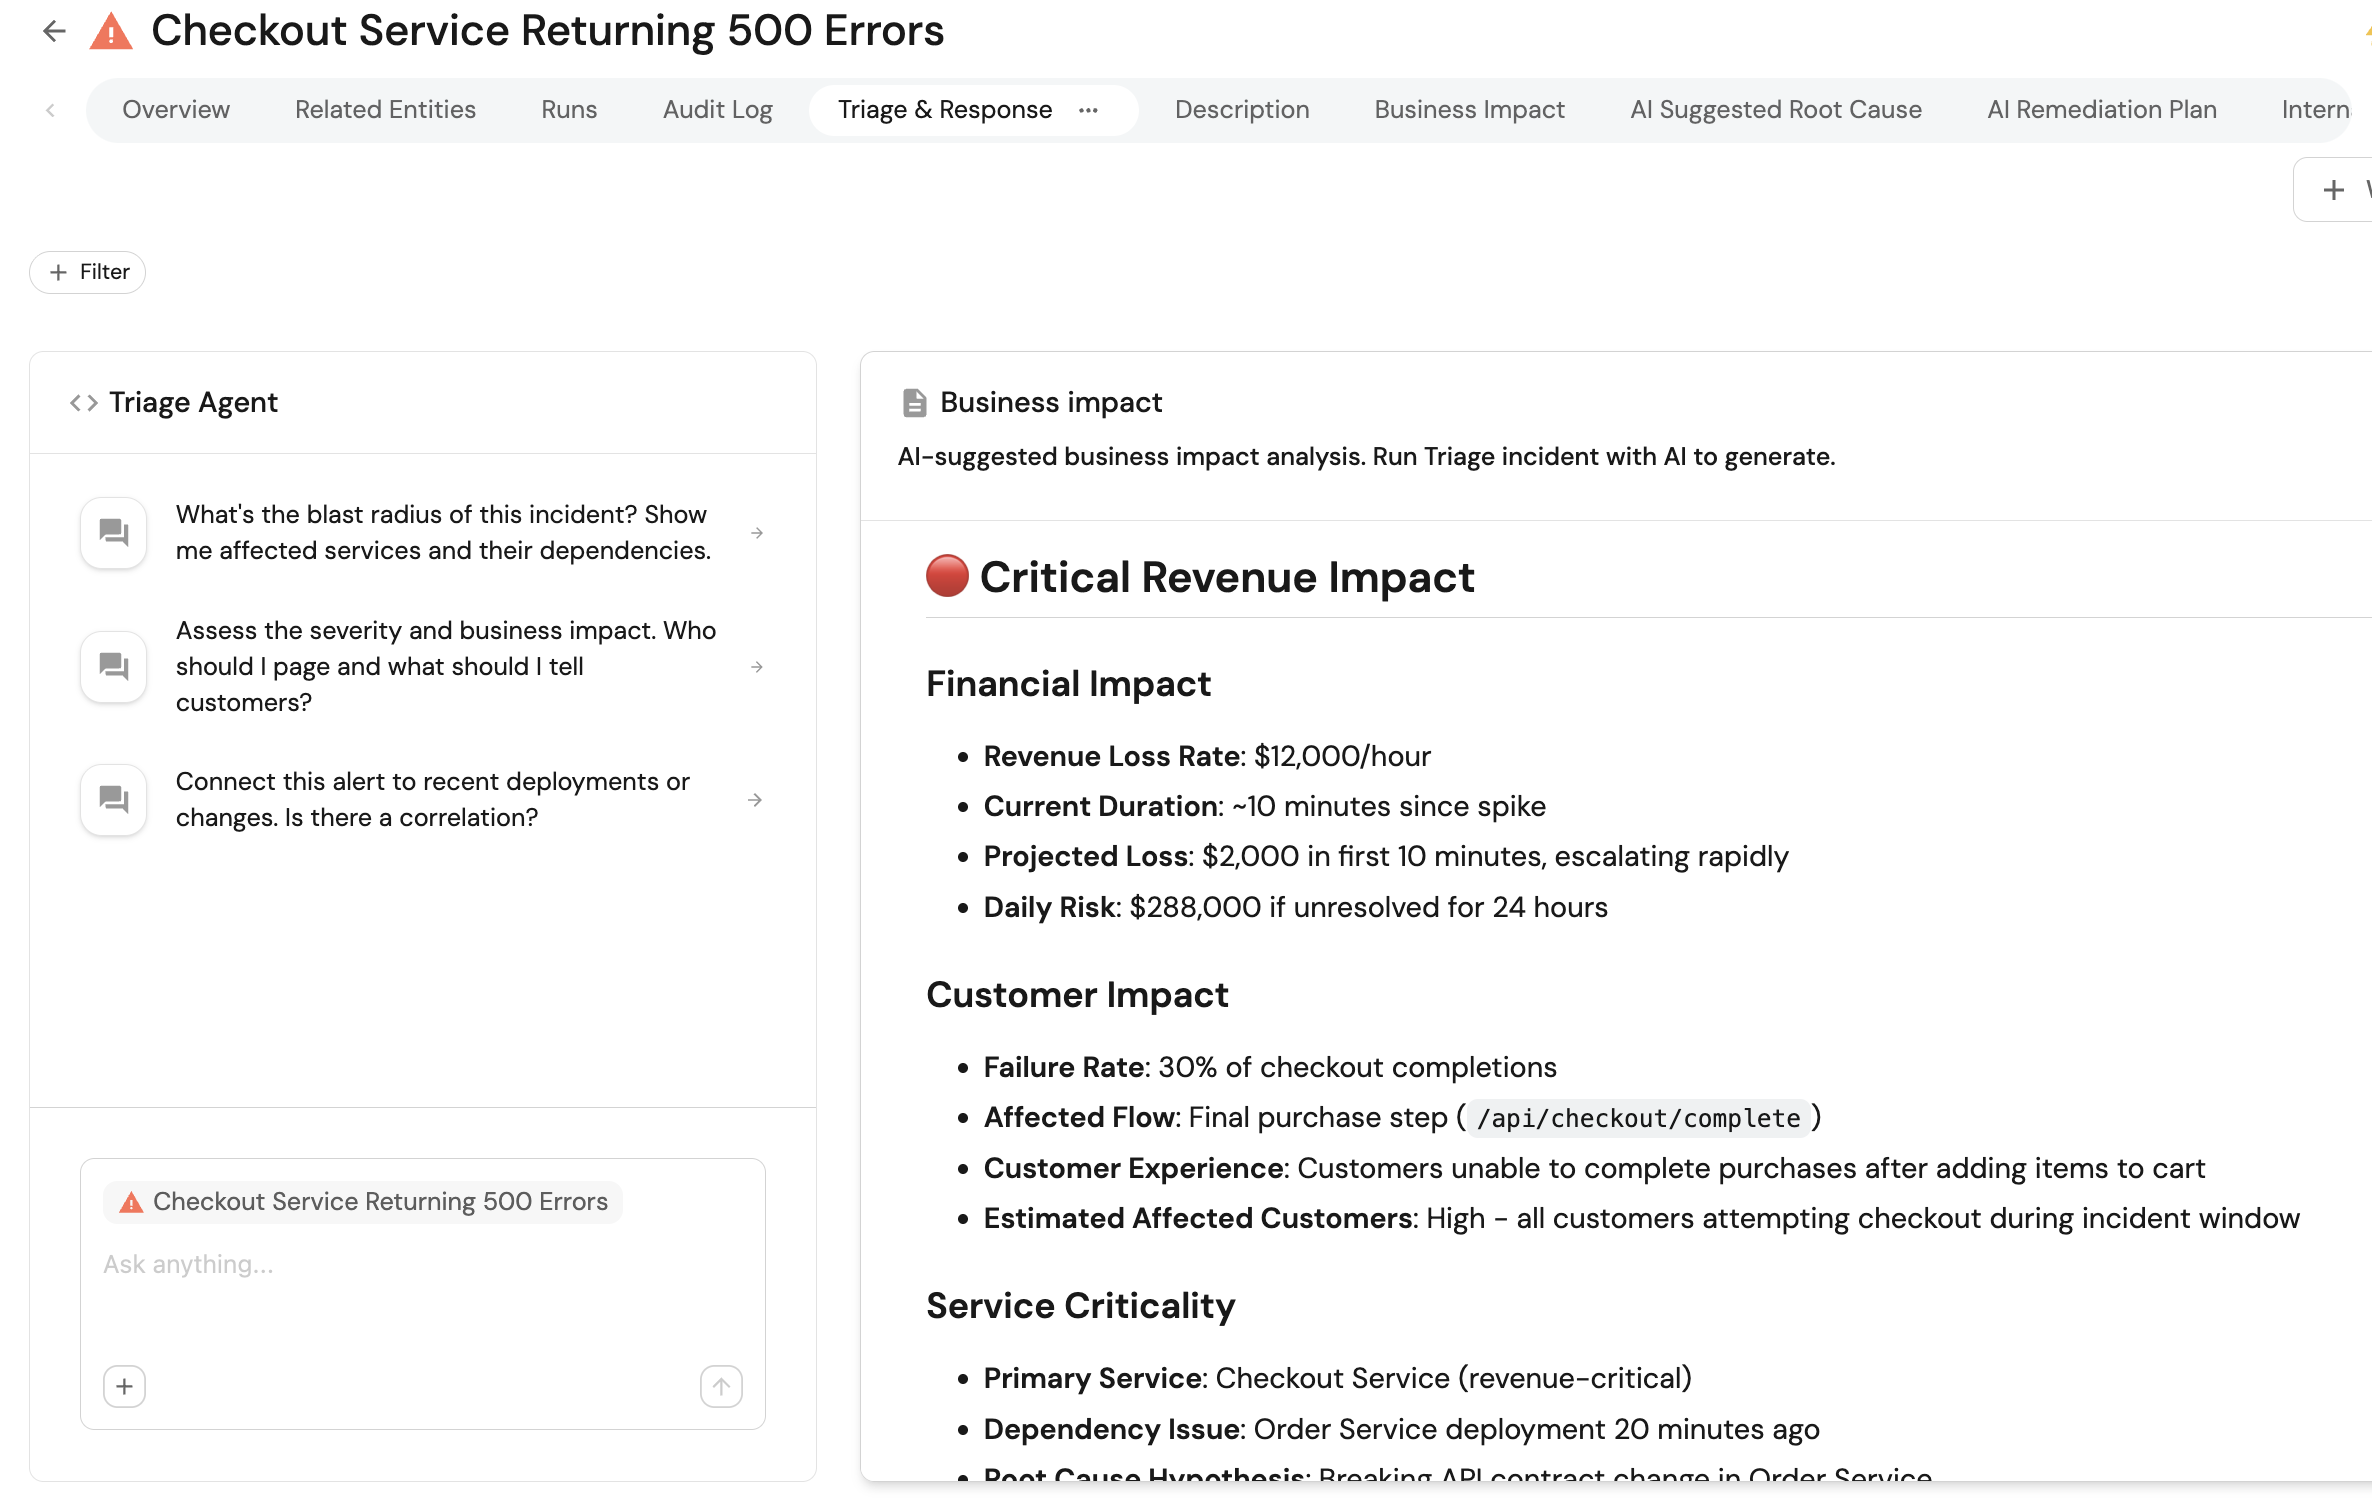
-
Run Approve incident triage, adjust severity/owner/team or override business impact and comms as needed, then confirm.
-
Verify the incident gets
severity,owner,response_team,triaged_at, andstatusset to investigating. -
Use the AI invocations page to debug runs, tool calls, and failures.
Orchestrate incident response with AI
When incidents occur, engineers waste critical minutes manually coordinating response logistics instead of fixing the actual problem. They need to create dedicated Slack channels, set up Zoom meetings for war rooms, create tracking tickets in Jira, and notify the right people, all while gathering context about affected services.
This guide demonstrates how to implement an AI-powered incident response system in Port. When an incident is created, orchestration can run in one of two ways:
-
Workflow: A single workflow runs a fixed sequence of steps (Slack channel, Zoom meeting, Jira ticket, notifications) based on severity.
-
Actions & Automations: An AI agent has access to Port actions and automatically chooses and runs the right sequence based on the incident context.
Both approaches use the same data model, external tools, and secrets. Only the implementation (workflow vs. actions + automations + AI agent) differs.
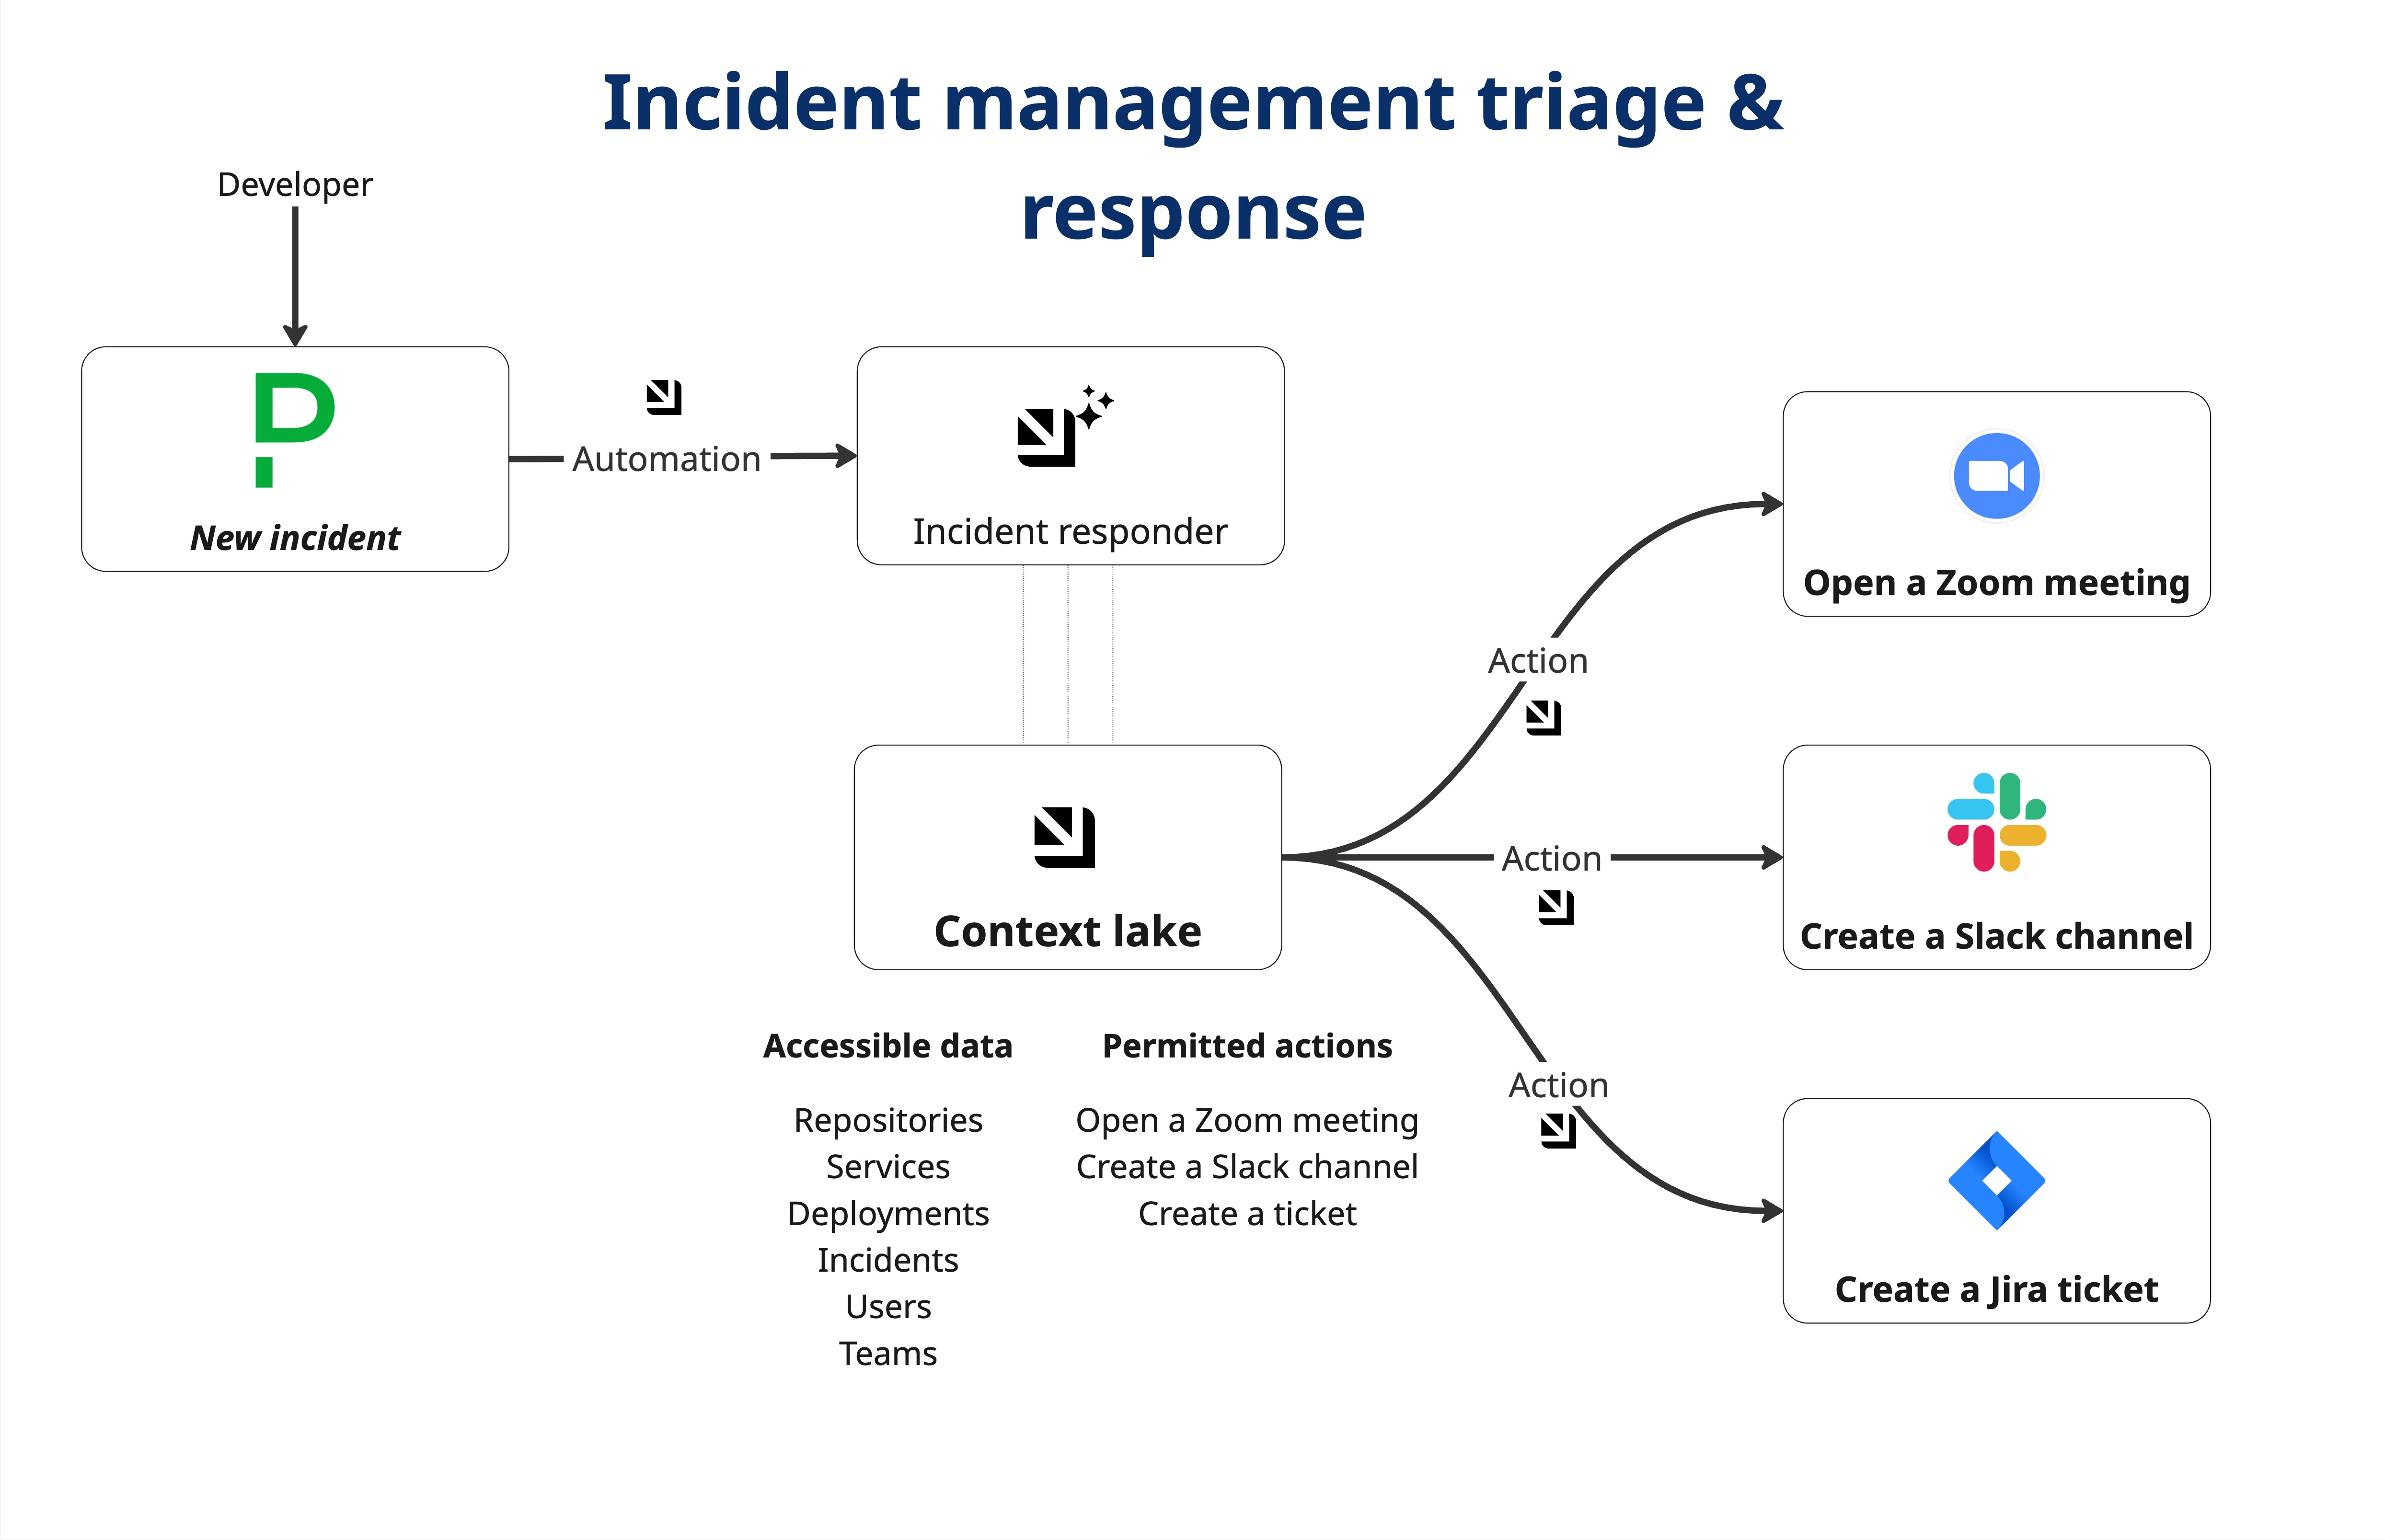
Where AI orchestration helps
- Eliminate manual coordination delays by automating incident setup tasks
- Ensure consistent incident response with standardized communication channels and tracking
- Scale incident management across teams without requiring every engineer to know all setup steps
- Accelerate time to resolution by removing logistics overhead during high-stress situations
Prepare external incident response tools
This guide assumes the following:
- You have a Port account and have completed the onboarding process
- You have access to one of Port's incident management integrations (we'll use PagerDuty in this guide)
- You have access to a Slack developer account with permissions to create apps
- You have access to a Zoom developer account with permissions to create Server-to-Server OAuth apps
- You have access to a Jira instance with API access
- For the Workflow option: you have access to workflows in Port. Workflows are currently in open beta and available to all users.
While this guide uses PagerDuty for incident management, you can adapt it for other incident management tools like FireHydrant, Incident.io, or Opsgenie. The same principles apply regardless of the incident source.
Set up the incident orchestration data model
We will configure the necessary blueprint to support our AI-powered incident orchestration workflow.
Create PagerDuty incident blueprint
The incident blueprint will store incident data from your incident management tool and track orchestration results.
-
Go to the builder page of your portal.
-
Click on + Blueprint.
-
Click on the
{...} Edit JSONbutton. -
Copy and paste the following JSON configuration:
PagerDuty incident blueprint (Click to expand)
{"identifier": "pagerdutyIncident","description": "This blueprint represents a PagerDuty incident in our software catalog","title": "PagerDuty Incident","icon": "pagerduty","schema": {"properties": {"status": {"icon": "DefaultProperty","title": "Incident Status","type": "string","enum": ["triggered","annotated","acknowledged","reassigned","escalated","reopened","resolved","escalated to human"],"enumColors": {"triggered": "red","annotated": "blue","acknowledged": "yellow","reassigned": "blue","escalated": "yellow","reopened": "red","resolved": "green","escalated to human": "bronze"}},"url": {"type": "string","format": "url","title": "Incident URL"},"urgency": {"title": "Incident Urgency","type": "string","enum": ["high", "low"],"enumColors": {"high": "red","low": "green"}},"priority": {"title": "Priority","type": "string"},"severity": {"type": "string","title": "Severity","enum": ["Critical", "High", "Medium", "Low"],"enumColors": {"Critical": "red","High": "red","Medium": "yellow","Low": "lime"}},"description": {"type": "string","title": "Description"},"assignees": {"title": "Assignees","type": "array","items": {"type": "string","format": "user"}},"escalation_policy": {"type": "string","title": "Escalation Policy"},"created_at": {"title": "Created At","type": "string","format": "date-time"},"updated_at": {"title": "Updated At","type": "string","format": "date-time"},"resolved_at": {"title": "Incident Resolution Time","type": "string","format": "date-time","description": "The timestamp when the incident was resolved"},"recovery_time": {"title": "Time to Recovery","type": "number","description": "The time (in minutes) between the incident being triggered and resolved"},"triggered_by": {"type": "string","title": "Triggered By"},"slack_channel": {"type": "string","title": "Slack Channel","description": "The Slack channel created for this incident","icon": "Slack"},"zoom_meeting_link": {"type": "string","title": "Zoom Meeting Link","description": "The Zoom meeting link for the war room","icon": "Team","format": "url"},"jira_tracking_ticket": {"type": "string","title": "Jira Tracking Ticket","icon": "Jira","format": "url","description": "The Jira ticket created to track this incident"}},"required": []},"mirrorProperties": {},"calculationProperties": {},"relations": {"pagerdutyService": {"title": "PagerDuty Service","target": "pagerdutyService","required": false,"many": false}}} -
Click Create to save the blueprint.
Port's PagerDuty integration creates a pagerdutyIncident blueprint by default. You can extend this existing blueprint by adding the following properties to enable orchestration tracking:
-
Go to the builder page of your portal.
-
Select the
PagerDuty Incidentblueprint. -
Click on the
{...} Edit JSONbutton. -
Add the following properties under the
propertiesschema:PagerDuty incident blueprint extended properties (Click to expand)
"slack_channel": {"type": "string","title": "Slack Channel","description": "The Slack channel created for this incident"},"zoom_meeting_link": {"type": "string","format": "url","title": "Zoom Meeting Link","description": "The Zoom meeting link for the war room"},"jira_tracking_ticket": {"type": "string","format": "url","title": "Jira Tracking Ticket","description": "The Jira ticket created to track this incident"}
The rest of this guide will reference pagerdutyIncident as the blueprint identifier.
Connect Slack, Zoom, and Jira
We need to configure integrations with Slack, Zoom, and Jira to enable the orchestration actions.
Set up the Slack app
-
Create a Slack app and install it on a workspace.
-
Add the following permissions to the Slack app:
-
Create channel (Required):
channels:managegroups:writeim:writempim:write
-
Find a user with an email address (Optional):
users:read.email
-
Invite users to channel (Optional):
channels:write.invitesgroups:write.invitesmpim:write.invites
-
Send messages (Required):
chat:writechat:write.public
User permissionsWithout scopes for
Find a user with an email addressandInvite users to channel, the channel will be created but users will not be added to it automatically. -
-
Navigate back to the OAuth & Permissions page. You will see an access token under OAuth Tokens for Your Workspace that you will use in the
SLACK_BOT_TOKENPort secret.
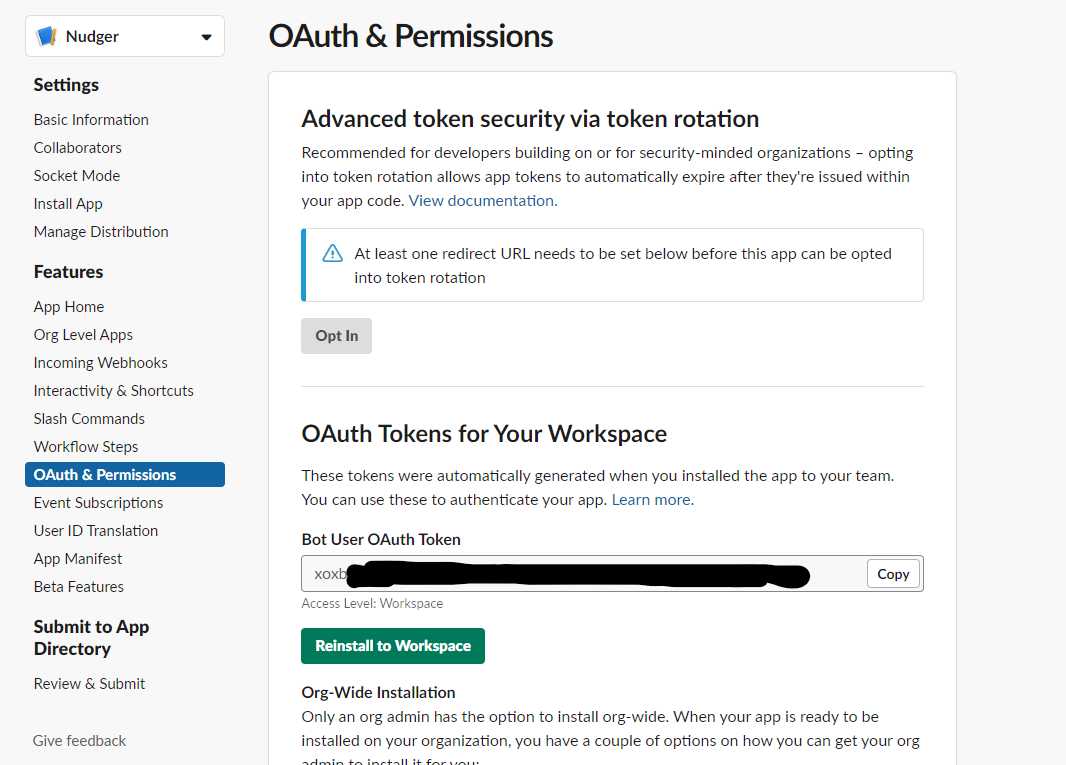
Set up the Zoom app
Create a Server-to-Server OAuth app:
-
Go to Zoom Marketplace.
-
Click Develop → Build App → select Server-to-Server OAuth.
-
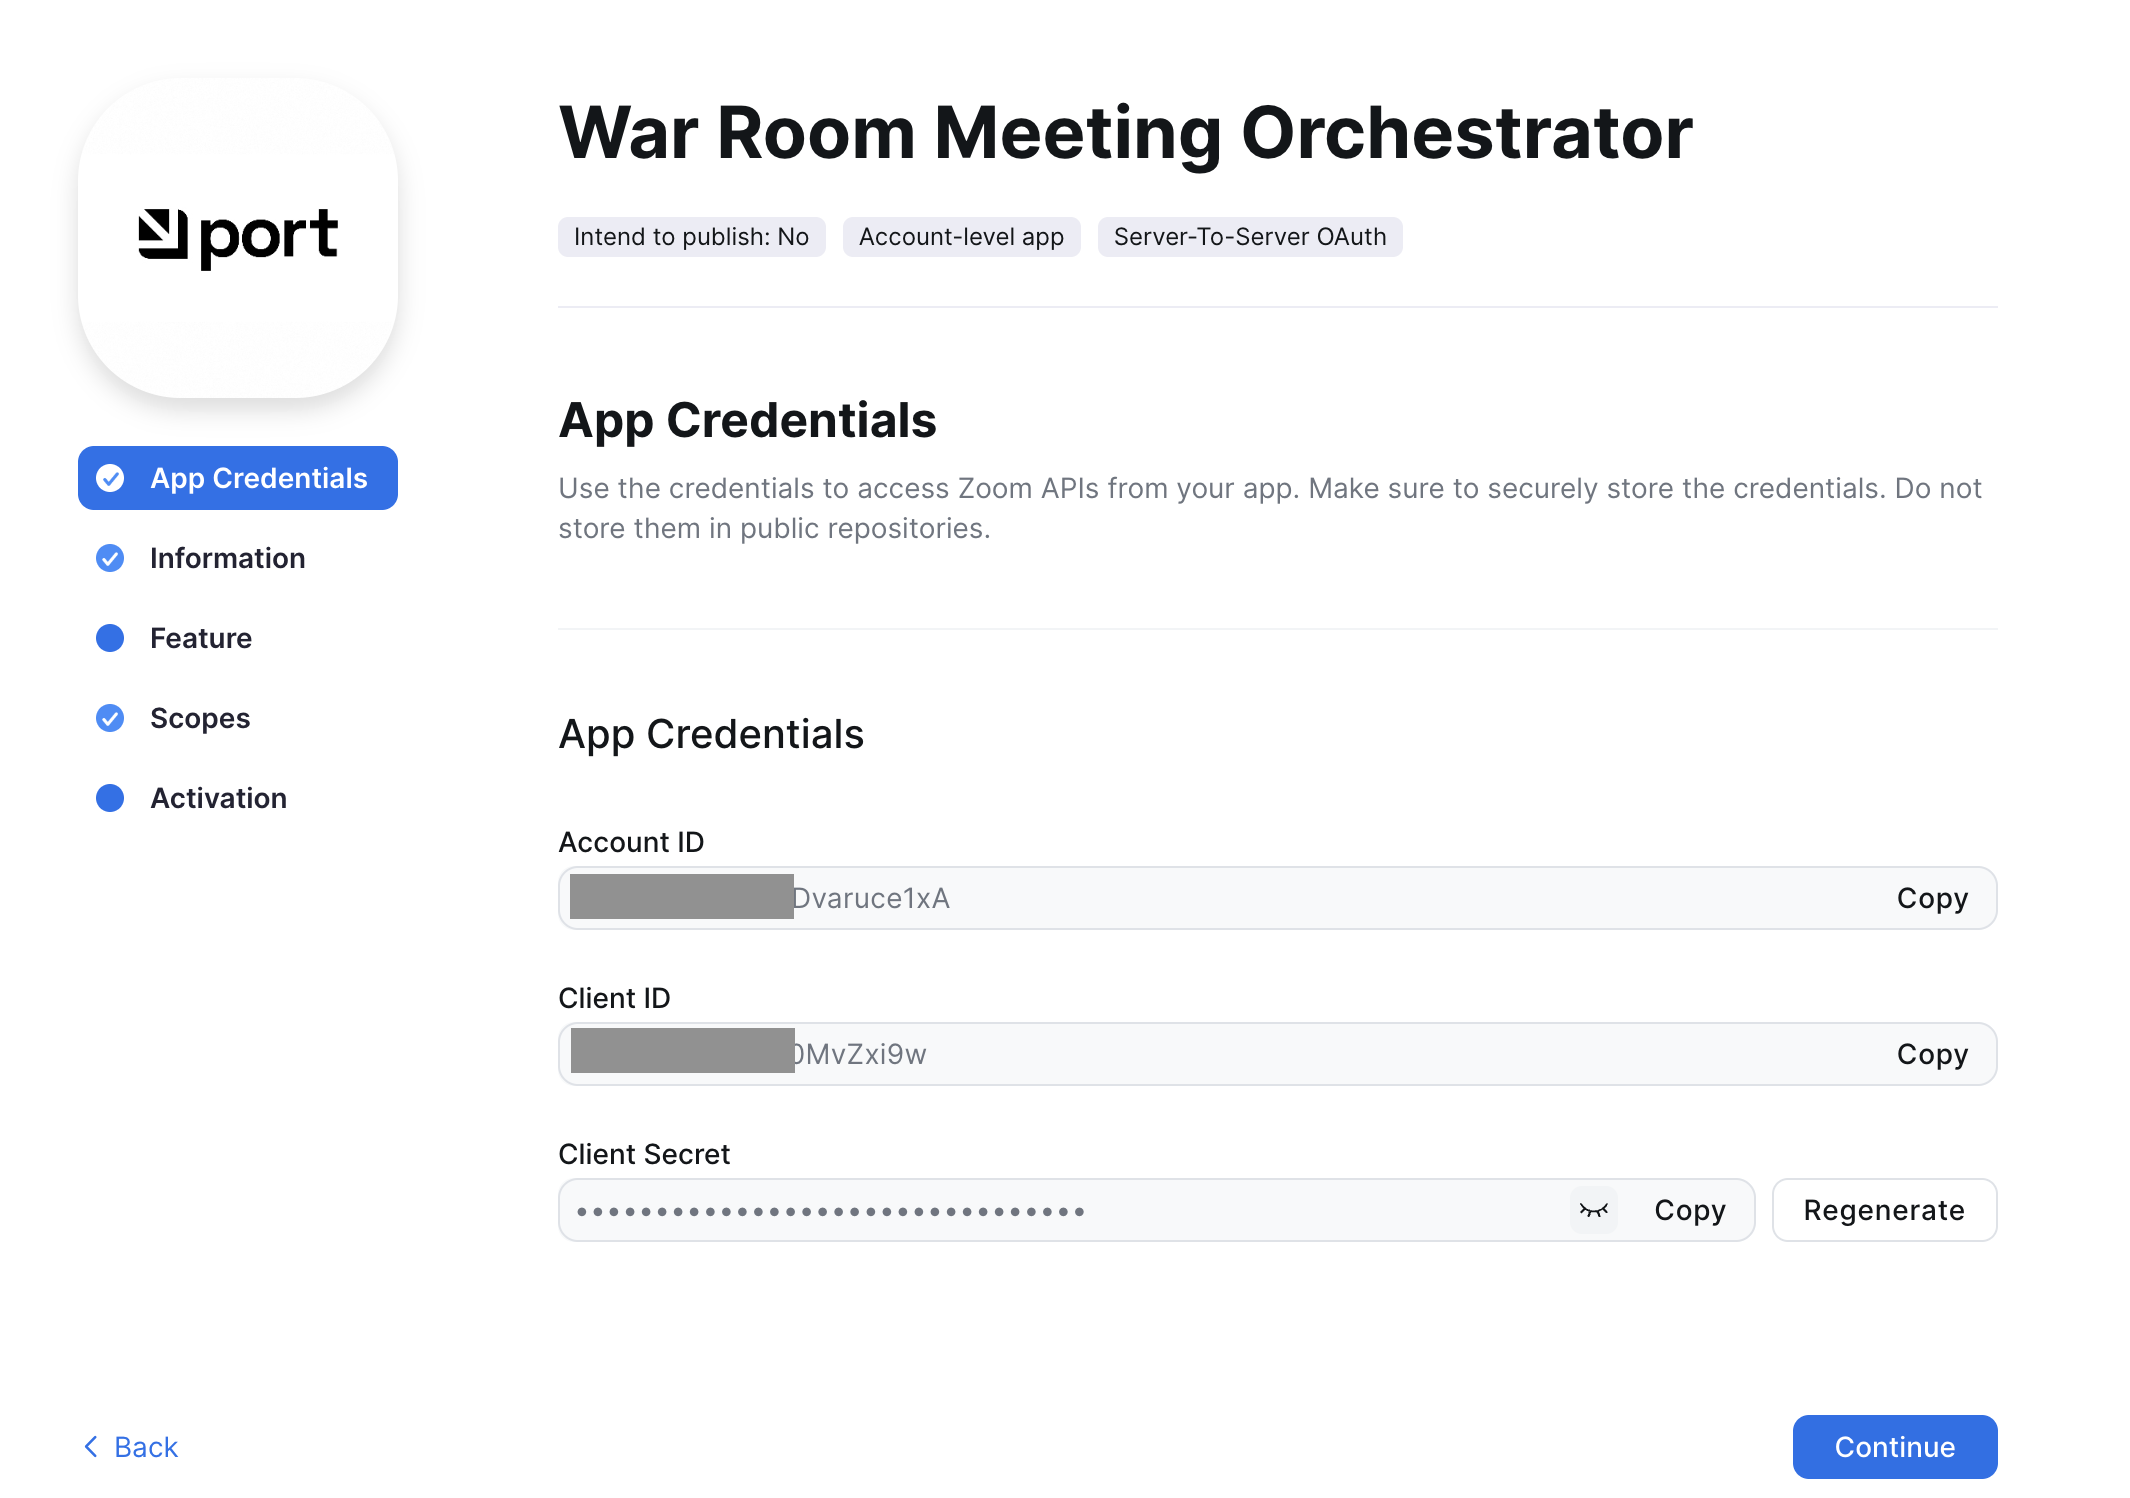
Fill in the app details and make note of:
- Account ID
- Client ID
- Client Secret
-
Under Scopes, add:
meeting:writemeeting:read- (optionally)
user:read
Set up Jira API access
-
Log in to your Jira instance.
-
Generate an API token:
- Go to Atlassian Account Settings
- Click Create API token
- Copy the generated token (you will need this for the Port secret)
Add Port secrets for orchestration
To add secrets to your portal:
-
In your Port application, click on your profile picture
 .
. -
Click on Credentials.
-
Click on the
Secretstab. -
Click on
+ Secretand add the following secrets:SLACK_BOT_TOKEN- Your Slack bot token from the OAuth & Permissions pageZOOM_ACCOUNT_ID- Your Zoom account IDZOOM_CLIENT_ID- Your Zoom client IDZOOM_CLIENT_SECRET- Your Zoom client secretJIRA_AUTH- Base64 encoded string of your Jira credentials. Generate this by running:Replaceecho -n "your-email@domain.com:your-api-token" | base64your-email@domain.comwith your Jira email andyour-api-tokenwith your Jira API token.
Build the orchestration implementation in Port
Choose one implementation. The data model and external tools above are the same for both.
- Workflow: One workflow defines the full sequence. When an incident is created, the workflow runs and branches by severity (critical/high, medium, low). No AI agent, the flow is deterministic and visible in the workflow editor.
- Actions & Automations: You create separate actions (Slack, Zoom, Jira, notify) and automations that trigger an AI agent and update the incident when actions complete. The AI agent decides which actions to run based on incident context.
- Workflow
- Actions & Automations
Build the incident orchestration workflow
Use Port's workflow feature to chain nodes (Slack, Zoom, Jira, notifications, entity update) in a single workflow. The workflow runs automatically when a PagerDuty incident is created.
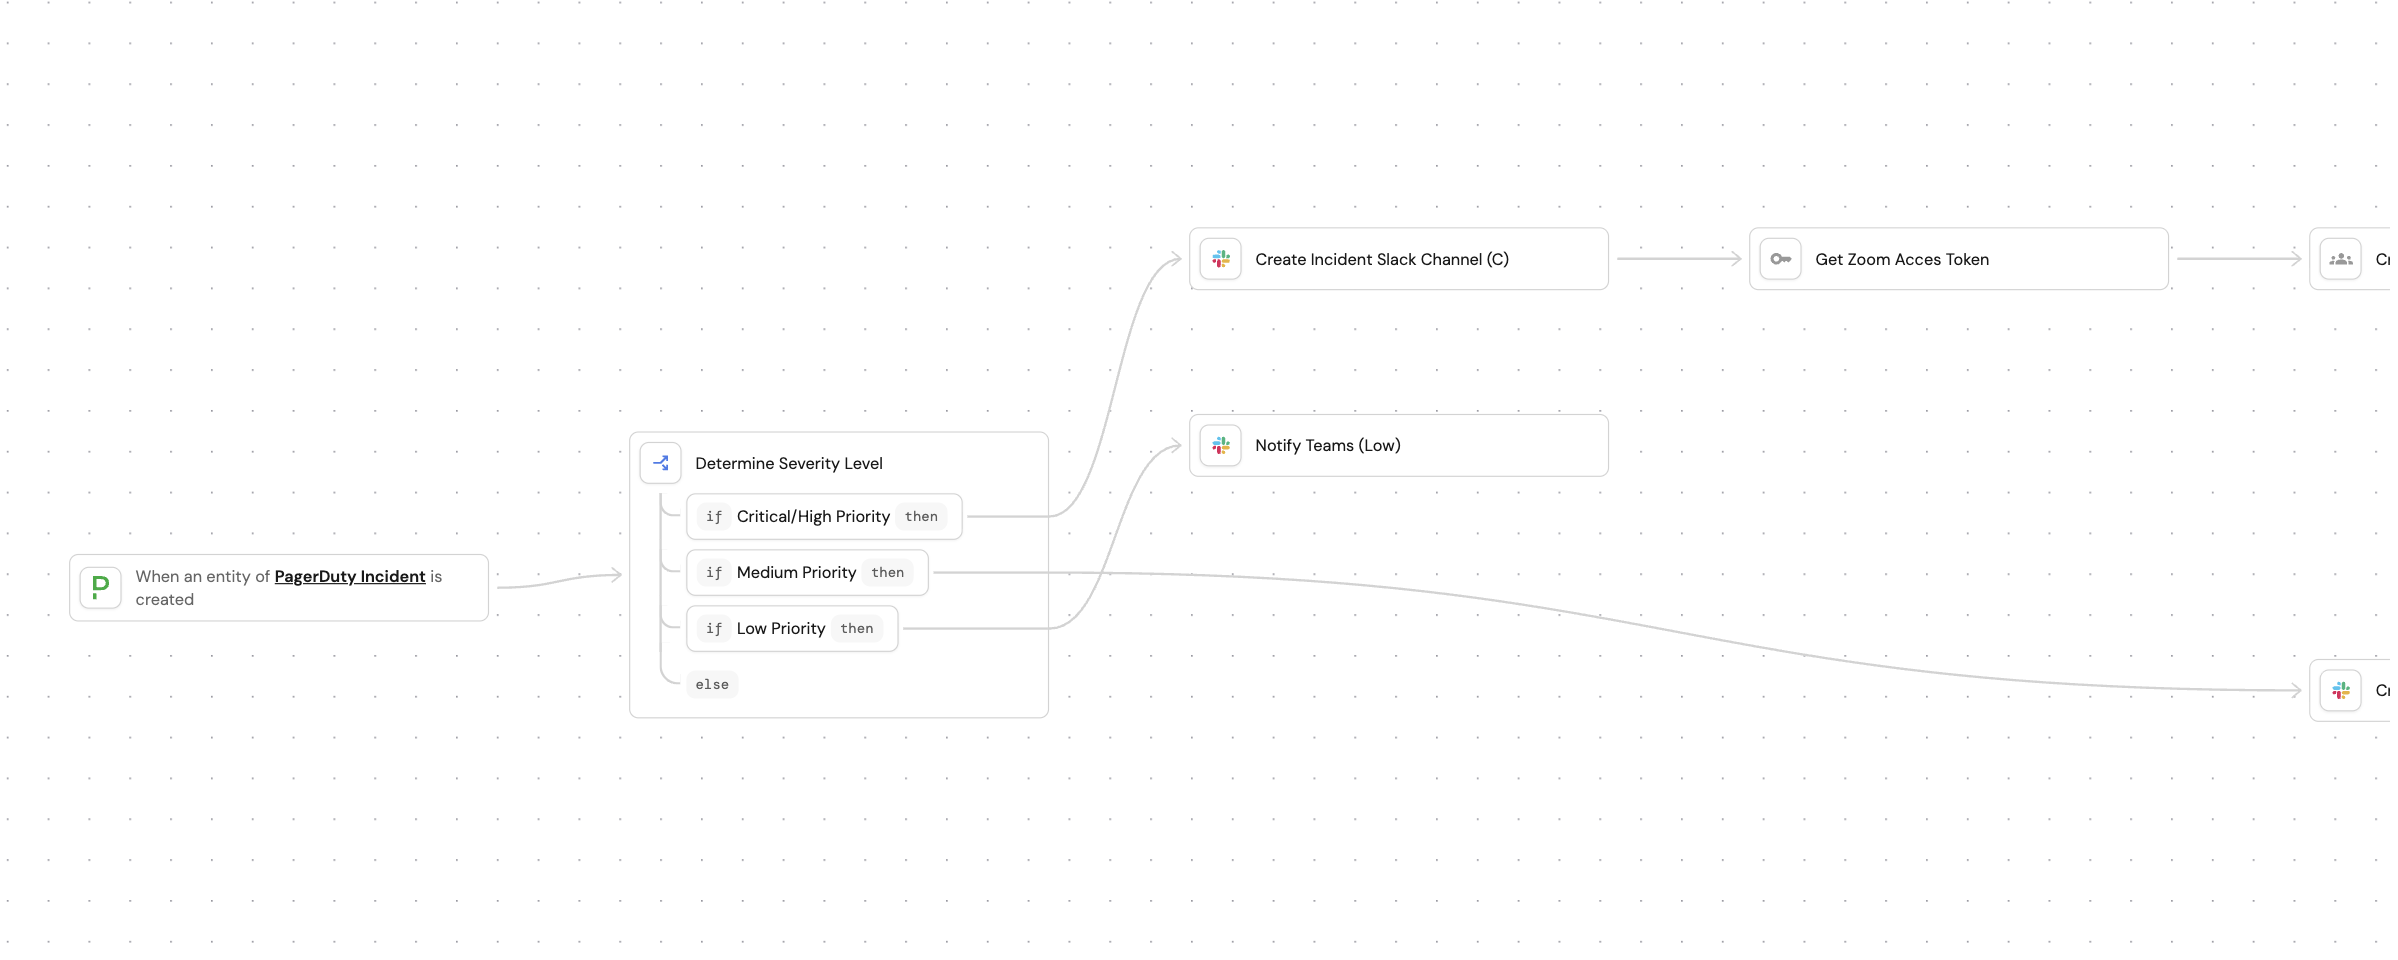
We will build the workflow using the workflow editor and the AI assistant to generate the initial structure. You can also skip the AI assistant and paste the workflow template directly.
-
Go to the workflows page of your portal.
-
Click + Workflow button in the top-right corner.
-
Click on Skip to editor to open the workflow editor.
-
Copy and paste this JSON template directly into the workflow editor.
Incident orchestration workflow template (Click to expand)
{"identifier": "incident_orchestration_workflow","title": "Automated Incident Orchestration","icon": "Alert","description": "Automatically orchestrates incident response by creating Slack channels, Zoom meetings, Jira tickets, and notifications based on incident severity. Updates the incident entity with all created resources in a single bulk update.","allowAnyoneToViewRuns": true,"nodes": [{"identifier": "create_jira_ticket_critical","title": "Create Jira Tracking Ticket","icon": "Jira","description": "Creates Jira bug ticket for critical/high incidents","config": {"type": "WEBHOOK","url": "<YOUR_JIRA_ORGANIZATION_URL>/rest/api/3/issue","agent": false,"synchronized": true,"method": "POST","headers": {"Content-Type": "application/json","Authorization": "Basic {{ .secrets.JIRA_AUTH }}"},"body": {"fields": {"labels": ["port-workflow", "incident"],"project": {"key": "<YOUR_JIRA_PROJECT>"},"summary": "{{.outputs.trigger.incident_title}}","issuetype": {"name": "Bug"},"description": {"type": "doc","content": [{"type": "paragraph","content": [{"text": "Incident Details\n\n- Priority: {{ .outputs.trigger.incident_priority }}\n- Urgency: {{ .outputs.trigger.incident_urgency }}\n- Status: {{ .outputs.trigger.incident_status }}\n- PagerDuty URL: {{ .outputs.trigger.incident_url }}\n\nDescription:\n{{ .outputs.trigger.incident_description }}\n\nResponse Resources:\n- Slack Channel: {{ .outputs.create_slack_channel_critical.slack_channel_name }}\n- Zoom Meeting: {{.outputs.create_zoom_meeting_critical.zoom_meeting_url }}","type": "text"}]}],"version": 1}}}},"variables": {"jira_ticket_url": "https://{{ (.response.data.self | capture(\"https://(?<domain>[^/]+)\") ).domain }}/browse/{{ .response.data.key }}"}},{"identifier": "create_jira_ticket_medium","title": "Create Jira Tracking Ticket","icon": "Jira","description": "Creates Jira bug ticket for medium priority incidents","config": {"type": "WEBHOOK","url": "<YOUR_JIRA_ORGANIZATION_URL>/rest/api/3/issue","agent": false,"synchronized": true,"method": "POST","headers": {"Content-Type": "application/json","Authorization": "Basic {{ .secrets.JIRA_AUTH }}"},"body": {"fields": {"labels": ["port-workflow", "incident"],"project": {"key": "<YOUR_JIRA_PROJECT>"},"summary": "{{.outputs.trigger.incident_title}}","issuetype": {"name": "Bug"},"description": {"type": "doc","content": [{"type": "paragraph","content": [{"text": "Incident Details\n\n- Priority: {{ .outputs.trigger.incident_priority }}\n- Urgency: {{ .outputs.trigger.incident_urgency }}\n- Status: {{ .outputs.trigger.incident_status }}\n- PagerDuty URL: {{ .outputs.trigger.incident_url }}\n\nDescription:\n{{ .outputs.trigger.incident_description }}\n\nResponse Resources:\n- Slack Channel: {{ .outputs.create_slack_channel_medium.slack_channel_name }}","type": "text"}]}],"version": 1}}}},"variables": {"jira_ticket_url": "https://{{ (.response.data.self | capture(\"https://(?<domain>[^/]+)\") ).domain }}/browse/{{ .response.data.key }}"}},{"identifier": "create_slack_channel_critical","title": "Create Incident Slack Channel (C)","icon": "Slack","description": "Creates dedicated Slack channel for critical/high incidents","config": {"type": "WEBHOOK","url": "https://slack.com/api/conversations.create","agent": false,"synchronized": true,"method": "POST","headers": {"Content-Type": "application/json","Authorization": "Bearer {{ .secrets.SLACK_BOT_TOKEN }}"},"body": {"name": "{{ .outputs.trigger.incident_id | ascii_downcase }}","is_private": false}},"variables": {"slack_channel_name": "#{{ .response.data.channel.name }}"}},{"identifier": "create_slack_channel_medium","title": "Create Incident Slack Channel (M)","icon": "Slack","description": "Creates dedicated Slack channel for medium priority incidents","config": {"type": "WEBHOOK","url": "https://slack.com/api/conversations.create","agent": false,"synchronized": true,"method": "POST","headers": {"Content-Type": "application/json","Authorization": "Bearer {{ .secrets.SLACK_BOT_TOKEN }}"},"body": {"name": "{{ .outputs.trigger.incident_id | ascii_downcase }}","is_private": false}},"variables": {"slack_channel_name": "#{{ .response.data.channel.name }}"}},{"identifier": "create_zoom_meeting_critical","title": "Create War Room Meeting","icon": "Team","description": "Set up a Zoom meeting for the war room after obtaining access token","config": {"type": "WEBHOOK","url": "https://api.zoom.us/v2/users/me/meetings","agent": false,"synchronized": true,"method": "POST","headers": {"Content-Type": "application/json","Authorization": "Bearer {{ .outputs.get_zoom_meeting_access_token.zoom_access_token }}"},"body": {"type": 2,"topic": "{{ .outputs.trigger.incident_title }}","duration": 60,"settings": {"mute_upon_entry": true,"join_before_host": true},"timezone": "UTC","start_time": "{{ now | todateiso8601 }}"}},"variables": {"zoom_meeting_url": "{{ .response.data.join_url }}"}},{"identifier": "determine_severity","title": "Determine Severity Level","icon": null,"description": "Evaluates priority and urgency to determine response level","config": {"type": "CONDITION","options": [{"identifier": "critical_high","title": "Critical/High Priority","expression": "(.outputs.trigger.incident_priority == \"P1\" or .outputs.trigger.incident_priority == \"P2\" or .outputs.trigger.incident_urgency == \"Critical\" or .outputs.trigger.incident_urgency == \"High\" or .outputs.trigger.incident_urgency == \"high\")"},{"identifier": "medium","title": "Medium Priority","expression": "(.outputs.trigger.incident_priority == \"P3\" or .outputs.trigger.incident_urgency == \"Medium\" or .outputs.trigger.incident_urgency == \"medium\")"},{"identifier": "low","title": "Low Priority","expression": "(.outputs.trigger.incident_priority == \"P4\" or .outputs.trigger.incident_urgency == \"Low\" or .outputs.trigger.incident_urgency == \"low\")"}]},"variables": {}},{"identifier": "get_zoom_meeting_access_token","title": "Get Zoom Access Token","icon": "Key","description": "Set up a Zoom meeting for the war room by first obtaining access token and then proceeding to call the create zoom meeting link","config": {"type": "WEBHOOK","url": "https://zoom.us/oauth/token","agent": false,"synchronized": true,"method": "POST","headers": {"Content-Type": "application/x-www-form-urlencoded","Authorization": "Basic {{ .secrets.ZOOM_CLIENT_ID + \":\" + .secrets.ZOOM_CLIENT_SECRET | @base64 }}"},"body": {"account_id": "{{ .secrets.ZOOM_ACCOUNT_ID }}","grant_type": "account_credentials"}},"variables": {"zoom_access_token": "{{ .response.data.access_token }}"}},{"identifier": "notify_teams_critical","title": "Notify Teams (Critical/High)","icon": "Slack","description": "Sends comprehensive Slack notification for critical/high incidents","config": {"type": "WEBHOOK","url": "https://slack.com/api/chat.postMessage","agent": false,"synchronized": true,"method": "POST","headers": {"Content-Type": "application/json; charset=utf-8","Authorization": "Bearer {{ .secrets.SLACK_BOT_TOKEN }}"},"body": {"blocks": [{"text": "🚨 *INCIDENT ALERT* 🚨\n\n*Incident:* {{ .outputs.trigger.incident_title }}\n*Priority:* `{{ .outputs.trigger.incident_priority }}` | *Urgency:* `{{ .outputs.trigger.incident_urgency }}`\n*Status:* {{ .outputs.trigger.incident_status }}\n\n📋 *Response Resources Created:*\n• Slack Channel: {{ .outputs.create_slack_channel_critical.slack_channel_name }} \n• Jira Ticket: <{{ .outputs.create_jira_ticket_critical.jira_ticket_url }}|View ticket in Jira>\n• PagerDuty: <{{ .outputs.trigger.incident_url }}|View incident in PagerDuty>\n• Zoom meeting: <{{ .outputs.create_zoom_meeting_critical.zoom_meeting_url}}|Join Zoom>\n\n <{{.outputs.trigger.incident_url}}|View incident in Port>⚡ *Action Required:* Join the Slack channel and Zoom meeting immediately!","type": "markdown"}],"channel": "{{ .outputs.create_slack_channel_critical.slack_channel_name }}"}},"variables": {}},{"identifier": "notify_teams_low","title": "Notify Teams (Low)","icon": "Slack","description": "Sends simple Slack notification for low priority incidents","config": {"type": "WEBHOOK","url": "https://slack.com/api/chat.postMessage","agent": false,"synchronized": true,"method": "POST","headers": {"Content-Type": "application/json; charset=utf-8","Authorization": "Bearer {{ .secrets.SLACK_BOT_TOKEN }}"},"body": {"blocks": [{"text": "ℹ️ *Low Priority Incident*\n\n*Incident:* {{ .outputs.trigger.incident_title }}\n*Priority:* `{{ .outputs.trigger.incident_priority }}` | *Urgency:* `{{ .outputs.trigger.incident_urgency }}`\n*Status:* {{ .outputs.trigger.incident_status }}\n\n🔗 <{{ .outputs.trigger.incident_url }}|View incident in Port>\n\n📝 No immediate action required. Monitor as needed.","type": "markdown"}],"channel": "#isaac-test"}},"variables": {}},{"identifier": "notify_teams_medium","title": "Notify Teams (Medium)","icon": "Slack","description": "Sends Slack notification for medium priority incidents","config": {"type": "WEBHOOK","url": "https://slack.com/api/chat.postMessage","agent": false,"synchronized": true,"method": "POST","headers": {"Content-Type": "application/json; charset=utf-8","Authorization": "Bearer {{ .secrets.SLACK_BOT_TOKEN }}"},"body": {"blocks": [{"text": "⚠️ *Incident Alert*\n\n*Incident:* {{ .outputs.trigger.incident_title }}\n*Priority:* `{{ .outputs.trigger.incident_priority }}` | *Urgency:* `{{ .outputs.trigger.incident_urgency }}`\n*Status:* {{ .outputs.trigger.incident_status }}\n\n📋 *Response Resources Created:*\n• Slack Channel: {{ .outputs.create_slack_channel_medium.slack_channel_name }} \n• Jira Ticket: <{{ .outputs.create_jira_ticket_medium.jira_ticket_url }}|View in Jira>\n• PagerDuty: <{{ .outputs.trigger.incident_url }}|View in PagerDuty>\n\n:link: <{{.outputs.trigger.incident_url}}|View incident in Port>👀 Please review and coordinate in the Slack channel.","type": "markdown"}],"channel": "{{ .outputs.create_slack_channel_medium.slack_channel_name }}"}},"variables": {}},{"identifier": "trigger","title": "Incident Created","icon": null,"description": "Triggers when a PagerDuty incident is created","config": {"type": "EVENT_TRIGGER","event": {"type": "ENTITY_CREATED","blueprintIdentifier": "pagerdutyIncident"}},"variables": {"service_id": "{{ .diff.after.relations.pagerdutyService }}","incident_id": "{{ .diff.after.identifier }}","incident_url": "{{ .diff.after.properties.url }}","incident_title": "{{ .diff.after.title }}","incident_status": "{{ .diff.after.properties.status }}","incident_urgency": "{{ .diff.after.properties.urgency }}","incident_priority": "{{ .diff.after.properties.priority }}","incident_description": "{{ .diff.after.properties.description }}"}},{"identifier": "update_incident_critical","title": "Update Incident (All Resources)","icon": null,"description": "Bulk updates the incident entity with Slack, Zoom, and Jira URLs","config": {"type": "UPSERT_ENTITY","blueprintIdentifier": "pagerdutyIncident","mapping": {"identifier": "{{ .outputs.trigger.incident_id }}","properties": {"slack_channel": "{{ .outputs.create_slack_channel_critical.slack_channel_name // .outputs.create_slack_channel_medium.slack_channel_name}}","zoom_meeting_link": "{{ .outputs.create_zoom_meeting_critical.zoom_meeting_url }}","jira_tracking_ticket": "{{ .outputs.create_jira_ticket_critical.jira_ticket_url // .outputs.create_jira_ticket_medium.jira_ticket_url }}"}}},"variables": {}}],"connections": [{"description": "Analyze incident severity","sourceIdentifier": "trigger","targetIdentifier": "determine_severity"},{"description": "Critical/High → Create Slack channel","sourceIdentifier": "determine_severity","targetIdentifier": "create_slack_channel_critical","sourceOptionIdentifier": "critical_high"},{"description": "Then get Zoom API acces token","sourceIdentifier": "create_slack_channel_critical","targetIdentifier": "get_zoom_meeting_access_token"},{"description": "Then create Zoom meeting","sourceIdentifier": "get_zoom_meeting_access_token","targetIdentifier": "create_zoom_meeting_critical"},{"description": "Then create Jira ticket","sourceIdentifier": "create_zoom_meeting_critical","targetIdentifier": "create_jira_ticket_critical"},{"description": "Then notify teams","sourceIdentifier": "create_jira_ticket_critical","targetIdentifier": "notify_teams_critical"},{"description": "Finally Bulk update incident with all resources","sourceIdentifier": "notify_teams_critical","targetIdentifier": "update_incident_critical"},{"description": "Medium → Create Slack channel","sourceIdentifier": "determine_severity","targetIdentifier": "create_slack_channel_medium","sourceOptionIdentifier": "medium"},{"description": "Then create Jira ticket","sourceIdentifier": "create_slack_channel_medium","targetIdentifier": "create_jira_ticket_medium"},{"description": "Then notify team","sourceIdentifier": "create_jira_ticket_medium","targetIdentifier": "notify_teams_medium"},{"description": "Finally update incident with Slack & Jira","sourceIdentifier": "notify_teams_medium","targetIdentifier": "update_incident_critical"},{"description": "Low → Notify only","sourceIdentifier": "determine_severity","targetIdentifier": "notify_teams_low","sourceOptionIdentifier": "low"}]} -
Click Publish in the top right corner of the editor. If you encounter validation errors, refer to the troubleshooting page.
Configure the incident orchestration workflow
After publishing, replace placeholder values in the workflow nodes.
Specify Jira project key
- In the
create_jira_ticket_criticalandcreate_jira_ticket_mediumnodes:- Replace
<YOUR_JIRA_ORGANIZATION_URL>in the webhook URL with your Jira organization URL (e.g.,example.atlassian.net). - Set the
<YOUR_JIRA_PROJECT>value to your Jira project key. - Ensure that the Jira authorization header is set to
Basic {{ .secrets.JIRA_AUTH }}.
- Replace
Configure Slack
- In the
create_slack_channel_critical,create_slack_channel_medium, andnotify_teams_lownodes:- Set the authorization header to
Bearer {{ .secrets.SLACK_BOT_TOKEN }}. - Update the low-priority channel name if needed.
- Set the authorization header to
Configure Zoom
In the get_zoom_meeting_access_token node, set the authorization header to Basic {{ .secrets.ZOOM_CLIENT_ID + ":" + .secrets.ZOOM_CLIENT_SECRET | @base64 }}.
Create orchestration self-service actions
We will create self-service actions that the AI agent can invoke to orchestrate incident response setup.
Create incident Slack channel
This action creates a dedicated Slack channel for the incident.
-
Go to the self-service page of your portal.
-
Click on
+ New Action. -
Click on the
{...} Edit JSONbutton. -
Copy and paste the following JSON configuration:
Create incident Slack channel (Click to expand)
{"identifier": "create_incident_slack_channel","title": "Create Incident Slack Channel","icon": "Slack","trigger": {"type": "self-service","operation": "DAY-2","userInputs": {"properties": {},"required": [],"order": []},"blueprintIdentifier": "pagerdutyIncident"},"invocationMethod": {"type": "WEBHOOK","url": "https://slack.com/api/conversations.create","agent": false,"synchronized": true,"method": "POST","headers": {"RUN_ID": "{{ .run.id }}","Content-Type": "application/json","Authorization": "Bearer {{ .secrets.SLACK_BOT_TOKEN }}"},"body": {"name": "{{ .entity.identifier | ascii_downcase }}","is_private": false}},"requiredApproval": false,"description": "Creates a dedicated Slack channel for an incident"} -
Click Save to create the action.
Create Zoom meeting link initializer
This action obtains a Zoom access token and then triggers the meeting creation.
-
Go back to the self-service page of your portal.
-
Click on
+ New Action. -
Click on the
{...} Edit JSONbutton. -
Copy and paste the following JSON configuration:
Create Zoom meeting link initializer (Click to expand)
{"identifier": "create_zoom_meeting_link_initializer","title": "Initialize Zoom Meeting Setup","icon": "Team","description": "Obtain Zoom access token and prepare for meeting creation","trigger": {"type": "self-service","operation": "DAY-2","userInputs": {"properties": {},"required": [],"order": []},"blueprintIdentifier": "pagerdutyIncident"},"invocationMethod": {"type": "WEBHOOK","url": "https://zoom.us/oauth/token","agent": false,"synchronized": true,"method": "POST","headers": {"RUN_ID": "{{ .run.id }}","Content-Type": "application/x-www-form-urlencoded","INCIDENT_ENTITY": "{{ .entity.identifier }}","Authorization": "Basic {{ .secrets.ZOOM_CLIENT_ID + \":\" + .secrets.ZOOM_CLIENT_SECRET | @base64 }}"},"body": {"grant_type": "account_credentials","account_id": "{{ .secrets.ZOOM_ACCOUNT_ID }}"}}} -
Click Save to create the action.
Create Zoom meet link
This action creates the actual Zoom meeting using the access token.
-
Go back to the self-service page of your portal.
-
Click on
+ New Action. -
Click on the
{...} Edit JSONbutton. -
Copy and paste the following JSON configuration:
Create Zoom meet link (Click to expand)
{"identifier": "create_zoom_meet_link","title": "Create Zoom Meeting Link","icon": "Team","description": "Creates a Zoom meeting link for the incident war room","trigger": {"type": "self-service","operation": "CREATE","userInputs": {"properties": {"zoom_access_token": {"title": "Zoom Access Token","icon": "DefaultProperty","type": "string"},"incident": {"title": "Incident","icon": "DefaultProperty","type": "string","blueprint": "pagerdutyIncident","format": "entity"}},"required": ["zoom_access_token", "incident"],"order": ["zoom_access_token", "incident"]}},"invocationMethod": {"type": "WEBHOOK","url": "https://api.zoom.us/v2/users/me/meetings","agent": false,"synchronized": true,"method": "POST","headers": {"RUN_ID": "{{ .run.id }}","Content-Type": "application/json","INCIDENT_ENTITY": "{{ .inputs.incident.identifier }}","Authorization": "Bearer {{ .inputs.zoom_access_token }}"},"body": {"topic": "{{ .inputs.incident.title }}","type": 2,"start_time": "{{ now | todateiso8601 }}","duration": 60,"timezone": "UTC","settings": {"join_before_host": true,"mute_upon_entry": true}}}} -
Click Save to create the action.
Create Jira tracking ticket
This action creates a Jira ticket to track the incident.
-
Go back to the self-service page of your portal.
-
Click on
+ New Action. -
Click on the
{...} Edit JSONbutton. -
Copy and paste the following JSON configuration:
Create Jira tracking ticket (Click to expand)
{"identifier": "create_jira_tracking_ticket","title": "Create Jira Tracking Ticket","icon": "Jira","description": "Creates a Jira tracking ticket from an incident","trigger": {"type": "self-service","operation": "DAY-2","userInputs": {"properties": {"title": {"type": "string","title": "Title","description": "Title of the issue"},"description": {"type": "string","title": "Description","description": "Detailed description about the issue"},"issue_type": {"icon": "DefaultProperty","title": "Issue Type","type": "string","default": "Bug","enum": ["Epic", "Task", "Bug"],"enumColors": {"Epic": "green","Task": "lightGray","Bug": "red"}}},"required": ["title"],"order": ["title", "description", "issue_type"]},"blueprintIdentifier": "pagerdutyIncident"},"invocationMethod": {"type": "WEBHOOK","url": "https://<YOUR_JIRA_ORGANIZATION_URL>/rest/api/3/issue","agent": false,"synchronized": true,"method": "POST","headers": {"RUN_ID": "{{ .run.id }}","Content-Type": "application/json","Authorization": "Basic {{.secrets.JIRA_AUTH}}"},"body": {"fields": {"project": {"key": "<YOUR_JIRA_PROJECT>"},"summary": "{{.inputs.title}}","description": {"type": "doc","version": 1,"content": [{"type": "paragraph","content": [{"type": "text","text": "{{.inputs.description}}"}]}]},"issuetype": {"name": "{{.inputs.issue_type}}"},"labels": ["port-ai"]}}},"requiredApproval": false}Configure your Jira environmentReplace
<YOUR_JIRA_ORGANIZATION_URL>in the webhook URL with your Jira organization URL (e.g.,example.atlassian.net). Also replace<YOUR_JIRA_PROJECT>with your actual Jira project key. -
Click Save to create the action.
Send Slack message action
This action sends notification messages to Slack channels.
-
Go back to the self-service page of your portal.
-
Click on
+ New Action. -
Click on the
{...} Edit JSONbutton. -
Copy and paste the following JSON configuration:
Send Slack message (Click to expand)
{"identifier": "send_a_slack_message","title": "Send Slack Message","icon": "Slack","description": "Sends a notification message to a Slack channel","trigger": {"type": "self-service","operation": "CREATE","userInputs": {"properties": {"channel": {"title": "Channel ID","icon": "DefaultProperty","type": "string","description": "The Slack channel ID where the message will be sent"},"message": {"title": "Message","icon": "DefaultProperty","type": "string","description": "The message content to send"}},"required": ["channel", "message"],"order": ["channel", "message"]}},"invocationMethod": {"type": "WEBHOOK","url": "https://slack.com/api/chat.postMessage","agent": false,"synchronized": true,"method": "POST","headers": {"RUN_ID": "{{ .run.id }}","Content-Type": "application/json","Authorization": "Bearer {{ .secrets.SLACK_BOT_TOKEN }}"},"body": {"channel": "{{ .inputs.channel }}","text": "{{ .inputs.message }}"}},"requiredApproval": false} -
Click Save to create the action.
Set up automations
We will create automations to orchestrate the complete incident response workflow:
-
Trigger the AI agent when incidents are created.
-
Update the incident with Slack channel ID after creation.
-
Create Zoom meeting after obtaining access token.
-
Update incident with Zoom meeting link.
-
Update incident with Jira ticket link.
Trigger incident orchestrator agent
This automation invokes the Incident Orchestrator agent as soon as an incident is created.
-
Go to the automations page of your portal.
-
Click on
+ Automation. -
Copy and paste the following JSON schema:
Trigger incident orchestrator agent automation (Click to expand)
{"identifier": "trigger_incident_orchestrator_agent","title": "Trigger Incident Orchestrator Agent","description": "Automation to invoke the Incident Response Orchestrator agent as soon as an incident is created","trigger": {"type": "automation","event": {"type": "ENTITY_CREATED","blueprintIdentifier": "pagerdutyIncident"},"condition": {"type": "JQ","expressions": [],"combinator": "and"}},"invocationMethod": {"type": "WEBHOOK","url": "https://api.port.io/v1/agent/incident_orchestrator_agent/invoke","agent": false,"synchronized": true,"method": "POST","headers": {"RUN_ID": "{{ .run.id }}","Content-Type": "application/json"},"body": {"prompt": "Here is the created Incident:\n Incident identifier: {{.event.diff.after.identifier}}\n\nIncident Title:{{.event.diff.after.title}}\n\nFull Incident Entity: {{.event.diff.after.properties}}\n","labels": {"source": "auto_orchestrate_incident_response","incident_id": "{{ .event.diff.after.identifier }}"}}},"publish": true} -
Click Create to save the automation.
Set incident Slack channel ID
This automation updates the incident with the Slack channel ID after the channel has been created.
-
Go back to the automations page of your portal.
-
Click on
+ Automation. -
Copy and paste the following JSON schema:
Set incident Slack channel ID automation (Click to expand)
{"identifier": "set_incident_slack_channel_id_on_creation","title": "Set Incident Slack Channel ID on Creation","description": "This automation updates an incident with the slack channel ID after a Slack channel has been created","icon": "Slack","trigger": {"type": "automation","event": {"type": "RUN_UPDATED","actionIdentifier": "create_incident_slack_channel"},"condition": {"type": "JQ","expressions": [".diff.before.status== \"IN_PROGRESS\"",".diff.after.status== \"SUCCESS\"",".diff.after.response.ok == true"],"combinator": "and"}},"invocationMethod": {"type": "UPSERT_ENTITY","blueprintIdentifier": "pagerdutyIncident","mapping": {"identifier": "{{.event.diff.after.entity.identifier}}","properties": {"slack_channel": "{{ .event.diff.after.response.channel.name }}"}}},"publish": true} -
Click Create to save the automation.
Create war room meeting
This automation calls the Zoom API to create the meeting after obtaining the access token.
-
Go back to the automations page of your portal.
-
Click on
+ Automation. -
Copy and paste the following JSON schema:
Create war room meeting automation (Click to expand)
{"identifier": "create_war_room_meeting","title": "Create War Room Meeting","description": "Calls Zoom API to create the meeting after getting the access token","icon": "Team","trigger": {"type": "automation","event": {"type": "RUN_UPDATED","actionIdentifier": "create_zoom_meeting_link_initializer"},"condition": {"type": "JQ","expressions": [".diff.before.status== \"IN_PROGRESS\"",".diff.after.status== \"SUCCESS\""],"combinator": "and"}},"invocationMethod": {"type": "WEBHOOK","url": "https://api.port.io/v1/actions/create_zoom_meet_link/runs","agent": false,"synchronized": true,"method": "POST","headers": {"RUN_ID": "{{ .run.id }}","Content-Type": "application/json"},"body": {"properties": {"zoom_access_token": "{{ .event.diff.after.response.access_token }}","incident": "{{ .event.diff.before.entity.identifier }}"}}},"publish": true} -
Click Create to save the automation.
Upsert meeting link on success
This automation updates the incident with the created Zoom meeting link.
-
Go back to the automations page of your portal.
-
Click on
+ Automation. -
Copy and paste the following JSON schema:
Upsert meeting link on success automation (Click to expand)
{"identifier": "upsert_meeting_link_on_success","title": "Upsert Meeting Link on Success","description": "Updates the incident with the created zoom meeting link","trigger": {"type": "automation","event": {"type": "RUN_UPDATED","actionIdentifier": "create_zoom_meet_link"},"condition": {"type": "JQ","expressions": [".diff.before.status== \"IN_PROGRESS\"",".diff.after.status== \"SUCCESS\""],"combinator": "and"}},"invocationMethod": {"type": "UPSERT_ENTITY","blueprintIdentifier": "pagerdutyIncident","mapping": {"identifier": "{{.event.diff.before.properties.incident.identifier}}","properties": {"zoom_meeting_link": "{{ .event.diff.after.response.join_url }}"}}},"publish": true} -
Click Create to save the automation.
Update incident with Jira ticket
This automation updates the incident with the response of the created Jira ticket.
-
Go back to the automations page of your portal.
-
Click on
+ Automation. -
Copy and paste the following JSON schema:
Update incident with Jira ticket automation (Click to expand)
{"identifier": "update_incident_with_jira_ticket","title": "Update Incident With Jira Ticket","description": "automation to update the incident with the response of the created Jira ticket","icon": "Jira","trigger": {"type": "automation","event": {"type": "RUN_UPDATED","actionIdentifier": "create_jira_tracking_ticket"},"condition": {"type": "JQ","expressions": [".diff.before.status== \"IN_PROGRESS\"",".diff.after.status== \"SUCCESS\""],"combinator": "and"}},"invocationMethod": {"type": "UPSERT_ENTITY","blueprintIdentifier": "pagerdutyIncident","mapping": {"identifier": "{{.event.diff.after.entity.identifier}}","properties": {"jira_tracking_ticket": "https://{{ (.event.diff.after.response.self | capture(\"https://(?<domain>[^/]+)\") ).domain }}/browse/{{ .event.diff.after.response.key }}"}}},"publish": true} -
Click Create to save the automation.
Create the incident orchestration AI agent
Now we will create the AI agent that orchestrates the incident response setup.
-
Go to the AI Agents page of your portal.
-
Click on
+ AI Agent. -
Toggle
Json modeon. -
Copy and paste the following JSON schema:
Incident orchestrator AI agent (Click to expand)
{"identifier": "incident_orchestrator_agent","title": "Incident Orchestrator Agent","icon": "Details","team": [],"properties": {"description": "AI agent to orchestrate incident management","status": "active","prompt": "You are an AI Incident Orchestrator responsible for automating incident response setup. When an incident is triggered, your role is to analyze its severity, affected services, and context — then immediately execute the appropriate actions (create Slack channel, generate meeting link, create Jira tracking ticket, notify teams) using the available tools.\n\nYour goal is to remove all manual coordination delays. You must not just recommend or summarize actions — you must autonomously invoke the correct self-service actions in real time.\n\nCore Responsibilities:\n1. Analyze the incident payload (severity, affected service, owner, tier, assignee, etc.) to determine response scope.\n2. Decide and EXECUTE the correct actions based on severity/urgency/priority:\n - **Critical or High** → ALWAYS run all these 4 actions `create_incident_slack_channel`, `create_zoom_meeting_link_initializer`, `create_jira_tracking_ticket`, and `send_a_slack_message` to notify all relevant teams.\n - **Medium** → ALWAYS run `create_incident_slack_channel`, `create_jira_tracking_ticket` and `send_a_slack_message`; skip zoom meet link setup unless escalation occurs.\n - **Low** → run `send_a_slack_message` only.\n3. Each action must be invoked directly — do not output instructions or links for humans to click.\n4. After execution, summarize the outcome: which actions were triggered, resource names/links, and any context derived from the incident.\n\n#IMPORTANT\n1. NEVER FORGET to call the create the Zoom meeting action for HIGH/CRITICAL incidents (DO NOT SKIP IT).\n2. When creating a Slack channel, derive the channel name from the incident identifier by converting it to lowercase and replacing any invalid characters with hyphens (only lowercase letters, numbers, hyphens, and underscores are allowed). Capture the exact channel id/name returned by the `create_incident_slack_channel` action response and use that channel id when invoking `send_a_slack_message`. Never invent or guess channel ids or names — if the create-channel tool fails to return one, reuse the sanitized incident identifier as the channel name and report the issue in the summary.\n3. In case you run into errors when calling an action, use the available tools to describe the action details to understand the required properties and parameters.\n\nOperate decisively, execute autonomously, and provide a concise summary once orchestration is complete.","execution_mode": "Automatic","tools": ["^(list|search|track|describe)_.*","run_create_incident_slack_channel","run_create_jira_tracking_ticket","run_create_zoom_meeting_link_initializer","run_send_a_slack_message"]},"relations": {}} -
Click Create to save the agent.
Test incident orchestration
After you complete either the Workflow or the Actions & Automations setup, use the steps below to verify that orchestration runs correctly.
Create a test incident
-
Go to your PagerDuty instance and create a new incident, or use Port's API to create a test incident entity.
-
Verify that the incident appears in your Port catalog.
Verify execution
If you used Workflow: Open the run from the Audit log and confirm each node completed successfully. Check node outputs for Slack, Zoom, and Jira responses.
If you used Actions & Automations: Check the AI agent's execution logs in the AI Invocation page. Verify that the agent analyzed the incident severity and executed the appropriate actions (Slack channel, Zoom meeting for high/critical, Jira ticket, notifications).
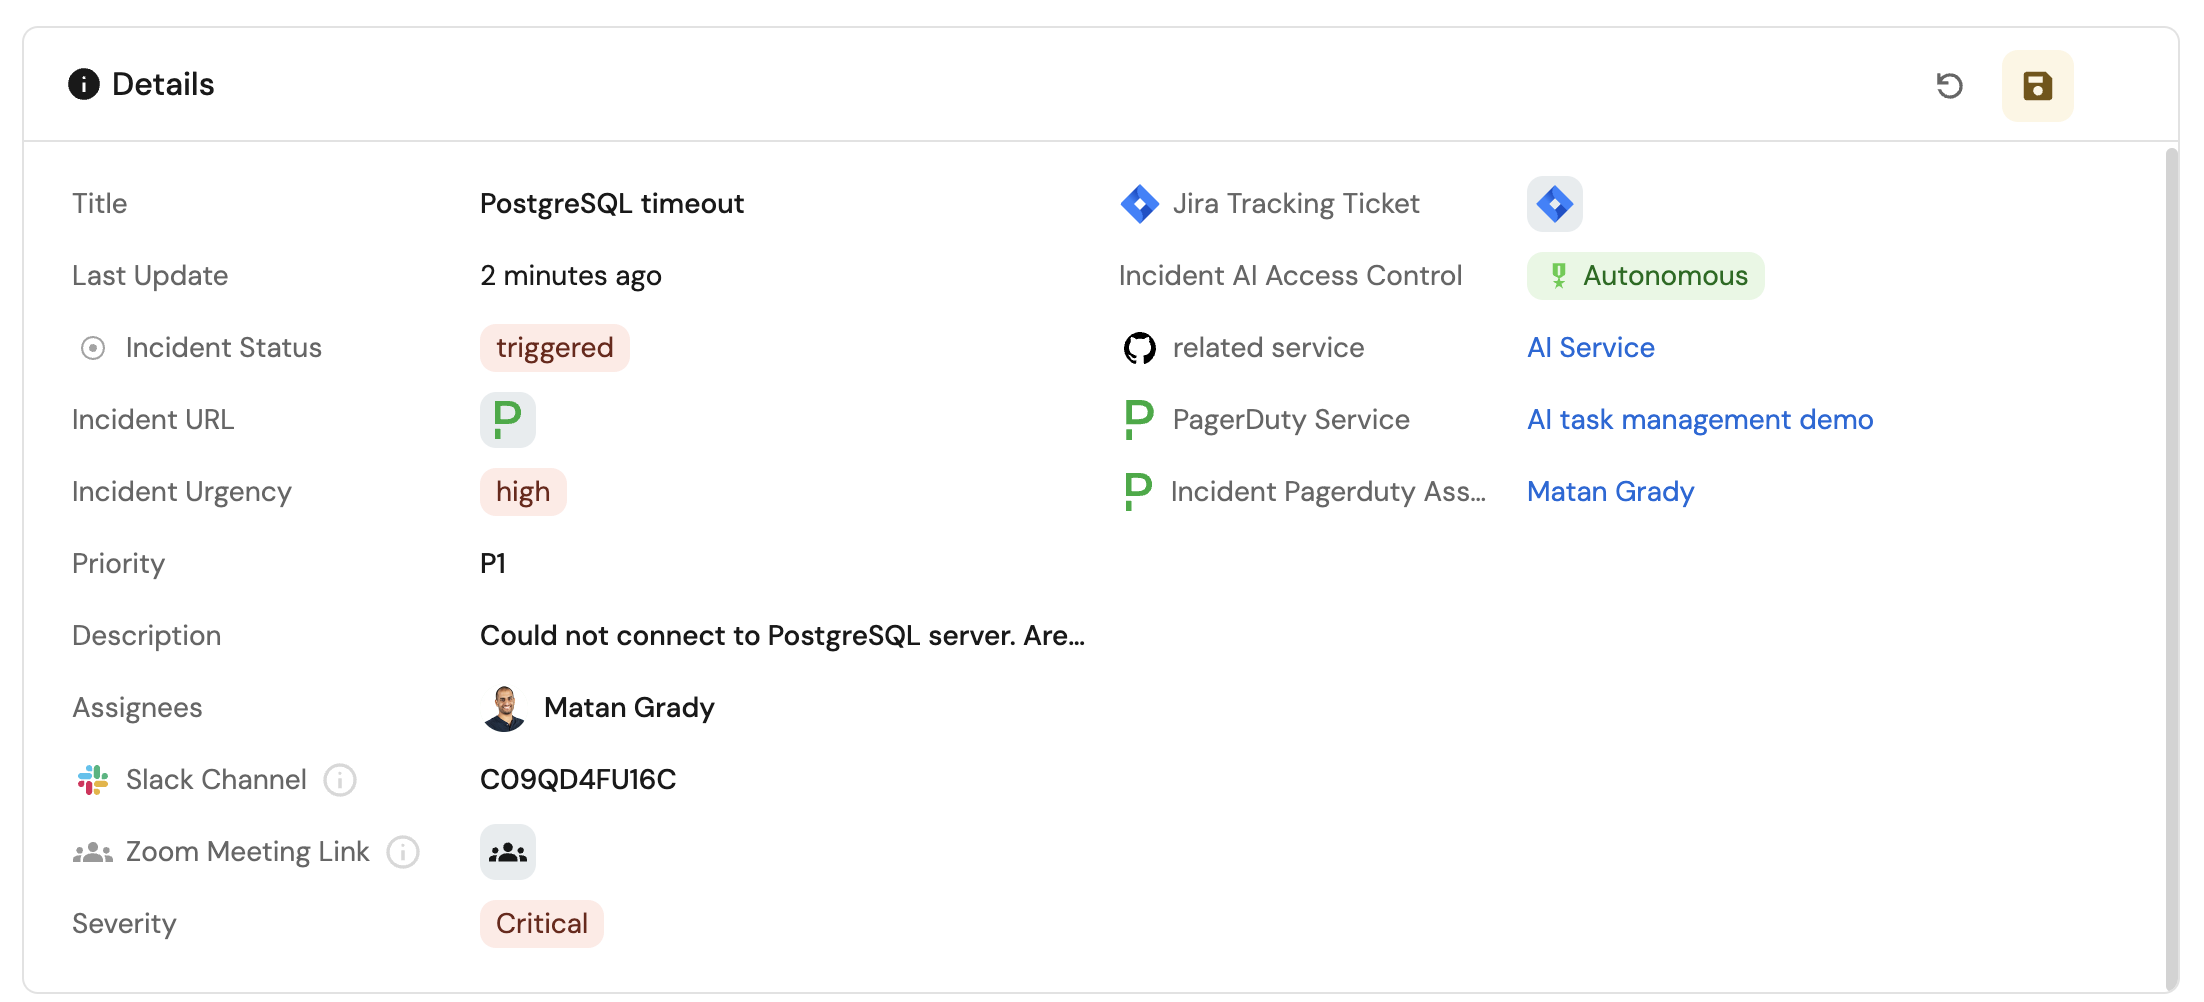
Verify incident updates
-
Go to your Port catalog and find the incident entity.
-
Check that the incident has been updated with:
- Slack channel ID
- Zoom meeting link (if applicable)
- Jira tracking ticket URL
-
Verify the links are functional and accessible.
Test in Slack
-
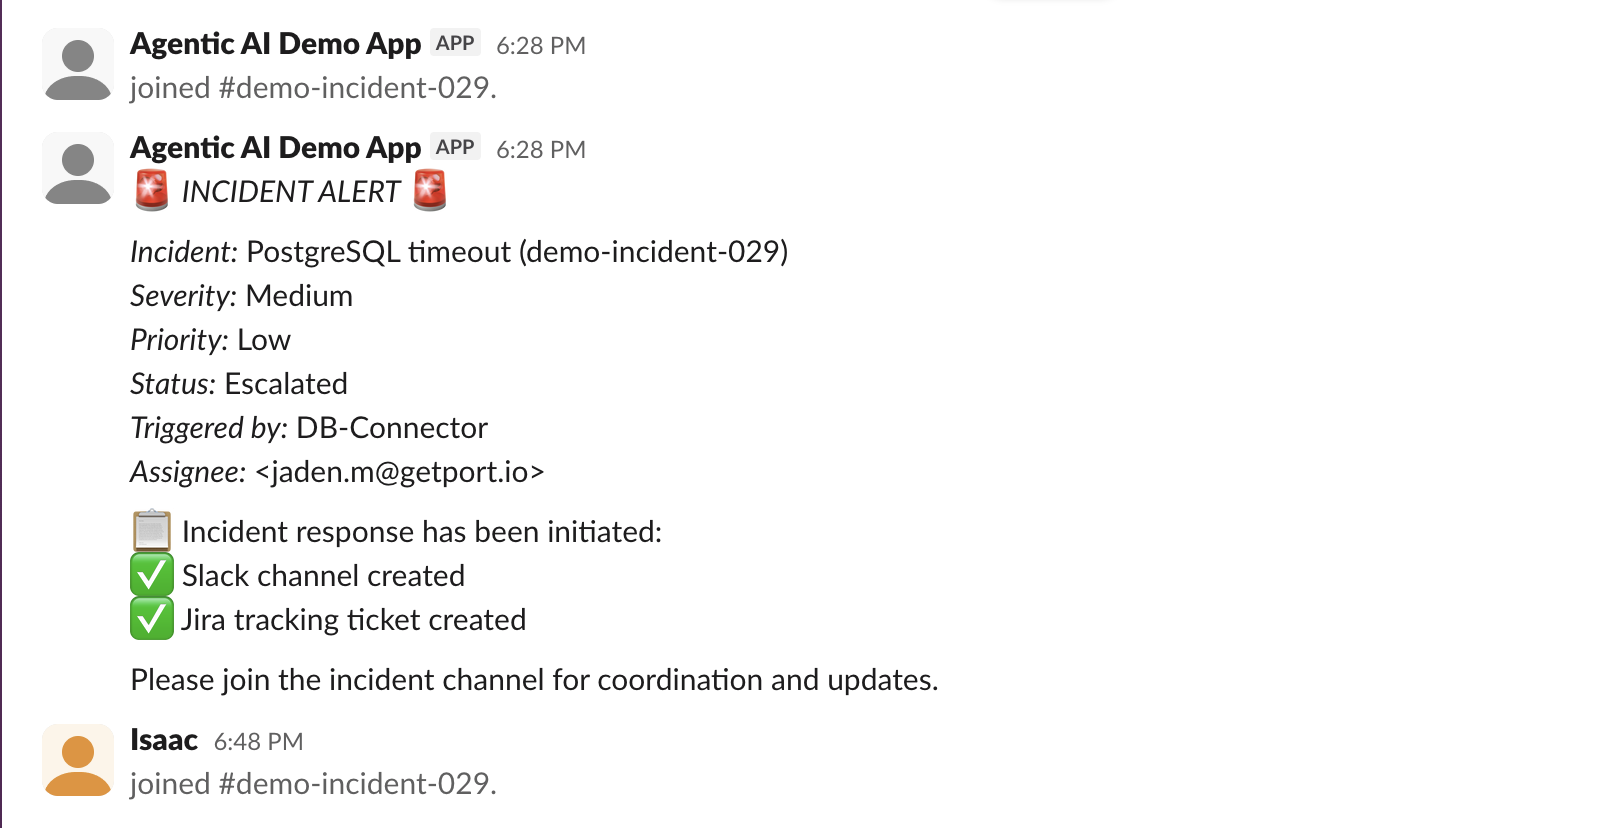
Go to your Slack workspace.
-
Verify that:
- A new channel was created with the incident identifier
- Notification messages were posted to the channel
- The channel contains relevant incident information
Generate incident updates with AI
This guide demonstrates how to build an AI agent that generates incident updates and sends Slack notifications with relevant technical context.
When you are busy fixing an incident, you do not have time to write updates. Others still need to know what is going on, so this guide also includes an n8n workflow option that uses Port as a context lake for incident updates.
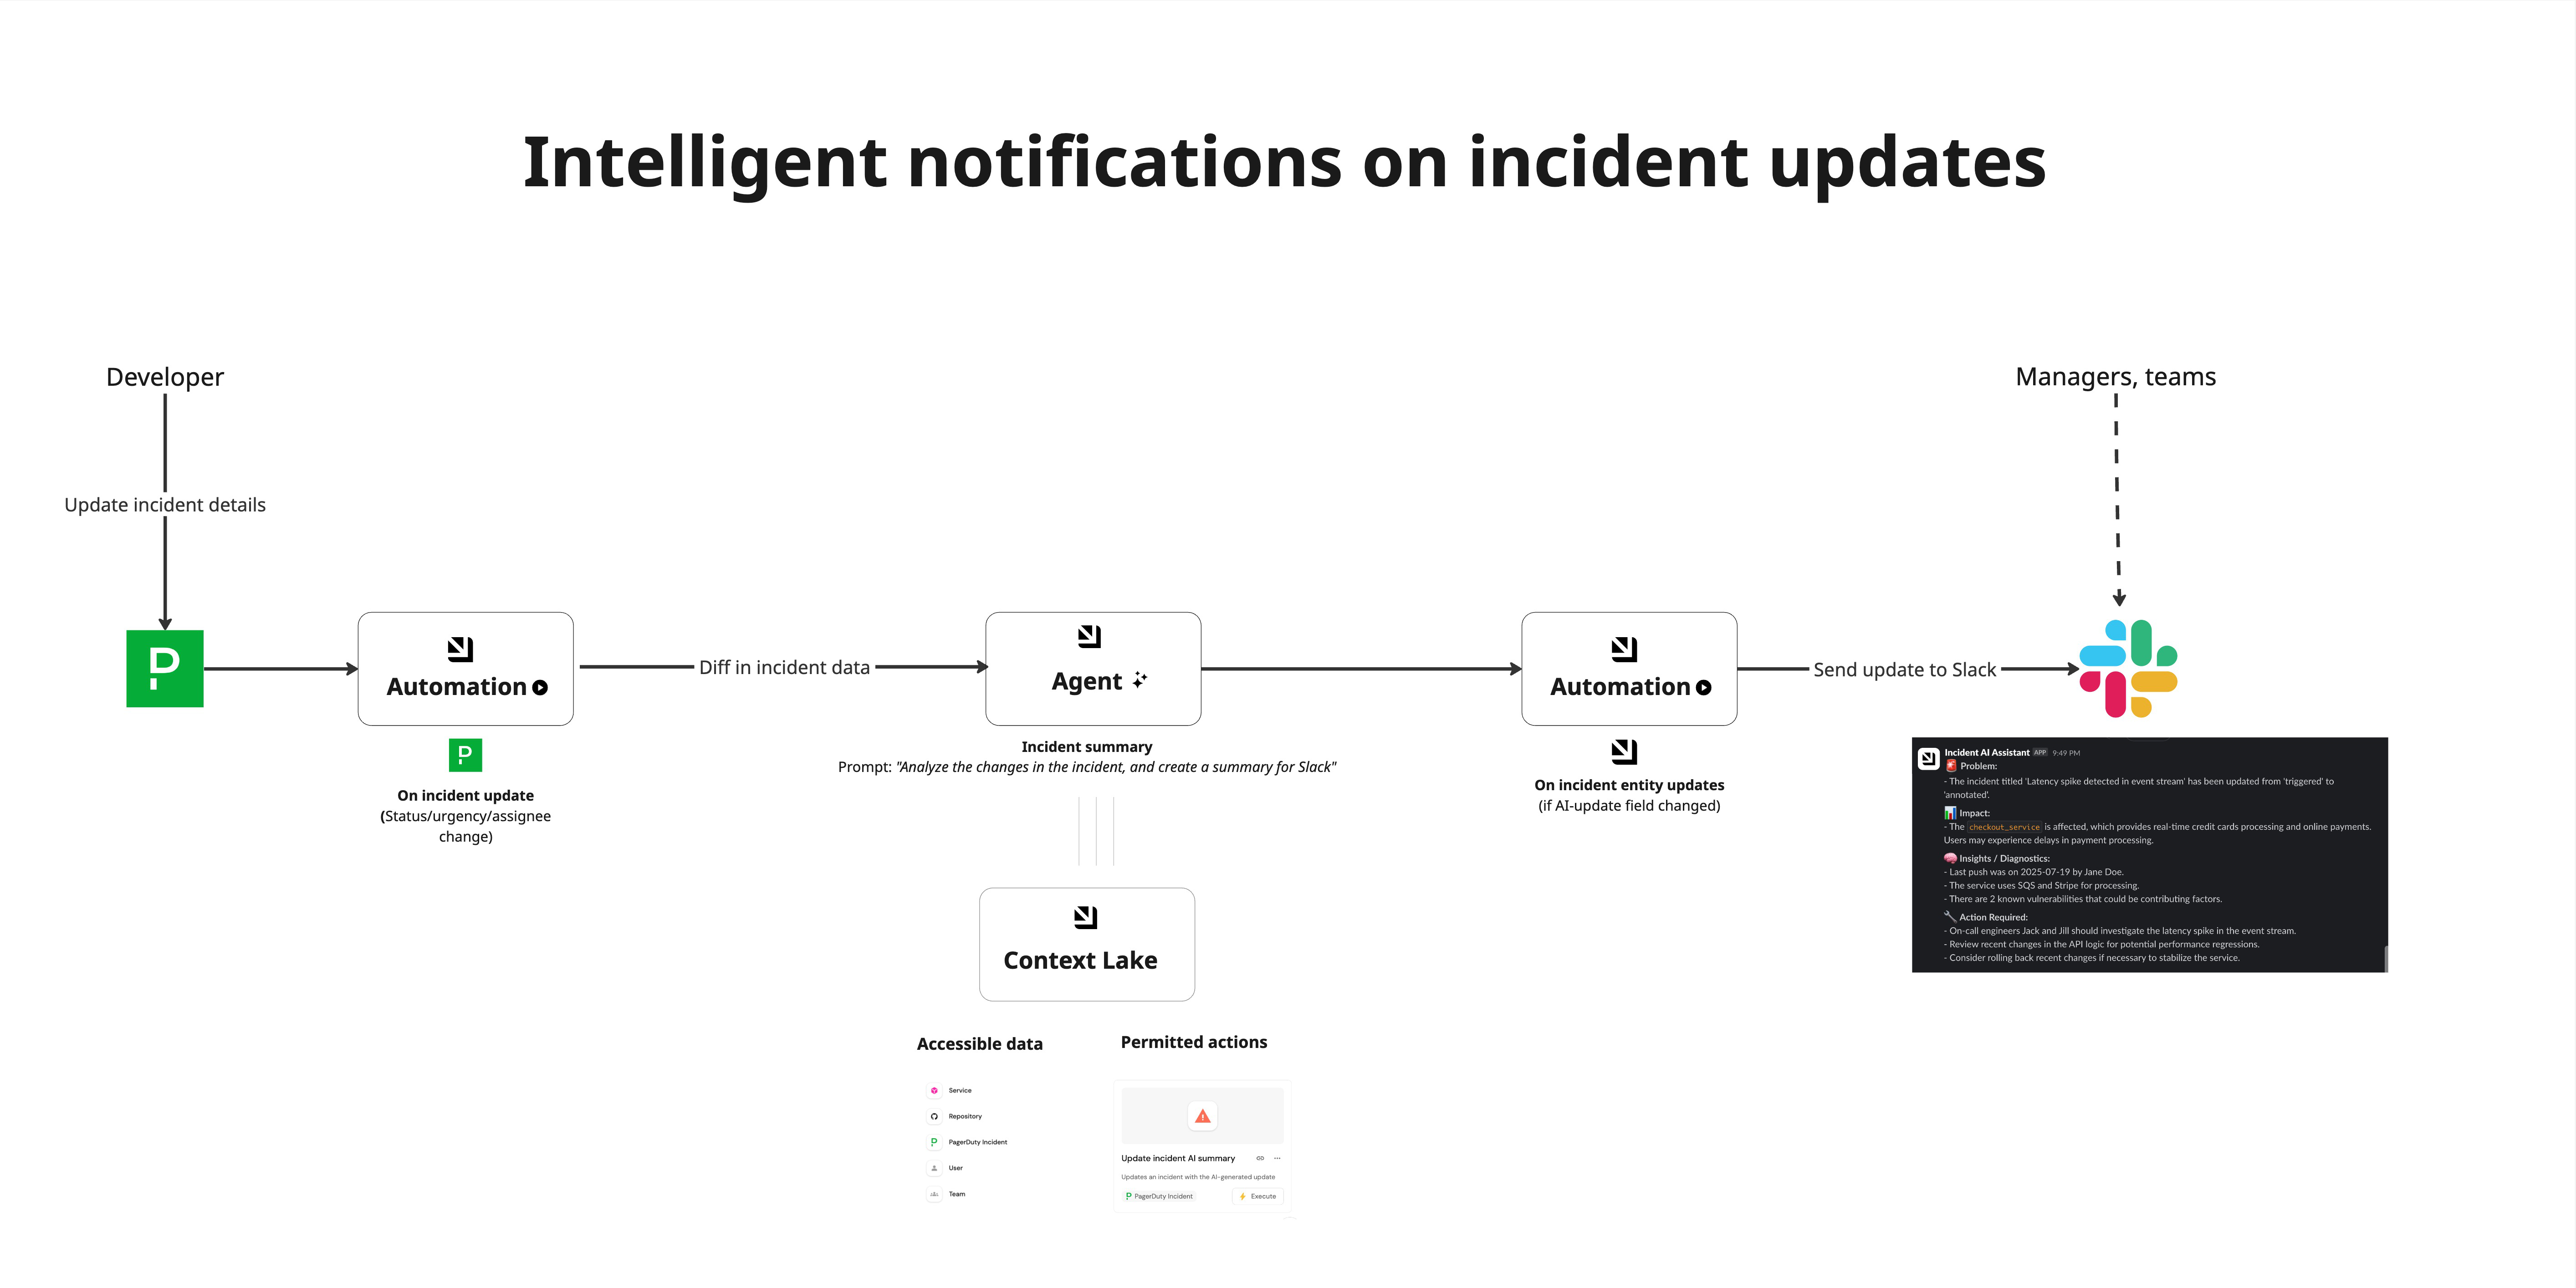
Where AI incident updates help
- Automatically generate contextual incident updates when incidents are updated.
- Send notifications to Slack with relevant technical context.
- Provide on-call engineers with enriched incident information.
Prepare incident update prerequisites
This guide assumes the following:
-
You have a Port account and have completed the onboarding process.
-
PagerDuty integration is installed in your account.
-
GitHub integration is installed in your account:
GitHub Ocean integration is installed in your account.
While this guide uses PagerDuty and GitHub, you can adapt it for other incident management tools like OpsGenie or FireHydrant, and other Git providers like GitLab or Azure DevOps.
Set up incident update context
We will create and configure blueprints to support our AI-enhanced incident management workflow. This includes setting up the incident data model and enriching it with repository metadata.
Update the incident and service blueprints
To enable AI-generated incident updates and Slack notifications, update your blueprints as follows:
-
Add an
ai_updateproperty to the incident blueprint-
Go to the builder page of your portal.
-
Find and select your incident blueprint (e.g.,
pagerdutyIncident). -
Click on
{...} Edit JSON. -
Add the following property to the
propertiessection:AI update property (Click to expand)
"ai_update": {"type": "string","title": "AI Update"} -
Click Save to update the blueprint.
-
-
Add a
slack_channelproperty to the service blueprint-
Go to the builder page of your portal.
-
Find and select your service blueprint (e.g.,
pagerdutyService). -
Click on
{...} Edit JSON. -
Add the following property to the
propertiessection:Slack channel property (Click to expand)
"slack_channel": {"type": "string","title": "Slack Channel"} -
Click Save to update the blueprint.
Slack channel configurationThis step is optional. You can choose to:
- Send notifications to a static channel (hardcoded in the automation).
- Store the Slack channel in other hierarchies (e.g., on the incident itself).
- Use different channels based on incident severity or team.
-
Update repository blueprint with additional context
When installing the GitHub app, the Repository blueprint is created by default. However, we need to add additional properties to enrich incident updates with repository metadata.
-
Go to the builder page of your portal.
-
Find and select your existing repository blueprint (e.g.,
githubRepository). -
Click on
{...} Edit JSON. -
Add the following properties to the
propertiessection:Additional repository properties (Click to expand)
"last_contributor": {"title": "Last contributor","icon": "TwoUsers","type": "string","format": "user"},"last_push": {"icon": "GitPullRequest","title": "Last push","description": "Last commit to the main branch","type": "string","format": "date-time"},"vulnerabilities": {"type": "number","title": "Known Vulnerabilities","description": "Number of critical security vulnerabilities"} -
Click Save to update the blueprint.
Add repository relation and mirror properties
We will now enhance the incident blueprint with mirror properties from the repository blueprint to provide better context for AI-generated incident updates.
-
Go to the builder page of your portal.
-
Find the
pagerdutyIncidentblueprint and click on it. -
Add a relation to the
Repositoryblueprint. -
Add the following mirror properties:
Mirror properties configuration (Click to expand)
{"mirrorProperties": {"repository_last_push": {"title": "Repository Last Push","path": "repository.last_push"},"repository_last_contributor": {"title": "Repository Last Contributor","path": "repository.last_contributor"},"repository_vulnerabilities": {"title": "Repository Vulnerabilities","path": "repository.vulnerabilities"},"repository_readme": {"title": "Repository README","path": "repository.readme"},"slack_channel": {"title": "Slack Channel","path": "pagerdutyService.slack_channel"}}} -
Click Save to apply the mirror properties.
Set up the incident update self-service action
We will create a self-service action that the AI agent can run automatically to update the incident with the AI update. This approach provides more flexibility and allows manual triggering.
-
Go to the self-service page of your portal.
-
Click on
+ New Action. -
Click on the
{...} Edit JSONbutton. -
Copy and paste the following JSON configuration:
Update incident with AI update action (Click to expand)
{"identifier": "update_incident_with_ai_update","title": "Update Incident with AI Update","icon": "Alert","description": "Updates an incident with the AI-generated update","trigger": {"type": "self-service","operation": "DAY-2","userInputs": {"properties": {"ai_update": {"title": "AI Update","type": "string","format": "markdown"}},"required": ["ai_update"],"order": ["ai_update"]},"blueprintIdentifier": "pagerdutyIncident"},"invocationMethod": {"type": "WEBHOOK","url": "https://api.port.io/v1/blueprints/pagerdutyIncident/entities/{{ .entity.identifier }}","agent": false,"synchronized": true,"method": "PATCH","headers": {"RUN_ID": "{{ .run.id }}","Content-Type": "application/json"},"body": {"properties": {"ai_update": "{{ .inputs.ai_update }}"}}},"requiredApproval": false} -
Click Save to create the action.
Create the incident update AI agent
Next, we will create an AI agent that generates helpful incident updates with contextual information.
Configure the incident update AI agent
-
Go to the AI Agents page of your portal.
-
Click on
+ AI Agent. -
Toggle
Json modeon. -
Copy and paste the following JSON schema:
Incident update AI agent configuration (Click to expand)
{"identifier": "incident_update_ai","title": "Incident Update AI","icon": "Alert","team": [],"properties": {"description": "AI agent that generates helpful incident updates and sends them to Slack with on-call tagging","status": "active","prompt": "You are an expert incident management AI agent generating clear, contextual summaries for Slack notifications.\nYour task is to produce Slack-compatible summaries for incident updates shared with engineering and on-call teams. Focus on clarity, relevance, and next steps.\n\nYour Slack summary MUST follow this structure and tone:\n\n- 🚨 *Problem:* Brief summary of what changed and why it triggered this update.\n- 📊 *Impact:* Which services or what is affected? Any delivery, uptime, or user-facing issues?\n- 🧠 *Insights / Diagnostics:* Add key technical context from repository metadata: last commit, contributor, vulnerabilities, etc or draw from your technical knowledge on what would have caused this.\n- 🔧 *Action Required:* List next steps for the on-call team. Be specific about what they need to check or resolve.\n\n🔧 **Slack Output Rules**\n* NEVER USE `**bold**` or `[text](url)` — instead use:\n * `*bold*` for emphasis\n * `<https://url.com|Label>` for links\n* Use emoji to indicate sections: `🚨`, `📋`, `👥`, `🔄`\n* Use bullet points (`-`) for clarity\n* Separate sections with one line space (not headers)\n* Never include raw markdown headers like `###` or `---`\n* Your final output **must** look clean when copy-pasted into a Slack message.\n\n*After generating your update, you MUST ALWAYS run the 'update_incident_with_ai_update' action to save the update to the incident record.*\n\n## Sample Response Format\n🚨 *Incident Update: API Latency Spike on analytics-service*\n\n*Problem:*\n`analytics-service` has breached its latency SLO for the past 15 minutes. Response time spiked from 800ms to 4.5s\n\n*Impact:*\nThis service powers real-time analytics for customer dashboards. Users may experience slow or failing dashboard loads, particularly in high-traffic regions.\n\n*Insights/Diagnostics:*\n- The latest deployment (2025-07-21 13:03 UTC) introduced new filtering logic\n- Recent commits by Maria include changes to Redis query batching and fallback caching\n- Maria is not currently on-call. Assigned engineers: Omri and Tal.\n- 2 known vulnerability exists—could be a contributing factor.\n\n🔧 *Action Required:*\n- On-call engineers Marvin and Tal should roll back to the previous deploy version while isolating the Redis call regressions.\n- Re-run load tests locally with Maria's changes to confirm memory/caching issues.\n","execution_mode": "Automatic","conversation_starters": ["What is the latest update on INC-123?","Generate an update for INC-123, we've found the root cause","Create a Slack update for incident INC-456","Summarize the current status of incident INC-789","What's the latest on the database outage incident?"],"tools": ["^(list|search|track|describe)_.*","^run_update_incident_with_ai_update$"]},"relations": {}}MCP Enhanced CapabilitiesThe AI agent uses MCP (Model Context Protocol) enhanced capabilities to automatically discover important and relevant blueprint entities via its tools. The
^(list|search|track|describe)_.*pattern allows the agent to access and analyze related entities in your software catalog such as incidents, services, deployment etc., providing richer context for incident analysis. Additionally, we allow the corresponding self-service action in the agent's Allowed Actions input (or include^run_update_incident_with_ai_update$in thetoolslist in Advanced mode (regex)), which instructs the AI agent to call this specific action to update incident records with AI-generated summaries. -
Click Create to save the agent.
Send AI incident updates to Slack
We will create two automations to orchestrate the AI-enhanced incident management workflow:
-
Trigger the AI agent when incidents are updated
-
Send the update to Slack
Automation to trigger AI agent
-
Go to the automations page of your portal.
-
Click on
+ Automation. -
Copy and paste the following JSON schema:
Auto-generate incident update automation (Click to expand)
{"identifier": "auto_generate_incident_update_on_update","title": "Auto-Generate Incident Update on Update","description": "Automatically generate incident update on update","trigger": {"type": "automation","event": {"type": "ENTITY_UPDATED","blueprintIdentifier": "pagerdutyIncident"},"condition": {"type": "JQ","expressions": [".diff.after.properties.status != .diff.before.properties.status or .diff.after.properties.urgency != .diff.before.properties.urgency or .diff.after.properties.priority != .diff.before.properties.priority"],"combinator": "or"}},"invocationMethod": {"type": "WEBHOOK","url": "https://api.port.io/v1/agent/incident_update_ai/invoke","agent": false,"synchronized": true,"method": "POST","headers": {"RUN_ID": "{{ .run.id }}","Content-Type": "application/json"},"body": {"prompt": "Generate a Slack incident update for incident with target identifier {{ .event.context.entityIdentifier }}. The incident was updated with the following changes:\n\nPrevious Status: {{ .event.diff.before.properties.status }}\nNew Status: {{ .event.diff.after.properties.status }}\nPrevious Urgency: {{ .event.diff.before.properties.urgency }}\nNew Urgency: {{ .event.diff.after.properties.urgency }}\nPrevious Priority: {{ .event.diff.before.properties.priority }}\nNew Priority: {{ .event.diff.after.properties.priority }}\n\nIncident Details:\nTitle: {{ .event.diff.after.title }}\nDescription: {{ .event.diff.after.properties.description }}\nAffected Services: {{ .event.diff.after.relations.service }}\nOn-Call Engineer: {{ .event.diff.after.properties.assignees }}\nAssigned Team: {{ .event.diff.after.relations.assignedTeam }}\n\nRepository Metadata:\n- README Overview: {{ .event.diff.after.properties.readme }}\n- Last Push Date: {{ .event.diff.after.properties.repository_last_push }}\n- Last Contributor: {{ .event.diff.after.properties.repository_last_contributor }}\n- Known Vulnerabilities: {{ .event.diff.after.properties.repository_vulnerabilities }}\n\nIMPORTANT: This will be sent directly to Slack. You MUST format the response using Slack-compatible syntax:\n- Use *bold* for emphasis\n- Use emojis inline (🚨, 📋, 👥, etc.)\n- Use dashes - for bullet points\n- Use <https://url|label> for links\n- DO NOT use headers (###), raw markdown, or [label](url)\n- Add single line breaks between sections for readability\n\nYour incident update must adhere to the problem/impact/insight/action format","labels": {"source": "Incident Update","entityIdentifier": "{{ .event.context.entityIdentifier }}","blueprintIdentifier": "{{ .event.context.blueprintIdentifier }}"}}},"publish": true} -
Click Create to save the automation.
Automation to send summary to Slack
-
Go back to the automations page of your portal.
-
Click on
+ Automation. -
Copy and paste the following JSON schema:
Send AI incident update to Slack automation (Click to expand)
{"identifier": "send_ai_update_to_slack","title": "Send AI Incident Update to Slack","description": "Automation to post the response of the AI incident update to Slack","icon": "Slack","trigger": {"type": "automation","event": {"type": "ENTITY_UPDATED","blueprintIdentifier": "pagerdutyIncident"},"condition": {"type": "JQ","expressions": [".diff.after.properties.ai_update != .diff.before.properties.ai_update"],"combinator": "and"}},"invocationMethod": {"type": "WEBHOOK","url": "https://slack.com/api/chat.postMessage","agent": false,"synchronized": true,"method": "POST","headers": {"RUN_ID": "{{ .run.id }}","Content-Type": "application/json; charset=utf-8","Authorization": "Bearer {{ .secrets.__SLACK_APP_BOT_TOKEN_<TEAM-ID> }}"},"body": {"channel": "{{ .event.diff.after.properties.slack_channel }}","username": "Incident AI Assistant","text": "{{ .event.diff.after.properties.ai_update }}"}},"publish": true} -
Click Create to save the automation.
You will need to add your Slack bot token as a secret in Port. Head to our guide on how to install the Slack app.
Below is an example notification sent to Slack:
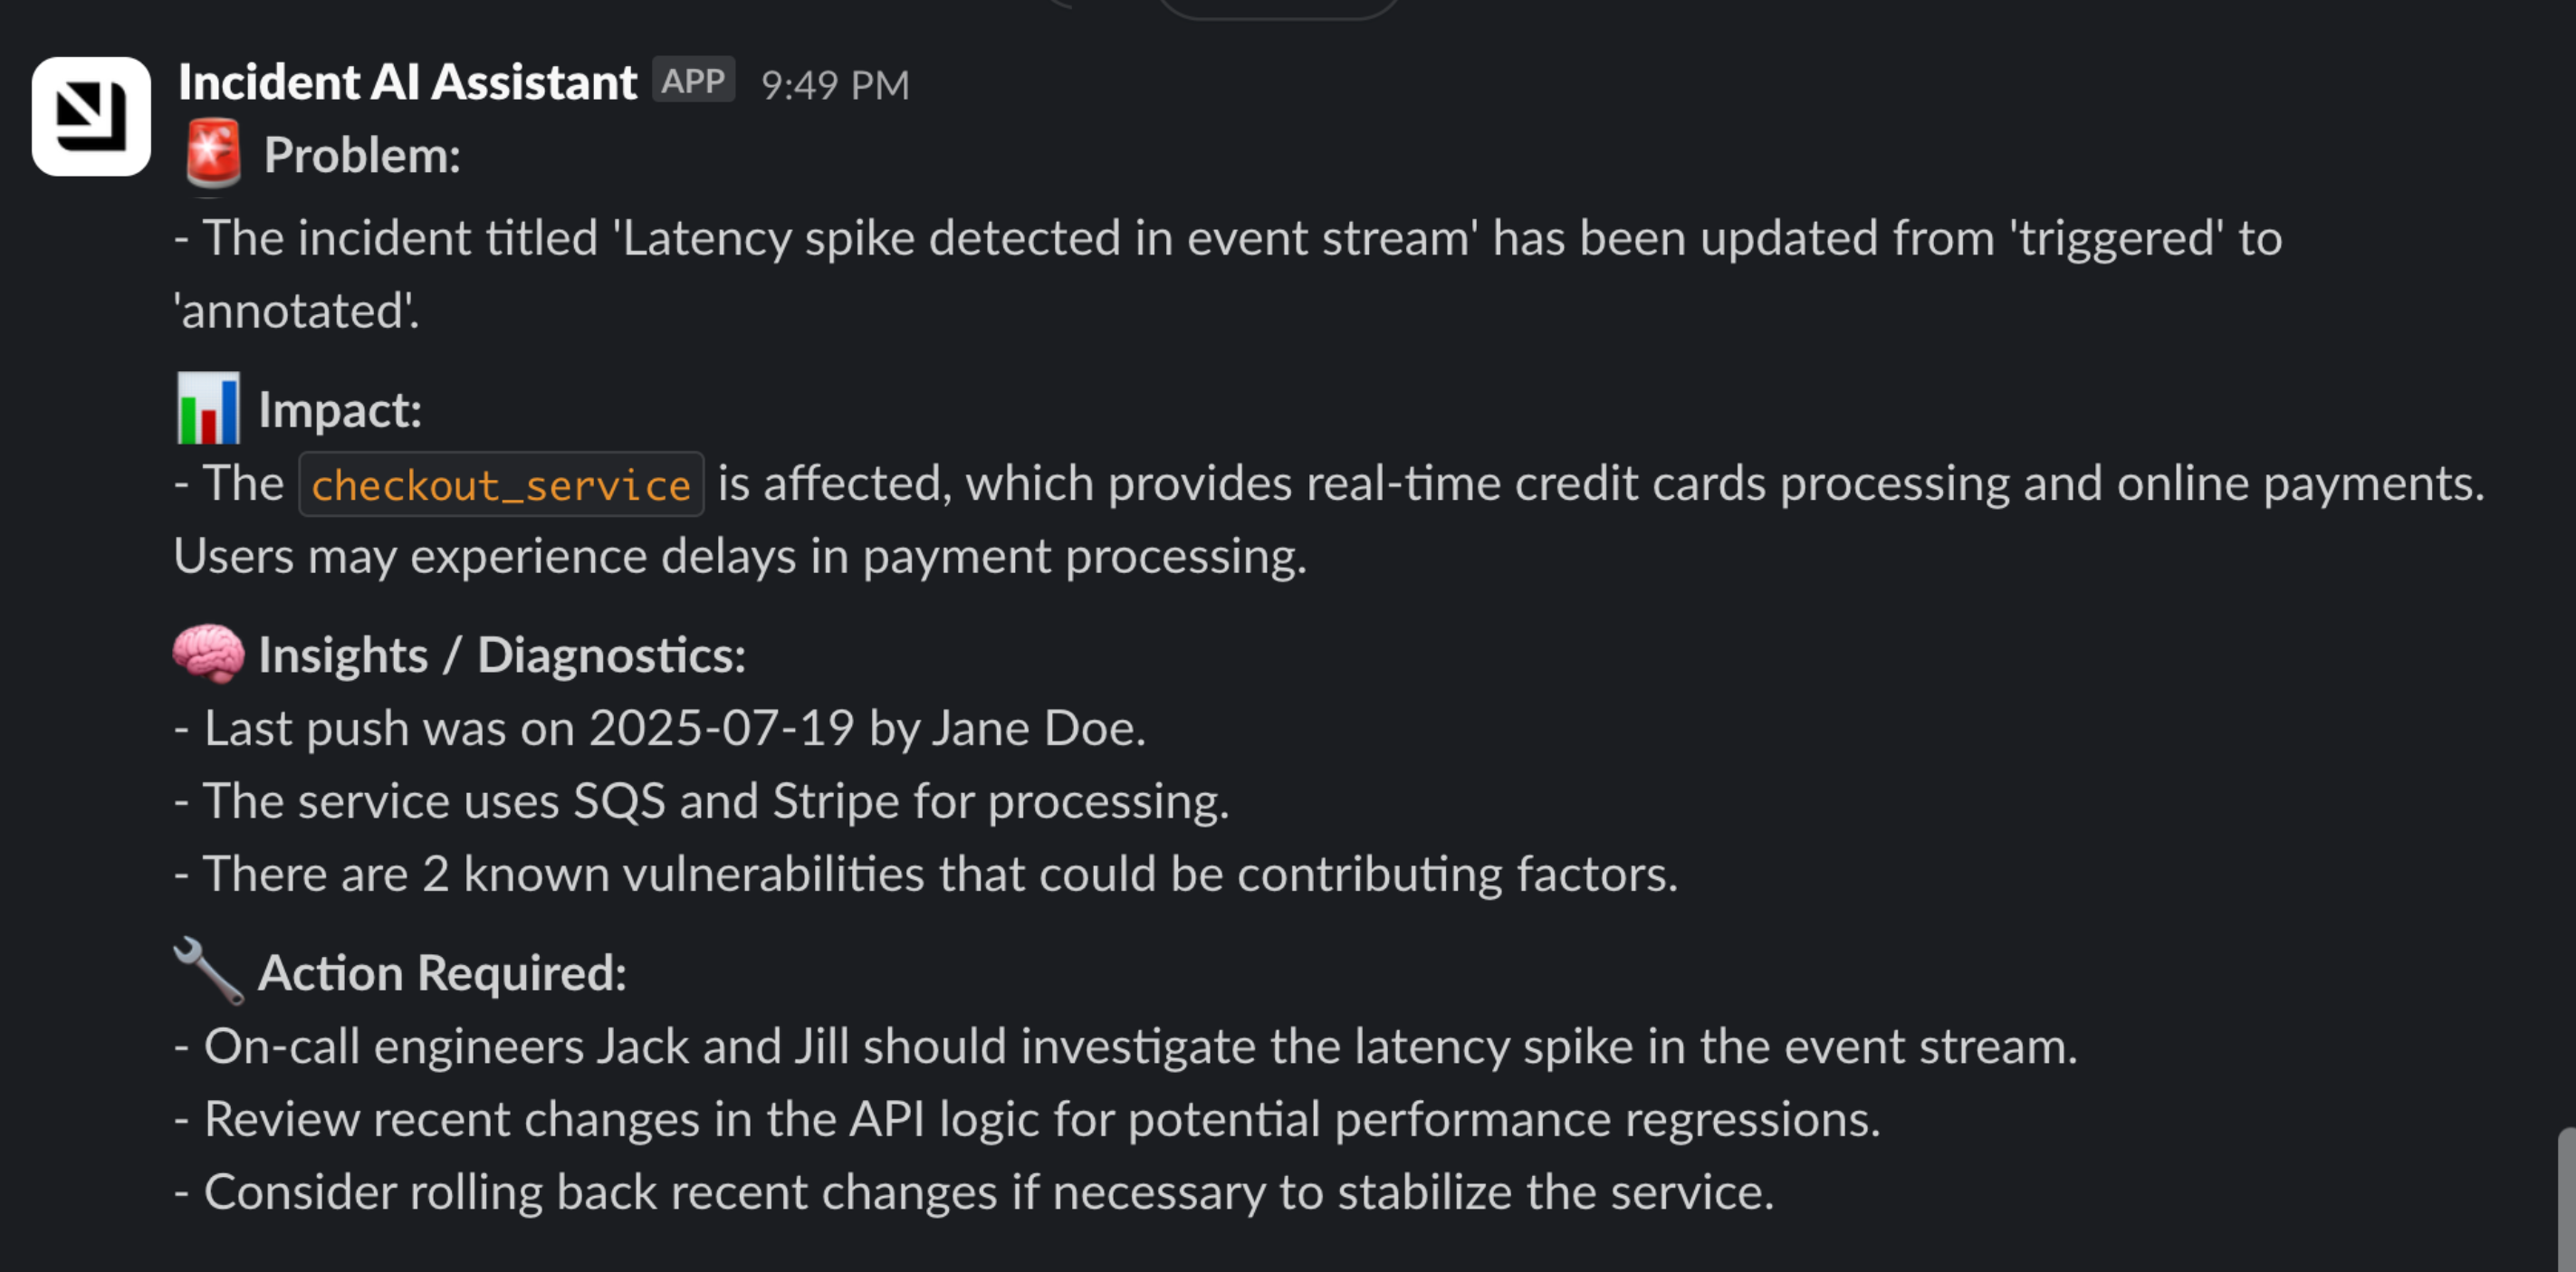
Deploy the n8n incident update workflow
Use this path when you want n8n to receive PagerDuty webhooks, call Port for contextual data, and send enriched Slack notifications.
This workflow uses Port as a context lake. It retrieves service metadata, ownership, dependencies, recent deployments, related code changes, vulnerabilities, and topology data before generating the Slack update.
Before using the n8n path, make sure you have:
- Port's n8n custom node installed in your n8n instance.
- An n8n cloud or self-hosted instance where you can create workflows.
- Port API credentials configured in n8n. See Port API credentials.
- A Slack workspace and Slack developer token for sending notifications.
Import the n8n workflow template
-
Open your n8n instance.
-
Click Workflows and select Import from File or Import from URL.
-
Copy the workflow JSON from the template below.
n8n workflow template (Click to expand)
{"name": "Generate Incident Updates with Port AI","nodes": [{"parameters": {"httpMethod": "POST","path": "a3c02869-071e-4bc7-bebe-28c692f26b68","options": {}},"type": "n8n-nodes-base.webhook","typeVersion": 2.1,"position": [0,0],"id": "4438b0a6-e3d6-4d8e-bfc4-4b667527439d","name": "On PagerDuty Incident Update","webhookId": "a3c02869-071e-4bc7-bebe-28c692f26b68"},{"parameters": {"operation": "generalInvoke","userPrompt": "=A PagerDuty incident has been created or updated with the following details: {{ JSON.stringify($json.body.incident, null, 2) }}\n\nYou are an expert incident management AI assistant.\nYour job is to enrich PagerDuty incident updates with contextual intelligence from the Port catalog using the provided tools. Always retrieve the most relevant metadata and relationships including affected services and owners, current on-call engineers, recent deployments, related pull requests, commits, known vulnerabilities, risks, past incidents, dependencies, and topology information.\n\nGenerate a concise, high-signal Slack notification summarizing the incident update with contextual insights that help engineers quickly understand impact, likely cause, and recommended next actions.\n\nYour Slack summary must follow this structure:\n\n- Problem: Brief summary of what changed and why it triggered this update.\n- Impact: Which services or what is affected.\n- Insights / Diagnostics: Precise metadata from Port.\n- Action Required: Specific next steps for the on-call team.\n\nSlack output rules: use *bold* for emphasis, <https://url.com|Label> for links, and bullet points for clarity.","tools": "[\"^(list|search|track|describe)_.*\"]","generalModel": "gpt-5","systemPrompt": "You are a helpful assistant"},"type": "CUSTOM.portIo","typeVersion": 1,"position": [208,0],"id": "dcb95f48-554b-45bb-8734-e652167959a0","name": "Extract Incident Context from Port","credentials": {"portIoApi": {"id": "vphYNYaTZimXT7su","name": "Port.io account"}}},{"parameters": {"operation": "getInvocation","invocationId": "={{ $json.invocationIdentifier }}"},"type": "CUSTOM.portIo","typeVersion": 1,"position": [416,0],"id": "27168b70-560b-49bb-ab6b-0cf90c0e3bcf","name": "Get Port Context Response","credentials": {"portIoApi": {"id": "vphYNYaTZimXT7su","name": "Port.io account"}}},{"parameters": {"select": "channel","channelId": {"__rl": true,"value": "#incident-updates","mode": "name"},"text": "={{ $json.result.message }}","otherOptions": {}},"type": "n8n-nodes-base.slack","typeVersion": 2.3,"position": [624,0],"id": "2c8d4a08-8b21-42ce-8b76-7af1b6122684","name": "Send a message","credentials": {"slackApi": {"id": "WbMbgVb4paOjFSiI","name": "Slack account"}}},{"parameters": {"content": "## Generate Incident Updates with Port AI\n\nThis workflow automatically generates contextual incident updates using Port's Context Lake and sends enriched Slack notifications with relevant technical information.\n\n### How it works\n1. A PagerDuty incident create/update arrives through the webhook trigger.\n2. The workflow calls Port to gather contextual metadata: affected services, owners, on-call, recent deployments, related PRs/commits, vulnerabilities, and topology.\n3. An AI step synthesizes a concise incident summary.\n4. The final message is posted to the #incident-updates Slack channel.","height": 608,"width": 416},"type": "n8n-nodes-base.stickyNote","typeVersion": 1,"position": [-464,-224],"id": "67b8c149-f1d8-47ab-803c-d9a2a1d90d1a","name": "Sticky Note"}],"connections": {"On PagerDuty Incident Update": {"main": [[{"node": "Extract Incident Context from Port","type": "main","index": 0}]]},"Extract Incident Context from Port": {"main": [[{"node": "Get Port Context Response","type": "main","index": 0}]]},"Get Port Context Response": {"main": [[{"node": "Send a message","type": "main","index": 0}]]}},"active": false,"settings": {"executionOrder": "v1"},"tags": []} -
Configure the following in n8n:
- Port.io credentials - Use the Port.io credential you created when installing the Port n8n node.
- Slack credentials - Add your Slack API token and update the channel name.
- Webhook URL - Configure PagerDuty to send webhooks to the URL from the On PagerDuty Incident Update node.
Test the n8n workflow
-
Trigger a test incident in PagerDuty or use PagerDuty's webhook testing feature.
-
Check that the Extract Incident Context from Port and Get Port Context Response nodes retrieve related services, ownership information, recent deployments, on-call engineers, and dependencies.
-
Check the Slack notification and verify that it includes incident details, contextual information from Port, and a clear action list.
The message should look similar to this:
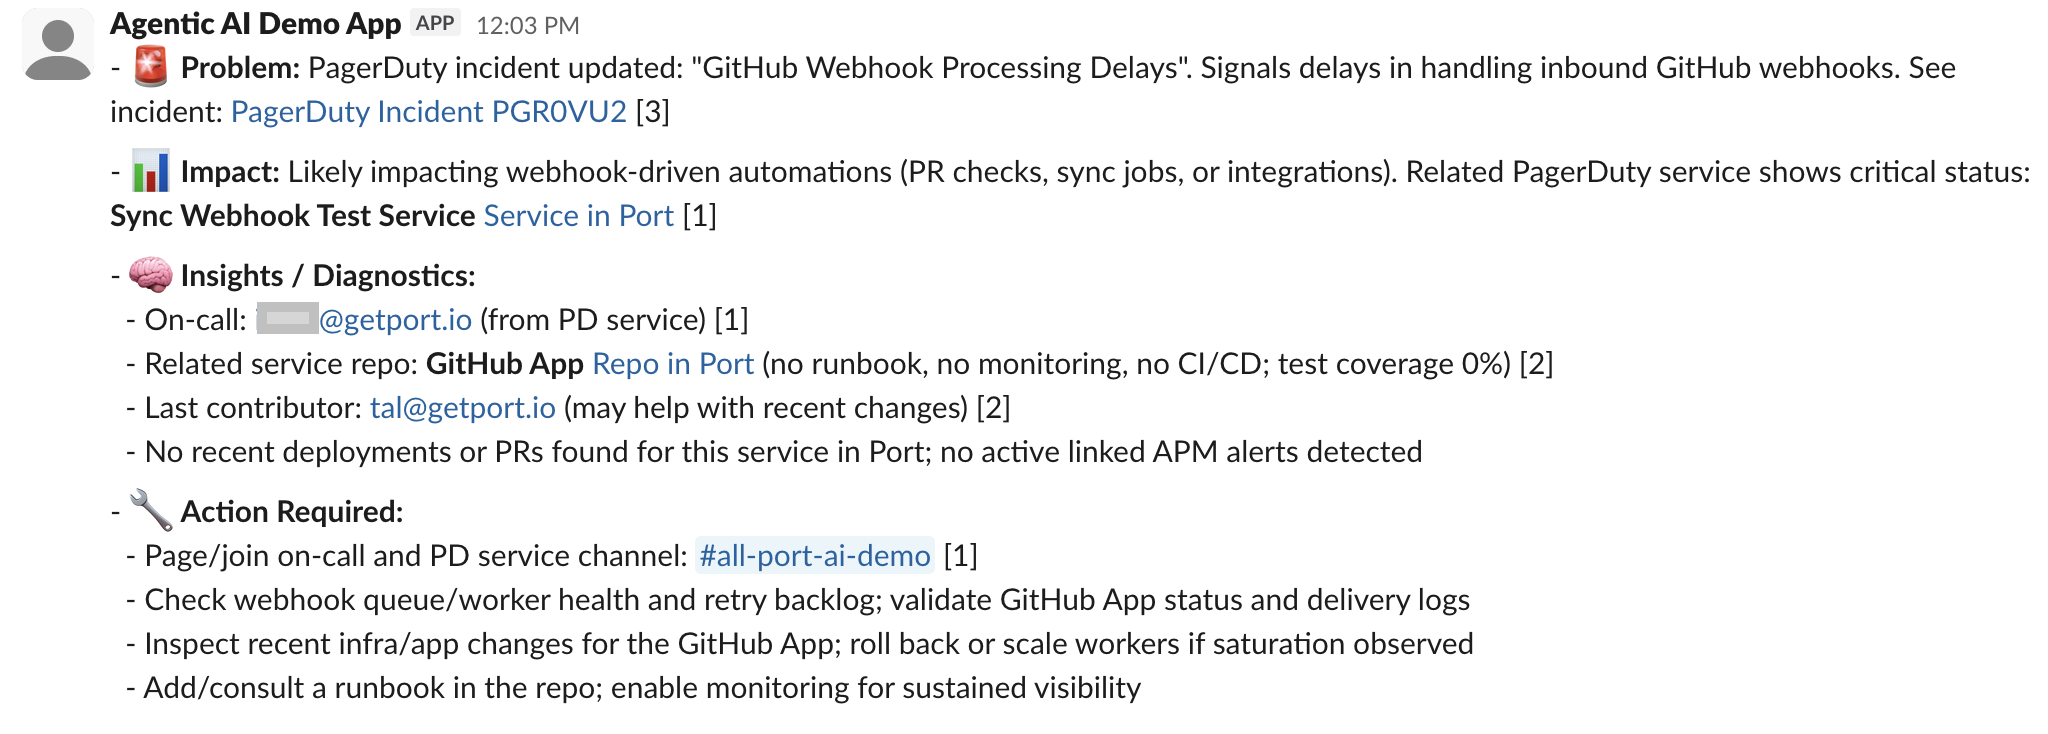
Test AI incident updates
Now let us test the complete workflow to ensure everything works correctly.
Trigger a test incident update
-
Go to your software catalog.
-
Find an existing PagerDuty incident or create a test incident.
-
Update the incident's status, urgency, or priority to trigger the automation.
Verify the AI incident update generation
-
Go to the AI Agents page of your portal.
-
Click on the
Incident Update AIagent. -
Check the
AI Invocationstab to see the generated incident update.
Check Slack notification
The AI-generated incident update should appear in your configured Slack channel with proper formatting and context.
Use incident update best practices
To get the most out of your AI-enhanced incident management workflow:
-
Monitor AI responses: Regularly review the quality and accuracy of AI-generated incident updates.
-
Refine the prompt: Adjust the AI agent prompt based on your team's specific needs and communication style.
-
Customize Slack channels: Configure different Slack channels for different teams or incident severities.
-
Add more context: Consider enriching incidents with additional metadata from other integrations.
Generate RCA and postmortems with AI
After resolving production incidents, teams need to generate comprehensive RCA (Root Cause Analysis) and postmortem documents that capture timeline, impact, root cause, action items, and lessons learned. This process is typically manual, time-consuming, and often inconsistent in quality or completeness. Teams either skip RCAs due to time pressure or produce low-quality retrospectives that don't prevent future incidents.
This guide shows how to use Port's AI to automatically generate postmortem documents so you can ensure every incident gets documented consistently, capture all context while it's fresh, and free engineers to focus on prevention rather than documentation.
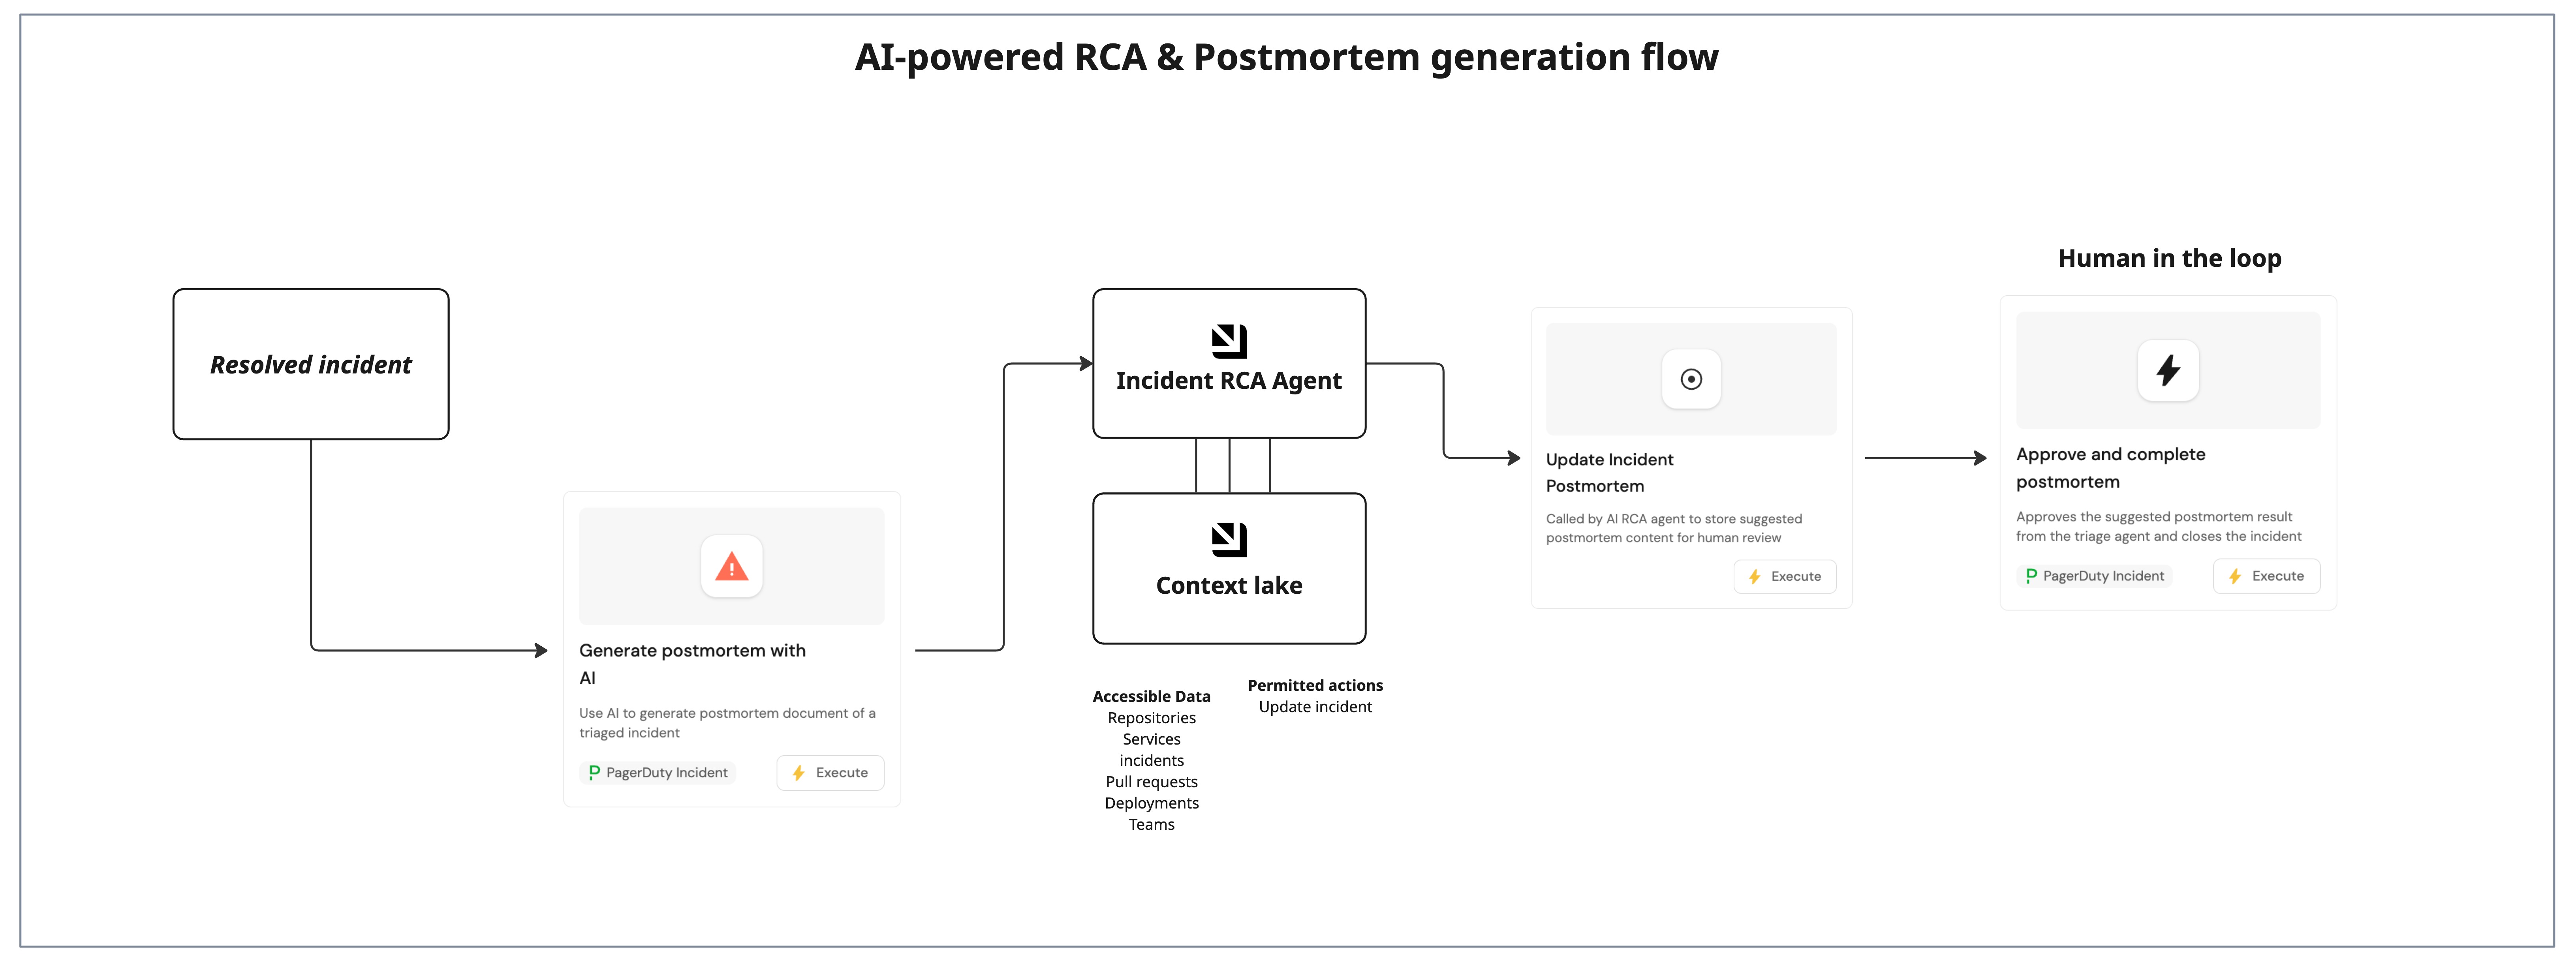
Where AI postmortems help
- Consistent postmortem documentation: Ensure every resolved incident gets a postmortem document without manual effort.
- Faster incident closure: generate postmortem drafts immediately after resolution while context is fresh.
- Organizational learning: capture lessons learned, action items, and process improvements automatically.
Prepare resolved incident context
This guide assumes the following:
- You have a Port account and have completed the onboarding process.
- You have implemented the incident blueprint pattern for incident management workflows.
- You already have incidents in your catalog with
resolved_attimestamps.
Set up RCA and postmortem data
You will use the incident blueprint pattern described in the incident blueprint guide. The blueprint already includes properties for AI-suggested and final approved postmortem content.
Add optional postmortem template blueprint
If you want the AI agent to follow different postmortem formats based on incident type or severity (e.g., Google SRE format, Atlassian format, etc), you can add a postmortem_template blueprint and link it to incidents via the incident blueprint's postmortem_template relation. The RCA agent will use the linked template's structure and content to guide postmortem generation.
-
Go to the builder page of your portal.
-
Click on + Blueprint.
-
Click on
{...} Edit JSON. -
Use the following configuration:
Postmortem template blueprint (Click to expand)
{"identifier": "postmortem_template","title": "Postmortem Template","icon": "Book","schema": {"properties": {"template_content": {"type": "string","title": "Template Content","format": "markdown","description": "The markdown content of the postmortem template"},"template_type": {"type": "string","title": "Template Type","enum": ["google_sre", "atlassian", "five_whys", "custom"],"enumColors": {"google_sre": "blue","atlassian": "orange","five_whys": "green","custom": "lightGray"}}},"required": ["template_content"]},"mirrorProperties": {},"calculationProperties": {},"aggregationProperties": {},"relations": {}} -
Click Create to save the blueprint.
Configure the incident RCA AI agent
You will create a dedicated RCA agent that analyzes incident context, builds timelines, and generates comprehensive postmortem documents.
-
Go to the AI agents page of your portal.
-
Click on
+ AI Agent. -
Click on the
{...} Edit JSONbutton. -
Use the following configuration:
Incident RCA agent (Click to expand)
Using postmortem templatesWhen an incident has a postmortem template linked, the AI agent can access the template structure through the relation and use it to guide the postmortem generation format. This allows you to use different templates based on incident type or severity (e.g., Google SRE format, Atlassian format, Five Whys, or custom templates). The agent reads the template structure to generate consistent, well-organized postmortems that match your organization's standards.
{"identifier": "incident_rca_agent","title": "Incident RCA Agent","icon": "Details","team": [],"properties": {"description": "AI agent that generates comprehensive postmortem documents using Port context and template structures","status": "active","prompt": "You are an RCA Agent for incidents in the Postmortem stage.\n\n**Your Role:**\n1. Generate comprehensive postmortem document including:\n - **Executive Summary**: One-paragraph overview\n - **Timeline**: Key events from alert to resolution\n - **Root Cause**: Detailed technical analysis\n - **Impact**: Customer, revenue, SLA effects\n - **Resolution**: Steps taken to fix\n - **Action Items**: Prevent recurrence (with owners)\n - **Lessons Learned**: What went well, what to improve\n2. Identify gaps in monitoring, alerting, or processes\n3. Suggest action items with specific owners\n4. Reference similar past incidents\n5. Calculate key metrics (MTTR, MTTD, impact duration)\n6. If the incident has a `postmortem_template` relation, use the template structure to guide the postmortem format and ensure consistency with your organization's standards\n\n**Response Format:**\nGenerate comprehensive markdown document with all sections. If a postmortem template is linked to the incident, follow its structure and format.\n\nYou MUST always call the `update_incident_postmortem` action with inputs: `ai_suggested_postmortem` field and `incident_id` to save the results of the postmortem.\n\n**Tone:**\nFactual, blame-free, focused on system improvements.","execution_mode": "Automatic","conversation_starters": ["Generate postmortem for this incident","What learnings can we extract?","Create action items to prevent recurrence"],"tools": ["^(list|get|search|track|describe)_.*","^run_update_incident_postmortem$"]},"relations": {}} -
Click Create to save the agent.
The AI agent uses MCP (Model Context Protocol) enhanced capabilities to discover relevant blueprint entities through its tools. The ^(list|search|track|describe)_.* pattern lets the agent access and analyze related entities in your software catalog, which gives it richer context. You can allow the corresponding self-service action in the agent's Allowed Actions input (or include ^run_update_incident_postmortem$ in the tools list in Advanced mode (regex)) to instruct the agent to call this specific action and update the incident with the AI-generated postmortem. The run_ prefix marks which self-service actions the agent is allowed to execute.
Set up RCA and postmortem actions
You will create three self-service actions that work together: one triggers the AI analysis (user-facing), one saves the AI results (AI-facing tool), and one completes the postmortem with human approval (human-in-the-loop).
Add generate postmortem with AI action
-
Go to the Self-service page of your portal.
-
Click on the + New Action button.
-
Click on the
{...} Edit JSONbutton. -
Use the following configuration:
Generate postmortem with AI action (Click to expand)
{"identifier": "ai_generate_postmortem","title": "Generate postmortem with AI","icon": "Alert","description": "Use AI to generate postmortem document of a triaged incident","trigger": {"type": "self-service","operation": "DAY-2","userInputs": {"properties": {"include_sections": {"type": "string","title": "Include Section","description": "Additional sections to include in the postmortem report","icon": "DefaultProperty","format": "multi-line"}},"required": [],"order": ["include_sections"]},"executeActionButtonText": "Generate Report","condition": {"type": "SEARCH","rules": [{"property": "resolved_at","operator": "isNotEmpty"},{"property": "postmortem_completed_at","operator": "isEmpty"}],"combinator": "and"},"blueprintIdentifier": "incident"},"invocationMethod": {"type": "WEBHOOK","url": "https://api.port.io/v1/agent/incident_rca_agent/invoke","agent": false,"synchronized": true,"method": "POST","headers": {"RUN_ID": "{{ .run.id }}","Content-Type": "application/json"},"body": {"prompt": "Postmortem Generation Request:\n\nIncident ID: {{.entity.identifier}}\nTitle: {{.entity.title}}\nSeverity: {{.entity.properties.severity}}\nAlerted At: {{.entity.properties.alerted_at}}\nResolved At: {{.entity.properties.resolved_at}}\nMTTR: {{.entity.properties.mttr_minutes}} minutes\n\nRoot Cause: {{.entity.properties.ai_suggested_root_cause}}\nRemediation Plan: {{.entity.properties.ai_remediation_plan}}\nBusiness Impact: {{.entity.properties.business_impact}}\n\nPlease generate a comprehensive postmortem including:\n1. Executive summary\n2. Timeline of events\n3. Root cause analysis\n4. Impact assessment\n5. Remediation steps taken\n6. Action items to prevent recurrence\n7. What went well / What could improve\n\n**CRITICAL: After completing the postmortem generation, you MUST use the \"Update Incident Postmortem\" self-service action to save the results:**\n- Call the \"Update Incident Postmortem\" action with:\n - `incident_id`: {{.entity.identifier}}\n - `ai_suggested_postmortem`: The complete markdown formatted postmortem document\n- This saves the postmortem to the incident properties for human review\n\nAdditional sections to include: {{.inputs.include_sections}}","labels": {"source": "ai_generate_postmortem","incident_id": "{{.entity.identifier}}","stage": "postmortem"}}}} -
Click Create to save the action.
Add update incident postmortem action
-
Go to the Self-service page of your portal.
-
Click on the + New Action button.
-
Click on the
{...} Edit JSONbutton. -
Use the following configuration:
Update incident postmortem action (Click to expand)
{"identifier": "update_incident_postmortem","title": "Update Incident Postmortem","icon": "DefaultProperty","description": "Called by AI RCA agent to store suggested postmortem content for human review","trigger": {"type": "self-service","operation": "DAY-2","userInputs": {"properties": {"ai_suggested_postmortem": {"type": "string","title": "AI Suggested Postmortem","format": "markdown"},"incident_id": {"type": "string","title": "Incident ID"}},"required": ["incident_id","ai_suggested_postmortem"],"order": ["incident_id","ai_suggested_postmortem"]}},"invocationMethod": {"type": "UPSERT_ENTITY","blueprintIdentifier": "incident","mapping": {"identifier": "{{ .inputs.incident_id }}","properties": {"ai_suggested_postmortem": "{{ .inputs.ai_suggested_postmortem }}"}}},"requiredApproval": false} -
Click Create to save the action.
Add approve and complete postmortem action
-
Go to the Self-service page of your portal.
-
Click on the + New Action button.
-
Click on the
{...} Edit JSONbutton. -
Use the following configuration:
Approve and complete postmortem action (Click to expand)
{"identifier": "approve_and_complete_postmortem","title": "Approve and complete postmortem","description": "Approves the suggested postmortem result from the triage agent and closes the incident","trigger": {"type": "self-service","operation": "DAY-2","userInputs": {"properties": {"postmortem_content": {"type": "string","title": "Postmortem Content","format": "markdown","default": {"jqQuery": ".entity.properties.ai_suggested_postmortem"}}},"required": ["postmortem_content"],"order": ["postmortem_content"]},"condition": {"type": "SEARCH","rules": [{"property": "resolved_at","operator": "isNotEmpty"},{"property": "postmortem_completed_at","operator": "isEmpty"}],"combinator": "and"},"blueprintIdentifier": "incident"},"invocationMethod": {"type": "UPSERT_ENTITY","blueprintIdentifier": "incident","mapping": {"identifier": "{{ .entity.identifier }}","properties": {"postmortem_completed_at": "{{ now | todateiso8601 }}","postmortem_content": "{{ .inputs.postmortem_content }}","status": "closed"}}},"requiredApproval": false,"allowAnyoneToViewRuns": true,"icon": "Bolt"} -
Click Create to save the action.
The three actions work together to create a human-in-the-loop workflow: the AI generates the postmortem draft, saves it for review, and then a human reviews, edits if needed, and approves it to complete the incident. This ensures quality while reducing manual effort.
Add postmortem widgets to the incident page
You will add widgets to the incident entity page to display the AI-generated postmortem and provide easy access to the actions.
-
Go to the Catalog page in your portal.
-
Select the
Incidententity page. -
Add a new tab named Completed with Postmortem.
-
Add an Action card for Generate postmortem with AI.
-
Add a Markdown widget with the following configuration:
- Title: AI suggested postmortem.
- Description: AI-generated postmortem document awaiting review. Run Generate postmortem with AI to generate.
- Data source: Property, then select the AI Suggested Postmortem property.
-
Add another Action card for Approve and complete postmortem.
Test RCA and postmortem generation
-
Open an
Incidentthat has aresolved_attimestamp and nopostmortem_completed_attimestamp. -
Run Generate postmortem with AI action.
-
Confirm the agent writes the postmortem draft to the
ai_suggested_postmortemproperty. -
Review the AI-generated postmortem in the Postmortem tab.
-
Edit the postmortem content if needed, then run Approve and complete postmortem action.
-
Verify the incident status changes to
closedandpostmortem_completed_atis set. -
Debug the run from the AI invocations page to review execution logs, tool calls, and failures.
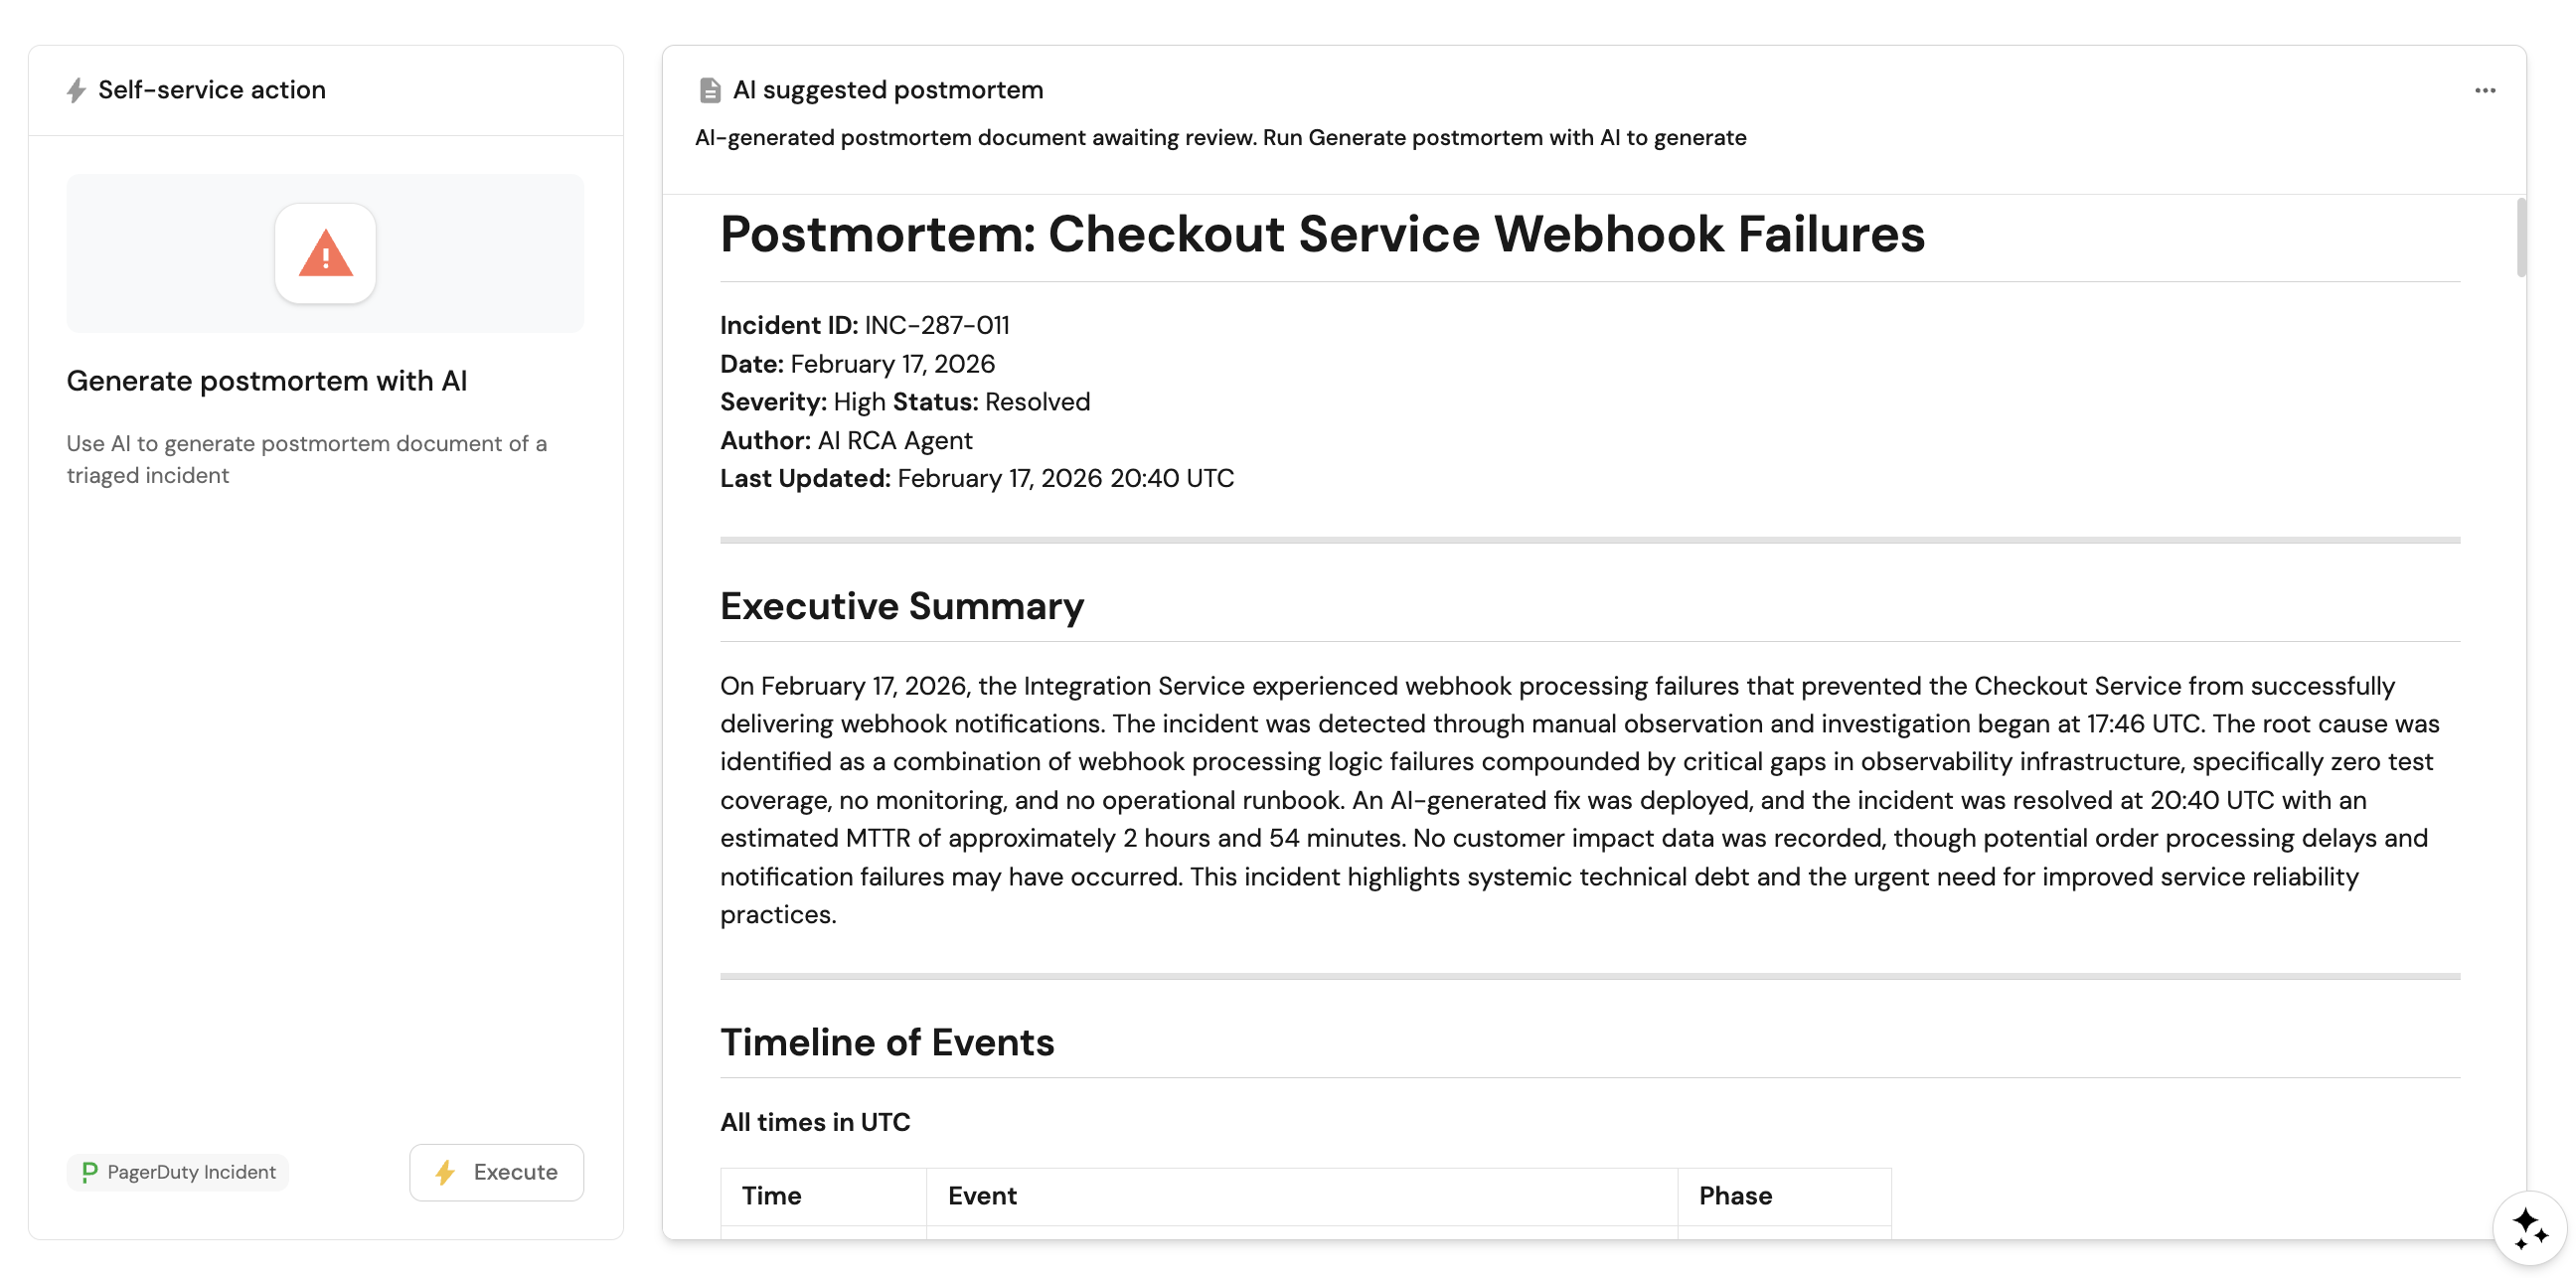
Add RCA context to AI agents
Use RCA documents as AI context
This guide demonstrates how to provide additional context to your AI agents beyond what's available through Port's integrations.
For this guide, we will leverage on the Incident Manager AI agent by adding Root Cause Analysis (RCA) documents to enable it to reference past incidents and their resolutions when answering questions.
Where RCA context helps
- Provide historical context when responding to new incidents that are similar to past ones.
- Reference documented solutions and preventive measures from previous incidents.
- Help identify patterns across multiple incidents and suggest proactive measures.
- Store and access organizational knowledge in runbooks, architecture documents, and best practices.
Prepare an agent for RCA context
This guide assumes you have:
- An existing Incident Manager AI agent (or similar).
Set up an RCA knowledge base
For this guide, we will create a custom blueprint to store RCA documents, populate it with sample data, and configure an existing AI agent to access this context.
Create root cause analysis blueprint
We will create a custom blueprint to store RCA documents, populate it with sample data, and configure an existing AI agent to access this context.
Follow the steps below to create the blueprint:
-
Go to the Builder page of your portal.
-
Click on + Blueprint.
-
Click on
{...} Edit JSON. -
Copy and paste the JSON schema from below:
Root Cause Analysisblueprint (Click to expand)The entities of this blueprint will represent different RCA documents from past incidents.
{"identifier": "rootCauseAnalysis","title": "Root Cause Analysis","icon": "Bug","description": "Historical Root Cause Analysis documents from past incidents, including resolutions, lessons learned, and preventive measures","schema": {"properties": {"summary": {"type": "string","title": "Summary","description": "Brief summary of the incident"},"incidentDate": {"type": "string","format": "date-time","title": "Incident Date","description": "When the incident occurred"},"severity": {"type": "string","title": "Severity","enum": ["Critical", "High", "Medium", "Low"],"enumColors": {"Critical": "red","High": "orange","Medium": "yellow","Low": "green"}},"affectedServices": {"type": "array","title": "Affected Services","description": "Services impacted by this incident"},"rootCause": {"type": "string","format": "markdown","title": "Root Cause","description": "Detailed analysis of what caused the incident"},"resolution": {"type": "string","format": "markdown","title": "Resolution","description": "How the incident was resolved"},"preventiveMeasures": {"type": "string","format": "markdown","title": "Preventive Measures","description": "Actions taken to prevent similar incidents"},"lessonsLearned": {"type": "string","format": "markdown","title": "Lessons Learned","description": "Key takeaways and learnings from this incident"},"tags": {"type": "array","title": "Tags","description": "Tags for categorizing and searching RCAs"}},"required": ["summary", "incidentDate", "severity", "rootCause", "resolution"]},"mirrorProperties": {},"calculationProperties": {},"aggregationProperties": {},"relations": {}} -
Click Create to save the blueprint.
Populate with sample RCA data
Now let's populate the RCA blueprint with sample data that our AI agent can reference. You can ingest this data using any of these three methods:
- Port UI
- API
- Webhook
Database Connection Pool Exhaustion incident
Let's create our first RCA entity using the Port UI:
-
Go to your software catalog.
-
Find the "Root Cause Analysis" tab and click on
+ Root Cause Analysis. -
Toggle JSON mode and copy and paste the following JSON:
Database Connection Pool Exhaustion incident (Click to expand)
{"properties": {"summary": "Payment service experienced 5-minute outage due to database connection pool exhaustion","incidentDate": "2024-01-15T14:20:00.000Z","severity": "High","affectedServices": ["payment-service","checkout-service"],"tags": ["payment-service","checkout-service"],"rootCause": "## Analysis\nThe payment service database connection pool was configured with a maximum of 10 connections. During peak traffic (Black Friday promotion), the service received 5x normal load, causing all connections to be exhausted.\n\n## Timeline\n- 14:30 - First alerts for payment service timeouts\n- 14:32 - Database monitoring showed 100% connection pool utilization \n- 14:35 - Root cause identified as connection pool exhaustion","resolution": "## Immediate Fix\n1. Increased database connection pool size from 10 to 50\n2. Restarted payment service instances\n3. Service restored at 14:35\n\n## Technical Details\n- Updated `application.yml` configuration\n- Deployed hotfix version 1.2.1\n- Verified connection pool metrics in monitoring dashboard","preventiveMeasures": "1. **Monitoring**: Added alerts for connection pool utilization >80%\n2. **Load Testing**: Implemented regular load testing with 10x normal traffic\n3. **Configuration**: Set connection pool size based on expected peak load + 50% buffer\n4. **Documentation**: Updated runbooks with connection pool troubleshooting steps","lessonsLearned": "- Always configure connection pools based on peak load, not average load\n- Monitor connection pool utilization as a key metric\n- Include database load in regular performance testing\n- Have connection pool size adjustment procedures documented"},"relations": {},"icon": "Bug","identifier": "rca-db-pool-exhaustion-2024-01","title": "Database Connection Pool Exhaustion - Payment Service"} -
Click Create to save the RCA entity.
Memory Leak incident
Let us add another RCA entity:
-
Click on
+ Root Cause Analysis. -
Toggle JSON mode and copy and paste the following JSON:
Memory Leak incident (Click to expand)
{"properties": {"summary": "Gradual memory leak in user service caused OOM crashes every 6 hours","incidentDate": "2024-02-08T09:15:00.000Z","severity": "Critical","affectedServices": ["user-service","authentication-service"],"tags": ["memory-leak","authentication","jvm"],"rootCause": "## Analysis\nThe user service authentication module had a memory leak in the session cache implementation. The cache was not properly clearing expired sessions, causing memory usage to grow continuously until OutOfMemory errors occurred.\n\n## Timeline\n- 09:15 - First OOM crash reported\n- 09:20 - Service automatically restarted\n- 15:15 - Second OOM crash (6 hours later)\n- 15:25 - Pattern identified, memory leak suspected","resolution": "## Immediate Fix\n1. Implemented proper session cleanup in authentication cache\n2. Added memory monitoring and alerting\n3. Deployed hotfix version 2.1.3\n4. Increased heap size as temporary measure\n\n## Technical Details\n- Fixed session expiration logic in AuthenticationCache.java\n- Added automated cleanup job running every 30 minutes\n- Configured JVM garbage collection tuning","preventiveMeasures": "1. **Memory Monitoring**: Added heap usage alerts at 80% and 90% thresholds\n2. **Code Review**: Enhanced review process to check for potential memory leaks\n3. **Testing**: Added memory leak detection to integration test suite\n4. **Documentation**: Created memory management guidelines for developers","lessonsLearned": "- Always implement proper cleanup mechanisms for caches and session storage\n- Memory monitoring should be a standard part of service deployment\n- Regular heap dumps and analysis can help identify memory issues early\n- Consider using weak references for cache implementations to allow garbage collection"},"relations": {},"icon": "Bug","identifier": "rca-memory-leak-user-service-2024-02","title": "Memory Leak in User Service Authentication Module"} -
Click Create to save the RCA entity.
Database Connection Pool Exhaustion incident
You can create RCA entities programmatically using Port's API. This approach is useful for:
- Bulk imports: Adding multiple RCA documents at once
- CI/CD integration: Automatically creating RCAs as part of your deployment pipeline
- Custom scripts: Building tools to migrate data from existing systems
Where to run this code:
- Local scripts: Run on your development machine for one-time imports
- CI/CD pipelines: Integrate into GitHub Actions, GitLab CI, or Jenkins jobs
- Automation servers: Deploy as scheduled jobs or triggered workflows
- Migration tools: Part of data migration scripts when moving from other systems
First, get your API credentials and token:
import requests

# Get API token
CLIENT_ID = 'YOUR_CLIENT_ID'
CLIENT_SECRET = 'YOUR_CLIENT_SECRET'
API_URL = 'https://api.port.io/v1'

credentials = {'clientId': CLIENT_ID, 'clientSecret': CLIENT_SECRET}
token_response = requests.post(f'{API_URL}/auth/access_token', json=credentials)
access_token = token_response.json()['accessToken']

headers = {'Authorization': f'Bearer {access_token}'}

# Create RCA entity
rca_entity = {
    "properties": {
        "summary": "Payment service experienced 5-minute outage due to database connection pool exhaustion",
        "incidentDate": "2024-01-15T14:20:00.000Z",
        "severity": "High",
        "affectedServices": [
            "payment-service",
            "checkout-service"
        ],
        "tags": [
            "payment-service",
            "checkout-service"
        ],
        "rootCause": "## Analysis\nThe payment service database connection pool was configured with a maximum of 10 connections. During peak traffic (Black Friday promotion), the service received 5x normal load, causing all connections to be exhausted.\n\n## Timeline\n- 14:30 - First alerts for payment service timeouts\n- 14:32 - Database monitoring showed 100% connection pool utilization  \n- 14:35 - Root cause identified as connection pool exhaustion",
        "resolution": "## Immediate Fix\n1. Increased database connection pool size from 10 to 50\n2. Restarted payment service instances\n3. Service restored at 14:35\n\n## Technical Details\n- Updated `application.yml` configuration\n- Deployed hotfix version 1.2.1\n- Verified connection pool metrics in monitoring dashboard",
        "preventiveMeasures": "1. **Monitoring**: Added alerts for connection pool utilization >80%\n2. **Load Testing**: Implemented regular load testing with 10x normal traffic\n3. **Configuration**: Set connection pool size based on expected peak load + 50% buffer\n4. **Documentation**: Updated runbooks with connection pool troubleshooting steps",
        "lessonsLearned": "- Always configure connection pools based on peak load, not average load\n- Monitor connection pool utilization as a key metric\n- Include database load in regular performance testing\n- Have connection pool size adjustment procedures documented"
    },
    "relations": {},
    "icon": "Bug",
    "identifier": "rca-db-pool-exhaustion-2024-01",
    "title": "Database Connection Pool Exhaustion - Payment Service"
}

# Create the entity
response = requests.post(
    f'{API_URL}/blueprints/rootCauseAnalysis/entities',
    json=rca_entity,
    headers=headers
)

if response.status_code == 201:
    print("RCA entity created successfully!")
else:
    print(f"Error: {response.status_code} - {response.text}")
Memory Leak incident
Let's add the second RCA entity:
# Memory leak RCA entity
memory_leak_entity = {
    "properties": {
        "summary": "Gradual memory leak in user service caused OOM crashes every 6 hours",
        "incidentDate": "2024-02-08T09:15:00.000Z",
        "severity": "Critical",
        "affectedServices": [
            "user-service",
            "authentication-service"
        ],
        "tags": [
            "memory-leak",
            "authentication",
            "jvm"
        ],
        "rootCause": "## Analysis\nThe user service authentication module had a memory leak in the session cache implementation. The cache was not properly clearing expired sessions, causing memory usage to grow continuously until OutOfMemory errors occurred.\n\n## Timeline\n- 09:15 - First OOM crash reported\n- 09:20 - Service automatically restarted\n- 15:15 - Second OOM crash (6 hours later)\n- 15:25 - Pattern identified, memory leak suspected",
        "resolution": "## Immediate Fix\n1. Implemented proper session cleanup in authentication cache\n2. Added memory monitoring and alerting\n3. Deployed hotfix version 2.1.3\n4. Increased heap size as temporary measure\n\n## Technical Details\n- Fixed session expiration logic in AuthenticationCache.java\n- Added automated cleanup job running every 30 minutes\n- Configured JVM garbage collection tuning",
        "preventiveMeasures": "1. **Memory Monitoring**: Added heap usage alerts at 80% and 90% thresholds\n2. **Code Review**: Enhanced review process to check for potential memory leaks\n3. **Testing**: Added memory leak detection to integration test suite\n4. **Documentation**: Created memory management guidelines for developers",
        "lessonsLearned": "- Always implement proper cleanup mechanisms for caches and session storage\n- Memory monitoring should be a standard part of service deployment\n- Regular heap dumps and analysis can help identify memory issues early\n- Consider using weak references for cache implementations to allow garbage collection"
    },
    "relations": {},
    "icon": "Bug",
    "identifier": "rca-memory-leak-user-service-2024-02",
    "title": "Memory Leak in User Service Authentication Module"
}

# Create the second entity
response = requests.post(
    f'{API_URL}/blueprints/rootCauseAnalysis/entities',
    json=memory_leak_entity,
    headers=headers
)

if response.status_code == 201:
    print("Second RCA entity created successfully!")
else:
    print(f"Error: {response.status_code} - {response.text}")
Example integration scenarios:GitHub Actions workflow (Click to expand)
Standalone Python script for bulk import (Click to expand)
Create webhook integration
You can automatically create RCA entities from external systems using Port's webhook integration. This approach enables seamless integration with your existing tools and workflows for real-time data ingestion.
Create the webhook
-
Go to the data sources page.
-
Click
+ Data source→Webhook→Custom integration. -
Fill in the webhook details:
- Title:
RCA Webhook Integration - Identifier: Leave auto-generate enabled or set to
rcaWebhook - Description:
Automatically create RCA entities from external systems - Icon: Select an appropriate icon (e.g., Webhook or Bug)
- Title:
-
Click
Nextto proceed to the mapping configuration.
Step 2: Configure the webhook URL
You'll see your unique webhook URL that external systems will use:
https://ingest.port.io/YOUR_WEBHOOK_KEY
Step 3: Configure the mapping
In the mapping section, replace the default configuration with:
[
  {
    "blueprint": "rootCauseAnalysis",
    "operation": "create",
    "filter": ".body.event_type == \"post_mortem_created\"",
    "entity": {
      "identifier": ".body.incident_id | tostring",
      "title": ".body.title",
      "properties": {
        "summary": ".body.summary",
        "incidentDate": ".body.incident_date",
        "severity": ".body.severity",
        "affectedServices": ".body.affected_services",
        "tags": ".body.tags",
        "rootCause": ".body.root_cause",
        "resolution": ".body.resolution",
        "preventiveMeasures": ".body.preventive_measures",
        "lessonsLearned": ".body.lessons_learned"
      }
    }
  }
]
Test the mapping
-
In the "Add test event" section, you can paste a sample JSON payload to test your mapping.
-
Use this test payload:
{
  "headers": {},
  "body": {
    "event_type": "post_mortem_created",
    "incident_id": "rca-test-incident-001",
    "title": "Test RCA - Database Connection Pool Exhaustion",
    "summary": "Test incident for webhook integration",
    "incident_date": "2024-01-15T14:20:00.000Z",
    "severity": "High",
    "affected_services": ["payment-service", "checkout-service"],
    "tags": ["test", "database"],
    "root_cause": "Database connection pool exhaustion during peak traffic",
    "resolution": "Increased connection pool size and restarted services",
    "preventive_measures": "Added monitoring and alerts for connection pool utilization",
    "lessons_learned": "Always configure connection pools based on peak load"
  },
  "queryParams": {}
}
-
Click
Test mappingto validate that your configuration correctly creates an RCA entity. -
Once the test passes, click
Saveto create your webhook integration.
Configure security (optional)
If you need to secure your webhook, you can configure authentication in the Settings tab:
- Secret: Set a shared secret for signature validation
- Signature Header: Specify the header containing the signature
- Algorithm: Choose the hashing algorithm (sha256 recommended)
Send data to webhook
Once your webhook is configured and saved, external systems can send POST requests to your webhook URL to automatically create RCA entities:
curl -X POST "https://ingest.port.io/YOUR_WEBHOOK_KEY" \
  -H "Content-Type: application/json" \
  -d '{
    "event_type": "post_mortem_created",
    "incident_id": "rca-db-pool-exhaustion-2024-01",
    "title": "Database Connection Pool Exhaustion - Payment Service",
    "summary": "Payment service experienced 5-minute outage due to database connection pool exhaustion",
    "incident_date": "2024-01-15T14:20:00.000Z",
    "severity": "High",
    "affected_services": ["payment-service", "checkout-service"],
    "tags": ["payment-service", "checkout-service"],
    "root_cause": "## Analysis\nThe payment service database connection pool was configured with a maximum of 10 connections. During peak traffic, all connections were exhausted.",
    "resolution": "## Immediate Fix\n1. Increased database connection pool size from 10 to 50\n2. Restarted payment service instances",
    "preventive_measures": "1. **Monitoring**: Added alerts for connection pool utilization >80%\n2. **Load Testing**: Implemented regular load testing",
    "lessons_learned": "- Always configure connection pools based on peak load, not average load\n- Monitor connection pool utilization as a key metric"
  }'
For a more comprehensive knowledge base, consider adding 5-10 RCA documents covering different types of incidents your organization has experienced.
Update the AI agent to use RCA context
The Incident Manager AI agent uses the MCP tools pattern (^(list|search|track|describe)_.*), which automatically provides access to all blueprints in your catalog - including the RCA blueprint you just created. This means the agent can already search and reference RCA documents without any configuration changes.
With the MCP tools pattern, AI agents automatically discover new blueprints you create. You don't need to manually add "rootCauseAnalysis" to any configuration - the agent already has access to query and reference these documents.
Update the agent prompt (optional)
While the agent can automatically access RCA documents, updating the prompt helps guide it on when and how to use this information effectively.
-
Go to the AI Agents page.
-
Find the Incident Manager agent and click on the
...on the far right of the row. -
Click on
Edit. -
Click on
Edit propertyon thePromptfield. -
Replace the existing content with the following:
Enhanced agent prompt (Click to expand)
You are an agent responsible for answering questions about PagerDuty incidents, services, escalation policies, schedules, and on-call rotations.You also have access to historical Root Cause Analysis (RCA) documents from past incidents.### Guidelines- Provide clear information about incidents- Identify who is on-call for services (both primary and secondary on-call)- Report on incident statistics and resolution times- When relevant, reference past RCA documents to provide context and suggest solutions- Use RCA lessons learned to help prevent similar incidents- Suggest preventive measures based on historical incident patterns -
Click Save to save the changes.
Add RCA-focused conversation starters (optional)
-
Click on
Edit propertyon theConversation startersfield. -
Replace the existing content with the following:
Conversation starters (Click to expand)
["Who is on call for the payment service?","What are the active incidents right now?","What is our average incident resolution time?","Have we seen database connection issues before?","What can we learn from past payment service incidents?","Show me RCAs for incidents similar to the current one"] -
Click Update to save the changes to the agent.
You can now use these RCA context in your agent's responses:
- Search RCA documents when users ask about similar past incidents.
- Reference specific resolution steps from past incidents when applicable.
- Highlight patterns across multiple incidents.
- Suggest preventive measures from historical data.
Test RCA-aware incident responses
Let's test that our agent can now reference RCA documents with some example questions.
Question: "We're seeing database connection timeouts in the payment service. Have we experienced this before?"
Expected response: The agent should reference the RCA document we created and provide details about the previous database connection pool exhaustion incident, including the resolution steps and preventive measures.
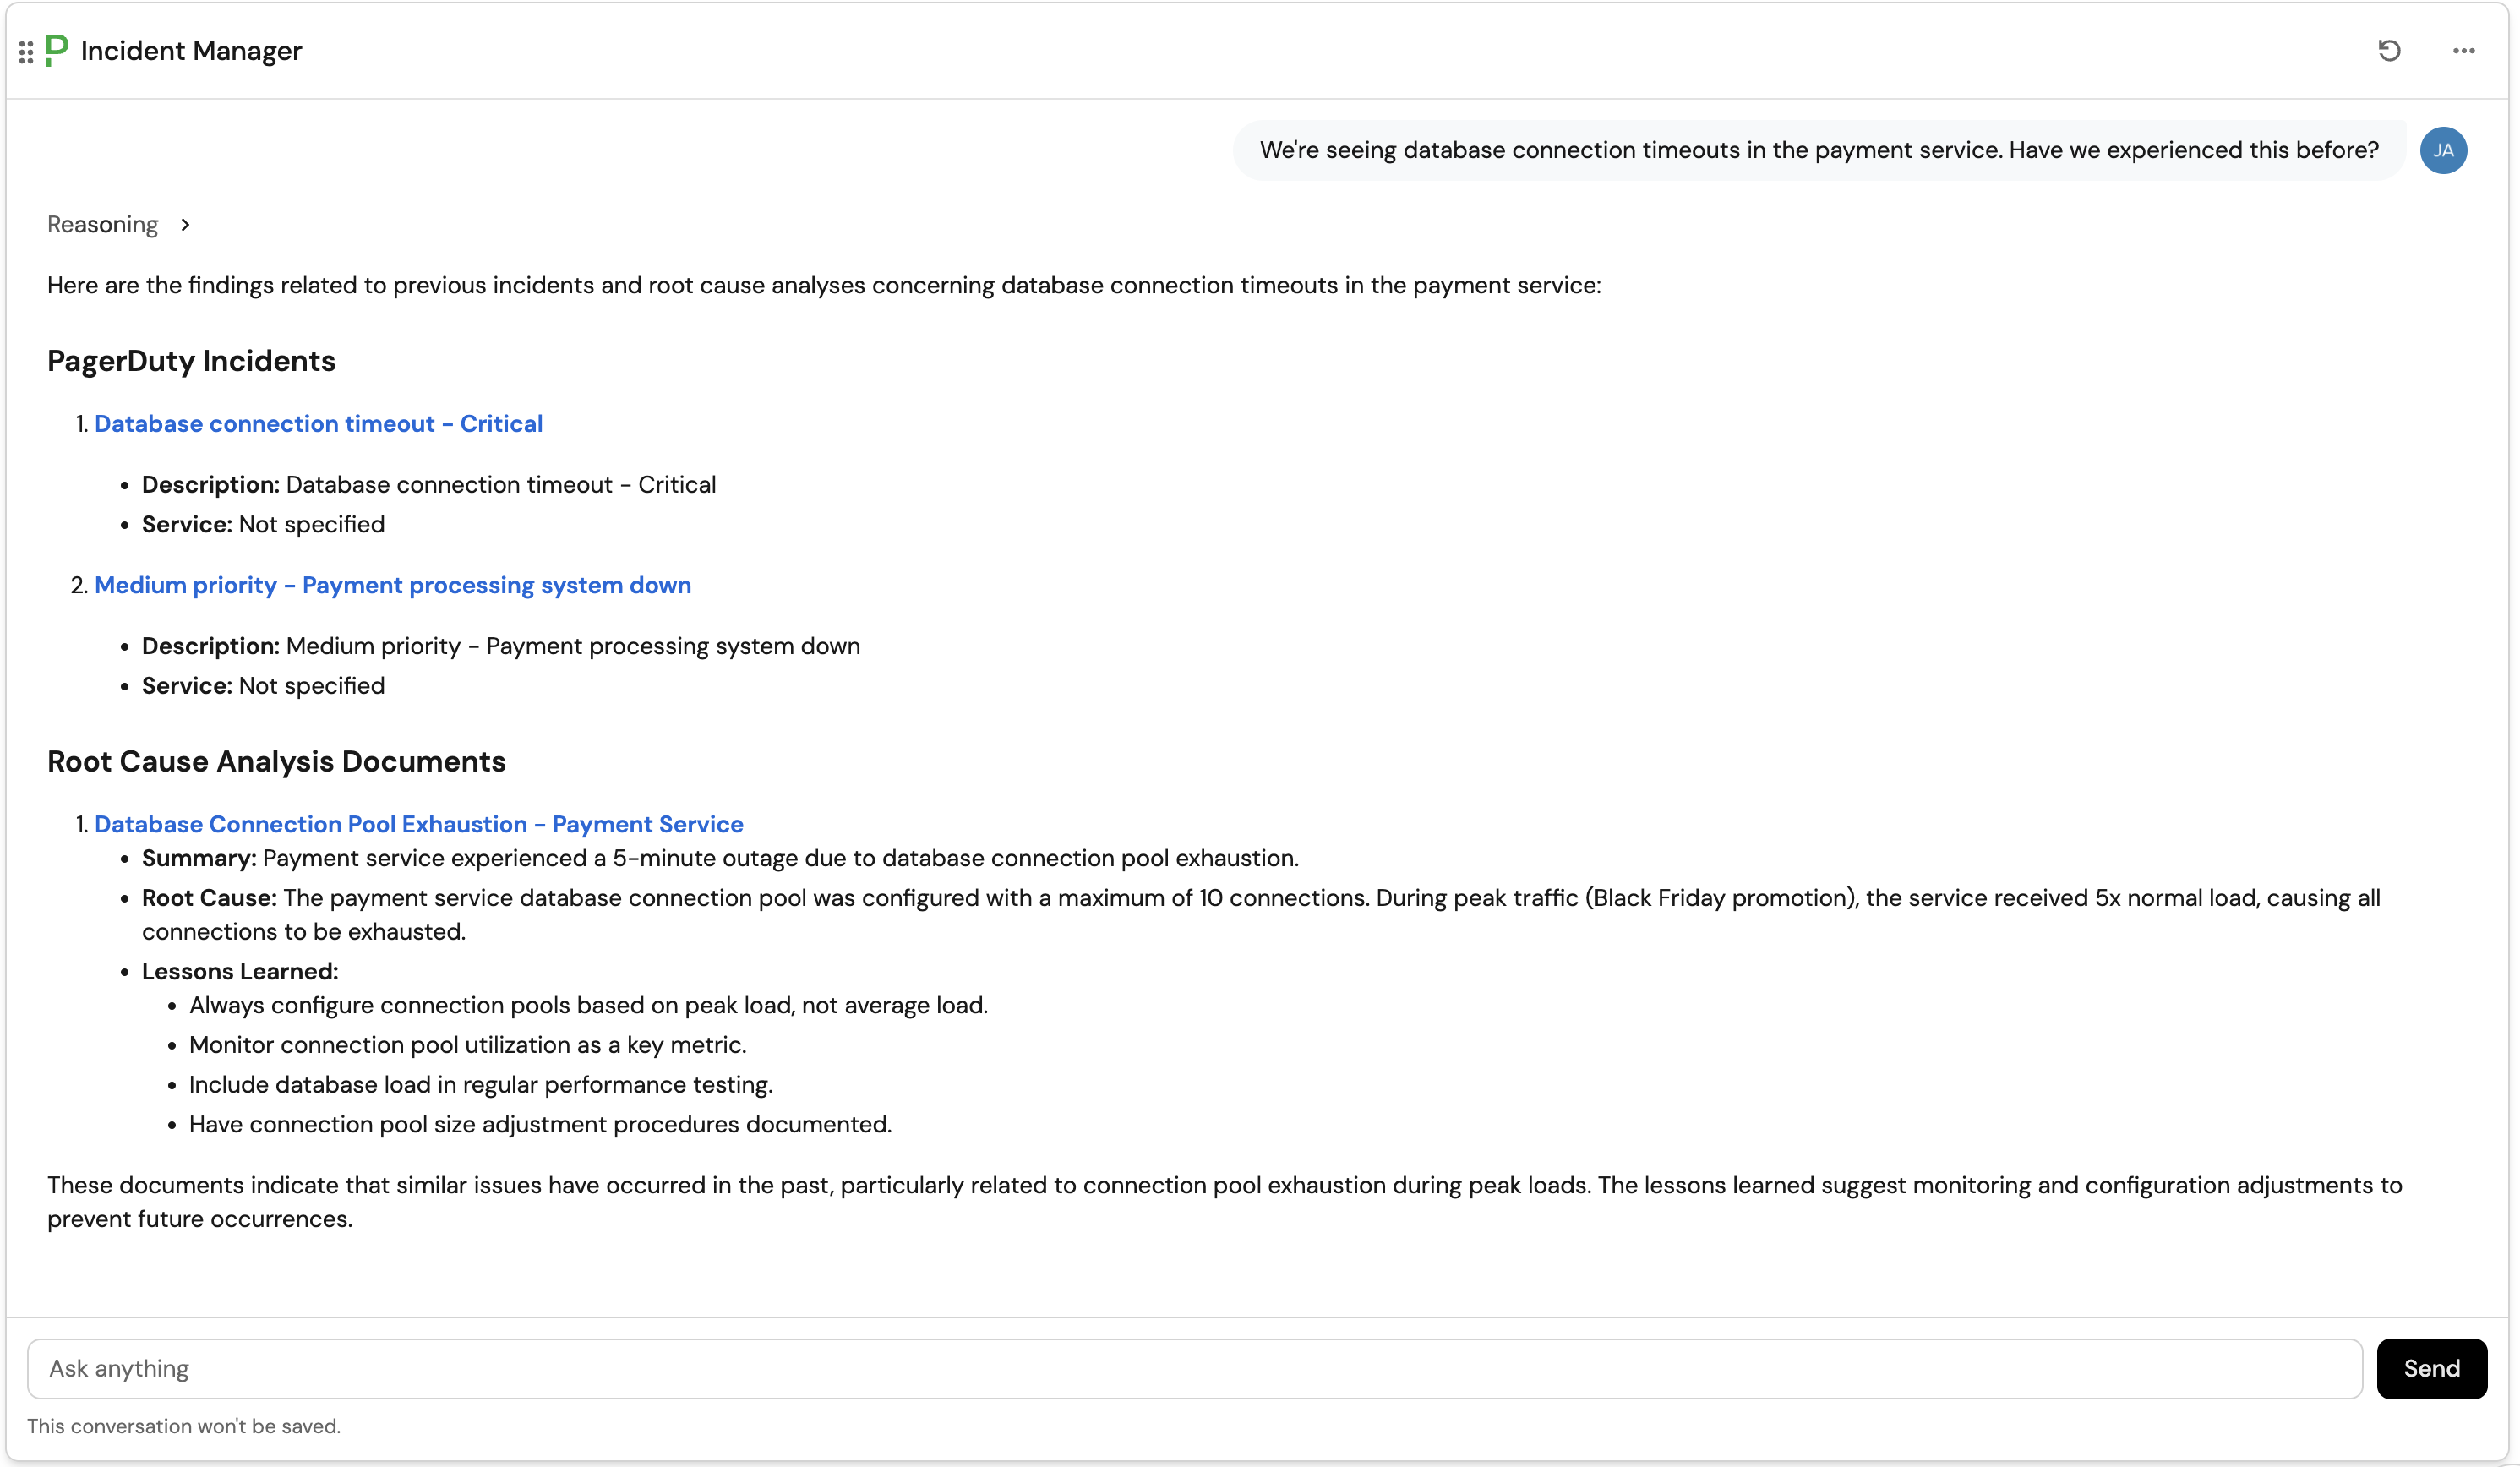
Question: "What lessons have we learned from past payment service incidents?"
Expected response: The agent should search through RCA documents tagged with payment-related services and summarize key lessons learned.
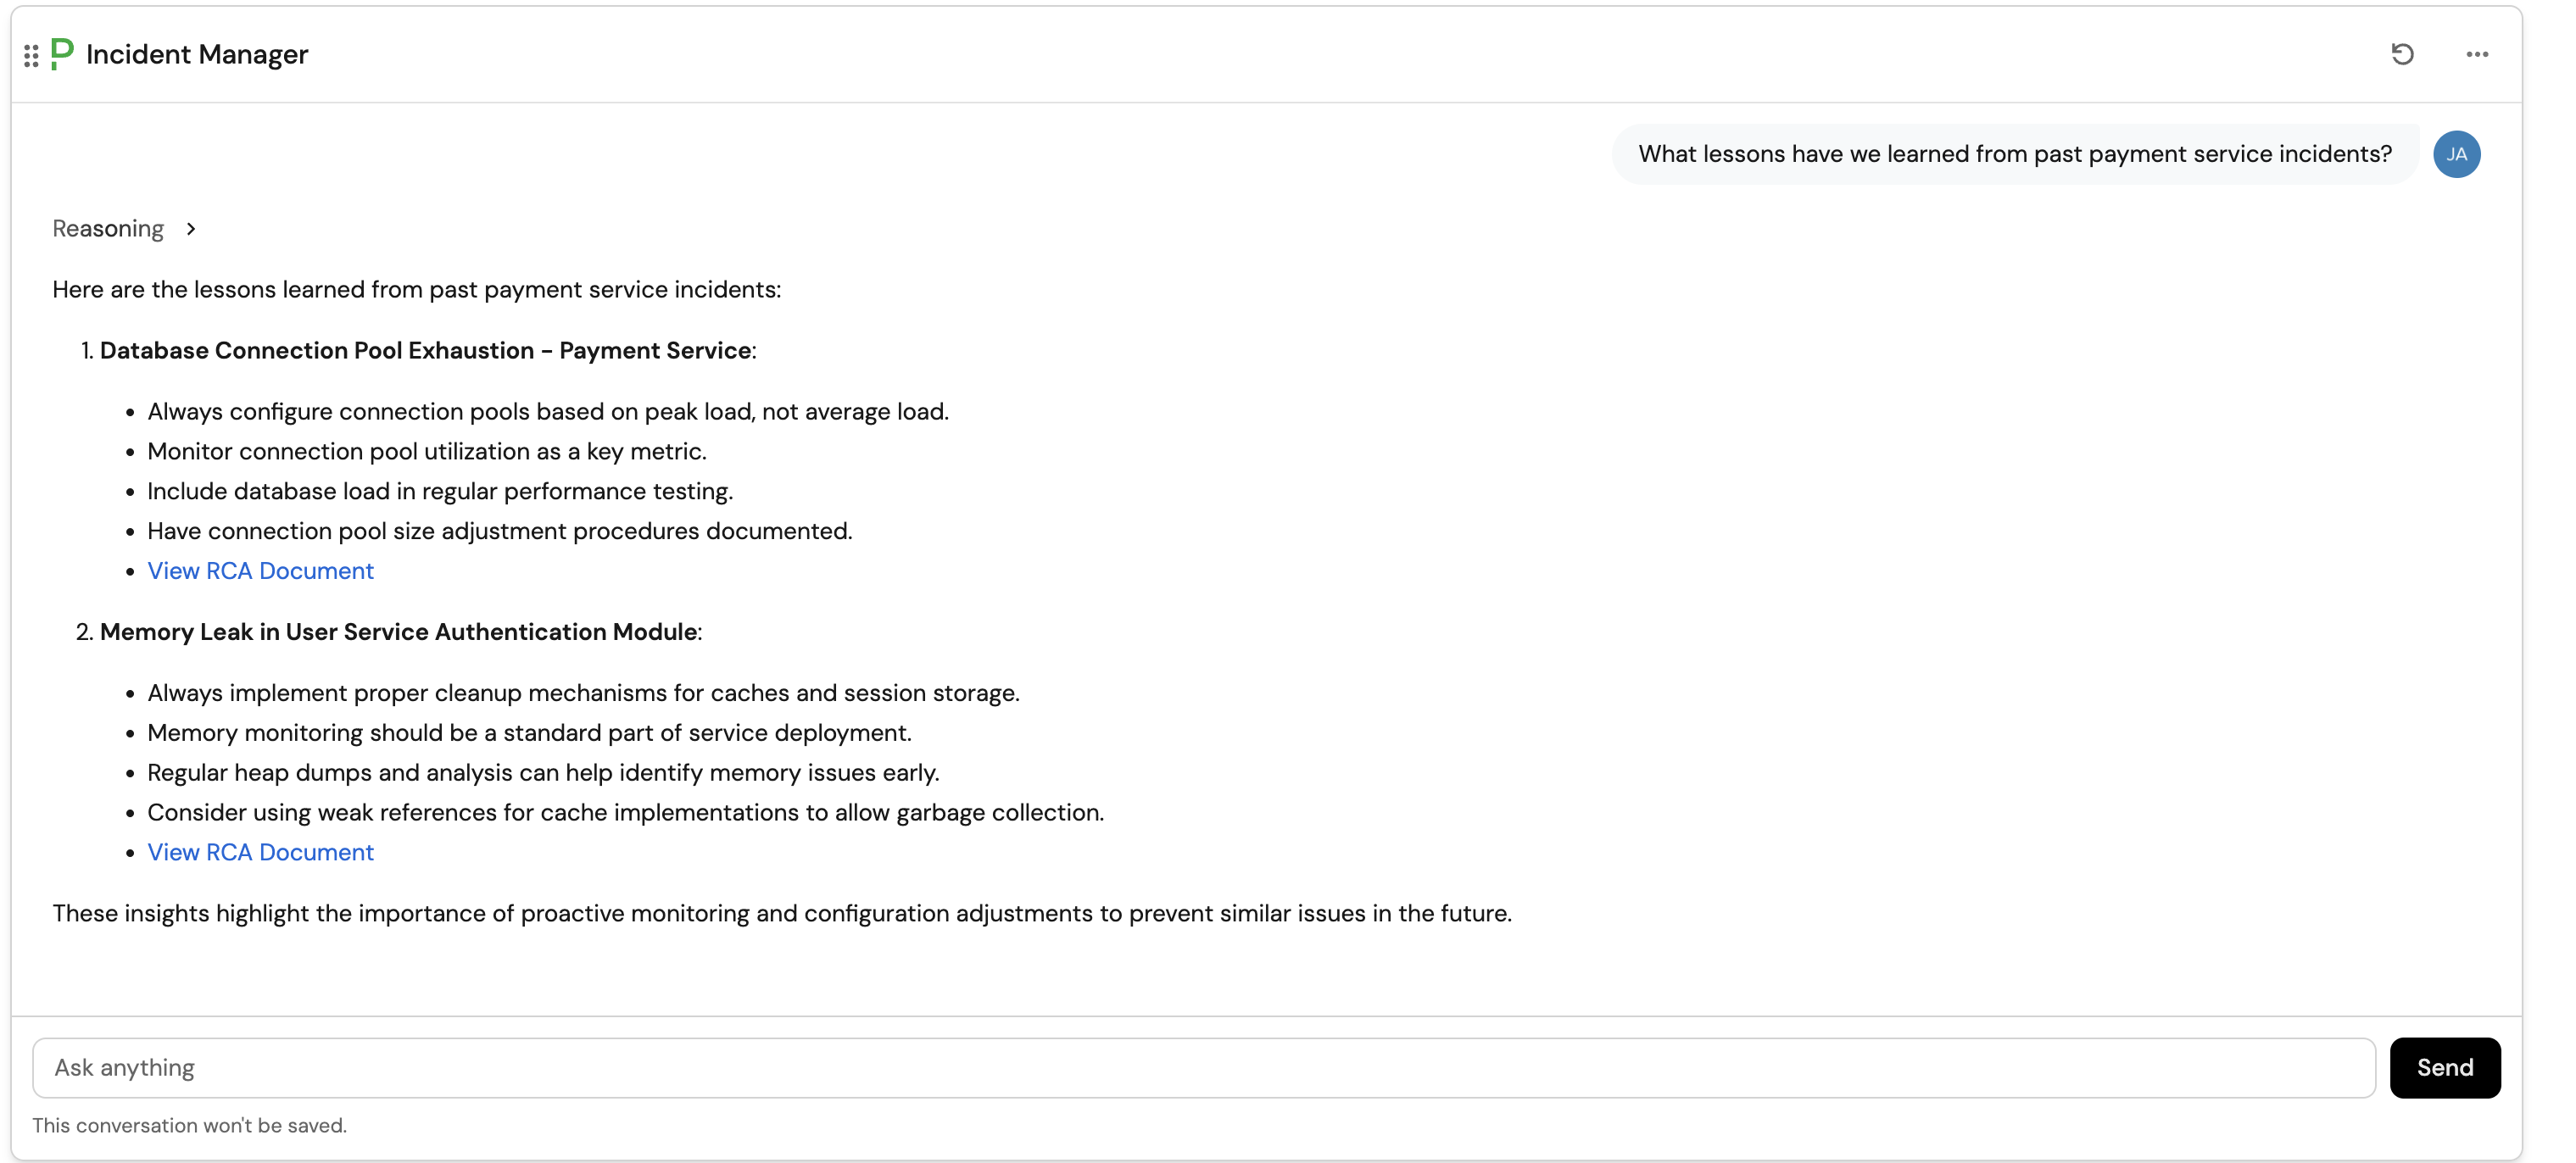
Question: "How should we prevent memory leaks in our services?"
Expected response: The agent should reference preventive measures from relevant RCA documents.
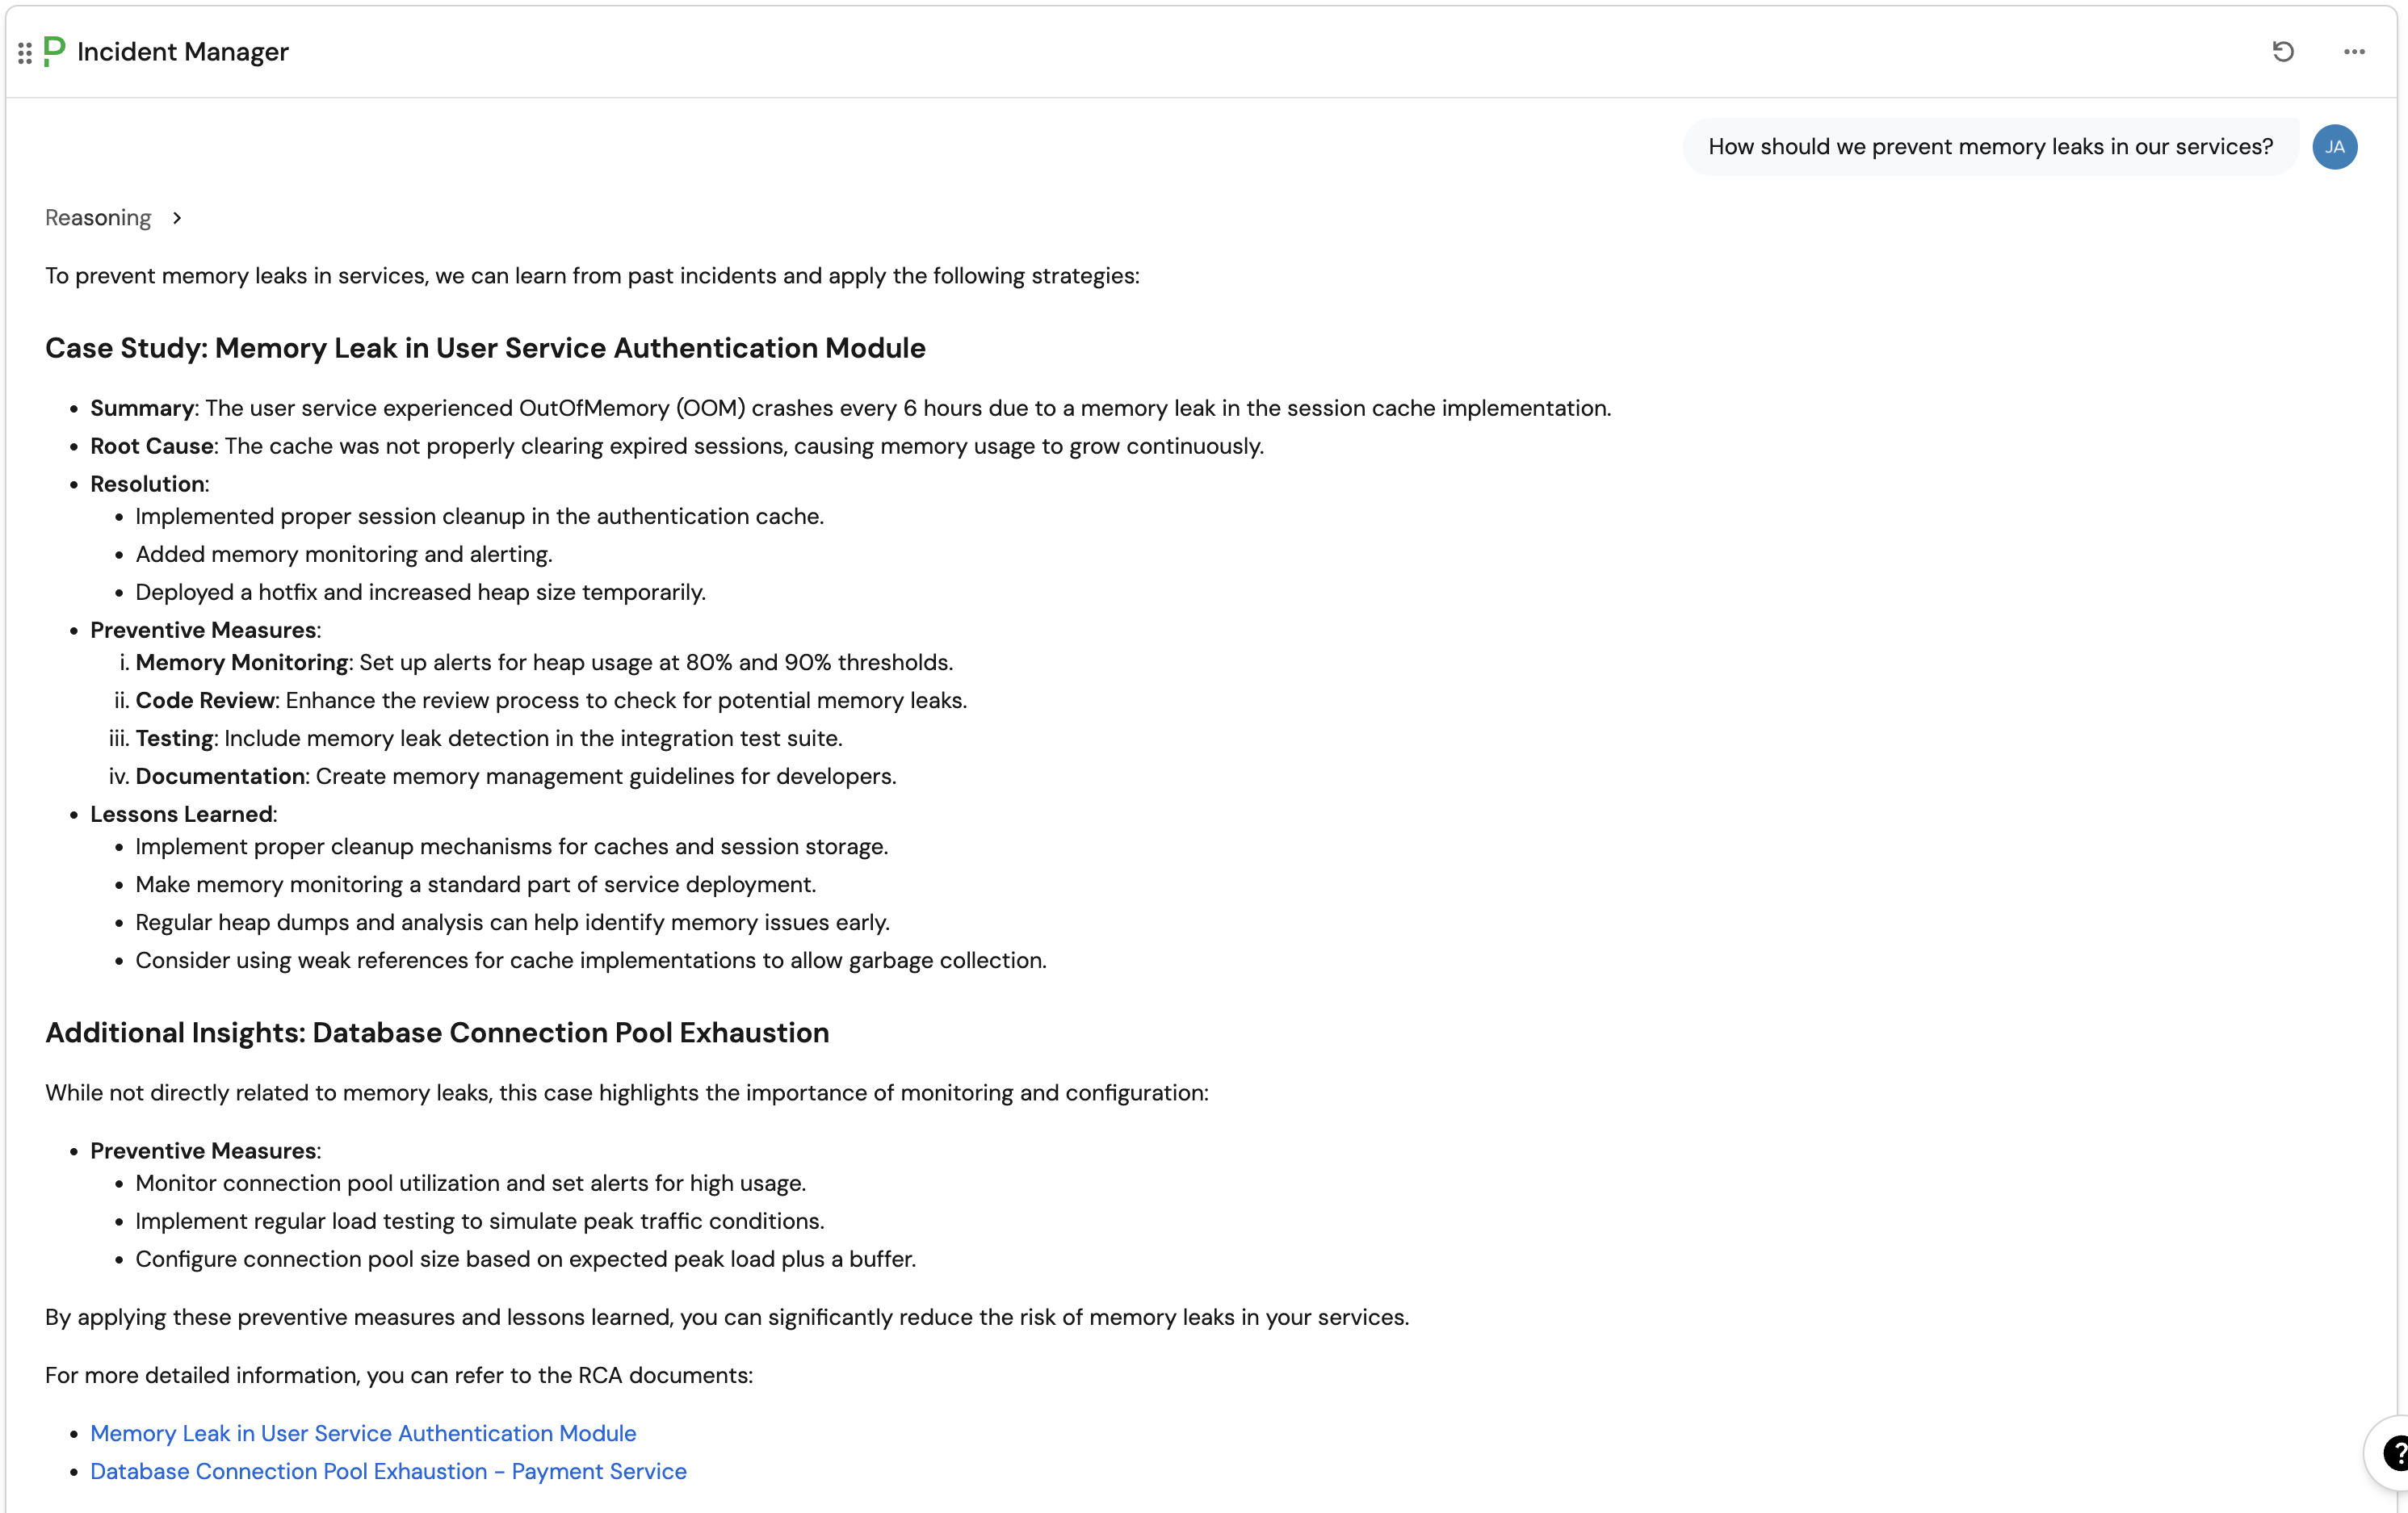
Review the RCA context setup
You have successfully enhanced your AI agent with custom context using entities! Your Incident Manager agent now has access to historical incident knowledge, making it significantly more valuable for both current incident response and prevention of future issues.
The approach we've demonstrated here can be extended to other types of documentation:
- Runbooks: Create a "Runbook" blueprint with markdown procedures.
- Architecture docs: Store system architecture information.
- Process documentation: Include incident response procedures.
- Best practices: Capture organizational standards and guidelines.
Extend the same context pattern
Beyond incident management, you can use the same approach to enhance your AI agents with various types of organizational knowledge:
Documentation agent
Create a "Documentation" blueprint to store:
- API documentation: Store OpenAPI specs, endpoint descriptions, and usage examples.
- Onboarding guides: New team member checklists and getting-started resources.
- Technical standards: Coding standards, architectural patterns, and best practices.
"Where can I find the API documentation for the user authentication service?"
Deployment agent
Create a "Deployment Guide" blueprint to store:
- Environment-specific configs: Production, staging, and development deployment procedures.
- Release notes: Feature descriptions, breaking changes, and migration guides.
- Rollback procedures: Step-by-step recovery instructions for different scenarios.
"What's the rollback procedure for the payment service in production?"
Security agent
Create a "Security Policy" blueprint to store:
- Compliance requirements: SOC2, GDPR, and other regulatory guidelines.
- Security reviews: Vulnerability assessments and remediation procedures.
- Access control policies: Permission matrices and approval workflows.
"What are the security requirements for handling customer data?"
Knowledge base agent
Create a "FAQ" or "Knowledge Article" blueprint to store:
- Common issues: Frequently asked questions and their solutions.
- Troubleshooting guides: Step-by-step diagnostic procedures.
- Team knowledge: Tribal knowledge, tips, and tricks from experienced team members.
"How do I debug slow database queries in our application?"
Begin with one additional use case that addresses your team's most common questions, then gradually expand to cover more areas as you see value from the AI agent interactions.
Expand the RCA knowledge base
Here are some ways to expand and improve your setup:
- Automate RCA creation: Set up automations to create RCA entities from incident post-mortems.
- Cross-reference data: Link RCAs to services, teams, and other relevant entities using relations.
- Monitor agent usage: Review AI invocation logs to see how effectively the agent uses RCA context.
- Add more context types: Create additional blueprints for different types of organizational knowledge.
- Regular maintenance: Periodically review and update RCA documents as processes evolve.