Auto-generate GitHub workflow documentation
Send this guide to your coding agent.
Prerequisite: Install Port MCP
Open plan mode. Implement this Port guide in my org via MCP:

https://docs.port.io/guides/all/ai-powered-github-workflow-documentation

Goal: get the guide's core flow working end-to-end in my org; adapting it to fit my existing setup takes priority over matching the guide 1:1.

Plan:
1. Confirm MCP is connected, in the right org, with sufficient permissions.
2. Diff the guide's data model (blueprints, properties, relations, actions, agents, automations, integrations, secrets) against mine.
3. Propose adaptations for gaps, reusing existing blueprints/relations over guide-named duplicates.
4. Flag what needs a UI click, credential, or secret from me, testing MCP capability empirically before ruling anything out.
5. Stop on any blocker and give me options. Approving this plan authorizes the writes it lists; pause only for writes beyond what's listed.

Build:
- Extend blueprint schema additively when upserting; don't remove or overwrite existing properties, and treat type conflicts as a blocker, not an auto-fix.
- List any mock data in the plan, minimal and labeled mock; once approved, seed it without re-asking, and tell me what you seeded.
- For anything the guide writes downstream (e.g. a webhook target), use a real entity, not a mock.
- For pages/widgets, use the real page identifier from the app URL, not a guessed slug.
- When you hit a UI step confirmed (not assumed) unsupported via MCP, pause, give exact clicks, then resume via MCP.
- Validate and give links after each meaningful step (only a tool-returned URL, no guessed paths); don't proceed if the last run wasn't a success.

Done:
- Confirm the guide's expected output exists and runs in Port.
- Summarize adaptations, seeded data, what was mocked or skipped, remaining UI steps, and how to verify.
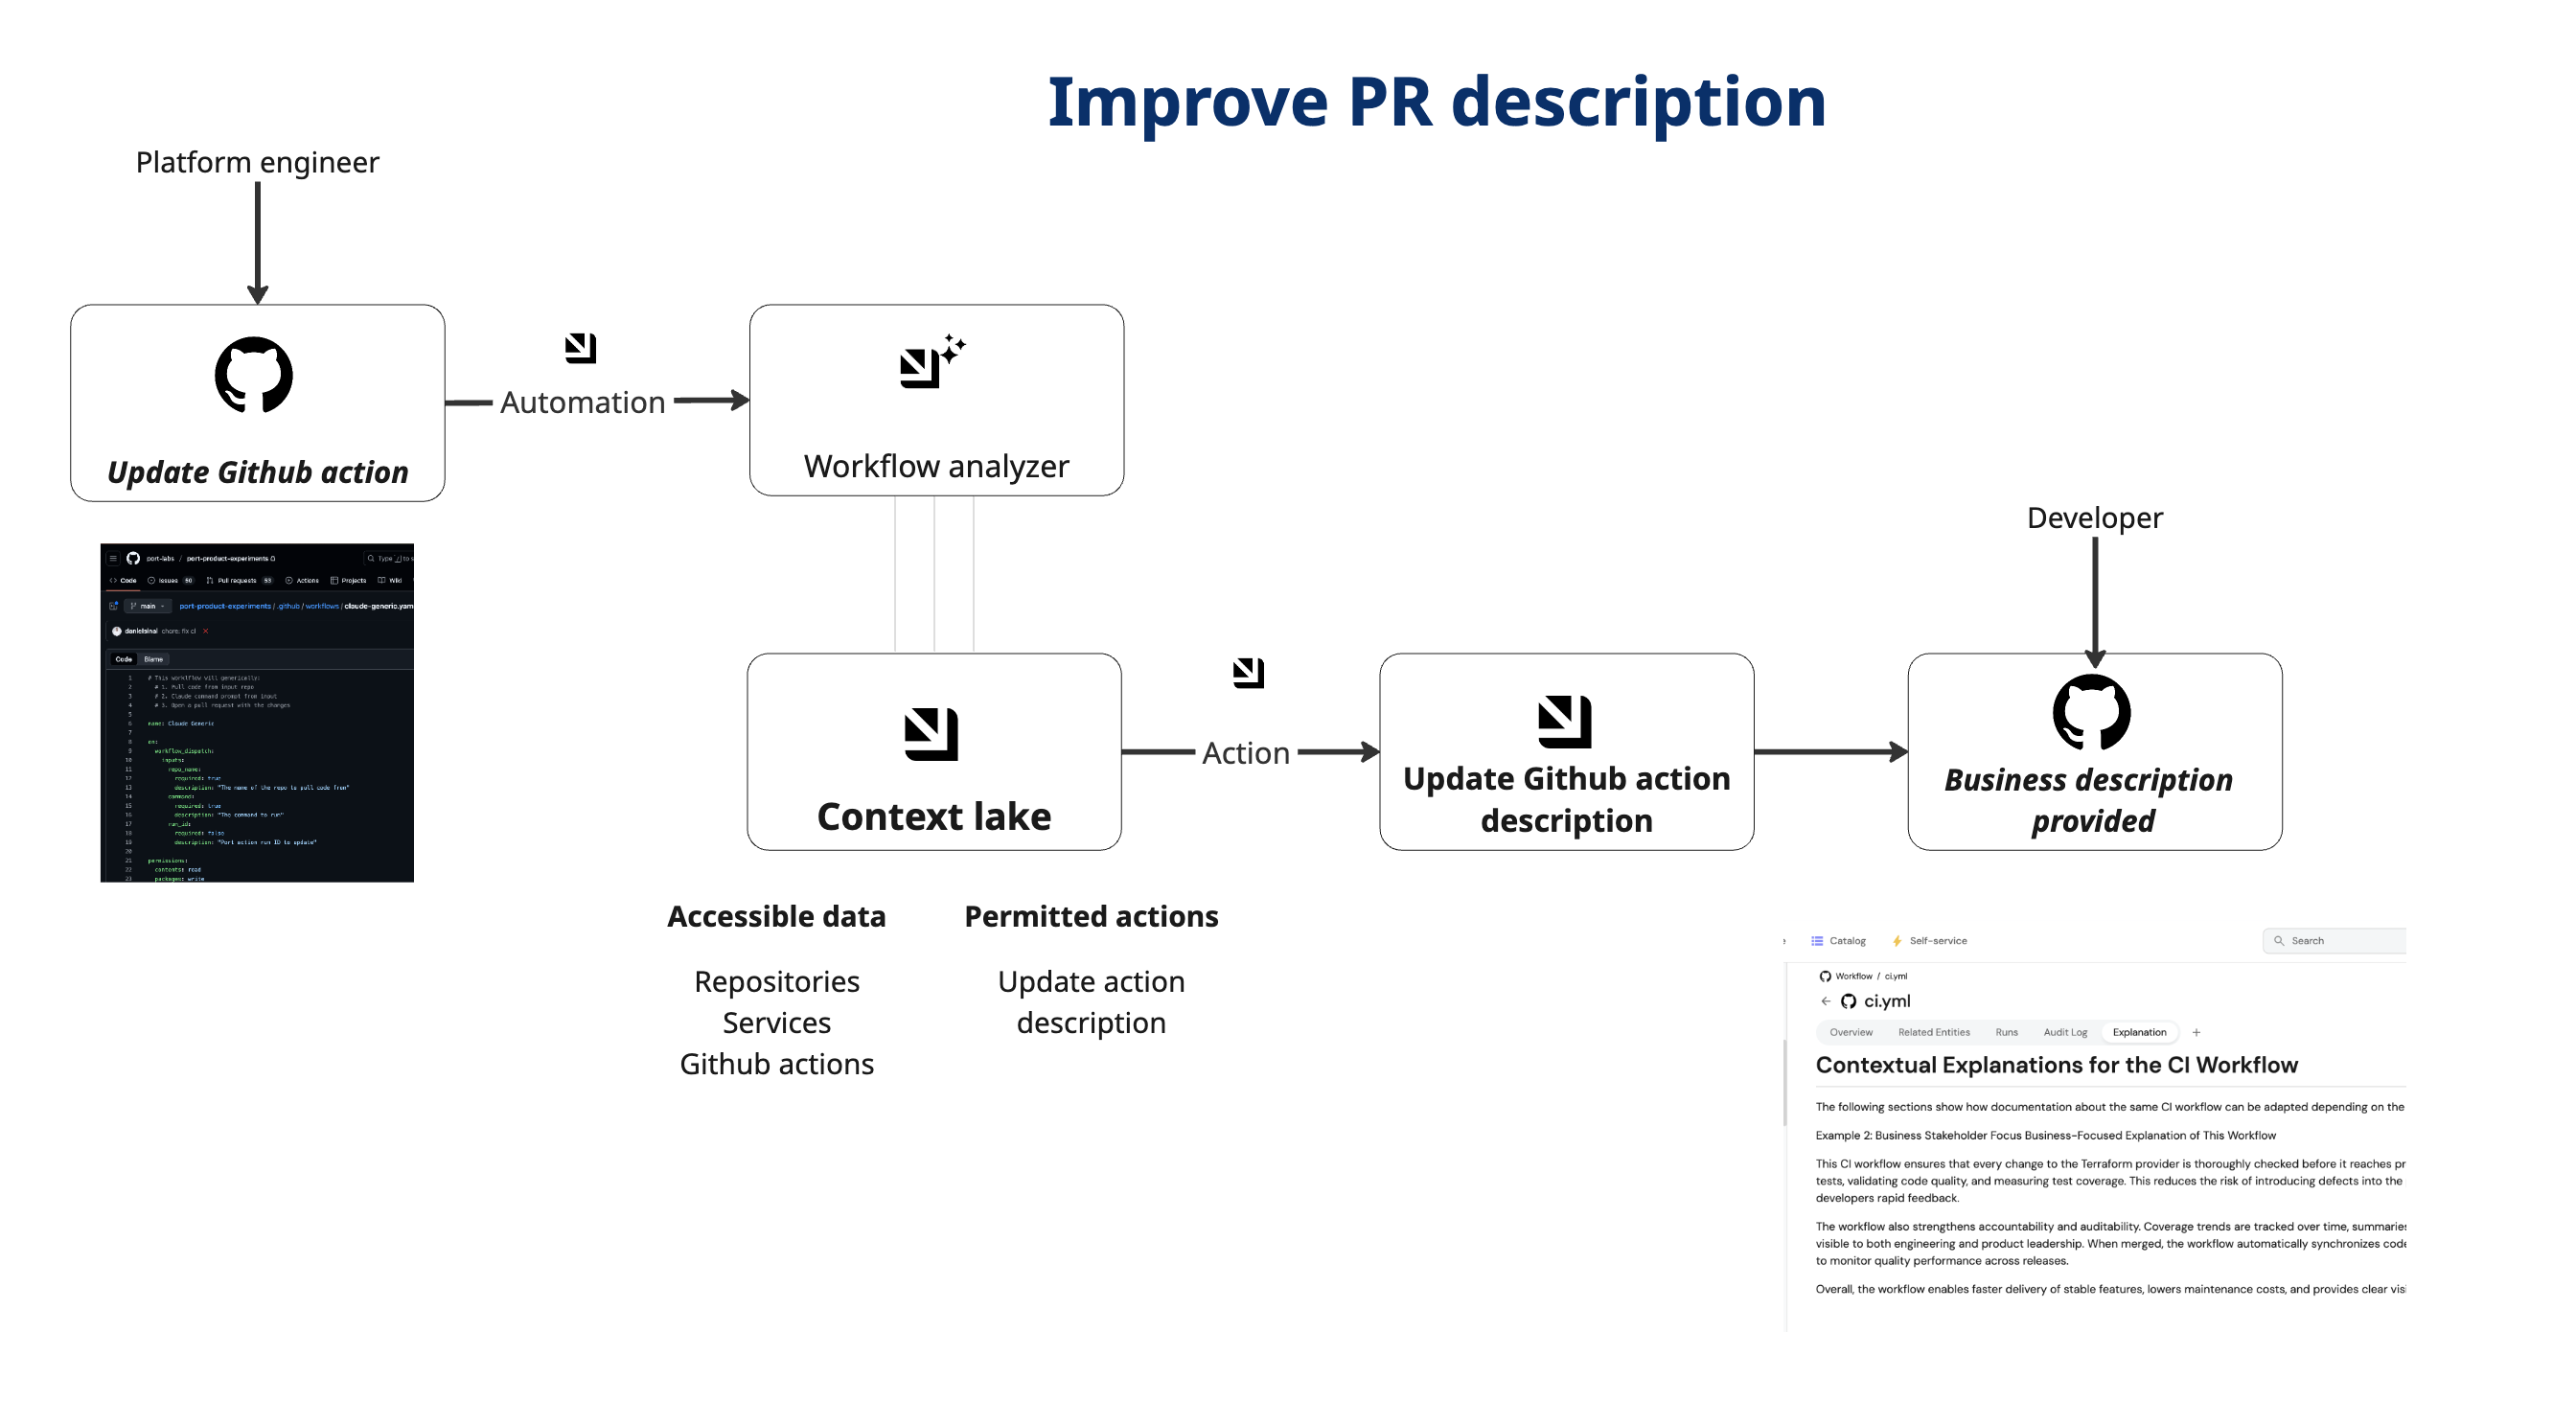
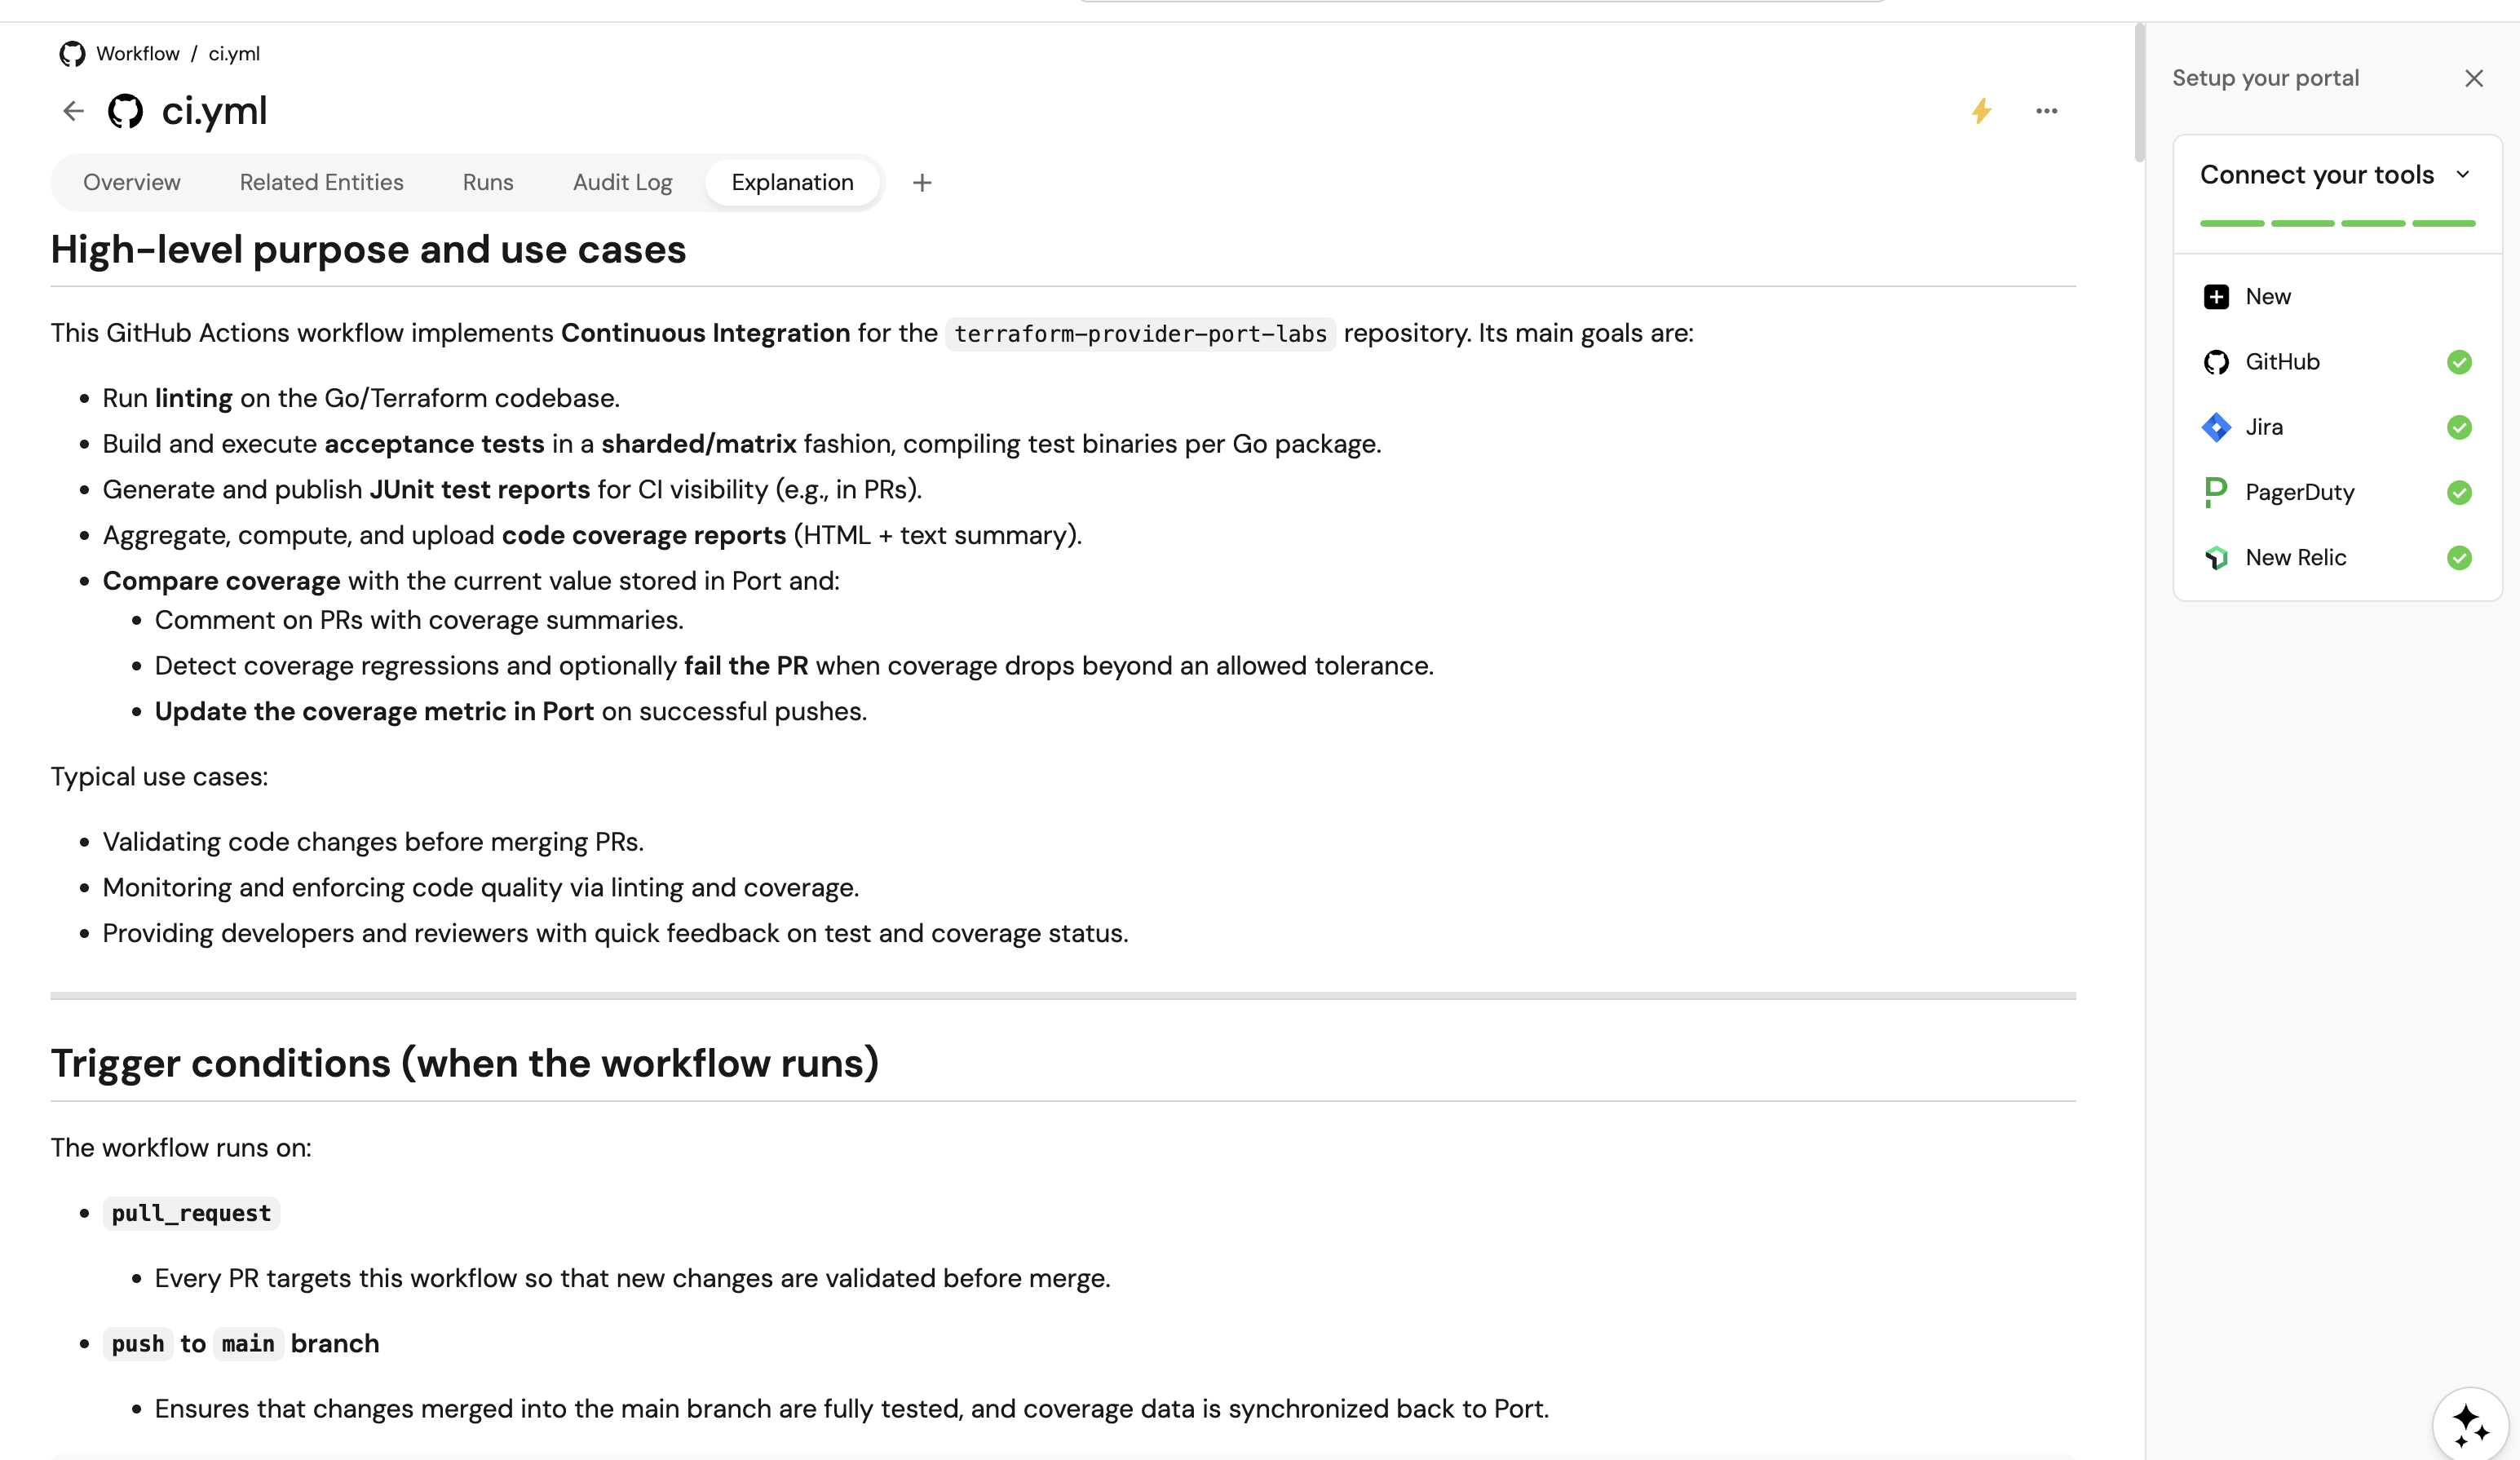
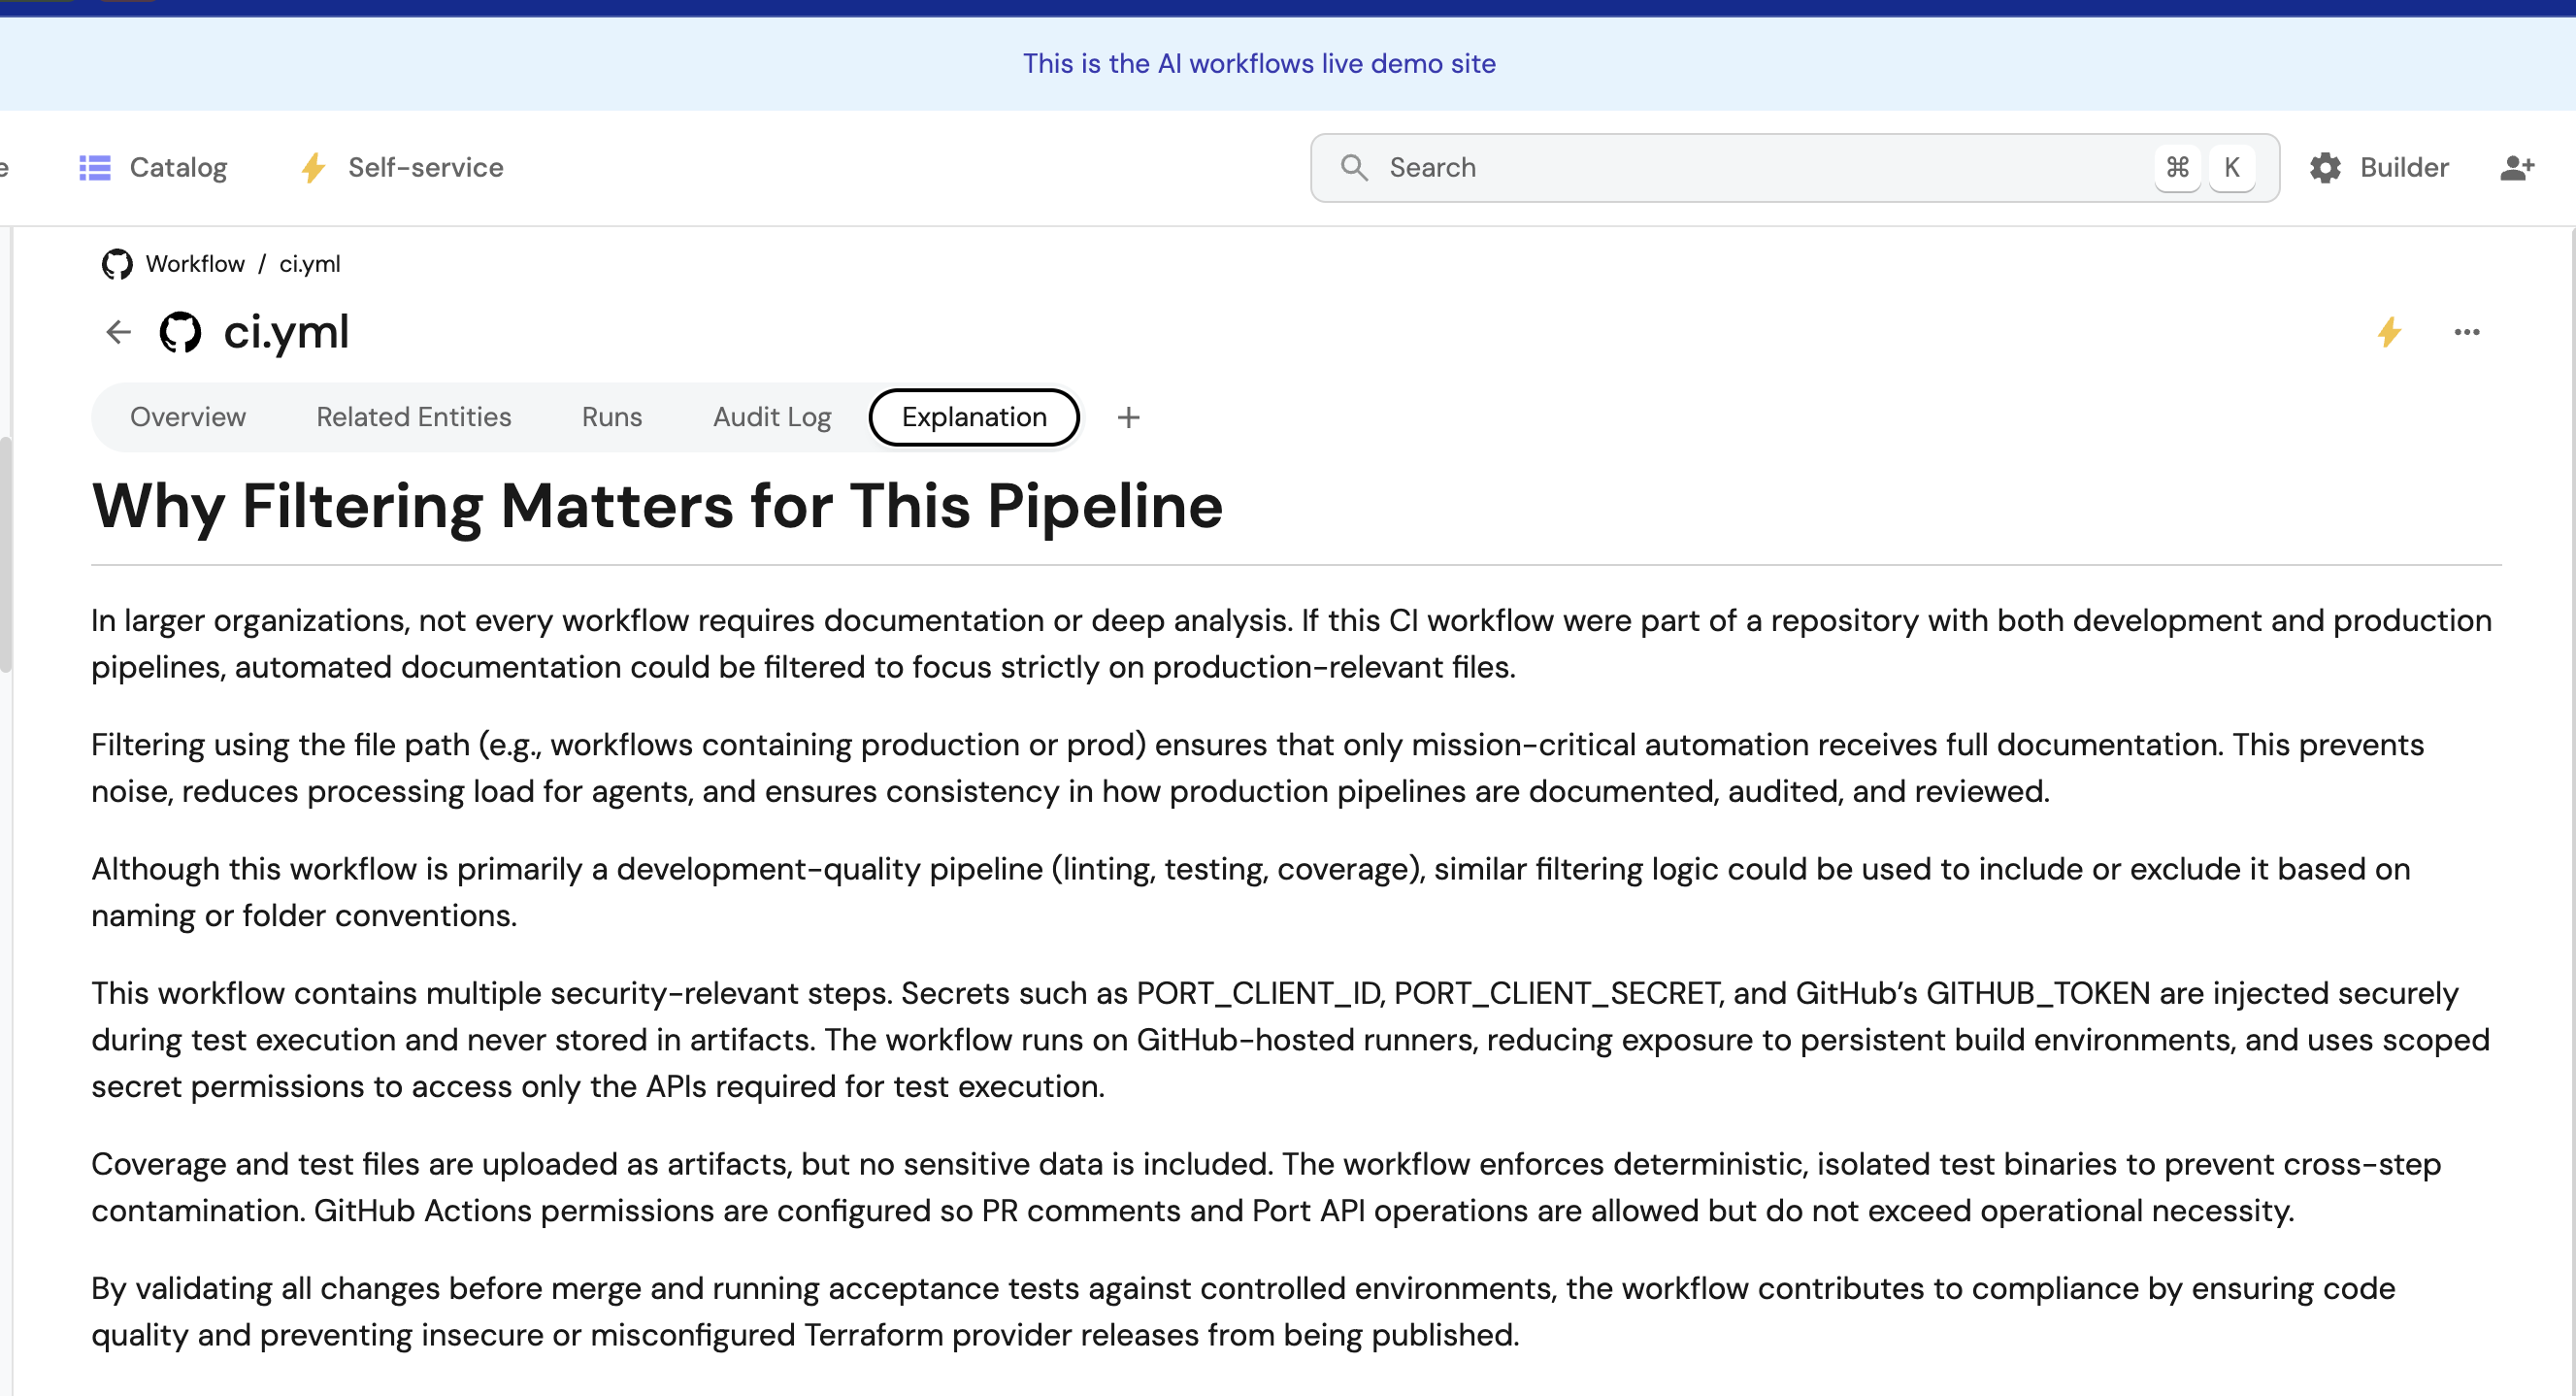
This guide demonstrates how to automatically generate and maintain clear, developer-friendly documentation for GitHub Actions workflows using Port's AI agents and automation system. When workflows are ingested or updated in Port, an AI agent analyzes the YAML configuration and generates markdown documentation explaining what the workflow does and how developers can use it.
Common use cases
This solution addresses several key challenges:
- Self-Maintaining Documentation - Documentation stays in sync with workflow changes automatically.
- Consistent Quality - Every workflow gets comprehensive, standardized documentation.
- Developer Experience - Clear explanations reduce confusion and support requests.
Prerequisites
This guide assumes you have:
- GitHub Ocean integration installed and configured.
Set up data model
Update GitHub Workflow blueprint
The githubWorkflow blueprint stores workflow metadata and AI-generated documentation. We need to add two properties to store the workflow YAML content and the AI-generated explanation.
-
Go to the Builder page of your portal.
-
Find and open the
githubWorkflowblueprint. -
Click on the
{...} Edit JSONbutton. -
Add the following properties to the
schema.propertiessection:Properties to add (Click to expand)
{"yamlContent": {"title": "YAML Content","type": "string","description": "The full YAML content of the workflow file"},"explanation": {"title": "Explanation","type": "string","format": "markdown","description": "AI-generated human-readable explanation of what the workflow does, when it runs, and how to use it"}} -
Click
Saveto update the blueprint.
Configure GitHub integration mapping
The GitHub integration needs to be configured to fetch workflow file contents and map them to the yamlContent property. The workflow kind doesn't provide file content directly, so we'll use the file kind to fetch the actual YAML files.
-
Go to Data Sources in Port.
-
Find your GitHub integration and click on it.
-
Go to the Mapping tab.
-
Add the following YAML configuration to fetch workflow file contents:
Workflow file mapping configuration (Click to expand)
resources:# Keep your existing workflow mapping for metadata (status, dates, etc.)- kind: workflowselector:query: "true"port:entity:mappings:identifier: ".__repository + \"/\" + .path"title: ".name"blueprint: '"githubWorkflow"'properties:path: ".path"status: ".state"createdAt: ".created_at"updatedAt: ".updated_at"link: ".html_url"relations:repository: ".__repository"# File mapping - to add the yamlContent- kind: fileselector:query: "true"files:- path: ".github/workflows/*.yml"- path: ".github/workflows/*.yaml"skipParsing: trueport:entity:mappings:identifier: ".__repository + \"/\" + .path"title: ".name"blueprint: '"githubWorkflow"'properties:path: ".path"yamlContent: .content | tostringrelations:repository: ".__repository" -
Click
Save & Resyncto save the mapping and trigger a sync.
Create workflow explanation update action
Before setting up the AI agent, we need to create a self-service action that the agent can invoke to update the workflow explanation property.
-
Go to Self-Service.
-
Click
+ New Action. -
Click
{...} Edit JSON. -
Copy and paste the following configuration:
Update Workflow Explanation action (Click to expand)
{"identifier": "update_workflow_explanation","title": "Update Workflow Explanation","icon": "Github","description": "Update the explanation property of a GitHub workflow entity","trigger": {"type": "self-service","blueprintIdentifier": "githubWorkflow","userInputs": {"properties": {"explanation": {"title": "Explanation","type": "string","format": "markdown","description": "The markdown documentation for this workflow"}},"required": ["explanation"]},"operation": "DAY-2"},"invocationMethod": {"type": "UPSERT_ENTITY","blueprintIdentifier": "githubWorkflow","mapping": {"identifier": "{{ .entity.identifier }}","properties": {"explanation": "{{ .inputs.explanation }}"}}},"requiredApproval": false} -
Click
Saveto create the action.
Create AI agent for documentation
Create an AI agent that analyzes workflow YAML and generates comprehensive documentation.
-
Go to AI Agents.
-
Click
+ AI Agent. -
Click
{...} Edit JSON. -
Copy and paste the following configuration:
Workflow Documentation AI Agent (Click to expand)
{"identifier": "workflow_documentation_agent","title": "Workflow Documentation Agent","icon": "AI","properties": {"description": "AI agent that automatically generates human-readable documentation for GitHub Actions workflows by analyzing YAML configurations","status": "active","prompt": "You are a GitHub Actions workflow documentation agent. Analyze workflow YAML files and generate clear markdown documentation.\n\n**Your Task**: Generate developer-friendly documentation covering:\n\n## 1. Overview\nBrief summary (2-3 sentences) of what the workflow does and its purpose.\n\n## 2. Triggers\n- When the workflow runs (push, PR, schedule, manual)\n- Branch and path filters\n- How to trigger manually (if applicable)\n\n## 3. Jobs & Steps\nFor each job, explain:\n- Job purpose and runner environment\n- Key steps and what they do\n- Dependencies between steps\n\n## 4. Configuration Requirements\n- **Secrets**: List required secrets and their purpose\n- **Permissions**: GitHub permissions needed\n- **Inputs**: Required workflow inputs (if any)\n\n## 5. Outputs\n- What the workflow produces (artifacts, deployments)\n- Where to find results\n\n## 6. Usage\nHow developers can:\n- Use this workflow\n- Set up required secrets\n- Trigger and monitor runs\n\n**Guidelines**:\n- Write clearly for all developer skill levels\n- Explain security considerations (secrets, permissions)\n- Use markdown formatting (headers, lists, code blocks)\n- Keep it concise but comprehensive\n\n**Action**: Invoke the 'update_workflow_explanation' action to update the workflow entity's explanation property with your generated markdown documentation.","execution_mode": "Automatic","tools": ["^(list|search|track|describe)_.*","run_update_workflow_explanation"]},"relations": {}} -
Click
Createto save the agent.
Trigger documentation generation
You can trigger documentation generation either manually or automatically:
- Manual (On-Demand)
- Automated (On Workflow Changes)
Create self-service action
Create a self-service action that developers can trigger to generate documentation on demand.
-
Go to Self-Service.
-
Click
+ New Action. -
Click
{...} Edit JSON. -
Copy and paste the following configuration:
Generate Workflow Documentation action (Click to expand)
{"identifier": "generate_workflow_documentation","title": "Generate Workflow Documentation","icon": "Github","description": "Trigger the AI agent to analyze a GitHub Actions workflow and generate human-readable documentation","trigger": {"type": "self-service","blueprintIdentifier": "githubWorkflow","userInputs": {"properties": {},"required": []},"operation": "DAY-2"},"invocationMethod": {"type": "WEBHOOK","url": "https://api.port.io/v1/agent/workflow_documentation_agent/invoke","agent": false,"synchronized": true,"method": "POST","headers": {"RUN_ID": "{{ .run.id }}","Content-Type": "application/json"},"body": {"prompt": "Analyze the GitHub Actions workflow with identifier {{ .entity.identifier }} and generate comprehensive documentation. First, retrieve the workflow entity using list_entities with blueprint 'githubWorkflow' and identifiers ['{{ .entity.identifier }}']. Read the workflow's YAML content from the yamlContent property and metadata to create a detailed explanation and update the workflow entity's 'explanation' property with the generated content as a markdown string.","labels": {"source": "self_service_action","workflow_id": "{{ .entity.identifier }}"}}},"requiredApproval": false} -
Click
Saveto create the action.
Set up automation
Create automation to automatically generate documentation when workflows are created or updated.
-
Go to Automations.
-
Click
+ Automation. -
Click
{...} Edit JSON. -
Copy and paste the following configuration:
Auto-Generate Workflow Documentation automation (Click to expand)
{"identifier": "auto_generate_workflow_documentation","title": "Auto-Generate Workflow Documentation","description": "Automatically triggers AI agent to generate documentation when a GitHub Actions workflow is created or updated","trigger": {"type": "automation","event": {"type": "ANY_ENTITY_CHANGE","blueprintIdentifier": "githubWorkflow"},"condition": {"type": "JQ","expressions": [".event.diff.after.properties.yamlContent != null",".event.diff.after.properties.yamlContent != \"\"",".event.diff.before.properties.yamlContent != .event.diff.after.properties.yamlContent || .event.diff.before == null"],"combinator": "and"}},"invocationMethod": {"type": "WEBHOOK","url": "https://api.port.io/v1/agent/workflow_documentation_agent/invoke","agent": false,"synchronized": false,"method": "POST","headers": {"RUN_ID": "{{ .run.id }}","Content-Type": "application/json"},"body": {"labels": {"source": "auto_workflow_documentation","workflow_id": "{{ .event.diff.after.identifier }}","workflow_path": "{{ .event.diff.after.properties.path }}"}}},"publish": true} -
Click
Createto save the automation.
Customization examples
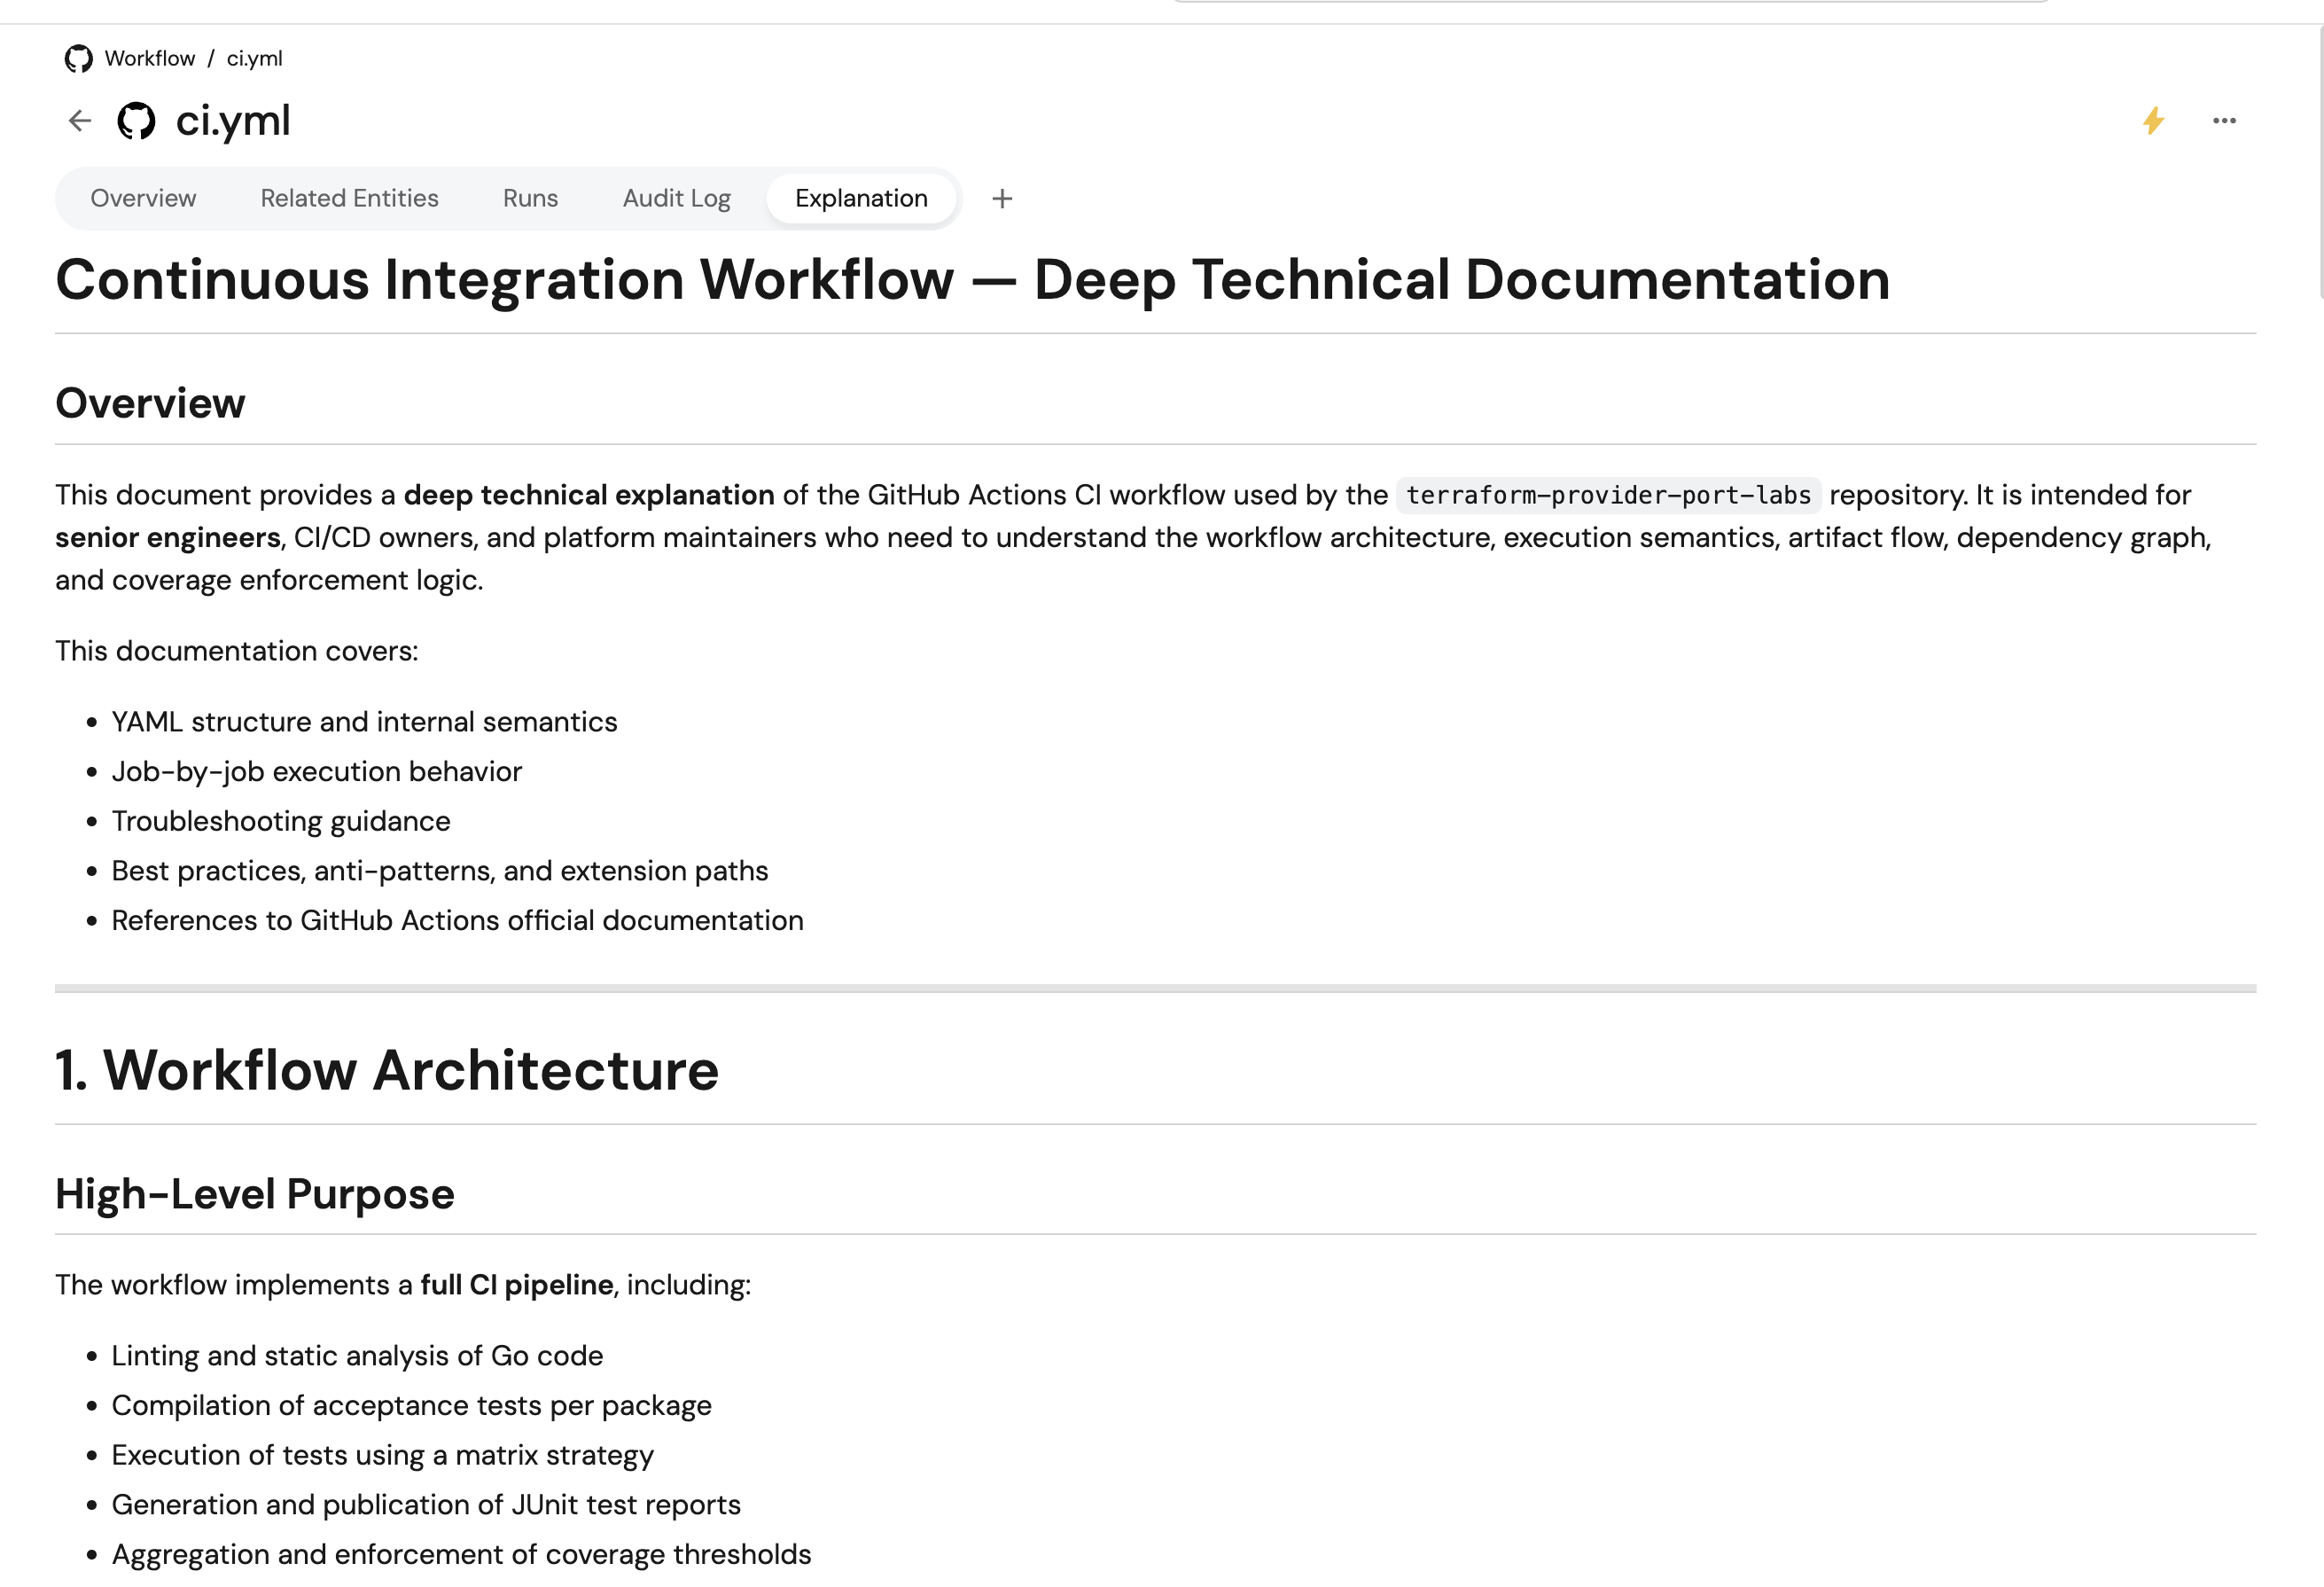
Example 1: Technical deep-dive style
Modify the AI agent prompt to generate more technical documentation:
{
  "prompt": "...\n\n### Documentation Style\nGenerate technical deep-dive documentation suitable for senior engineers:\n- Include implementation details\n- Explain YAML structure and syntax\n- Provide advanced troubleshooting\n- Reference GitHub Actions documentation\n\n..."
}
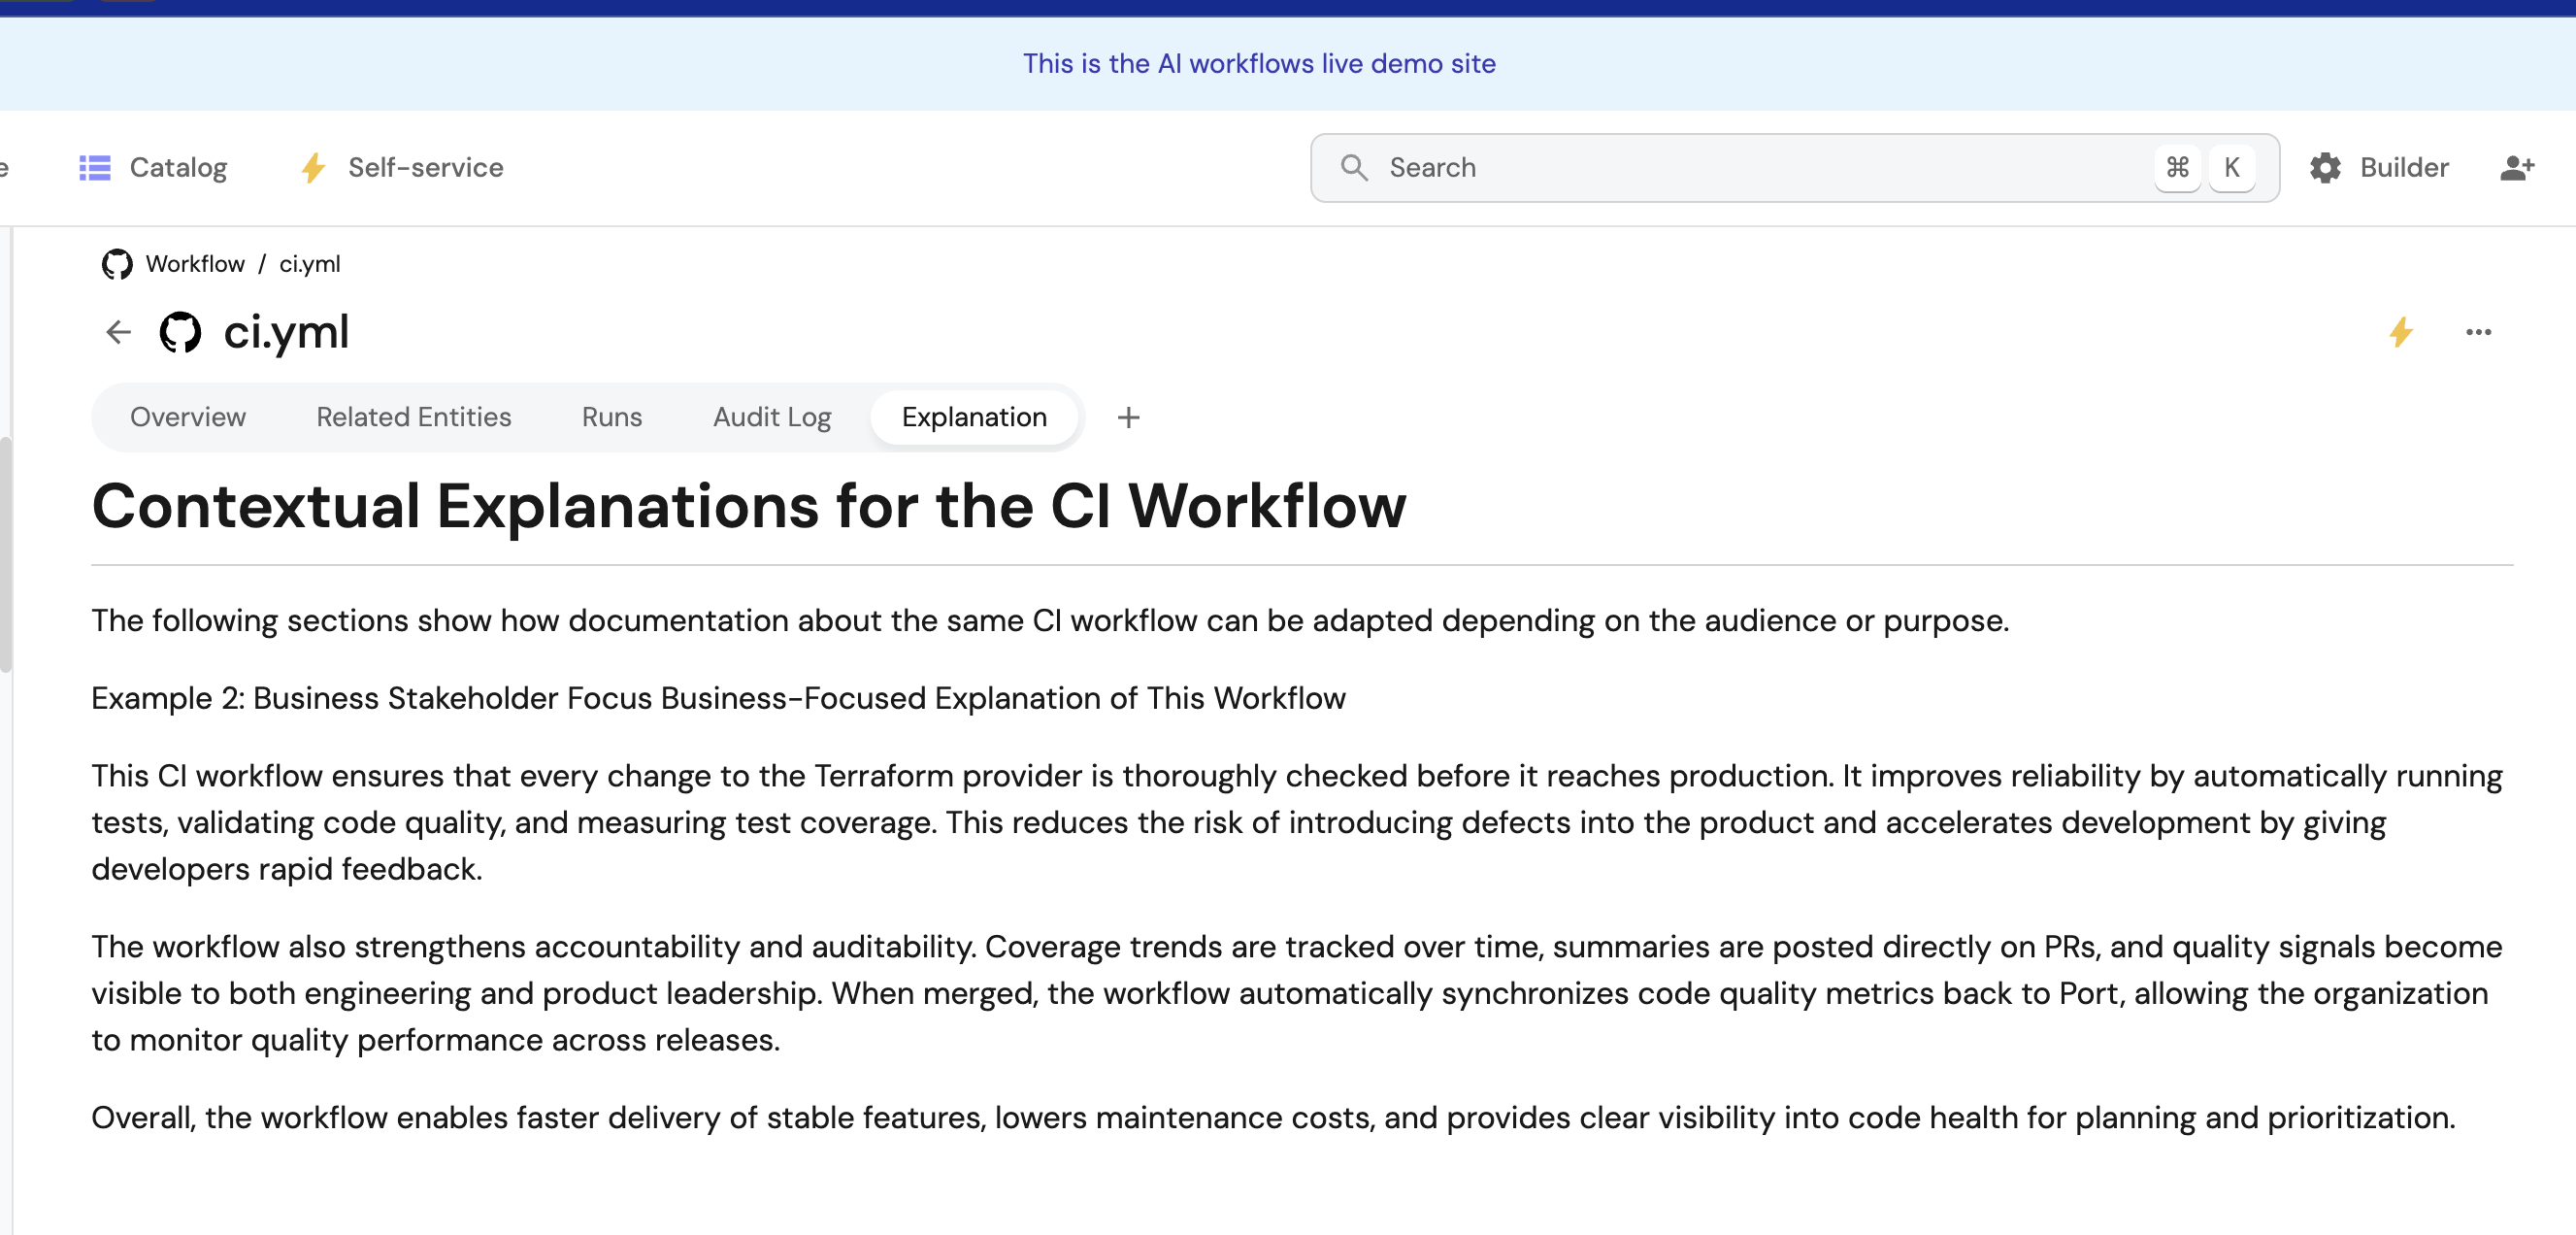
Example 2: Business stakeholder focus
Generate high-level, business-focused explanations:
{
  "prompt": "...\n\n### Documentation Style\nGenerate business-focused documentation:\n- Focus on outcomes and business value\n- Minimize technical jargon\n- Explain impact on development velocity\n- Highlight compliance and security benefits\n\n..."
}
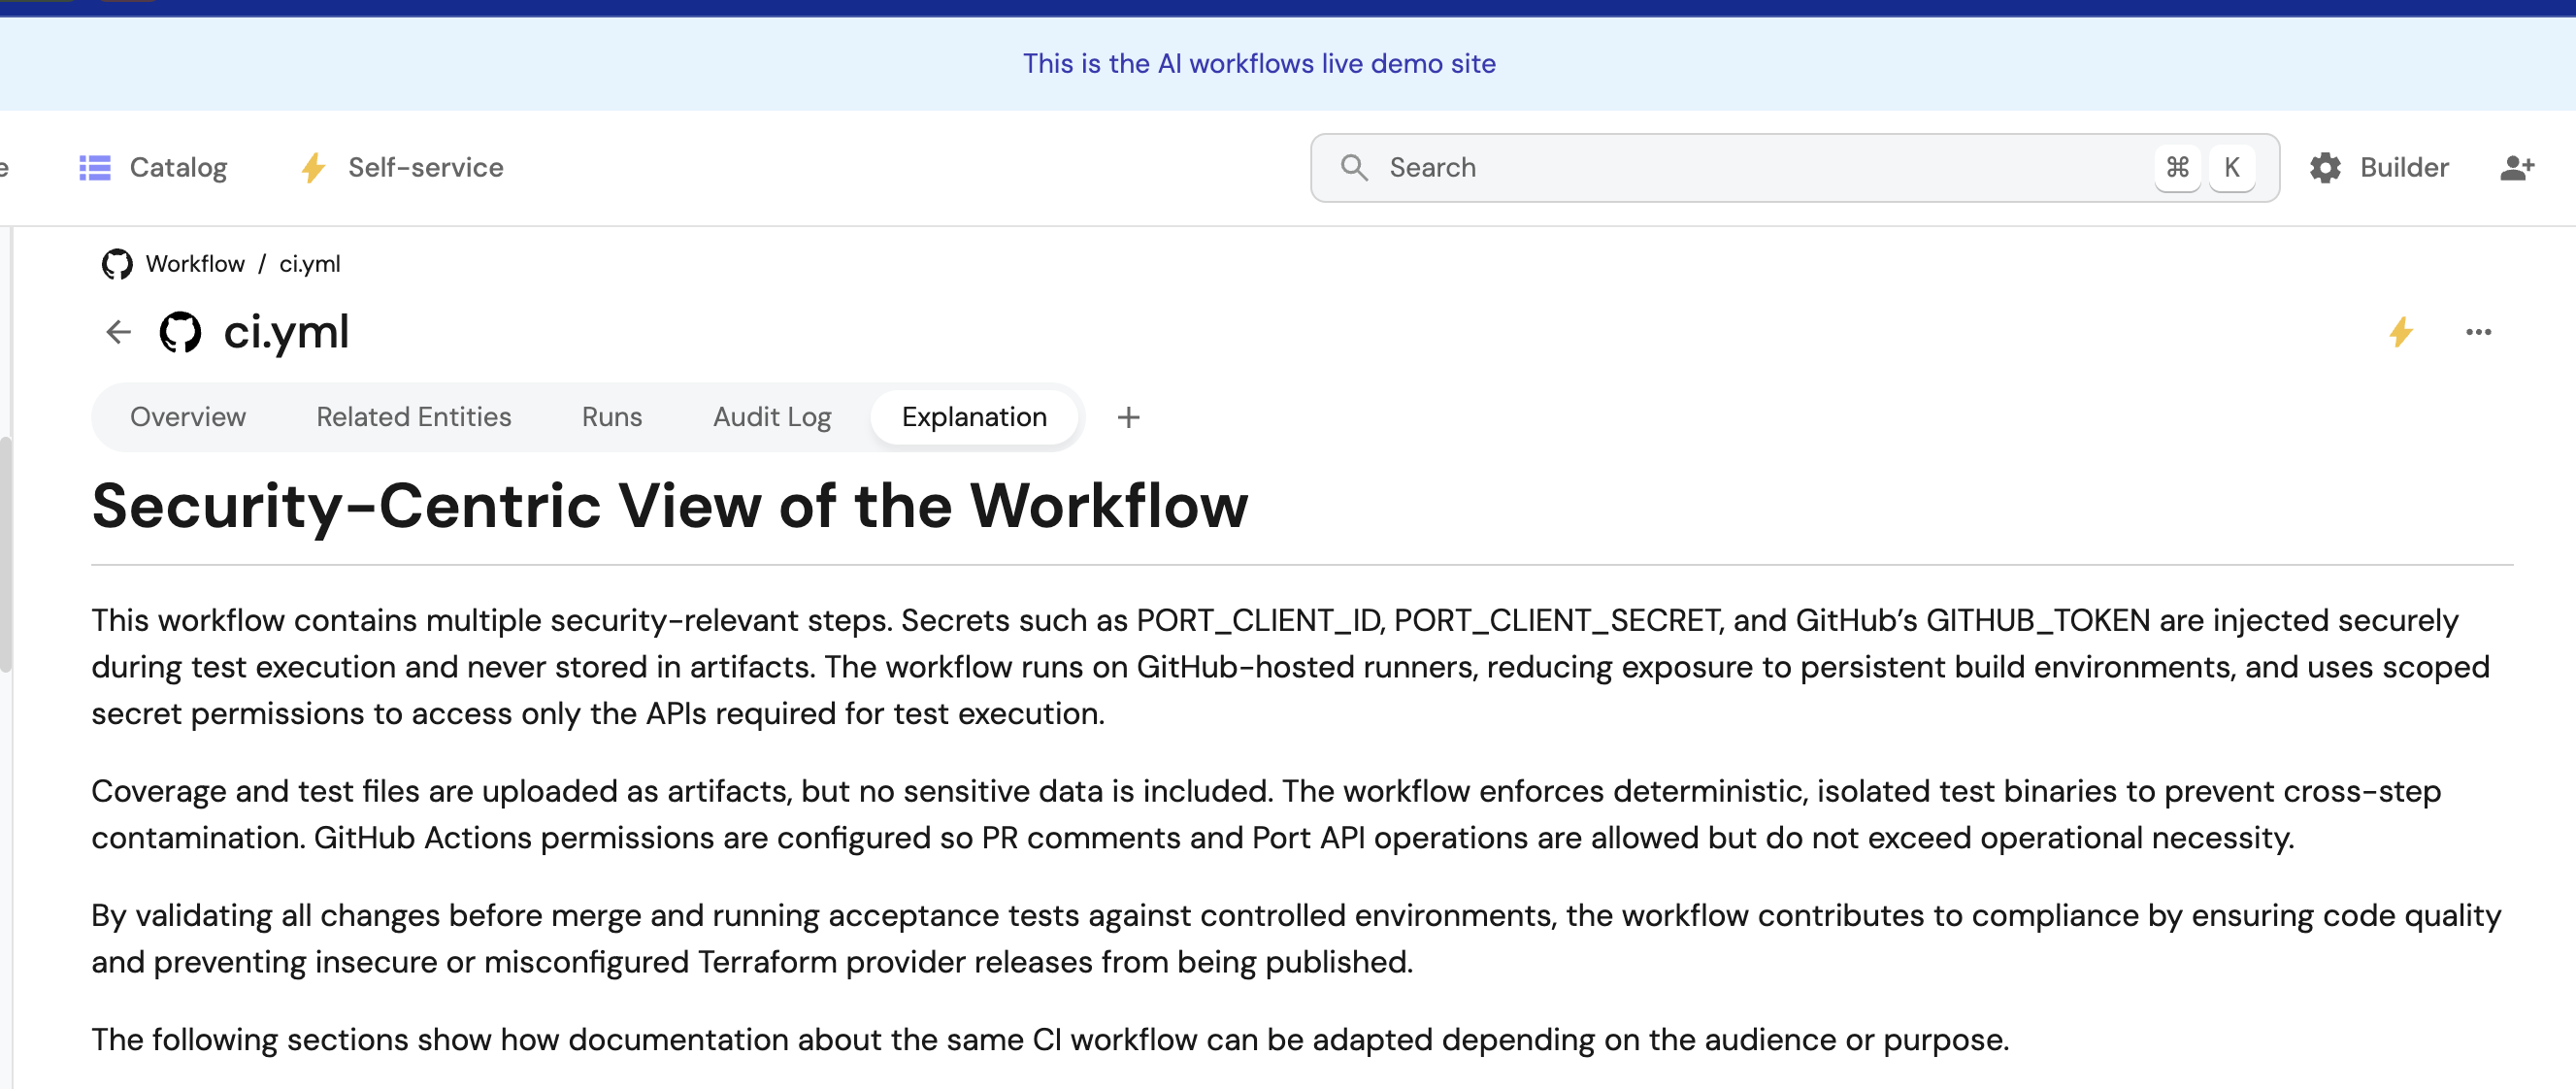
Example 3: Security-focused explanations
For security-critical workflows:
{
  "prompt": "...\n\n### Documentation Style\nGenerate security-focused documentation:\n- Highlight security implications of each step\n- Explain secret management requirements\n- Document permission requirements and why they're needed\n- Provide security best practices\n- Include compliance considerations\n\n..."
}
Example 4: Filter specific workflows
Only auto-document production workflows:
{
  "condition": {
    "type": "JQ",
    "expressions": [
      ".event.diff.after.properties.path | contains(\"production\") || .event.diff.after.properties.path | contains(\"prod\")"
    ],
    "combinator": "or"
  }
}
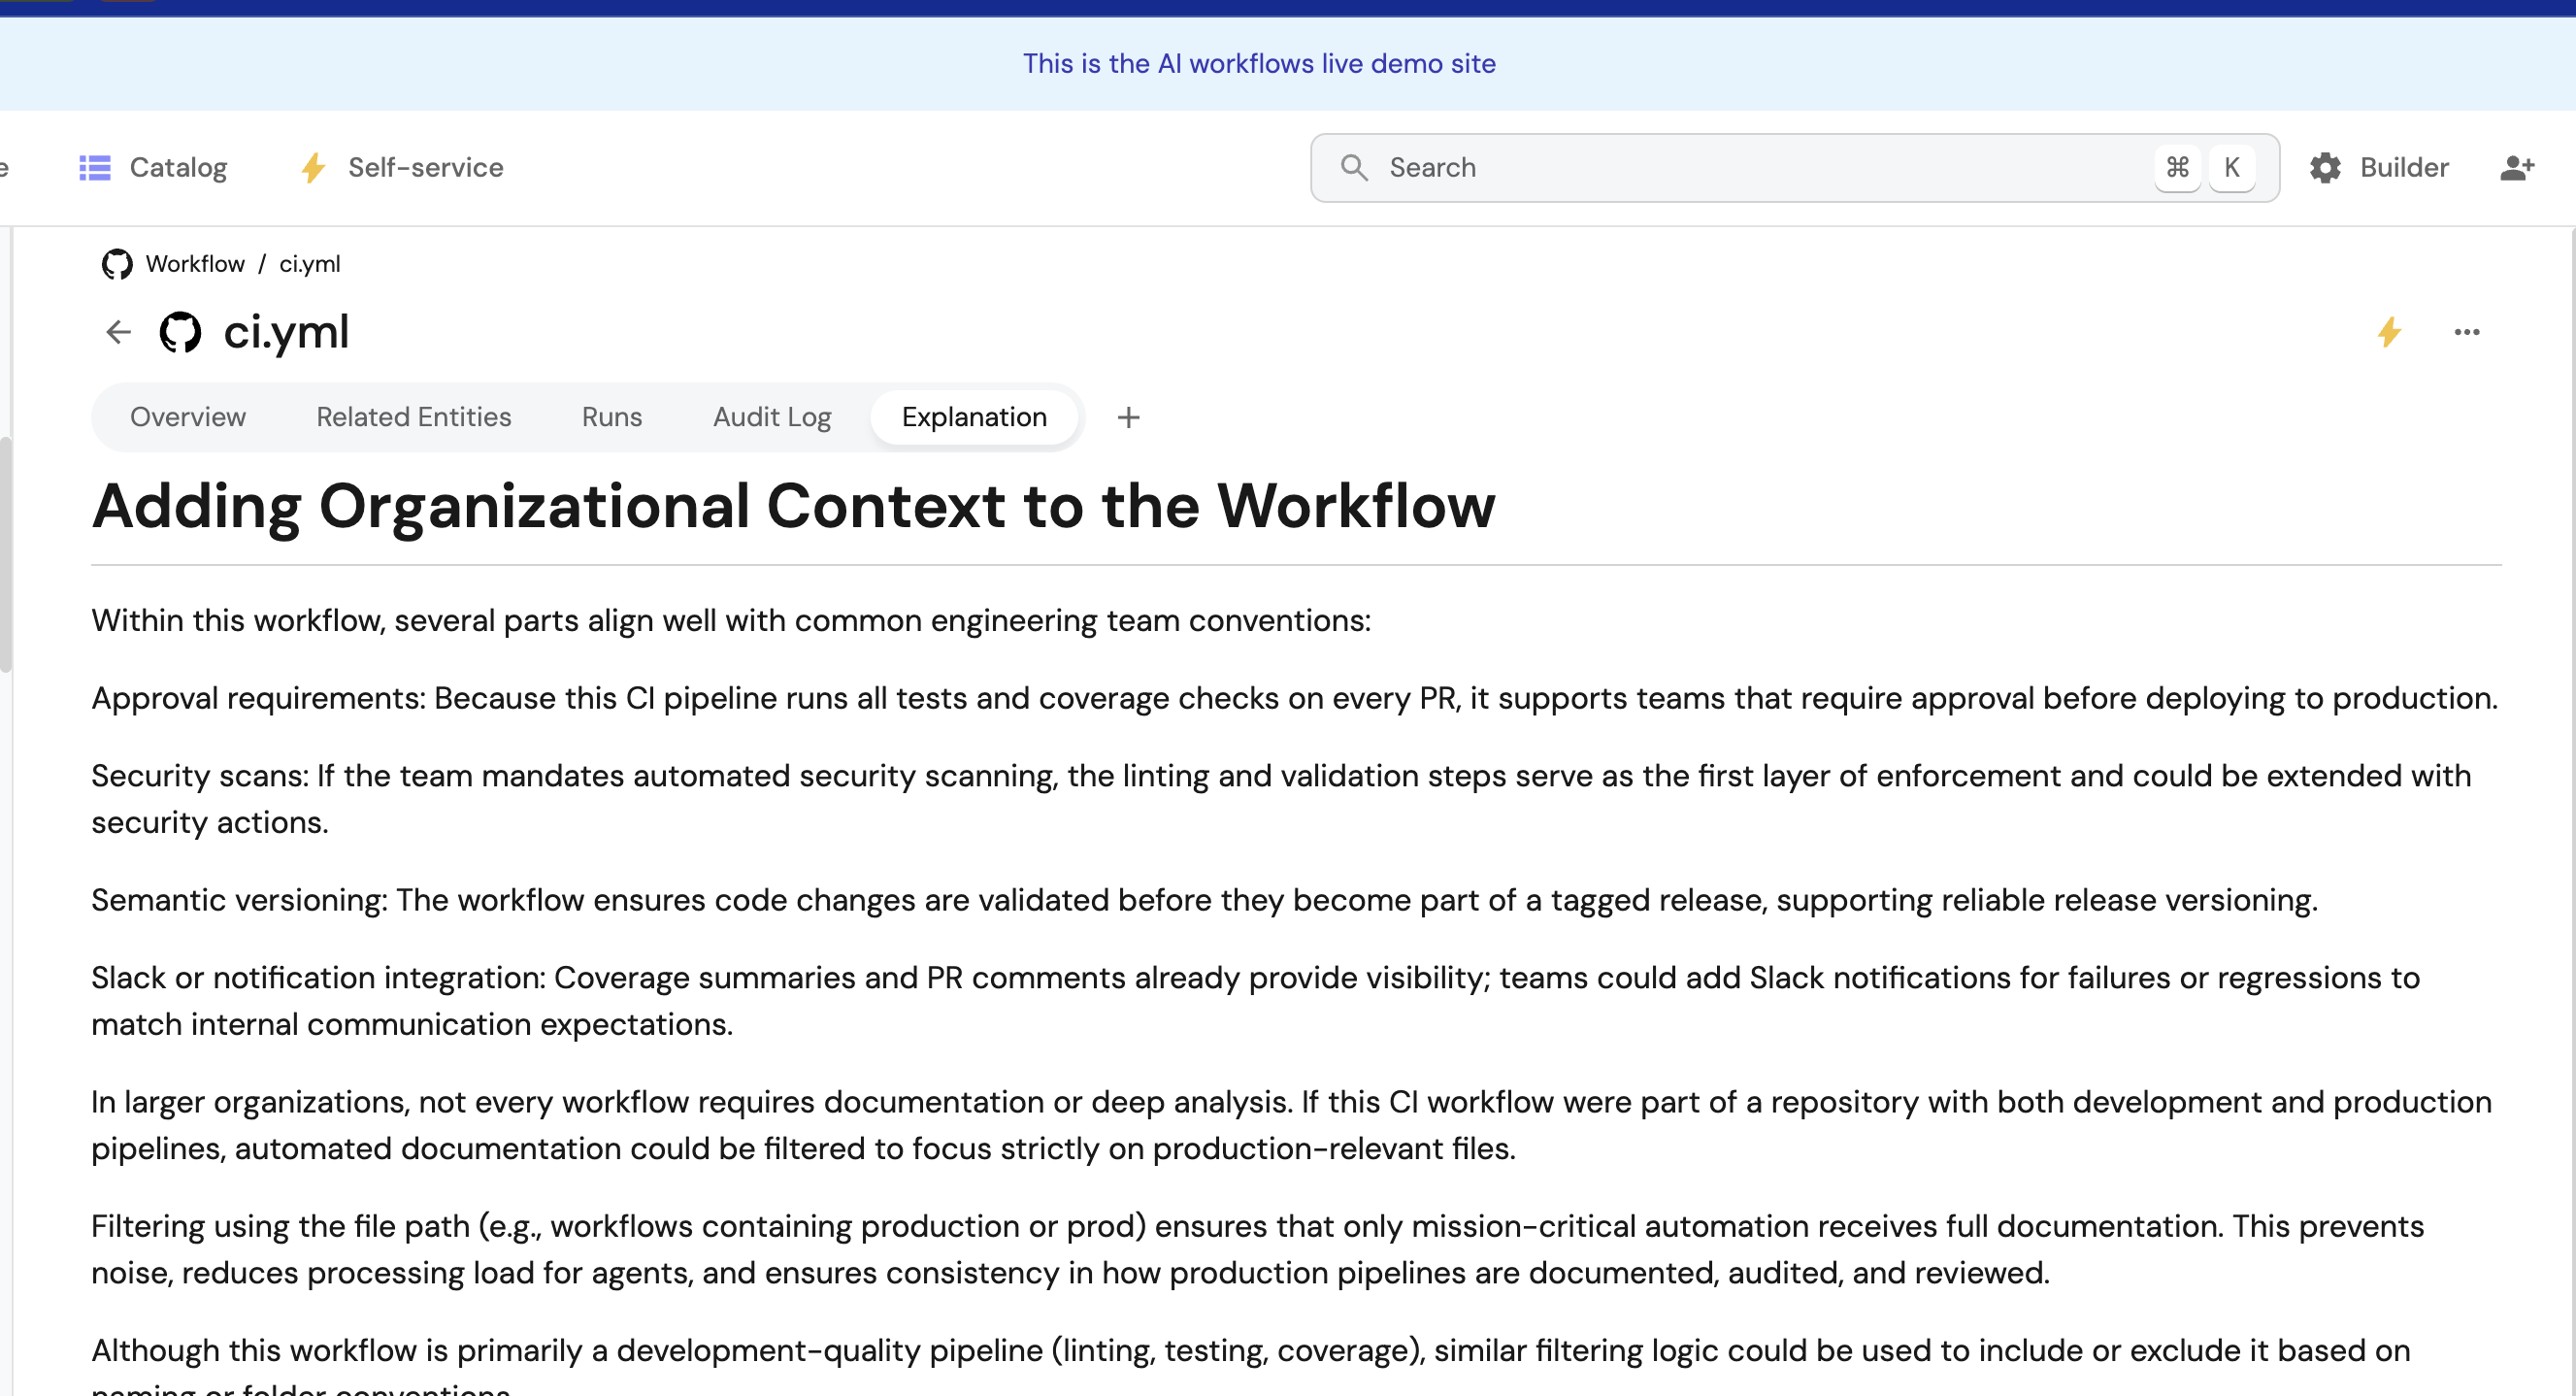
Example 5: Add team-specific context
Include team conventions in the prompt:
{
  "prompt": "...\n\n### Team Context\nOur organization follows these conventions:\n- All production deployments require approval\n- Security scans run on every PR\n- We use semantic versioning for releases\n- Slack notifications are sent to #deployments channel\n\nIncorporate these conventions into the documentation.\n\n..."
}