Properties
Properties are customizable data fields of blueprints, used to save and display information from external data sources.
New properties added to an existing blueprint are hidden by default in all table views across Port (catalog pages, entity pages, table and entity details widgets).
To display the property in a table, click on the 
 Manage Properties icon and toggle the property on.
Configure properties in Port
You can create, delete, or edit properties via the Data model page or directly from the software catalog.
From the Data model page
To edit an existing property:
- Go to the Data model page in Port.
- Expand the blueprint you want to edit by double-clicking on it.
- Under the Properties tab, click on the property you want to edit.
- Make your desired changes to the form, then click Save.
To create a new property:
-
Go to the Data model page in Port.
-
Expand the blueprint you want to edit by double-clicking on it.
-
Click on the + New property button:

-
Fill in the form with the desired property details, including the property type, then click Create.
-
Newly added properties are hidden by default across all views.
From the software catalog
Each catalog page in your software catalog contains a table with all entities created from a certain blueprint. You can modify the properties of the blueprint directly from this table:
-
Go to the desired page of your software catalog.
-
In the top-right corner of the table are its filters, click on the Manage properties button:
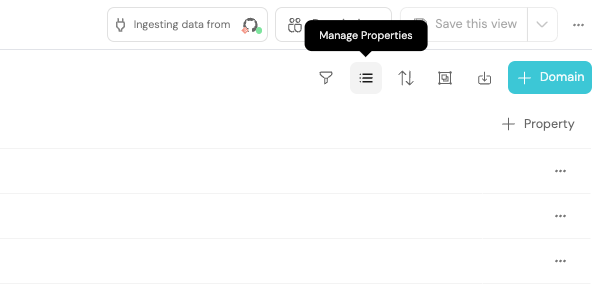
-
A dropdown will appear showing all of the properties. To modify or delete a property, hover over it and click on the
...icon: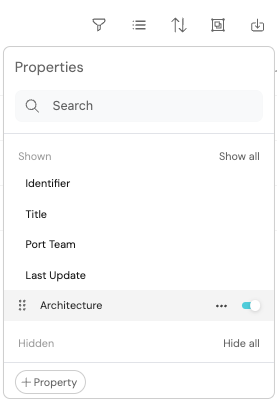
Note that meta-properties are not editable, so you will not see a
...icon next to them. -
To create a new property in the blueprint, click on the + Property button at the bottom of the dropdown.
You can also hide properties from the table by clicking on the toggle on the right side of the property name.
Structure
Each blueprint has a properties section under its schema. Each property is defined as an object with the following structure:
{
  "myProp": {
    "title": "My property",
    "icon": "My icon",
    "description": "My property",
    "type": "property_type"
  }
}
The different components that make up a basic property definition are listed in the following table:
| Field | Description |
|---|---|
title | Property title. |
identifier | Property identifier. (Maximum 100 characters) |
type | Mandatory field. The data type of the property. |
icon | Icon for the property. See the full icon list. |
description | Description of the property. This value is visible to users when hovering on the info icon in the UI. It provides detailed information about the use of a specific property. |
default | Default value for this property in case an entity is created without explicitly providing a value. |
The name of the property is the key of the property object. For example, in the code block above, the name of the property is myProp.
Change a property's type
The type field setting of a property (number, string, etc.) is permanent and cannot be changed after the property is created. If you create a number property, you won't be able to change it later to a string.
To change the type configuration after creation:
- Create a new property with the desired type.
- Use the migrate blueprint data feature to insert the data to the new property. Ensure you apply the correct conversions if needed (for example, converting numbers to strings).
- Delete the old property.
- Rename the new property to the old property name (optional).
Configure provider examples
The property pages include resource examples for version 2.29.0 of the Terraform provider and Pulumi provider. Run each example independently, or adapt its properties into a blueprint you already manage.
Configure Terraform
Set your Port credentials through environment variables:
export PORT_CLIENT_ID="<PORT_CLIENT_ID>"
export PORT_CLIENT_SECRET="<PORT_CLIENT_SECRET>"
Add this provider configuration to your Terraform project alongside the resource example. Use https://api.us.port.io for a US-region organization.
terraform {
  required_providers {
    port = {
      source  = "port-labs/port-labs"
      version = "2.29.0"
    }
  }
}

provider "port" {
  base_url = "https://api.port.io"
}
Run terraform init, then terraform validate and terraform plan to review the proposed changes before applying them.
Configure Pulumi
Create a Pulumi project for your chosen language and install the matching Port package:
- Python
- TypeScript / JavaScript
- Go
pip install port-pulumi==2.29.0
npm install @port-labs/port@2.29.0
go get github.com/port-labs/pulumi-port/sdk/v2@v2.29.0
Configure your stack with your Port credentials and region:
pulumi config set port:clientId "<PORT_CLIENT_ID>"
pulumi config set port:secret "<PORT_CLIENT_SECRET>" --secret
pulumi config set port:baseUrl "https://api.port.io"
Use https://api.us.port.io for a US-region organization. Add the resource example to your program and run pulumi preview to review the proposed changes.
Supported properties
The sections below follow the property picker's order. The Object form offers JSON, YAML, and Protobuf. Labeled URL has its own documentation page; in the UI, create it by enabling Custom display text on a URL property. You can configure Email through JSON or a provider.
Essential
- Owning teams - adds a relation to the
Teamblueprint and sets the blueprint's ownership. Can be added once per blueprint. - String - a primitive data type used to save text data.
- Email - a string format used to save email addresses.
- Number - a primitive data type used to save numeric data.
- Boolean - a primitive data type with one of two possible values, true and false.
- Object - groups the JSON, YAML, and Protobuf options in the property form.
- Labeled URL - an object format used to store URLs with custom display labels.
- Array - a data type used to save lists of data. Supports multi source ingestion to combine values from multiple writers.
- Enum - a data type used to define a named set of constant values.
- URL - a data type used to save links to websites.
- Date & time - a data type used to reference a date and time.
Relations
- Mirror - maps data from related entities onto your entity.
- Relation - connects entities from different blueprints.
Advanced
- Calculation - calculates a property's value based on other properties and relations.
- Aggregation - calculates metrics based on relations in your catalog, such as counting entities or averaging values.
- Timer - defines an expiration date or lifespan for an entity.
Embed
- Embedded URL - embeds external content, such as a dashboard or web page, directly on an entity page.
- Swagger UI - displays OpenAPI and AsyncAPI specification files within entity pages.
- Markdown - displays formatted Markdown content within entity pages.