Sentry


Port's Sentry integration allows you to model Sentry resources in your software catalog and ingest data into them.

Core support
Prerequisites
-
A Sentry account with access to the organization you want to sync.
-
Your Port user role is set to
Admin. -
A Sentry API token for resyncing data into Port.
Required permissions (click to expand)
- Issue & Event: Read (
event:read) - for syncing issues and issue tags. - Member: Read (
member:read) - for syncing organization members and teams. - Organization: Read (
org:read) - for organization-level API access. - Project: Read (
project:read) - for syncing projects and project tags. - Team: Read (
team:read) - for syncing teams and team members.
- Issue & Event: Read (
Setup
Choose one of the following installation methods: Not sure which method is right for your use case? Check the available installation methods.
Configuration
Port integrations use a YAML mapping block to ingest data from the third-party api into Port.
The mapping makes use of the JQ JSON processor to select, modify, concatenate, transform and perform other operations on existing fields and values from the integration API.
Default mapping configuration
This is the default mapping configuration for this integration:
Default mapping configuration (click to expand)
deleteDependentEntities: true
createMissingRelatedEntities: true
enableMergeEntity: true
resources:
- kind: user
  selector:
    query: 'true'
  port:
    entity:
      mappings:
        identifier: .email
        title: .user.name
        blueprint: '"sentryUser"'
        properties:
          username: .user.username
          isActive: .user.isActive
          dateJoined: .user.dateJoined
          lastLogin: .user.lastLogin
          orgRole: .orgRole
          inviteStatus: .inviteStatus
- kind: user
  selector:
    query: 'true'
  port:
    entity:
      mappings:
        identifier: .email
        blueprint: '"_user"'
        relations:
          sentry_user: .email
- kind: project-tag
  selector:
    query: 'true'
    tag: environment
  port:
    entity:
      mappings:
        identifier: .slug + "-" + .__tags.name
        title: .name + "-" + .__tags.name
        blueprint: '"sentryProjectEnvironment"'
        properties:
          dateCreated: .dateCreated
          platform: .platform
          status: .status
          link: .organization.links.organizationUrl + "/projects/" + .name
- kind: issue-tag
  selector:
    query: 'true'
    tag: environment
  port:
    entity:
      mappings:
        identifier: .id + "-" + .item.name
        title: .title + " -" + " " + .item.name
        blueprint: '"sentryIssue"'
        properties:
          link: .permalink + "?environment=" + .item.name
          status: .status
          isUnhandled: .isUnhandled
        relations:
          projectEnvironment: (.project.slug as $slug | .item | "\($slug)-\(.name)")
          assignee:
            combinator: '"and"'
            rules:
            - operator: '"="'
              property: '"$identifier"'
              value: .assignedTo.email
- kind: team
  selector:
    query: 'true'
    includeMembers: true
  port:
    entity:
      mappings:
        identifier: .slug
        title: .name
        blueprint: '"sentryTeam"'
        properties:
          dateCreated: .dateCreated
          memberCount: .memberCount
          roles: .teamRole
          projects: .projects | map (.slug)
        relations:
          members: if .__members != null then .__members | map(.user.email) | map(select(. != null)) else [] end
Mapping & selectors per resource
Examples of blueprints and the relevant integration configurations:
Set up live events
This integration supports live events, allowing real-time updates to your software catalog without waiting for the next scheduled sync.
Note that different events are supported depending on the resource type.
- Hosted by Port
- Self-hosted
Live events base URL
For integrations installed using the Hosted by Port method, you can obtain the live events base URL from the Get an integration API. The response includes liveEventsUuid and liveEventsIngestHostname in the appSpec section.
Call the endpoint with your integration's identifier:
curl -X GET \
  'https://api.port.io/v1/integration/<INTEGRATION_IDENTIFIER>' \
  -H 'Authorization: Bearer <PORT_ACCESS_TOKEN>'
The port_region, port.baseUrl, portBaseUrl, port_base_url and OCEAN__PORT__BASE_URL parameters select which Port API instance to use:
- EU (app.port.io) →
https://api.port.io - US (app.us.port.io) →
https://api.us.port.io
In the response, look for the following fields under spec.appSpec:
{
  "spec": {
    "appSpec": {
      "liveEventsUuid": "abcdefghijk",
      "liveEventsIngestHostname": "ingest.ocean.getport.io"
    }
  }
}
Combine them to build the live events base URL:
https://<liveEventsIngestHostname>/live-events/<liveEventsUuid>
For example, with the values above, the live events base URL is:
https://ingest.ocean.getport.io/live-events/abcdefghijk
This is the same URL configured for the integration.
BaseUrl & webhook configuration
To enable real-time updates of the data in your software catalog, you need to define the liveEvents.baseUrl parameter.
This parameter should be set to the URL of your Sentry integration instance, which needs to have the option to setup webhooks via HTTP requests/receive HTTP requests, so ensure the network is configured accordingly.
- If Sentry and the integration are in the same cluster/network: Use an internal URL (e.g., a Kubernetes service DNS name).
For Kubernetes deployments, create a service to expose the integration pod and use the service URL asliveEvents.baseUrl. If both the source system and integration are in the same cluster, an internal ClusterIP service is sufficient. - If Sentry is external to the integration's network: The integration must be exposed via an ingress, load balancer, or public URL that Sentry can reach.
If you're running high volumes of live events in a self-hosted deployment and want better reliability, event durability, or horizontal scalability, you can optionally set up Port's dedicated live events infrastructure. See live events at scale for details.
If liveEvents.baseUrl is not provided, the integration will continue to function correctly. In such a configuration, to retrieve the latest information from the target system, the scheduledResyncInterval parameter has to be set, or a manual resync will need to be triggered through Port's UI.
To test webhooks or live event delivery to your local environment, expose your local pod or service to the internet using ngrok (e.g. ngrok http http://localhost:8000)
To update Port in real time when Sentry issues change, create an internal integration in Sentry and configure it to send issue webhooks to Port.
Get the webhook URL
- Hosted by Port
- Self-hosted
First create a custom webhook integration in Port, then connect it to Sentry in Create the internal integration in Sentry:
- Go to the data sources page in Port.
- Select the Webhook tab.
- Click Custom integration. For more details, see the custom webhook integration guide.
- Enter a name for the integration (e.g Sentry Webhook).
- Enter a description for the integration.
- Click Next.
- After the custom integration is created, open its card.
- Select the Mapping tab.
- In the Configure Webhook event section, copy the webhook URL. You'll paste it in the Sentry internal integration steps below.
- In the Map the data from the external system into Port section, add a mapping for Sentry issue events. The mapping uses JQ to select and transform fields from the webhook payload.
Use the Test mapping section to verify that the JQ mapping works with a Sentry webhook payload before saving.
Configure liveEvents.baseUrl and webhook security in the Self-hosted tab above. Use the resulting webhook URL when you create the internal integration in Sentry below.
Example mapping (click to expand)
[
  {
    "blueprint": "sentryIssue",
    "operation": "create",
    "filter": ".body.data.issue.id != null",
    "entity": {
      "identifier": ".body.data.issue.id",
      "title": ".body.data.issue.title",
      "properties": {
        "link": ".body.data.issue.permalink",
        "status": ".body.data.issue.status",
        "isUnhandled": ".body.data.issue.isUnhandled"
      },
      "relations": {
        "projectEnvironment": ".body.data.issue.project.slug"
      }
    }
  }
]
Example webhook payload (click to expand)
{
  "body": {
    "action": "resolved",
    "data": {
      "issue": {
        "id": "7324623130",
        "shortId": "PROJECT-8V",
        "title": "N+1 Query",
        "permalink": "https://example.sentry.io/issues/7324623130/",
        "level": "info",
        "status": "resolved",
        "isUnhandled": false,
        "project": {
          "id": "4509038422523904",
          "name": "example-api",
          "slug": "example-api",
          "platform": "python-django"
        },
        "firstSeen": "2026-03-10T14:44:04.743762Z",
        "lastSeen": "2026-06-09T11:20:54.358658Z"
      }
    },
    "actor": {
      "type": "user",
      "name": "Example User"
    }
  },
  "headers": {
    "Sentry-Hook-Resource": "issue",
    "Sentry-Hook-Signature": "<signature>",
    "Sentry-Hook-Timestamp": "1781025505"
  },
  "queryParams": {}
}
Create the internal integration in Sentry
- Log in to Sentry with your organization's credentials.
- Click the gear icon (Setting) at the left sidebar of the page.
- Under Integrations, click Custom Integrations.
- At the upper corner of this page, click on Create New Integration.
- Sentry provides two types of integrations: Internal and Public. For the purpose of this guide, choose Internal Integration and click on the Next button.
- Under Internal Integration Details, input the following details:
- Name - use a meaningful name such as "Port Webhook".
- Webhook URL - paste the URL from the webhook URL instructions for your installation method.
- Under Permissions, grant Read permissions for the Issue & Event category.
- Under Webhooks, enable the issues checkbox to allow Sentry to report issue events to Port.
- Click Save Changes at the bottom of the page.
After saving the internal integration, Sentry displays a client secret. Copy it if you want Port to verify the signature of webhook requests from Sentry.
For more details on setting up internal integrations in Sentry, see the Sentry documentation.
Verify webhook signatures
Signature verification is optional. To enable it, use the client secret generated by Sentry when you created the internal integration.
- Hosted by Port
- Self-hosted
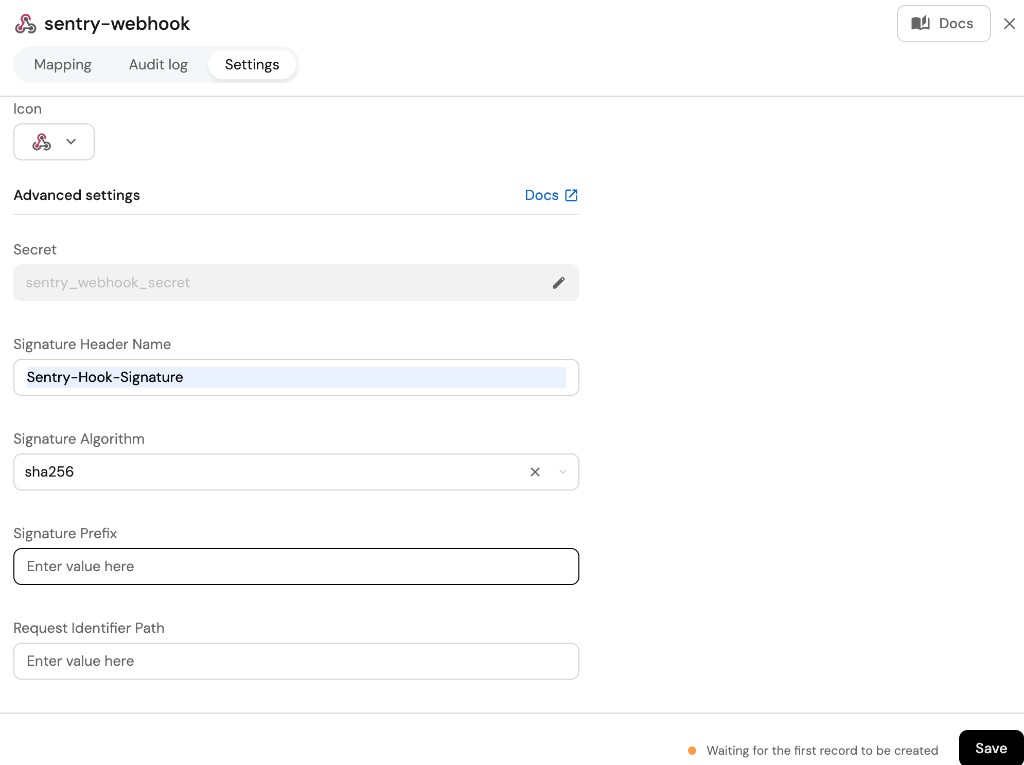
- Select the custom webhook integration's Settings tab.
- Paste the client secret from Sentry's internal integration in the Secret field.
- Set Signature Header Name to
Sentry-Hook-Signature. - Set Signature Algorithm to
sha256. - Click Save.
Configure integration.secrets.sentryWebhookSecret with the client secret — see the optional parameters in Setup.
Monitoring and sync status
To learn more about how to monitor and check the sync status of your integration, see the relevant documentation.