Configure mapping
The mapping of an integration's data source defines the ingested data and its destination. It allows you to specify:
- Which data you wish to ingest from the integrated tool.
- Which properties in the integration's blueprints will be filled with the ingested data.
How does mapping work?
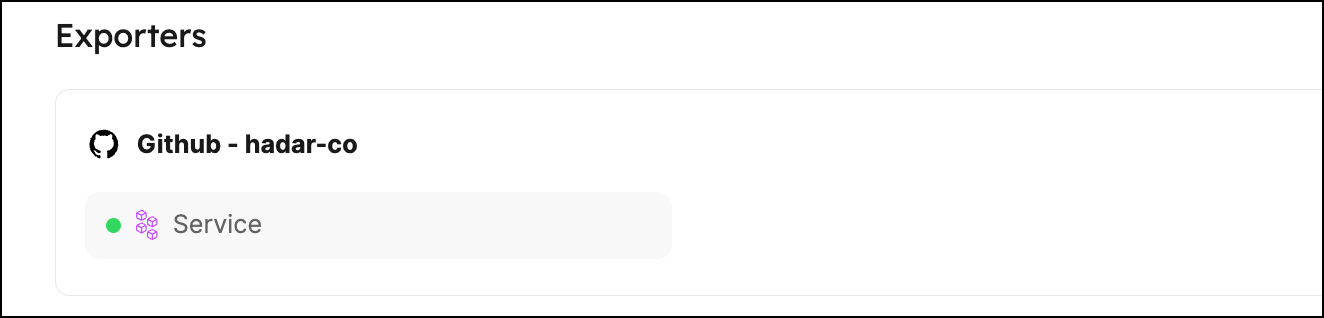
Integration mapping is configured in the data sources page of your portal, under Exporters.
Each integration has its own mapping, which can be edited via a YAML editor or a visual form.
To understand how mapping works, let's take a look at an example. After you complete the onboarding and connect your Git provider to Port, you will see an exporter entry in your data sources page:
Clicking on this entry will open a modal. Click the Mapping tab to view and edit the mapping configuration.
From there, you can click {...} Edit YAML to open the YAML editor, or use the form editor to configure the mapping through a visual interface.
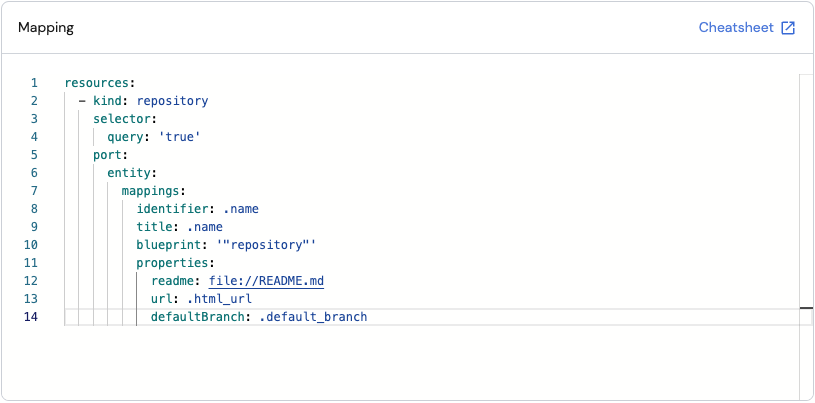
Note that Port provides default mapping, providing values to the properties defined in the relevant blueprint:
Port provides two ways to configure the mapping:
- Form editor - a visual, guided experience.
- YAML editor - a code-based configuration.
Mapping concepts
The following concepts are the building blocks of a mapping configuration. They apply to both editors - understanding them once lets you work fluently in either.
Resources and kinds
A resource represents one type of data to fetch and map. Each resource specifies a kind - the API object type to fetch (e.g., repository, pull-request, issue).
Resources are processed sequentially from top to bottom. This means:
- The first resource is fetched and ingested before the second one starts.
- If you have relations between entities (e.g., pull requests referencing repositories), list the target blueprint first so those entities exist before the relation is created.
- For large datasets, the order can affect sync duration since each resource must complete before the next begins.
A mapping can contain multiple resources of the same kind with different filters, allowing you to map the same API object to different blueprints or with different property values.
Selector
Selectors belong to the Extraction phase. They modify the API request by adding query parameters or other parameters that change what the API returns. Unlike the query filter, selectors act on the request - not the response.
Available selectors vary per integration, based on the API capabilities of the integrated tool. Using selectors to narrow what the API returns can reduce sync time and help avoid hitting API rate limits.
Query
The query field belongs to the Transformation phase. It accepts a JQ expression evaluated against each object returned by the API:
- If the expression evaluates to
true, the object is ingested. - If it evaluates to
false, the object is skipped.
Set query to "true" to ingest all objects, or use a JQ expression to filter specific objects. This field is called Data filter in the form editor. In YAML, it appears as query inside the selector block - but unlike other selector keys, it filters the API response rather than modifying the request.
Entity mappings
Entity mappings define how fields from the API response are translated into Port entity properties. For each resource, you specify a target blueprint, how to derive the entity's identifier and title, which API fields map to which blueprint properties, and optionally which relations to populate.
The exact structure of entity mappings differs between the two editors - see Transformation in the form editor section and Transformation in the YAML editor section.
When using JQ to reference identifiers or property names that contain hyphens, you must wrap them in double quotes and use bracket notation.
For example, use .["my-property"] instead of .my-property, which JQ interprets as subtraction.
This applies to secrets, properties, and any other identifiers containing hyphens:
- Secrets:
.secrets["zendesk-api-token"] - Properties:
.properties["my-custom-field"] - Relations:
.relations["parent-service"]
Mapping relations
In Port, relations define how blueprints are connected to one another. The mapping configuration lets you populate these relations automatically during ingestion.
There are two ways to reference a related entity in a mapping:
- Direct identifier reference - provide the related entity's identifier as a JQ expression. Use this when the API response contains the identifier of the related entity.
- Search query - find the related entity by matching one of its properties. Use this when you don't have the identifier directly, but know a property value that uniquely identifies it.
Limitations for search query relations
- A "single type" relation expects a single entity to be returned. A "many type" relation expects an array.
- The maximum number of entities returned is 500.
- Calculation properties are not supported.
- Mirror properties are supported only for single type relations, one level deep.
- Only the
=,in, andcontainsoperators are supported. - The search is scoped to the relation's target blueprint - it will not match entities from other blueprints, even if they have a matching property value.
Manually assigning relations in the UI
You can also assign relations manually without touching the mapping configuration:
- Go to the relevant catalog page (e.g., services).
- Hover over an entity, click
..., and select Edit. - In the relation field, select the related entity from the dropdown, then click Update.
Relation values are overwritten on every sync
Every time an integration syncs an entity, the relation value in Port is replaced with whatever the mapping returns. Port does not merge or append relation values across syncs or across different integrations.
This has two important implications:
- If your JQ returns an empty array (e.g. because a filter excludes all items), Port will clear that relation - removing any previously set values.
- If two integrations both write to the same relation, the last sync to run wins. The other integration's values are overwritten.
The mapping expression must therefore return the complete desired set of relation identifiers every time it runs.
Workarounds:
- Merge all sources in one mapping: Use a single integration that queries all sources and returns the merged set in the JQ expression.
- Manage the relation manually: Exclude the relation from the integration's mapping entirely by omitting it from the
relationsblock, and assign values manually in Port's UI. - Use an automation to append: Create a Port automation that reacts to entity changes and uses JQ array concatenation to append new values while preserving existing ones.
Map by property
In some cases you may not know the identifier of the entity you want to map to, but you do know one of its properties. Instead of a direct identifier, you can use a search query rule in the identifier, team, or relation fields to find and update the entity by that property. Search query mapping is only supported for these three fields.
This is useful when you want to map data directly to an existing entity without needing a separate blueprint. For example, a PagerDuty integration can map directly to a service entity using a pagerduty_service_id property, without a separate PagerDuty service blueprint.
Limitations
- The search query must return exactly one entity - otherwise the entire request will fail.
To avoid failures from identical property values across multiple blueprints, include an additional rule filtering by$blueprint. - If the search query returns no entities, a new entity will not be created.
- The query is executed on the same blueprint from the request's URL.
- Only the
=andinoperators are supported. Calculationandmirrorproperties are not supported.
Searching by property can also be used when using Port's API to create an entity.
Items to parse
When the API returns an array that you want to expand into multiple separate Port entities, use items to parse. Port iterates over the array and creates one entity per item.
There are three related options:
itemsToParse- a JQ expression pointing to the array in the API response. Each element in the array becomes a separate entity.itemsToParseName- a custom name for referencing each array element. Use this when your API response already has a top-level key that conflicts with the default name.itemsToParseTopLevelTransform- controls whether the target array is removed from the payload during iteration. Whentrue(default), the array is removed. Whenfalse, the original array remains accessible alongside individual items.
Limitations
itemsToParseNameis not supported in non-Ocean integrations: Github app, Kubernetes, and Webhook integrations.- When
itemsToParseNameis enabled, you cannot use the "test mapping" option in Port's UI.
Advanced options
These options apply globally across all resources in a mapping configuration. In the YAML editor they are set at the root level, in the form editor they appear under Advanced Configuration.
| UI label | YAML key | Description |
|---|---|---|
| Auto-create related entities | createMissingRelatedEntities | Automatically creates missing related entities during ingestion. Useful when creating an entity whose related entity does not yet exist in Port. |
| Auto-delete related entities | deleteDependentEntities | Deletes dependent Port entities when a related entity is removed. Required when two blueprints have a required relation and the source entity must be deleted alongside the target. |
| Deletion safety limit | entityDeletionThreshold | Maximum proportion of entities that can be deleted in a single sync (0 to 1). For example, 0.5 means deletion is skipped if more than 50% of entities would be deleted. |
Additional options may be available depending on the integration. Refer to the specific integration's documentation for the full list.
The Auto-create related entities option cannot be used to create entities in protected blueprints such as _user and _team.
JQ runtime
Port's JQ runtime runs in UTC. This affects any time-based JQ functions you use in your mapping, such as now, todate, strftime, and strptime.
When writing JQ expressions that reference the current time or calculate relative durations, assume the server clock is UTC:
# Get the current time as a UTC ISO string
now | todate
# Output: "2024-04-15T10:30:00Z"

# Calculate days since last update (assuming .updated_at is an ISO string)
(now - (.updated_at | sub("\\.[0-9]+Z$"; "Z") | strptime("%Y-%m-%dT%H:%M:%SZ") | mktime)) / 86400 | floor
If your source data contains timestamps with a non-UTC offset (e.g. 2024-04-15T12:30:00+02:00), you must normalize them to UTC before comparing against now or using Port's datetime property format. Port stores and displays all datetime values in UTC.
Common test errors
When running Test mapping, you may come across one of the following errors:
-
Missing kind example for {kind}
Cause: No example data is available for this resource kind.
Resolution: Add example data for the missing kind. -
Selector query is false or evaluated to false
Cause: The data filter expression returnedfalsefor the example data.
Resolution: Update your JQ expression or use an example that matches your filter. -
must NOT have additional properties, additional property: "[property]"
Cause: The mapping YAML contains an unrecognized field, often due to a typo.
Resolution: Check for typos in your field names and ensure they match the expected mapping schema. -
Blueprint with identifier "[identifier]" was not found
Cause: The blueprint identifier referenced in the mapping does not exist in your portal.
Resolution: Verify the identifier matches an existing blueprint in your portal.
Form editor
The form editor is currently available for select integrations, with support for all integrations coming soon.
The form editor is the default mapping experience. It provides a visual, step-by-step interface for configuring the mapping concepts above.
To access the form editor, click on an integration in your data sources page and navigate to the Mapping tab. If AI is enabled for your organization, an Ask AI button is available at the top of the editor for mapping assistance.
If your mapping YAML contains an error, the form editor may be unavailable and the YAML view will be shown first. In that case, hover over the Edit form button to see a description of the issue, or use Test mapping in the YAML view to identify it.
Each integration resource appears as a collapsible strip that you can drag and drop to reorder. Click a strip to expand and configure it. To add a new resource, click + Resource at the bottom, then select a kind from the list of all supported kinds for that integration.
Each resource has three configuration phases:
Extraction
Configure selectors to shape the API request for this resource. Selectors add parameters to the API request, changing what the API returns. They do not filter the response after it arrives.
Click + Selector to see all selectors supported by the selected kind. Hover over a selector to read its description and purpose.
Transformation
Configure the entity mappings for this resource. The left panel contains the mapping configuration, and the right panel shows Raw data samples from the integration to help write and validate JQ expressions.
Target blueprint
Select the blueprint to map data into from the Target Blueprint dropdown. Click + New Blueprint to create a new blueprint directly from the mapping form - it will be created in Port and automatically selected.
Data filter
Filters which items from the API response are ingested. This corresponds to the query concept. Set to true to ingest all items, or use a JQ expression to filter specific items.
Property mapping
Maps API response fields to blueprint properties. Each row shows a JQ expression on the left and the target Port property on the right. Click the edit icon next to any property to open the JQ expression editor, which displays a raw data sample alongside your expression for real-time validation. If AI is enabled for your organization, the ![]()
![]() icon appears in the top-right corner of the JQ expression editor - click it to describe in natural language what you want to calculate, and AI will generate the JQ expression for you.
icon appears in the top-right corner of the JQ expression editor - click it to describe in natural language what you want to calculate, and AI will generate the JQ expression for you.
Click + Property to add more properties from the blueprint. To create a new property on the blueprint directly, click + New Property - it will be added to the blueprint and immediately available for mapping. For more details on properties, see setup blueprint.
Map by property
To find and update an entity by one of its properties instead of its identifier, click the edit icon next to the Identifier row. In the Edit JQ expression editor, toggle Search query in the top-right corner. This replaces the identifier with a search query rule.
For a description of this feature and its limitations, see Map by property in the mapping concepts section.
Relation mapping
Maps relations between entities. Click + Relation to add a relation from the blueprint. To create a new relation on the blueprint, click + New Relation. For more details, see relate blueprints.
Each relation supports the two approaches described in Mapping relations. When editing a relation's JQ expression, toggle Search query in the expression editor to switch from a direct identifier reference to a search-based relation.
Items to parse
To create multiple entities from an array field in the API response, click the ... menu at the bottom-right of the transformation panel and enable Items to parse. Three fields will appear above the property mapping section: Items To Parse, Items To Parse Name, and Items To Parse Top Level Transform.
For a description of each option, see Items to parse in the mapping concepts section.
Test
Click Test mapping to run the mapping against the raw data samples and preview the resulting Port entity. The test shows results only for the current resource.
If the test fails, see Common test errors for a description of each error and how to resolve it.
Advanced configuration
The Advanced Configuration section at the bottom of the modal exposes the advanced options for the integration. Common options include:
- Auto-create related entities
- Auto-delete related entities
- Deletion safety limit
See the advanced options section for a description of each setting. Additional options may appear depending on the integration - refer to the integration's documentation for the full list of available options.
Once you have finished configuring the mapping, click Save and Resync to save your changes and trigger a full resync.
YAML editor
To access the YAML editor, click on an integration in your data sources page, navigate to the Mapping tab, and click {...} Edit YAML in the top-right corner. The YAML editor appears in the bottom corner of the modal, with the test result panel on the right. If AI is enabled for your organization, an Ask AI button is available in the right corner above the YAML editor for mapping assistance.
Extraction
This section covers the YAML keys used to control which objects are fetched from the integration's API. Some keys use JQ queries to filter the ingested data.
-
The
resourceskey is the root of the YAML configuration:resources:- kind: repository...
-
The
kindkey is a specifier for the object you wish to map from the tool's API (in this example, a Github repository).
To see whichkindsare available for mapping, refer to the integration's documentation. In this example, the available kinds are listed in the Github integration page.resources:- kind: repositoryselector:...
-
The
selectorblock can contain two types of keys:- Integration-specific keys (e.g.,
repoSearch,branchSearch) that add parameters to the API request, changing what the API returns. These correspond to the selector concept and vary by integration. - The
querykey, a JQ expression that filters the API response after it arrives. This corresponds to the query concept and is equivalent to the Data filter in the form editor.
resources:- kind: repositoryselector:query: "true" # JQ expression - filters objects in the API response# Integration-specific selector parameters, for example:includedFiles:- README.md- CODEOWNERSport:Using a JQ expression, you can define your desired filter conditions. For example, to ingest only repositories with a name starting with
"service", use thequerykey like this:query: .name | startswith("service") - Integration-specific keys (e.g.,
For an explanation of these concepts, see Resources and kinds, Selector, and Query.
Transformation
This section covers the YAML keys used to map API response fields to Port entity properties.
The port.entity.mappings key contains the section used to map the object fields to Port entities.
Here you can specify the blueprint in Port to which the data should be mapped, and which API object will be ingested to each of its properties.
To map properties, specify the property identifier as the key inside the properties object.
resources:
- kind: repository
selector:
query: "true"
port:
entity:
mappings: # Mappings between one GitHub API object to a Port entity. Each value is a JQ query.
identifier: ".name"
title: ".name"
blueprint: '"service"'
properties:
description: ".description"
url: ".html_url"
defaultBranch: ".default_branch"
To create multiple mappings of the same kind, add another item to the resources array:
resources:
- kind: repository
selector:
query: "true"
port:
entity:
mappings: # Mappings between one GitHub API object to a Port entity. Each value is a JQ query.
identifier: ".name"
title: ".name"
blueprint: '"service"'
properties:
description: ".description"
url: ".html_url"
defaultBranch: ".default_branch"
- kind: repository # In this instance repository is mapped again with a different filter
selector:
query: '.name == "MyRepositoryName"'
port:
entity:
mappings: ...
For an explanation of entity mappings, see Entity mappings.
Mapping relations
For instance, a Service blueprint can be related to a PagerDuty service blueprint.
After ingesting all of our Services and PagerDuty services, we want to connect each Service to its corresponding PagerDuty service.
Assigning relations automatically using the mapping configuration
You can define the relation in the mapping file of your data source (e.g. PagerDuty) so that relations are assigned automatically during ingestion.
Here's an example:
-
Go to your data sources page and click on the PagerDuty exporter:
-
In the bottom left panel, edit the mapping YAML file, and add the following entry to it:
- kind: servicesselector:query: "true"port:entity:mappings:identifier: .nameblueprint: '"service"'properties: {}relations:pager_duty_service: .idIn this mapping configuration,
pager_duty_serviceis the name of the relation identifier, and.idis a JQ expression that extracts the identifier of thePagerDuty servicefrom the ingested data.When the data is ingested:
- If a
serviceentity with the same identifier (.name) already exists in your catalog, Port will update it, adding thepager_duty_servicerelation and other associated data, such as the on-call property. - If no such
serviceexists, Port will create a newserviceentity with that identifier and attach the relatedPagerDuty serviceand the on-call property.
This configuration ensures your catalog stays up to date automatically. You can also customize the relation logic, for example, using search-based relations, depending on your naming conventions or data structure.
- If a
Mapping relations using search queries
In the example above we map a relation using a direct reference to the related entity's identifier.
Port also allows you to use a search query rule to map relations based on a property of the related entity.
This is useful in cases where you don't have the identifier of the related entity, but you do have one of its properties.
For example, consider the following scenario:
Say we have a service blueprint that has a relation (named service_owner) to a user blueprint. The user blueprint has a property named github_username.
Now, we want to map the service_owner relation based on the github_username property of the user entity.
To achieve this, we can use the following mapping configuration:
- kind: repository
selector:
query: 'true'
port:
entity:
mappings:
identifier: .name
title: .name
blueprint: '"service"'
relations:
service_owner:
combinator: '"and"'
rules:
- property: '"github_username"'
operator: '"="'
value: .owner.login
Instead of directly referencing the user entity's identifier, we use a search query rule to find the user entity whose github_username property matches the .owner.login value returned from GitHub's API.
When using a search query rule to map a relation, Port will query all entities of the relation's target blueprint (in this case - user) and return the one/s that match the rule.
Map by property
In some cases, we may not know the identifier of the entity we want to map to. If that entity has a property that we do know, we can use it to map the data.
This is especially useful when patching entities whose identifiers are not known in advance. Take the following example:
- Say we installed Port's PagerDuty integration, and we want to connect each
service(Git repository) to the relevantPagerDuty service. - We can create a property in our
serviceblueprint namedpagerduty_service_id, containing the identifier of the relevant PagerDuty service. - Then, in the
PagerDutyintegration mapping, we can use this property to map eachPagerDuty serviceto the relevantservice. - This way, we would not need to have a separate blueprint for
PagerDuty services, since the integration maps directly to theserviceblueprint.
Mapping by property is done using a search query rule in the following format:
resources:
- kind: services
selector:
query: 'true'
port:
entity:
mappings:
identifier:
combinator: '"and"'
rules:
- operator: '"="'
property: '"pagerduty_service_id"'
value: .id
blueprint: '"service"'
properties:
oncall: .__oncall_user | sort_by(.escalation_level) | .[0].user.email
... # Any other properties you want to map
In the example above, we search for a service entity whose pagerduty_service_id property is equal to the id of the PagerDuty service, and map data from the PagerDuty service to it.
Searching by property can also be used when using Port's API to create an entity.
To avoid failures when multiple blueprints share the same property value, add a $blueprint rule to your search query to restrict matches to a specific blueprint:
combinator: "and"
rules:
- property: "$blueprint"
operator: "="
value: "service"
# your other rules...
Items to parse
itemsToParse
The following example iterates over a Jira issue's comments array and creates a separate comment entity for each comment, using .item to reference each element:
- kind: issue
selector:
query: .issueType == 'Bug'
port:
itemsToParse: .fields.comments
entity:
mappings:
identifier: .item.id
blueprint: '"comment"'
properties:
text: .item.text
author: .item.author.name
relations:
issue: .key
In this example, Port will iterate over each comment in the comments array and create a separate comment entity for each one. The .item reference allows you to access properties of the current comment being processed.
itemsToParseName
The following example uses itemsToParseName: 'comment' to replace the default .item reference, avoiding a naming conflict with a top-level item key in the API response:
- kind: issue
selector:
query: .issueType == 'Bug'
port:
itemsToParse: .fields.comments
itemsToParseName: 'comment'
entity:
mappings:
identifier: .comment.id
blueprint: '"comment"'
properties:
text: .comment.text
author: .comment.author.name
relations:
issue: .key
In this example, we use comment instead of item to reference each array element, avoiding conflicts with any top-level item property in the API response.
itemsToParseTopLevelTransform
By default, Port removes the target array specified in itemsToParse from the original payload to improve parsing performance. The itemsToParseTopLevelTransform flag controls this behavior:
- When set to
true(default): The target array is removed from the payload, and you can only access array items via.item(or your customitemsToParseName). - When set to
false: The target array remains in the payload, allowing you to access both the original array and individual items.
Example with itemsToParseTopLevelTransform: true (default):
- kind: issue
selector:
query: .issueType == 'Bug'
port:
itemsToParse: .fields.comments
itemsToParseTopLevelTransform: true
entity:
mappings:
identifier: .item.id
blueprint: '"comment"'
properties:
text: .item.text
issueKey: .key # Can access top-level properties
relations:
issue: .key
Example with itemsToParseTopLevelTransform: false:
- kind: issue
selector:
query: .issueType == 'Bug'
port:
itemsToParse: .fields.comments
itemsToParseTopLevelTransform: false
entity:
mappings:
identifier: .item.id
blueprint: '"comment"'
properties:
text: .item.text
totalComments: .fields.comments | length # Can access the original array
issueKey: .key
relations:
issue: .key
When itemsToParseTopLevelTransform is false, you can access the original array (e.g., .fields.comments) in addition to individual items via .item.
- The
itemsToParseNamekey is not supported in non-Ocean integrations: Github app, Kubernetes and Webhook integrations. - When
itemsToParseNameis enabled, you cannot use the "test mapping" option in Port's UI.
The object returned from Jira for which we would apply this mapping might look like this (note the comments array):
Example Jira API response (click to expand)
{
"url": "https://example.com/issue/1",
"status": "Open",
"issueType": "Bug",
"comments": [
{
"id": "123",
"text": "This issue is not reproducing"
},
{
"id": "456",
"text": "Great issue!"
}
],
"assignee": "user1",
"reporter": "user2",
"creator": "user3",
"priority": "High",
"created": "2024-03-18T10:00:00Z",
"updated": "2024-03-18T12:30:00Z",
"key": "ISSUE-1"
}
Test
The mapping configuration window contains a JQ playground that allows you to test your JQ queries against example responses from the API of the integrated tool. This is useful for validating your queries and ensuring they return the expected results.
For integrations based on the Ocean framework, examples will be automatically generated for each resource kind in your mapping, based on real data ingested from the tool. You can disable this behavior by setting the sendRawDataExamples flag to false in the integration's configuration.
To test your mapping against the example data, click on the Test mapping button in the bottom-right panel.
Manually add test examples
For each resource kind in your mapping (in the bottom-left panel), you can add an example in the Test examples section.
Click on the Add kind button to add an example:
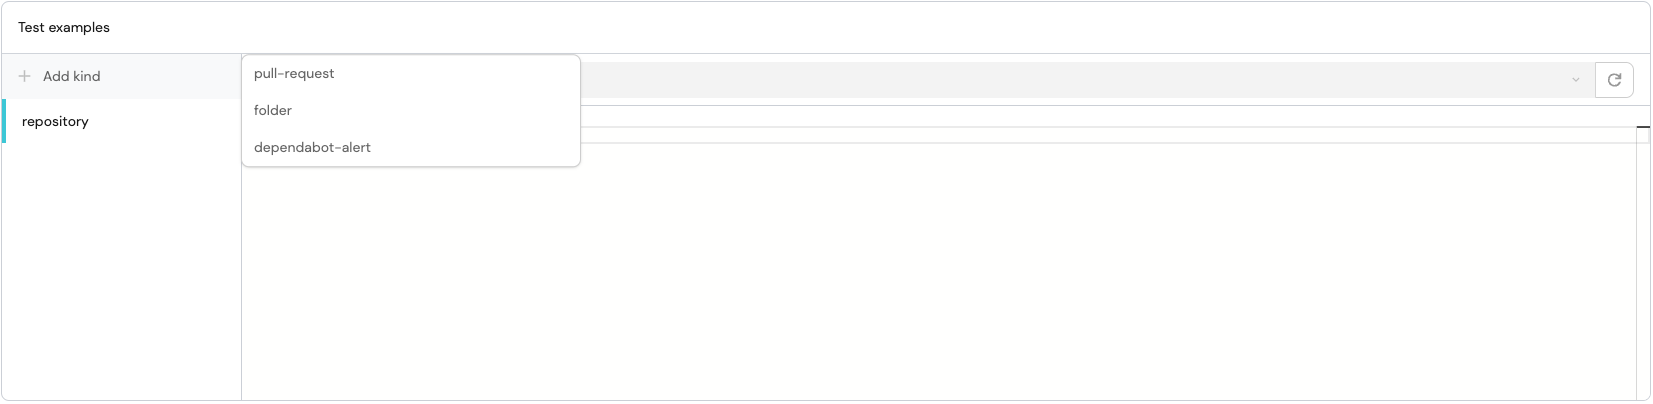
After adding your example, click on the Test mapping button in the bottom-right panel to test your mapping against the example data.
If the test fails, see Common test errors for a description of each error and how to resolve it.
In addition to the aforementioned JQ playground, Port provides a general JQ playground where you can test any JSON snippet against JQ expressions with real-time filters and AI-powered assistance.
Advanced configuration
Additional options
To use the advanced options, add them to the root of the mapping configuration:
createMissingRelatedEntities: true
deleteDependentEntities: true
entityDeletionThreshold: 0.5
resources:
  - kind: repository
    ...
Edit an integration's mapping
Once you have configured an integration's mapping to your liking, click the Resync button in the bottom-right to save your changes.
To edit an integration's mapping using Port's API, you can use the Patch integration route.
To perform a simple resync of an integration via the API without changing its mapping, use the same Patch integration route with the integration identifier and an empty body.
Follow-up video
The following video follows up on the video at the top of this page.
It demonstrates how to add new properties to a blueprint and map data into them: