Prompts
Port MCP Server supports two types of prompts:
- Static prompts: Pre-built prompts that are always available and don't require any setup.
- Custom dynamic prompts: Organization-specific prompts that you create and manage in your Port portal.
Both types become available in supported MCP clients (for example, Cursor or Claude) where developers and AI agents can discover and run them with the required inputs.
Prompt support in MCP clients depends on whether the client implements the prompts feature according to the MCP specification. Only some MCP clients currently support prompts. Check the MCP client documentation to see if your client supports prompts.
Static prompts
The Port MCP Server comes with pre-built static prompts that are always available in your MCP clients. These prompts provide helpful guidance and assistance for common Port workflows and don't require any setup or configuration.
The following static prompt is included:
- troubleshoot_integration: Troubleshoot integration issues. This prompt guides you through a systematic approach to identify and fix integration problems by analyzing sync metrics, event logs, and providing fixed configurations. Requires an
integrationargument specifying the name or identifier of the integration to troubleshoot.
Static prompts are automatically available in all MCP clients connected to your Port organization and don't appear in your Port portal's Prompts page.
Custom dynamic prompts
You can create custom prompts specific to your organization and expose them via the MCP Server. Once defined, these prompts become available in supported MCP clients where developers and AI agents can discover and run them.
Common use cases
- Automate on-call runbooks and incident-triage guidance
- Standardize code review or deployment checklists
- Generate structured updates and communications (e.g., incident status, release notes)
Set up the data model
-
Go to the Builder page in your portal.
-
Click + Blueprint.
-
Click the
{...}button in the top-right corner and choose Edit JSON. -
Paste the following JSON schema into the editor:
Prompt blueprint JSON (click to expand)
{
    "identifier": "prompt",
    "title": "Prompt",
    "icon": "Microservice",
    "ownership": {
        "type": "Direct",
        "title": "Owning Teams"
    },
    "schema": {
        "properties": {
            "description": {
                "type": "string",
                "title": "Description"
            },
            "arguments": {
                "items": {
                    "type": "object",
                    "properties": {
                        "name": {
                            "type": "string",
                            "description": "The name of the argument parameter"
                        },
                        "description": {
                            "type": "string",
                            "description": "A description of what this argument is for"
                        },
                        "required": {
                            "type": "boolean",
                            "description": "Whether this argument is required or optional",
                            "default": false
                        }
                    },
                    "required": [
                        "name",
                        "description"
                    ]
                },
                "type": "array",
                "title": "Arguments"
            },
            "template": {
                "icon": "DefaultProperty",
                "type": "string",
                "title": "Prompt Template",
                "format": "markdown"
            }
        },
        "required": [
            "description",
            "template"
        ]
    },
    "mirrorProperties": {},
    "calculationProperties": {},
    "aggregationProperties": {},
    "relations": {}
}
After this blueprint exists and you create entities for it, prompts will show up in supported MCP clients connected to your Port organization. In clients that surface MCP prompts, you’ll see them listed and ready to run with arguments.
Create prompts
Create entities of the prompt blueprint for each prompt you want to expose. At minimum, provide description and template. Optionally add arguments to parameterize the prompt.
- Using Prompts page
- Using Self-Service Action
- Using GitOps
- Go to the Prompts page in your portal.
- Click Create prompt.
- Fill out the form:
- Provide a title and description.
- Write the prompt template (supports markdown).
- Define any
arguments(optional) withname,description, and whether they arerequired.
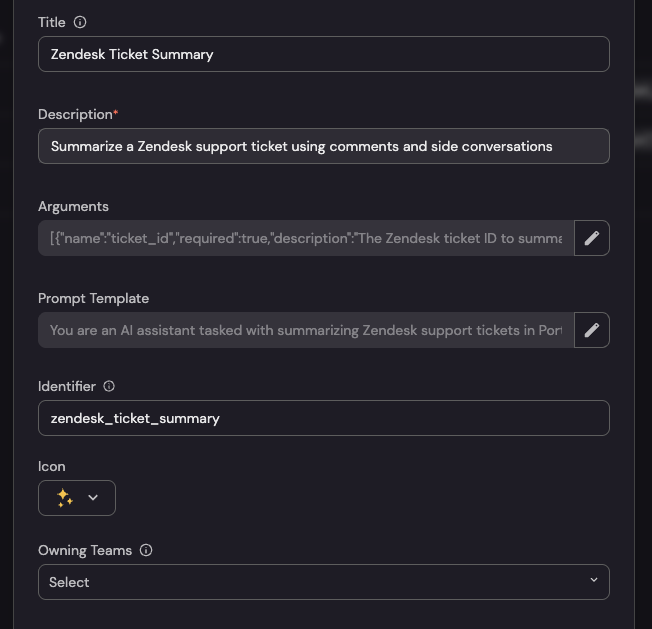
The template supports markdown and variable placeholders. Each argument defined in arguments is exposed by its name and can be referenced as {{name}} inside the template. When you run the prompt, the MCP Server collects values for required arguments and substitutes them into the matching placeholders before execution.
You can create a Self-Service Action in Port to allow your users to create prompts themselves.
-
Go to the self-service page of your portal.
-
Click on
+ New Action. -
Click on the
{...} Edit JSONbutton. -
Copy and paste the following JSON configuration:
Create New Prompt action JSON (Click to expand)
{
"identifier": "create_new_prompt",
"title": "Create New Prompt",
"icon": "Microservice",
"description": "Create prompt templates that appear in MCP clients (Claude, Cursor, VS Code, etc.) connected to your Port organization. Users can select prompts, provide required arguments, and get contextual AI assistance with dynamic data from Port.",
"trigger": {
    "type": "self-service",
    "operation": "CREATE",
    "userInputs": {
    "properties": {
        "arguments": {
        "type": "array",
        "title": "Template Arguments",
        "description": "Define arguments that users will provide when running this prompt. Each argument becomes available as {{argument_name}} placeholder in the template. Required arguments must be provided before prompt execution.",
        "items": {
            "type": "object",
            "properties": {
            "name": {
                "type": "string",
                "title": "Argument Name",
                "pattern": "^[a-zA-Z_][a-zA-Z0-9_]*$",
                "description": "The parameter name that will be substituted in the template using {{name}} syntax (e.g., 'service_name', 'environment', 'incident_id')"
            },
            "description": {
                "type": "string",
                "title": "Argument Description",
                "description": "Clear description explaining what this argument represents and how it's used in the prompt context"
            },
            "is_required": {
                "type": "boolean",
                "title": "Is Required",
                "default": false,
                "description": "When true, the MCP client (Claude, Cursor, VS Code) will require this argument before executing the prompt"
            }
            }
        }
        },
        "owning_team": {
        "type": "string",
        "title": "Owning Team (Optional)",
        "description": "The team that will own and maintain this prompt template",
        "format": "entity",
        "blueprint": "_team"
        },
        "prompt_title": {
        "type": "string",
        "title": "Prompt Title",
        "description": "Human-readable name for this prompt (displayed in MCP clients like Claude, Cursor, and VS Code)",
        "minLength": 3,
        "maxLength": 50
        },
        "prompt_template": {
        "type": "string",
        "title": "Prompt Template",
        "description": "The prompt content with placeholders for dynamic values. Use {{argument_name}} to reference arguments (e.g., 'Analyze service {{service_name}} in {{environment}}'). Supports markdown formatting. The MCP Server substitutes values into {{}} placeholders when the prompt runs.",
        "minLength": 20,
        "format": "multi-line"
        },
        "prompt_description": {
        "type": "string",
        "title": "Description",
        "description": "Explain what this prompt does and when to use it. This description helps users select the right prompt from the MCP client interface.",
        "minLength": 10,
        "maxLength": 500,
        "format": "multi-line"
        }
    },
    "required": [
        "prompt_title",
        "prompt_description",
        "prompt_template"
    ],
    "order": [
        "prompt_title",
        "prompt_description",
        "prompt_template",
        "arguments",
        "owning_team"
    ],
    "titles": {}
    },
    "blueprintIdentifier": "prompt"
},
"invocationMethod": {
    "type": "UPSERT_ENTITY",
    "blueprintIdentifier": "prompt",
    "mapping": {
    "identifier": "{{ .inputs.prompt_title | ascii_downcase | gsub(\" \"; \"_\") | gsub(\"[^a-z0-9_]\"; \"\") }}",
    "title": "{{ .inputs.prompt_title }}",
    "team": "{{ if (.inputs.owning_team | type) == \"object\" then [.inputs.owning_team.identifier] else [] end }}",
    "properties": {
        "template": "{{ .inputs.prompt_template }}",
        "arguments": "{{ (.inputs.arguments // []) | map({name: .name, description: .description, required: .is_required}) }}",
        "description": "{{ .inputs.prompt_description }}"
    }
    }
},
"requiredApproval": false
}
This Self-Service Action allows developers to create their own prompts without needing direct access to Port's data model. The action validates input and automatically creates properly formatted prompt entities.
You can ingest prompts from GitHub repositories using the GitHub integration. This enables a GitOps workflow where GitHub is the source of truth and Port stays in sync automatically.
Prerequisites:
Port's GitHub integration is installed in your account.
File structure:
Store prompts as YAML files under .github/prompts using the .prompt.yaml suffix. This is consistent with GitHub's prompt storage standard.
Example file: .github/prompts/code-review.prompt.yamlExample GitHub prompt (click to expand)
name: code-review
description: Review code changes for correctness, security, performance, and test coverage following repo conventions.
arguments:
  - name: change_scope
    description: Summary of the changes or files to review.
    required: false
  - name: focus_areas
    description: Specific concerns to prioritize (e.g., security, performance).
    required: false
message: |-
  # Code review

  Review code changes for this repository.

  Inputs:
  - change_scope: {{change_scope}}
  - focus_areas: {{focus_areas}}

  ## Instructions

  Focus on:
  - correctness and edge cases.
  - security risks and input validation.
  - performance regressions.
  - missing tests or insufficient coverage.
Configure the GitHub integration:
-
Go to the data sources page of your portal.
-
Find your GitHub integration and click on it.
-
Go to the Mapping tab.
-
Add the following configuration to your mapping YAML:
GitHub integration configuration (click to expand)
- kind: file
  selector:
    query: 'true'
    files:
      - path: .github/prompts/*.prompt.yaml
        skipParsing: false
  port:
    entity:
      mappings:
        identifier: .repo.name + "/" + .file.name
        title: .file.name | split(".") | .[0]
        blueprint: '"prompt"'
        properties:
          description: .file.content.description
          arguments: .file.content.arguments
template: .file.content.message -
Click Save to update the integration configuration.
After configuration, prompts from your GitHub repositories will automatically sync to Port. Changes in GitHub will appear in your Port catalog after the integration syncs.
For a complete guide on ingesting prompts and skills from GitHub using GitOps, including file structure examples, see the Ingest prompts and skills from GitHub using GitOps guide.
Examples
- Incident triage
- Scorecard remediation
- On-call handoff summary
A prompt to assists on-call engineers by summarizing recent alerts and deploys related to an incident, then suggesting next steps and linking relevant runbooks.
Example prompt execution:
You are assisting with an incident in the payment-service service (production).
Incident ID: INC-2024-001

For the last 24 hours:
- Summarize critical alerts and recent deploys
- Suggest next steps and owners
- Link relevant dashboards/runbooks
Incident triage prompt entity JSON (Click to expand)
{
  "identifier": "incident_response_assistant",
  "title": "Incident Response Assistant",
  "team": [],
  "properties": {
    "description": "Assists with incident response by summarizing critical alerts, recent deploys, and suggesting next steps with relevant dashboards and runbooks",
    "arguments": [
      {
        "name": "service_name",
        "required": true,
        "description": "The name of the service experiencing the incident"
      },
      {
        "name": "environment",
        "required": false,
        "description": "The environment where the incident is occurring (e.g., production, staging)"
      },
      {
        "name": "incident_id",
        "required": true,
        "description": "The unique identifier for the incident"
      },
      {
        "name": "timeframe",
        "required": false,
        "description": "The time period to analyze (e.g., '24 hours', '1 week')"
      }
    ],
    "template": "You are assisting with an incident in the {{service_name}} service ({{environment}}).\nIncident ID: {{incident_id}}\n\nFor the last {{timeframe}}:\n- Summarize critical alerts and recent deploys\n- Suggest next steps and owners\n- Link relevant dashboards/runbooks"
  },
  "relations": {},
  "icon": "Microservice"
}
A prompt that guides engineers to remediate failing scorecard rules by explaining each failure, its impact, and providing step-by-step fixes along with ownership suggestions.
Example prompt execution:
For user-management-service, generate remediation steps for failing rules in the "Production Readiness" scorecard.

For each failing rule:
- What is failing
- Why it matters
- Step-by-step remediation
- Owners and suggested timeline
Scorecard remediation prompt entity JSON (Click to expand)
{
  "identifier": "scorecard_remediation_guide",
  "title": "Scorecard Remediation Guide",
  "team": [],
  "properties": {
    "description": "Generate detailed remediation steps for failing scorecard rules, including what's failing, why it matters, step-by-step fixes, and ownership assignments",
    "arguments": [
      {
        "name": "service_name",
        "required": true,
        "description": "The name of the service that needs scorecard remediation"
      },
      {
        "name": "scorecard_name",
        "required": true,
        "description": "The name of the scorecard with failing rules"
      }
    ],
    "template": "For {{service_name}}, generate remediation steps for failing rules in the \"{{scorecard_name}}\" scorecard.\n\nFor each failing rule:\n- What is failing\n- Why it matters\n- Step-by-step remediation\n- Owners and suggested timeline"
  },
  "relations": {},
  "icon": "Microservice"
}
A prompt to generates a thorough on-call handoff report, highlighting active incidents, key risks, pending actions, and upcoming maintenance for the specified team.
Example prompt execution:
Create an on-call handoff for Platform Engineering for the last past week.

Include:
- Active incidents and current status
- Top risks and mitigations
- Pending actions and owners
- Upcoming maintenance windows
On-Call handoff report prompt entity JSON (Click to expand)
{
  "identifier": "oncall_handoff_report",
  "title": "On-Call Handoff Report",
  "team": [],
  "properties": {
    "description": "Generate comprehensive on-call handoff documentation including active incidents, risks, pending actions, and upcoming maintenance windows",
    "arguments": [
      {
        "name": "team",
        "required": true,
        "description": "The team name for which to create the on-call handoff"
      },
      {
        "name": "timeframe",
        "required": true,
        "description": "The time period to cover in the handoff (e.g., 'last 24 hours', 'past week')"
      }
    ],
    "template": "Create an on-call handoff for {{team}} for the last {{timeframe}}.\n\nInclude:\n- Active incidents and current status\n- Top risks and mitigations\n- Pending actions and owners\n- Upcoming maintenance windows"
  },
  "relations": {},
  "icon": "Microservice"
}
After creating entities, reconnect or refresh your MCP client; your prompts will be available and will prompt for any defined arguments.
See prompts in your client
- Cursor
- Claude
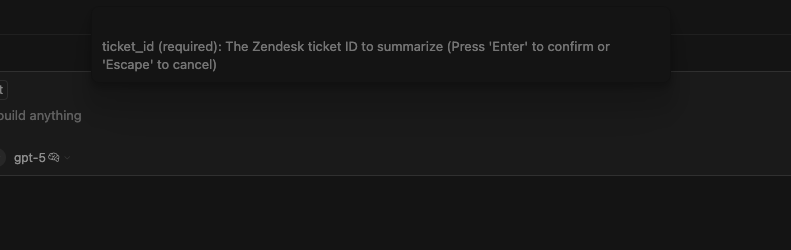
In Cursor, type / to open the prompts list. Selecting a prompt opens an input form for its arguments.
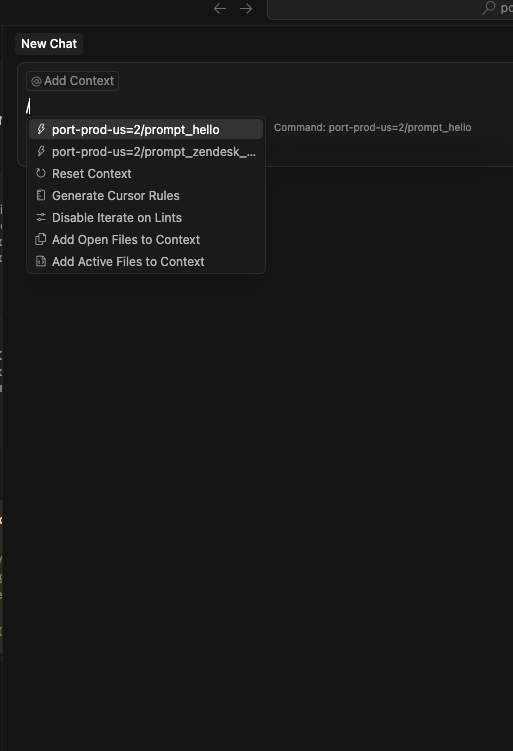
When you select a prompt, Cursor renders fields for the defined arguments. Required ones are marked and must be provided.
In Claude, click the + button and choose the prompts option to view the list from your Port organization. Selecting a prompt opens a parameter collection flow.
Claude will ask for any required arguments before running the prompt and will substitute them into the template.
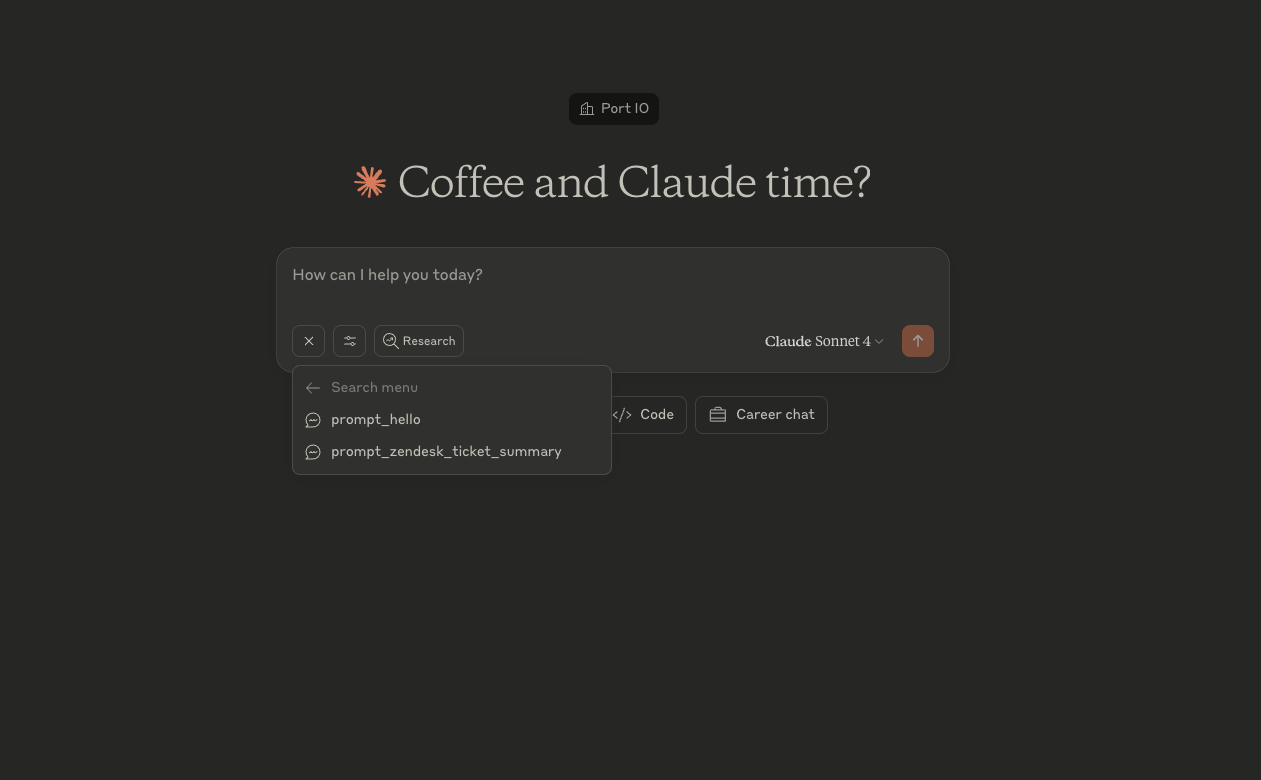
Using prompts in Port's AI Agent UI
Port's AI Agent web interface now supports MCP prompts, including both static prompts and custom dynamic prompts. You can browse and use prompts directly from the chat input without needing external MCP clients like Cursor or Claude Desktop.
How it works
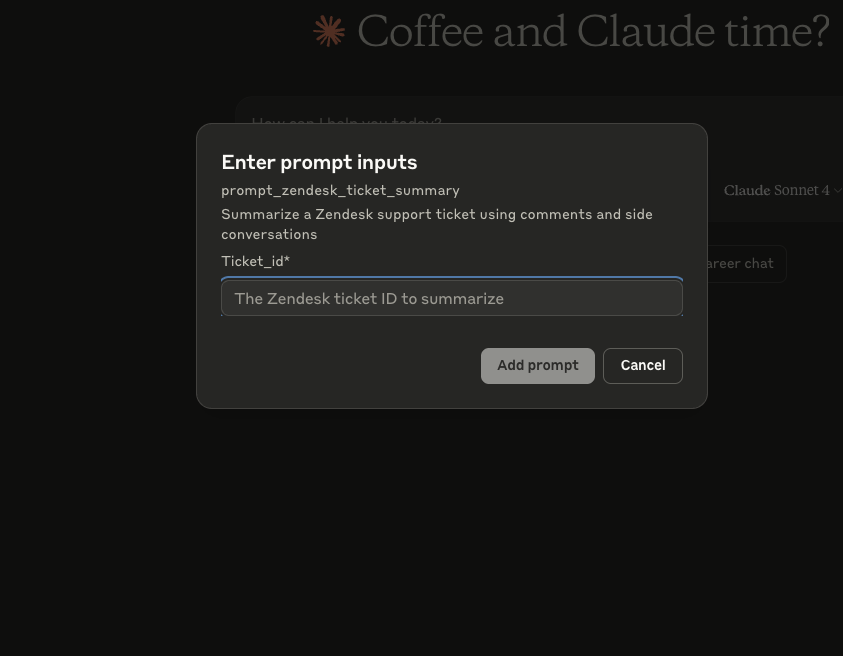
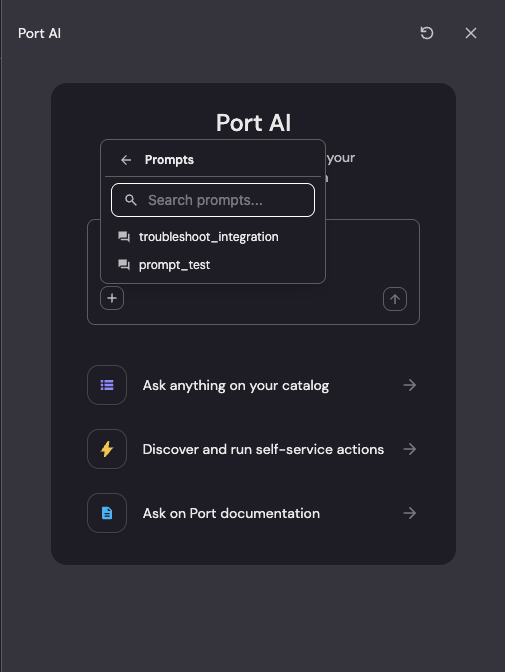
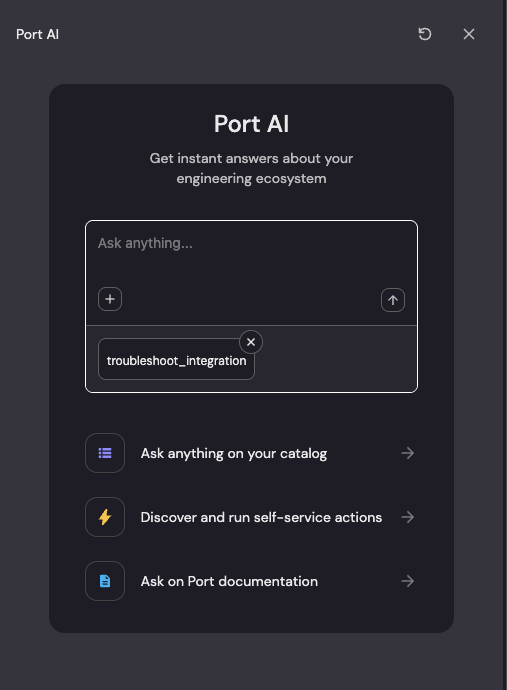
- Access prompts: Click the + button in the chat input to open the menu, then select Prompts.

- Browse and search: View all available prompts from your Port organization with search and filter support.
- Fill arguments: When selecting a prompt with arguments (required or optional), a dialog appears to fill in the values.

- Use the prompt: After submitting arguments, the prompt content is attached to your message and sent to the AI agent.
When you select a prompt with arguments (required or optional), an arguments dialog appears. When you select a prompt with no arguments, Port uses it immediately without any additional steps.