Circle CI Actions
Port's Circle CI integration allows you to trigger new pipelines in Circle CI directly from Port.
You can implement this action in two ways:
- Synced webhook and secrets: A simpler approach that uses Port's secret management to store your Circle CI credentials.
- Execution agent: A slightly more complex approach that runs within your infrastructure, keeping credentials in your environment.
Prerequisites
- A Circle CI personal API token.
- If you choose to implement using the Execution Agent, you will need to:
Set up data model
Before implementing either approach, you will need to create a blueprint for Circle CI projects:
-
Go to your Builder page.
-
Click on
+ Blueprint. -
Click on the
{...}button in the top right corner, and choose "Edit JSON". -
Add this JSON schema:
Circle CI project blueprint (click to expand)
{
  "identifier": "circle_ci_project",
  "title": "CircleCI Project",
  "icon": "CircleCI",
  "schema": {
    "properties": {
      "project_slug": {
        "title": "Slug",
        "type": "string"
      }
    },
    "required": ["project_slug"]
  },
  "mirrorProperties": {},
  "calculationProperties": {},
  "relations": {}
} -
Click
Saveto create the blueprint.
Implementation
- Synced webhook
- Execution agent
You can trigger Circle CI pipelines by leveraging Port's synced webhooks to directly interact with the Circle CI API and secrets to store your Circle CI credentials. This method simplifies the setup by handling everything within Port.
Add Port secrets
To add Circle CI credentials to your portal:
-
Click on your profile picture in the top right corner of your Port application.
-
Click on Credentials.
-
Click on the
Secretstab. -
Click on
+ Secretand add:CIRCLE_CI_TOKEN: Your Circle CI personal API tokenCIRCLE_CI_URL: The URL of your Circle CI instance (e.g.,https://circleci.com)
Create Circle CI self-service action
To create a self-service action that triggers a Circle CI pipeline, follow these steps:
-
Head to the self-service page.
-
Click on the
+ New Actionbutton. -
Click on the
{...} Edit JSONbutton. -
Copy and paste the following JSON configuration into the editor.
Trigger Circle CI pipeline action (click to expand)
{
  "identifier": "circle_ci_project_trigger_pipeline",
  "title": "Trigger CircleCI pipeline",
  "icon": "CircleCI",
  "trigger": {
    "type": "self-service",
    "operation": "DAY-2",
    "userInputs": {
      "properties": {
        "branch": {
          "title": "Branch",
          "type": "string",
          "default": "main"
        },
        "parameters": {
          "title": "Parameters",
          "type": "object",
          "default": {}
        }
      },
      "required": ["branch"],
      "order": ["branch", "parameters"]
    },
    "blueprintIdentifier": "circle_ci_project"
  },
  "invocationMethod": {
    "type": "WEBHOOK",
    "url": "{{.secrets.CIRCLE_CI_URL}}/api/v2/project/{{.entity.properties.project_slug}}/pipeline",
    "agent": false,
    "synchronized": true,
    "method": "POST",
    "headers": {
      "Circle-Token": "{{.secrets.CIRCLE_CI_TOKEN}}",
      "Content-Type": "application/json"
    },
    "body": {
      "branch": "{{.inputs.branch}}",
      "parameters": "{{.inputs.parameters}}"
    }
  },
  "requiredApproval": false
} -
Click
Save.
Now you should see the Trigger Circle CI Pipeline action in the self-service page. 🎉
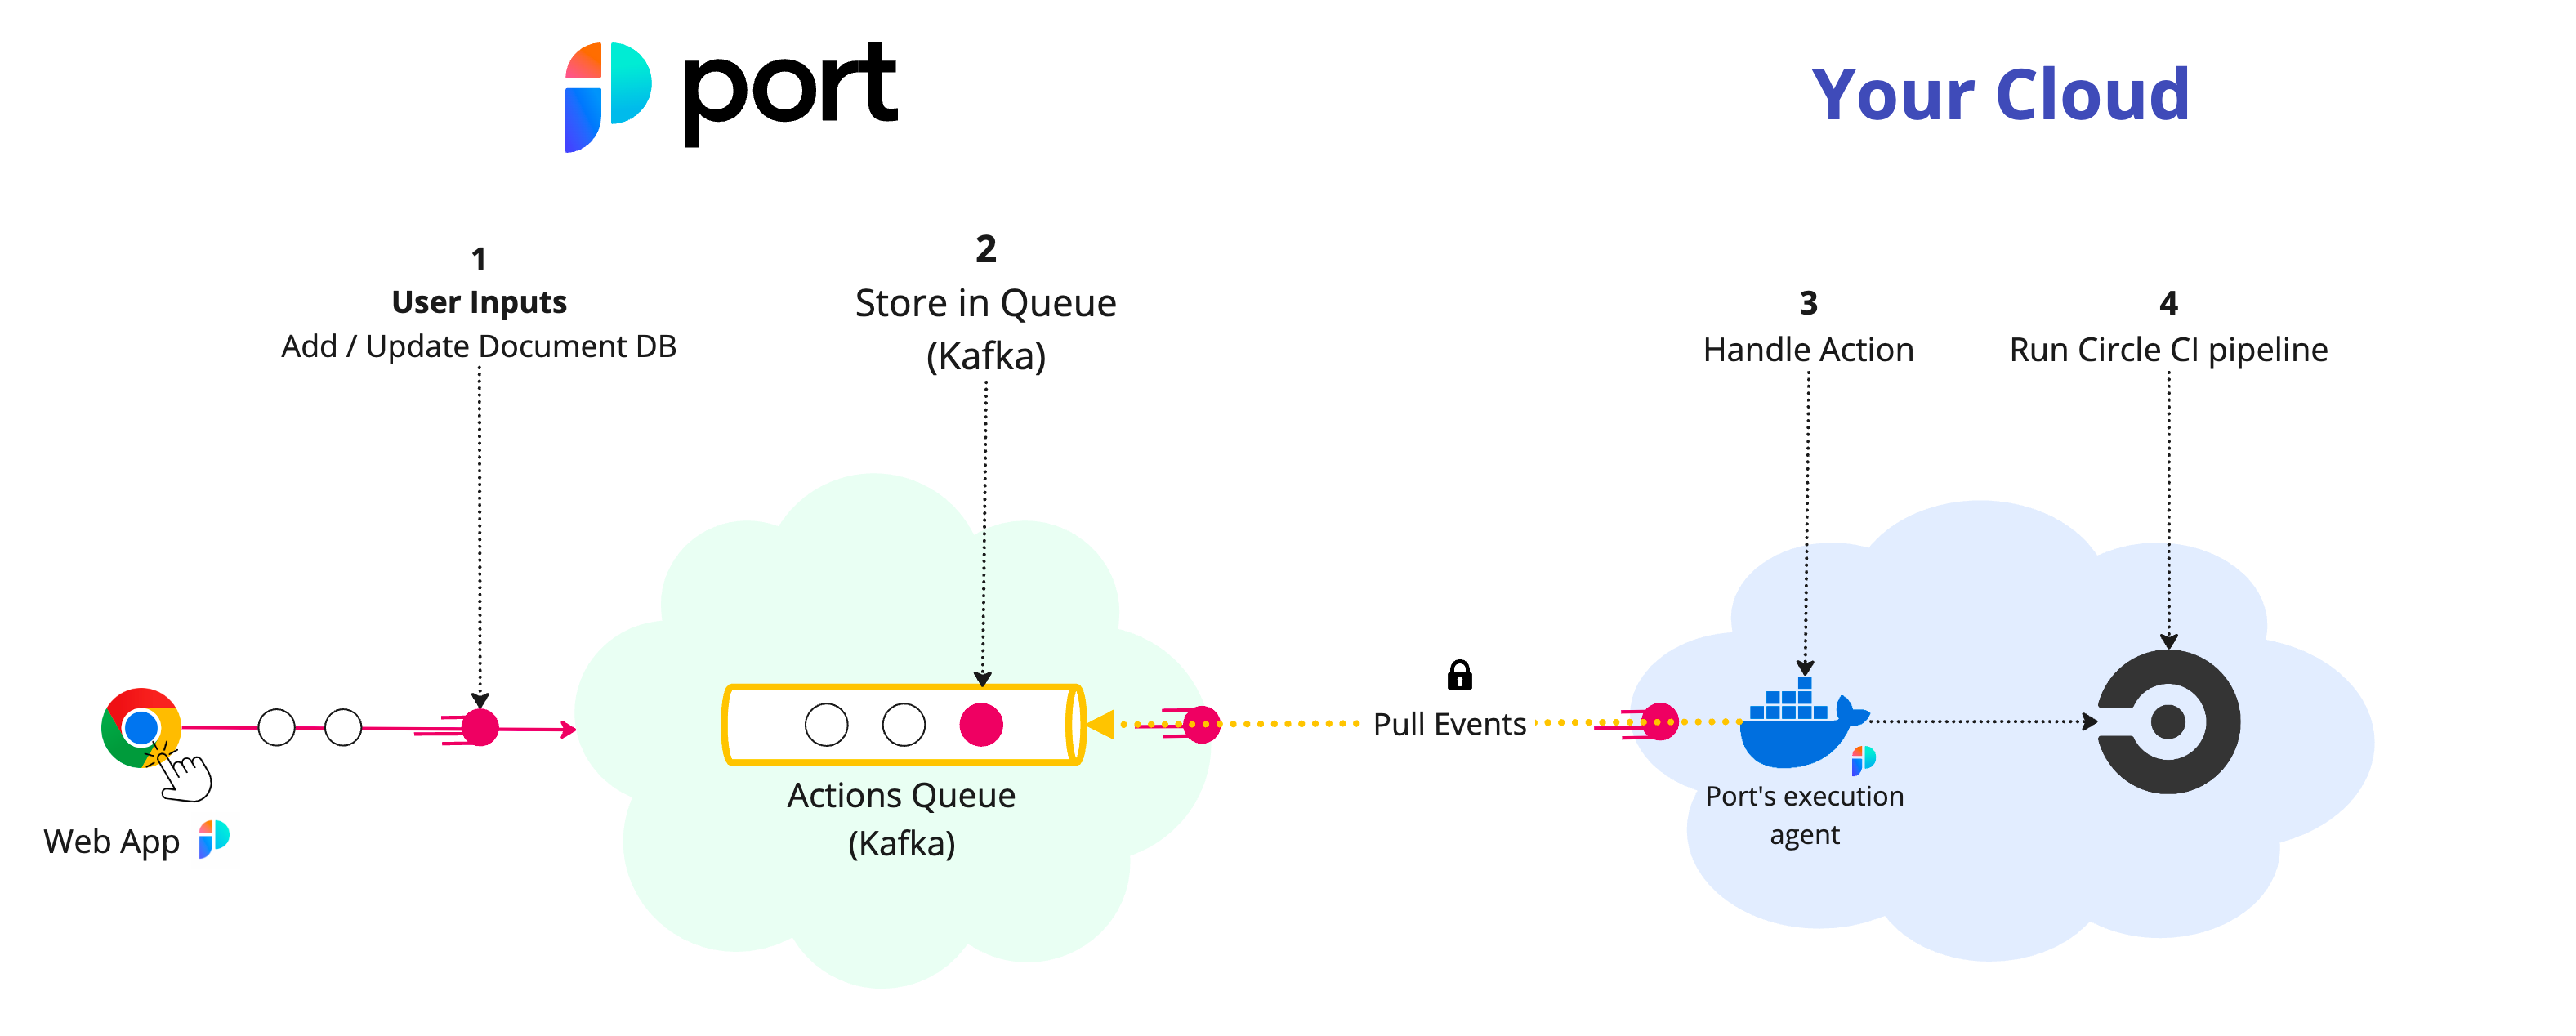
The Execution Agent approach runs an agent within your infrastructure that connects to Port via Kafka, keeping your credentials secure within your environment.
The steps are as follows:
- Port publishes an invoked
Actionmessage containing the pipeline details to a topic. - A secure topic (
ORG_ID.runs) holds all the action invocations. - Port's execution agent pulls the new trigger event from your Kafka topic and triggers your Circle CI pipeline.
Create Circle CI self-service action
To create a self-service action that triggers a Circle CI pipeline, follow these steps:
-
Head to the self-service page.
-
Click on the
+ New Actionbutton. -
Click on the
{...} Edit JSONbutton. -
Copy and paste the following JSON configuration into the editor.
Trigger Circle CI pipeline action (click to expand)
{
  "identifier": "circle_ci_project_trigger_circle_ci_pipeline",
  "title": "Trigger CircleCI pipeline",
  "icon": "CircleCI",
  "trigger": {
    "type": "self-service",
    "operation": "DAY-2",
    "userInputs": {
      "properties": {},
      "required": [],
      "order": []
    },
    "blueprintIdentifier": "circle_ci_project"
  },
  "invocationMethod": {
    "type": "WEBHOOK",
    "url": "https://circleci.com",
    "agent": true,
    "synchronized": false,
    "method": "POST",
    "body": {
      "action": "{{ .action.identifier[(\"circle_ci_project_\" | length):] }}",
      "resourceType": "run",
      "status": "TRIGGERED",
      "trigger": "{{ .trigger | {by, origin, at} }}",
      "context": {
        "entity": "{{.entity.identifier}}",
        "blueprint": "{{.action.blueprint}}",
        "runId": "{{.run.id}}"
      },
      "payload": {
        "entity": "{{ (if .entity == {} then null else .entity end) }}",
        "action": {
          "invocationMethod": {
            "type": "WEBHOOK",
            "agent": true,
            "synchronized": false,
            "method": "POST",
            "url": "https://circleci.com"
          },
          "trigger": "{{.trigger.operation}}"
        },
        "properties": {},
        "censoredProperties": "{{.action.encryptedProperties}}"
      }
    }
  },
  "requiredApproval": false
} -
Click
Save.
Now you should see the Trigger Circle CI Pipeline action in the self-service page. 🎉
Create the invocations.json mapping
Create a JSON file named invocations.json with the following content:Mapping invocations.json (click to expand)
[
  {
    "enabled": ".action == \"trigger_circle_ci_pipeline\"",
    "url": "(env.CIRCLE_CI_URL // \"https://circleci.com\") as $baseUrl | .payload.entity.properties.project_slug | @uri as $path | $baseUrl + \"/api/v2/project/\" + $path + \"/pipeline\"",
    "headers": {
      "Circle-Token": "env.CIRCLE_CI_TOKEN"
    },
    "body": {
      "branch": ".payload.properties.branch // \"main\"",
      "parameters": ".payload.action.invocationMethod as $invocationMethod | .payload.properties | to_entries | map({(.key): (.value | tostring)}) | add | if $invocationMethod.omitUserInputs then {} else . end"
    }
  }
]
Install execution agent
-
Add Port's Helm repo:
helm repo add port-labs https://port-labs.github.io/helm-chartsAlready existing repoIf you already added this repo earlier, run
helm repo updateto retrieve the latest versions of the charts. You can then runhelm search repo port-labsto see the charts. -
Install the
port-agentchart:helm install my-port-agent port-labs/port-agent \
--create-namespace --namespace port-agent \
--set-file controlThePayloadConfig=./invocations.json \
--set env.normal.PORT_ORG_ID=YOUR_ORG_ID \
--set env.normal.KAFKA_CONSUMER_GROUP_ID=YOUR_KAFKA_CONSUMER_GROUP \
--set env.secret.PORT_CLIENT_ID=YOUR_PORT_CLIENT_ID \
--set env.secret.PORT_CLIENT_SECRET=YOUR_PORT_CLIENT_SECRET \
--set env.secret.CIRCLE_CI_TOKEN=YOUR_CIRCLE_CI_PERSONAL_TOKEN
Let's test it!
-
Head to the self-service page of your portal
-
Click on
Trigger Circle CI Pipeline -
Fill in the pipeline details:
- Branch to run the pipeline on (defaults to main)
- Any additional parameters configured in the action
-
Click on
Execute -
Wait for the pipeline to be triggered in Circle CI
-
Check your Circle CI project page to see the new pipeline running